Table of Contents
Advertisement
Advertisement
Table of Contents

Related Manuals for Philips DECT 629


Summary of Contents for Philips DECT 629
-
Page 2: Quick Start Guide
Quick start guide / understanding the menu system Press the Left soft key (LSK) to go up or down in the menu list or to navigate within the lists. Press the LSK the menu or an option and confirm a setting. Press the Right soft key (RSK) to VIEW the details. -
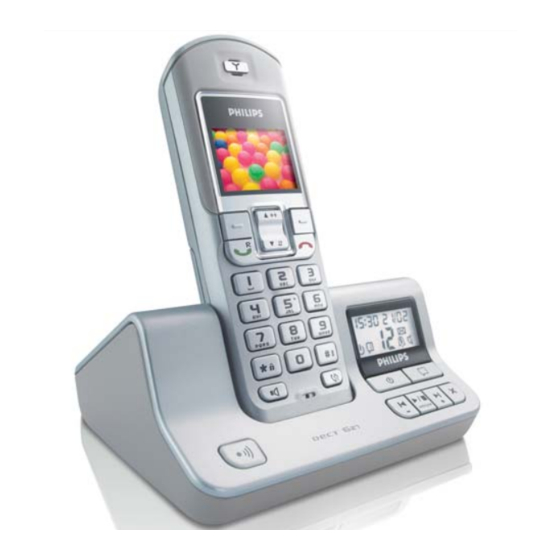
Page 3: Dect 623/Dect 627 Handset
DECT 623/DECT 627 Handset Colour Display Headline : shows icons and current menu operation. Soft key line : shows contextual menus. Left Soft key - In idle mode, short press to access the main menu. - Short press to select contextual menu. -
Page 4: Icons On The Handset Display
Icons on the handset display The display gives information about the operation of your telephone. A total of 8 icons can be shown in the headline of the display : When being used for the first time, it is sometimes necessary to wait until the battery is sufficiently charged before the icons appear on the display. -
Page 5: Dect 623 / Dect 627 Base Station
DECT 623 base station DECT 627 base station Volume keys To adjust the base volume level Backlight will be ON when there are new answer machine messages or answer machine memory is full. Icons see page 3 Paging key Press to locate all handsets. ON/OFF key Press to switch the answer machine ON or OFF... -
Page 6: Table Of Contents
Quick start guide DECT 623 / DECT 627 handset Icons on the handset display Icons on the base DECT 627 DECT 623 / DECT 627 base station Table of contents Menu structure Contextual soft key labels Conformity, environment and safety Declaration of conformity Using GAP standard compliance Installing the DECT 623/627... - Page 7 Call log View Store a number in the phonebook Delete all Redial list View Store a number in the phonebook Delete all Intercom Internal call Call transfer Conference call Personalize Wallpaper Contrast Handset tones Handset name Auto answer Language Advance settings Dial mode Flash time Voice language (only DECT 627)
-
Page 8: Menu Structure
Menu structure From idle mode, to enter the menu, press the Left soft key (LSK) Navigation keys to go up or down in the menu list. Menu Clock & Alarm Write a SMS Inbox Reply Edit Save Number Delete Delete all Edit Outbox Resend... - Page 9 Phonebook New Entry List Entry Edit Entry Delete Entry Delete All Personalize Wallpaper Contrast Handset Tones Handset name Auto Answer Language Dial Mode Adv.Settings Flash Time Voice Lang. Security Registration Unregistration Reset Enter name Enter number List of names List of names List of names Wallpaper 1/2/3/4 Level 1/2/3...
-
Page 10: Contextual Soft Key Labels
Call Forward Net. Service Call Fwd Busy network depen- dent features Call Fwd UnAns Voice Mail Call Back Withhold ID Contextual soft key labels Depending on context the following soft key labels may appear above the Left and Right soft keys : Soft key label Function MENU Initiate a menu function. -
Page 11: Conformity,Environment And Safety
Conformity Hereby, Philips declares that the DECT 623xx and DECT 627xx are in compliance with the essential requirements and other relevant provisions of Directive 1999/5/EC.This product can only be connected to the analogue telephone networks of the countries mentioned on the packaging. -
Page 12: Declaration Of Conformity
(page 43), then follow the procedure in the manufacturer’s instructions. Philips has marked the battery and packaging with standard symbols designed to promote the recycling and appropriate disposal of your eventual waste. A financial contribution has been paid to the associated national recovery & recycling system. -
Page 13: Installing The Dect 623/627
Installing the DECT 623/627 Unpacking your DECT 623 The DECT 623 package contains: One DECT 623 base station NiMh AAA 550 mAh rechargeable batteries A power supply unit Unpacking your DECT 627 The DECT 627 package contains: One DECT 627 base station NiMh AAA 550 mAh rechargeable... -
Page 14: Installing The Base Station
Installing the base station Place your product close enough to the telephone and mains power sockets so that the cables will reach.To properly install the base station, plug the line cord and the power cable into the base station. Plug the cord and the cable into the wall. If you have a broadband DSL Internet connection, please make sure you have one DSL filter plugged directly on each line socket used in the house and check the modem and the phone are plugged in the correct filter slot (one specific for each). -
Page 15: Configuration Mode
Configuration mode Before using your DECT 623/627, you need to configure it according to the country of use. Install the batteries. After a few minutes of charging, the configuration screen appears. Browse through the different countries. Press SELECT to choose the country that suits you. Browse through the list of operators. -
Page 16: Introduction
Introduction Idle mode In idle mode, the DECT 623/627 display shows various information: - The date & time, the name of the handset and the instructions to access the menu. - New calls, new SMS or network voicemailbox message, if any. - and the alarm clock , if activated. -
Page 17: Basic Principles
Basic principles To make, to answer and to end a call Predialling Dial the number Make the call *You can also press the key to answer an incoming external call in handsfree mode. If you have activated the Auto Answer Mode (see page 40) simply lift up the handset from the base or charger to answer a call. Warning ! Upon incoming calls, the handset ringer volume can increase in the earpiece. -
Page 18: In-Call Features
In-call features During an external call, some other options are available. To mute the handset microphone Press to select MUTE (the caller can no longer hear you). Press again to resume the conversation (UNMUTE). Intercom (available only if you have at least two handsets) During an external call, you can use the intercom key to call another handset and, for example, transfer the call to this handset. -
Page 19: Editing Systems
Editing system Case mode By default, the first letter of a sentence is in upper case. Use - all letters in upper case (ABC) - all letters in lower case (abc) or - the first letter in upper case and the rest of the word in lower case (Abc). Punctuation and mathematical signs are available by pressing characters are also available via Scroll... -
Page 20: Sms
Write a SMS Inbox Outbox Draft SMS settings Default Center SMS stands for Short Message Service.To benefit from this service you must subscribe to the Caller Line Identification Service (CLI) together with the SMS service from your network provider. SMS messages can be exchanged with a phone (mobile or compatible fixed lines), a fax or an Email address provided the receiver has also subscribed to the CLI &... -
Page 21: View Sms
View SMS The display shows that there is (are) new message(s) : 3 New SMS and in the headline the icon is ON. If the SMS tone is activated (see page 40) you will hear an alarm tone each time you receive a new message. -
Page 22: Inbox
Inbox All received SMS messages are stored in the Inbox (up to 20 messages). To reply to an SMS ( for received SMS Press to reach the menu list and press Scroll to Inbox and press Browse the list of SMS and press Press MENU, confirm Reply by pressing Enter the text (see page 18) and press Press OK to confirm the number. -
Page 23: Outbox
To delete an SMS from the Inbox Press to reach the menu list and press Scroll to Inbox and press Browse the list of SMS and press Press MENU, scroll to Delete and press The selected message will then be deleted immediately. To delete all SMS from the Inbox This option enables you to delete all SMS in the Inbox list. - Page 24 To resend an Outbox message Press to reach the menu list and press Scroll to Outbox and press Browse the list of SMS and press Press MENU, scroll to Resend and press To save a sent SMS as Draft Press to reach the menu list and press Scroll to Outbox and press Browse the list of SMS and press draft.
-
Page 25: Draft Folder
Draft folder You can store up to 20 messages in the Draft folder. To edit and send an SMS stored in the draft folder Press to reach the menu list and press Scroll to Draft and press Browse the list of SMS and press and send. -
Page 26: Sms Settings
SMS settings To set the SMS centre number(s) The SMS are sent via a centre.To receive an SMS from another operator, you must specify the corresponding numbers. Press to reach the menu list and press Scroll to SMS Settings and press Choose an SMS centre and press Press to select Outgoing Nr. -
Page 27: Clock & Alarm
Clock & Alarm Date & Time Alarm Alarm Tone Date & Time To set the date and time (of the handset and base station) After setting, the date and time are shown in idle mode. Press to reach the menu list. Scroll to Clock &... - Page 28 To set the alarm tone Three alarm tones are available. Press to reach the menu list. Scroll to Clock & Alarm and press SELECT. Scroll to Alarm Tone and press SELECT. The current alarm tone is heard. Browse through the list of alarm tones to hear them and press SELECT the appropriate one.
-
Page 29: Phonebook
Phonebook New Entry List Entry Edit Entry Delete Entry Delete All 50 names and numbers can be stored in the phonebook of the handset. The phonebook contains all the information related to the callers. Group ring tone All available ring tone melodies can be selected as group ring tones.When ringing, the ring tone helps you identify the caller’s group and the screen shows the caller’s name. -
Page 30: View
To store a number from redial list in the phonebook Press to reach the redial list. Browse through the redial list to select the wanted number. Press to access the menu. Scroll to Copy to Phbk and press Enter the name (see page 18, “Editing system”) and press The number is automatically inserted in the number field, press Browse through the list to hear the ring tones and select tone for this entry. -
Page 31: Phonebook List
To call Press RSK to reach the list of names directly. Browse through the list of names and select a name. Make the call. Note : A phonebook number can also be retrieved when the line is connected. In that case, viewing the details is not possible. - Page 32 To edit an entry Press to reach the menu list. Scroll to Phonebook and press Scroll to Edit Entry and press Browse through the list of names and press Press CLEAR to delete character by character. Enter the new name (see page 18, “Editing system”) and press Press CLEAR to delete digit by digit.
-
Page 33: Call Log
Call log The call log can store up to 20 entries and shows the list of outgoing calls. If you have subscribed to the Caller Line Identification (CLI), you also will have the incoming calls in the list. In this case, the name (or number) of the callers will be displayed.The date & time of the call are also shown. -
Page 34: Delete All
To delete a name or a number Press to directly reach the call log. Press SELECT to select Call log. Browse to view the wanted entry. Press MENU to access the menu. Scroll to Delete and press A confirmation tone is heard and the screen will show the call log again. To delete all call log entries Press to directly reach the call log. -
Page 35: View
Redial list The last 20 dialled numbers are stored in the redial list. The dialed numbers (or names, if the numbers match the phonebook entries) are displayed in chronological order with the most recent at the top of the list.When the redial list is empty the screen displays “List empty”. -
Page 36: Delete All
To delete a name or a number from redial list Press to directly reach the redial list. Browse through the redial list to select a record. Press to select MENU. Scroll to Delete and press SELECT. Then the screen will show the redial list again. To delete whole redial list Press to directly reach the redial list. -
Page 37: Internal Call
Enter the number of the handset you want to call or press Hang up or put the phone in the cradle to terminate the internal call. Note : If the handset does not belong to the Philips DECT 623/627 range, this function may not be available. -
Page 38: Conference Call
Conference call via the in-call options Conference call allows one external call to be shared with two handsets (in intercom).The 3 people can share the conversation. No operator subscription is needed. Press to put the external call on hold, the caller can no longer hear you. Enter the number of the handset you want to call. -
Page 39: Personalize
Personalize Wallpaper Contrast Handset Tones Handset name Auto Answer Language Wallpaper This feature allows you to specify the wallpaper that is displayed in idle mode. There are 4 wallpapers pre-installed in your phone. To specify a wallpaper Press to reach the menu list. Scroll to Personalize and press Press to select Wallpaper. - Page 40 To set the handset ring tone To select the ring melody from the choices available. Press to reach the menu list. Scroll to Personalize and press Scroll to Handset Tones and press Scroll to HS Ringtone and press The current melody is heard. Browse through the list of melodies to hear them and press SELECT the appropriate one.
-
Page 41: Handset Name
Handset name To rename a handset You can rename your handset and display the name in idle mode . By default the handset name is “PHILIPS”. Press to reach the menu list. Scroll to Personalize and press Scroll to Handset Name and press Enter the new handset name (see page 18). -
Page 42: Advance Settings
Adv. Settings Dial Mode Flash Time Voice Lang. Security Registration Unregistration Reset Dial Mode To change the dial mode By default your phone is pre-configured with the country dependent settings and you do not have to change them. Press to reach the menu list. Scroll to Adv. -
Page 43: Voice Language (Only Dect 627)
Voice Language To set the voice language You can change the language of the answer machine for the predefined outgoing messages (see page 47). Press to reach the menu list. Scroll to Adv. Settings and press Scroll to Voice Lang. and press Choose the appropriate language in the list and press Security To change the PIN code... -
Page 44: Registration
Up to 5 handsets can be registered to the base station. Warning : If you wish to register non Philips handsets to the DECT 623 or DECT 627 base station, make sure that this handset is GAP compliant otherwise it will not operate properly (see page 11). -
Page 45: Network Service (Operator Services)
Net Service Call Forward Call Fwd Busy Call Fwrd UnAns Voice Mail Call Back Withhold ID This feature allows you to activate or deactivate operator services that are subscription dependent. Contact your network operator for more information on the services.You can usually subscribe to Call forward, operator voice mailbox etc ... -
Page 46: Answer Machine Dect 627
Answer machine DECT 627 The DECT 627 includes an answer machine that records unanswered calls when it is activated. The answer machine can store up to 99 messages within the maximum recording time of 14 minutes. DECT 627 answer machine keys Volume keys To adjust the base volume level Base 627 Display with... -
Page 47: Display
DECT 627 answer machine display The display of the DECT 627 answer machine gives information about the answer machine and the settings.The date and time setting of the base is done simultaneously when setting date & time on the handset (see page 26). Time (HH : MM ) The Remote access code is activated. -
Page 48: Delete Answer Machine Messages
Volume adjustment During message playback and call screening you can adjust the loudspeaker volume by using the keys on the rear of the base: Press to increase the loudspeaker volume. Press to decrease the loudspeaker volume. Delete answer machine messages To delete an answer machine message Press to delete while listening to a message. - Page 49 Press to switch between outgoing message 1 or 2. The current outgoing message number will be shown inside the icon Press to confirm the selected outgoing message setting / ok and then proceed to the next setting. Note : if you do not wish to change the outgoing message type, press station).
-
Page 50: Outgoing Messages
Sequence 4 :To change the remote control access code The remote control access code is needed to remotely control your answer machine and to prevent unauthorized access of the answer machine from external callers. Warning ! If the setting of the remote access code is 00 (as by default), the remote control access is disabled. -
Page 51: Record And Listen To A Memo
To play back personal or default outgoing message To play back outgoing message 1, first check if outgoing message 1 is selected as the answer machine setting (see page 47). To playback outgoing message 2, first check if outgoing message 2 is selected as the answer machine setting (see page 47). -
Page 52: Remote Control
SMS tone : Battery low tone : Menu language (Handset) : Country dependent Auto answer : Wallpaper : Wallpaper 1 Handset name : PHILIPS Time/Date (Handset) : 00:00 Dialling mode : Country dependent Flash time : Country dependent PIN code Handset :... -
Page 53: Faq
(ISDN, ADSL). How do I solve this problem? Our products are designed to work on an analogue network. If you plugged your PHILIPS phone into a digital installation, the CLI may not be displayed upon incoming calls. Digital phone installations (ISDN) are not always compatible with analogue phones as far as operator services are concerned. - Page 54 Please check the incoming and outgoing centre numbers with the SMS provider or from the enclosed addendum to your phone user manual. 16/ When using my SMS-enabled Philips phone with another SMS-enabled phone on the same line, can it cause any problems ? Yes, this will prevent the phones from receiving SMS messages.You need to deactivate the SMS feature on...
-
Page 55: Troubleshooting
Noise interference on your radio or television Caller Line Identification (CLI) service does not work A phonebook entry cannot be stored www.philips.com/support CAUSES - Bad battery contact - Dirty contact - Battery is full - No power - Batteries are empty... - Page 56 PROBLEMS No new SMS are received No SMS can be sent or received No caller Id/ poor audio quality/Poor connection quality with broadband DSL internet Answer machine troubleshooting PROBLEMS The answer machine does not record messages The remote control access...
-
Page 57: Index
Add new entry (phonebook) 28 Alarm clock 26 Alarm tone 27 Answer a call 1, 16 Answer machine (only DECT 627) 45 Answer machine settings 47 Auto answer 40 Base keys 4 Base installation 13 Batteries & battery life 13 Call barring 42 Call duration 16 Call forward 44...