Table of Contents
Advertisement
Quick Links
Advertisement
Table of Contents

Related Manuals for Datron PRC1099A


Summary of Contents for Datron PRC1099A
- Page 1 PRC1099A-MSOP PRC1099A Radio Set Operator Manual Datron World Communications Inc. Manual Part No. PRC1099A-MSOP Release Date: May 2007 Revision: C 3030 Enterprise Court Vista, CA 92081, U.S.A. Phone: (760) 597-1500 Fax: (760) 597-1510 E-Mail: sales@dtwc.com www.dtwc.com...
- Page 3 Change Description Date of Revision Pages Description of Changes Revision Letter Affected 2/2006 Overall update to text and format. 5/2007 Update to graphics and text. PRC1099A-MSOP...
- Page 5 Software, documentation, and All rights reserved. any copies of each to Datron. This Software is licensed “AS IS” and Datron provides a war- Datron World Communications, Inc. ranty that covers the media upon which the Software is embed- This manual, as well as the software described in it, is ded for a period of 30 days from receipt of the product.
- Page 6 Remedies: Buyer’s sole remedies and the entire liability of Datron are set forth above. In no event will Datron be liable to Buyer or any other person for any damages, including any incidental or consequential damages,...
-
Page 7: Table Of Contents
The PRC1099A........ - Page 8 Vehicle Mounts..........7-5 PRC1099A-MSOP...
-
Page 9: Chapter 1: Introduction
All controls are on the front panel. The PRC1099A consists of the transceiver and battery pack. The PRC1099A is held in its case by four captive screws. A battery box that protects and houses the battery is attached to the case by two clamps. To prevent movement, the battery sits on a foam pad attached to the bottom of the case. -
Page 10: Technical Specifications
• Morse key KYR for telegraphy. • Secure voice equipment designed for HF SSB operation. • PRC1099A for digital data (burst or RTTY) transmission and reception. Technical Specifications Note: Specifications are subject to change without notice or obligation. Characteristic Specification... -
Page 11: Single Sideband And Hf Communications
This section discusses single sideband (SSB) mode and high frequency communications to provide more effective communications. Single Sideband The PRC1099A provides voice communications in SSB mode. This mode provides more efficient operation for high frequency communications than the FM (frequency modulation) mode used for tactical communications in the 30 to 88 MHz range. - Page 12 This means that the SSB transmitter puts all of the power into one information carrying sideband. This makes the PRC1099A as effective as a 120W AM transmitter. Apart from the improved efficiency, the SSB signal occupies less than half the frequency space of the AM signal and permits much better utilization of the crowded HF spectrum.
- Page 13 However, during periods of low sunspot activity, this frequency range will be completely dead. It is important to remember that at the higher frequencies there can be skip zones; and a strong signal may be received from 2000 kilometers away, while closer stations cannot be heard. PRC1099A-MSOP...
-
Page 15: Chapter 2: Installation
CHAPTER 2 INSTALLATION Unpacking The PRC1099A is packed in a heavy duty, corrugated cardboard carton with the accessories packed in a separate carton. Retain the cartons and packing materials for storage or reshipping purposes. Inspect the equipment for possible shipping damage. Check all accessories against the packing list. -
Page 16: Manpack Installation
2: Installation Manpack Installation 1. Place the PRC1099A on a level surface with the front panel facing down. Installing the Battery Release the two clamps by pushing down. Remove the battery box. Check the battery connector. If it is damaged, the transceiver must be repaired. - Page 17 (refer to figure below). Install the left shoulder strap in a similar manner. 10. Hook the two belt straps to the combat belt. PRC1099A-MSOP...
-
Page 18: Figure 2-2. Manpack Harness Installation
In addition, the end of the mount activates an internal switch that activates the automatic antenna tuner. The plastic filling in the thread is designed to prevent the antenna from unscrewing. If the plastic wears, the antenna can unscrew under vibration. PRC1099A-MSOP... - Page 19 1. Remove the cover from the Audio connector on the front panel of the Installing the transceiver. Handset Connect the handset to one of the Audio connectors. The following accessories are available as part of the PRC1099A manpack Manpack configuration. Accessories Harness (ST-138)
-
Page 20: Mobile Installations
Each configuration in this section is designed so that the core radio can be quickly removed (jerk-and-run) for emergency use of the PRC1099A as a manpack. The PRC1099A can be used in a 20W mobile configuration as shown below. 20W System 12V vehicle installations must use the MT-1099A-12 mount, and 24V vehicle installations must use the MT-1099A-24 mount. -
Page 21: Figure 2-4. Mobile 100W System
2: Installation The PRC1099A can be used in a 100W mobile configuration with the RA100 100W System power amplifier as shown below. 12V or 24V operation is possible in this configuration; make sure the RA100 and MT-1099A are the proper 12V or 24V model. -
Page 22: Figure 2-5. Mobile 400W System
MT-1099A to PRC1099A, control cable C992301 MT-1099A to RAT7000B, control cable The PRC1099A can be used in a 400W mobile configuration with the 400W System RA400-99 power amplifier as shown below. This system can only be used in a 24V vehicle. -
Page 23: Base Installations
External DC power to MT-1099A, power cable C991614 UPS500 to MT-1099A, power cable C991620 RAT1000C to RA-MAS, RF cable C991645 PRC1099A to RA400-99, RF cable C991949 PRC1099A to MT-1099A, power cable C992003 MT-1099A to RA400-99, control cable Base Installations All of the mobile installations described in the previous section can be used as base stations. -
Page 24: Connecting Audio Accessories
Eliminate background noise by turning the knob to SQUELCH This also reduces the receiver current drain. Battery Charger Installation This section covers the installation and use of the PRC1099A with the following accessories: • PRC-PS Power supply/battery charger • PRC-BC4 Multiple battery charger •... -
Page 25: Figure 2-6. Charging A Battery Using Prc-Ps And Prc1099A
Attach the PRC-PS to one of two power sources. • 115/230VAC (internally strapable) or • 24 Vdc Turn the PRC1099A on if you need to operate the radio while charging the battery. Otherwise, leave it off. Power on the charger and note the following indicators: •... -
Page 26: Figure 2-7. Charging A Battery Using Prc-Ps
• The CHARGING indicator light turns on during a normal charge cycle. • The READY indicator light turns on when the battery is fully charged. PRC-PS BB-LA6 INPUT INPUT C991609 24 Vdc Source 115/230 VAC Source Figure 2-7. Charging a Battery using PRC-PS 2-12 PRC1099A-MSOP... -
Page 27: Figure 2-8. Charging Multiple Batteries Using Prc-Bc4
• The CHARGING indicator light turns on during a normal charge cycle. • The READY indicator light turns on when the battery is fully charged. PRC-BC4 BB-LA6 C991610 C991610 C991610 INPUT INPUT BB-LA6 BB-LA6 BB-LA6 C991609 24 Vdc Source 115/230 VAC Source Figure 2-8. Charging Multiple Batteries using PRC-BC4 PRC1099A-MSOP 2-13... -
Page 28: Figure 2-9. Charging A Battery Using The Prc-Hc-30 And Prc1099A
BB-LA6 PRC1099A PRC-HC-30 C991611 Figure 2-9. Charging a Battery Using the PRC-HC-30 and PRC1099A Charging a battery directly from the hand crank generator is illustrated in Figure 2-10. 1. Attach the battery to the hand crank generator as shown. Mount the hand crank generator for convenient cranking. -
Page 29: Figure 2-11. Charging A Battery Using Prc-Spu-10 And Prc1099A
PRC1099A BB-LA6 C991613 Figure 2-11. Charging a Battery Using PRC-SPU-10 and PRC1099A Charging a battery directly from the PRC-SPU-10 is illustrated in Figure 2-12. Unfold the generator and orient it for maximum exposure to the sun. Attach the battery to be charged to the PRC-SPU-10. -
Page 30: Internal Battery Charger Option
2: Installation Internal Battery Charger Option 1. Connect the battery charger power cable (C991683) to a 12 to 30 Vdc power source. Connect the other end of the cable to the ACC connector of the PRC1099A. 2-16 PRC1099A-MSOP... -
Page 31: Chapter 3: Operation
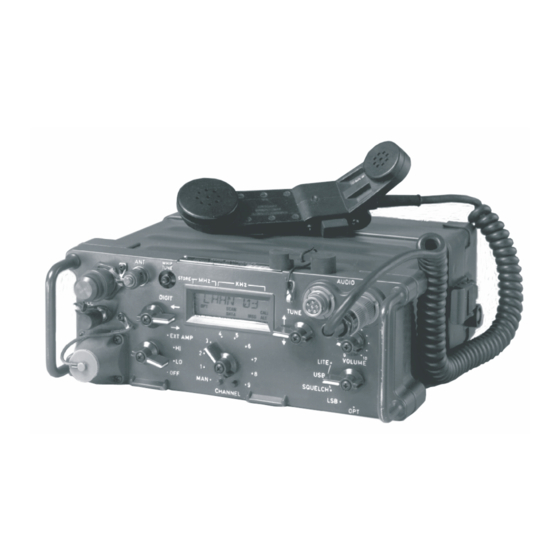
Figure 3-1. Front Panel Layout Turn the Power knob to the power level desired: Transceiver on, low power, 5W. Transceiver on, high power, 20W. Gives maximum range. If Low Battery icon displays, replace the battery. EXT AMP Enables external amplifier keyline when connected. PRC1099A-MSOP... -
Page 32: Using Knobs, Connectors And Indicators
Adjust the Volume for the desired sound level. Using Knobs, Connectors and Indicators The front panel of the PRC1099A has various knobs, connectors and indicators that guide you through its operation. Advanced features are accessed by selecting commands from menus. For placement of these knobs... - Page 33 Toggle up and hold to scroll from left to right. Look for the arrow symbols in the display area while accessing menus. They indicate that the Digit knob can be used to move to additional selections or settings in a menu. PRC1099A-MSOP...
- Page 34 Display accessible from it and the status of the battery. The display has a backlight feature for improved visibility. The PRC1099A is programmed directly from the display area. For information on how the display area is used to program the radio, refer to Chapter 4, “Radio Programming.”...
-
Page 35: Tuning The Antenna
3: Operation The Accessory connector provides the ability to create a variety system Accessory configurations for the PRC1099A such as the MT-1099A mobile mount for Connector vehicular installations. Note: Keep the cap on the accessory connector when it is not in use. -
Page 36: Cw Operation
CW Operation The PRC1099A operates in CW mode (telegraphy) when the key is installed in one of the audio connectors. The transceiver automatically switches to CW mode for semi break-in keying. This means the transmitter is held on when the key is depressed and automatically returns to receive when there is a short break in transmission. -
Page 37: Display Area
RADIO PROGRAMMING Display Area When the PRC1099A is first powered on, the display area briefly shows the version of the installed software and then the channel number assigned to the current position of the Channel knob. It also indicates what menus are available. - Page 38 UNE KNOB such as off and on. Save your entered or modified settings by pressing the button. is briefly displayed and the menu is redisplayed. SAVED To exit the menu, toggle the IGIT KNOB PRC1099A-MSOP...
-
Page 39: Setting Channels And Frequencies
4: Radio Programming Setting Channels and Frequencies The PRC1099A stores up to 100 different frequencies in channel numbers 00 to 99. Each of the channel positions on the front panel is capable of displaying any one of the 100 channels stored in memory. The transceiver utilizes 100 channels and can display 10 channels at a time. -
Page 40: Standard Option Menu
Enter to exit. Wrong Password is correct ACCEPT XXX = On or off LOCK: XXX Change with Tune knob LOCK SEL Enter to exit. XXXXX = Secret password PW: XXXXX Change with Tune knob NEW PWRD Enter to exit. PRC1099A-MSOP... - Page 41 0.25 Vdc. BATT BAD indicates the battery is either below 10.5 or above 15 Vdc. TUNER Tuner. For selecting the Datron tuner to use with the PRC1099A. PASSWORD Password. For entering a password to allow access to all menus.
-
Page 42: Standard Data Menu
Save with Whip Tune button XXX = On or off FLOW CTL FLOW: XXX Change with Tune knob Save with Whip Tune button XX = 00 to 99 RAD ADDR Change with Tune knob RA : XX Save with Whip Tune button PRC1099A-MSOP... - Page 43 RAD ADDR Radio Address. For selecting the address number of this radio when more than one radio is connected on the same data bus (00 through 99). PRC1099A-MSOP...
-
Page 44: Standard Scan Menu
XXX = On or off VDET SEL VDET : XXX Change with Tune knob Save with Whip Tune button XXX = 001 to 998 VDET HLD VH : XXX SC Change with Tune knob Save with Whip Tune button PRC1099A-MSOP... - Page 45 VDET HLD Voice Detect Hold. When voice detect is enabled, the radio automatically stops scanning on channels when voice communications are detected. For setting the amount of time the radio remains at that channel, without hearing more voice communications. PRC1099A-MSOP...
-
Page 46: Optional Ale Menu
Follow the Menu Structure and Menu Selection below to assist in programming the ALE settings into the radio. Menu Structure The diagram below shows the structure of the ALE menu and the legend indicates how to work within the selections and their settings. 4-10 PRC1099A-MSOP... - Page 47 XXX = On or off SOUNDSEL SOUND: XXX Change with Tune knob - Legend - Save with Whip Tune button Indicates Whip tune button pressed Indicates Tune knob moved up Indicates Tune knob moved down To exit any menu, use Digit knob PRC1099A-MSOP 4-11...
- Page 48 Receive Select. For disabling the automatic transmission of a reply to a properly received ALE signal. This is useful when transmissions are not allowed. To prevent replies from being transmitted, toggle the knob to display RX ONLY Press to save the selection. 4-12 PRC1099A-MSOP...
- Page 49 Use the _ symbol to enter a space. Press to enter. Continue this process until the address is complete (up to 15 characters). To save the address, scroll to the save symbol immediately below the A in the symbol sequence. Press to complete the process. PRC1099A-MSOP 4-13...
- Page 50 Press to save it. An asterisk * indicates that address is added. Continue adding addresses in the same manner. To save all selected net addresses, scroll to and press OTHR *** 4-14 PRC1099A-MSOP...
- Page 51 SOUND LN Sound Length. For selecting the length of time a sounding burst is transmitted for evaluation by the receiving station. Toggle the knob to increase or decrease the sounding bursts. Press to save the setting. PRC1099A-MSOP 4-15...
- Page 52 LQA Exchange. For turning the automatic LQA information exchange feature on or off. LQA is a numerical evaluation grade given to each channel after it is used. Toggle the knob to toggle between Press to save the setting. 4-16 PRC1099A-MSOP...
- Page 53 Memory Dump. To erase ALE memory data. A partial memory dump erases LQA data and a full memory dump erases all ALE data in the radio. Toggle the knob to toggle between (full) and (partial). Press to save the setting. PRC1099A-MSOP 4-17...
- Page 54 Example: 2.36 + 1.18 seconds = 3.54 seconds Add 392 ms to compensate for receiving stations requiring a minimum amount of dead air time to determine the end-of-transmission. Example: 3.54 + .392 = 3.932 seconds Total slot time for each net member = 3.932 seconds 4-18 PRC1099A-MSOP...
- Page 55 It is determined by multiplying the slot time by the total number of Note 1 slots. Because the PRC1099A is programmed to read in 10 ms increments, this total must be converted to milliseconds by multiplying it by 100. The maximum size of a net is 6553.4 milliseconds.
-
Page 56: Optional Message Menu
After 3 second time out Indicates Tune knob moved up Indicates Tune knob moved down To exit any menu, use Digit knob Scroll with Tune knob Message present MESSAGE DEL MSG? Delete message with SCROLL Whip Tune button 4-20 PRC1099A-MSOP... - Page 57 Use the _ symbol to enter a space. Press to enter the letter. Continue this process until the message is complete. To save the message, scroll to the save symbol immedi- ately below the A in the symbol sequence. Press to save the message. PRC1099A-MSOP 4-21...
-
Page 58: Optional Call Menu
XXX = None, * 1 to 9 Indicates Tune knob moved up MSG : XXXX * Indicates message present Indicates Tune knob moved down Change with Tune knob To exit any menu, use Digit knob Select with Whip Tune button 4-22 PRC1099A-MSOP... - Page 59 Note: Prior to attempting a call, the station to call must be entered into the Format Other Address setting within the ALE menu. To initiate an ALE call using the number assigned to it rather than its 15 character name: PRC1099A-MSOP 4-23...
- Page 60 NET CALL to make the selection. Press the knob to scroll to the desired net other address. Press to make the selection and select a message to send. If a message is not being sent, select NONE 4-24 PRC1099A-MSOP...
-
Page 61: Optional Transadapt/Transcall Menu
(or is 000 for All Call), the radio continues scanning, prepared to receive a call. The radio can scan up to 30 different groups of channels. For information on entering or modifying scan groups refer to "Standard Scan Menu" on page 4-8. PRC1099A-MSOP 4-25... - Page 62 CALL SEL Change with Tune knob CS : XXXX Save with Whip Tune button - Legend - Indicates Whip tune button pressed Indicates Tune knob moved up Indicates Tune knob moved down To exit any menu, use Digit knob 4-26 PRC1099A-MSOP...
- Page 63 Call system. In scan mode, the first usable frequency is located, not the best. When placing a Transcall call, the PRC1099A must be in scan mode before a call is initiated and the best frequency is located. To call a particular station, the transmitting station must know the call code of the receiving station.
- Page 64 CALL indicating the call is completed. If no reply is received, a slow error alarm sounds in the handset, and the radio automatically returns to normal operation. 4-28 PRC1099A-MSOP...
-
Page 65: Preventive Maintenance
The information in this chapter is essential for proper upkeep and operation of your equipment. It does not contain information on the replacement and repair of the internal boards in the PRC1099A. Refer to the PRC1099A-MS technical manual for that type of information. -
Page 66: Table 5-2. Weekly Preventive Maintenance
Perform a visual inspection before the equipment is placed in operation, Visual during operation and after shutdown. Inspection • Knobs and controls: Check for correct settings. • Handset: Check by substitution. • Antenna: Check for loose connection. • Battery: Check by substitution. PRC1099A-MSOP... - Page 67 • Fully seat the antenna. • Tune the radio. • Replace the battery. If you need to replace any of the external portions of the radio, refer to the Repair Parts figure and table below when considering replacement parts. PRC1099A-MSOP...
- Page 68 Protective BNC cap 610087-A Protective antenna cap 610088 Protective accessory cap 819909 Captive screw 891027 Tune knob 891027 Digit knob 891027 Power knob 891027 Mode knob 891027 Channel knob 891028 Volume knob 894102 Battery box 894104 Transceiver case 919107 Hinge PRC1099A-MSOP...
-
Page 69: Bite System
5: Maintenance BITE System The PRC1099A BITE system is designed to identify a faulty board. When a fault occurs, BITE fault messages are displayed on the front panel indicating the specific board affected. The BITE runs automatically on power up and can be run anytime by selecting BITE TST from the OPT menu (refer to "Standard... -
Page 71: Short Whip Antenna
ANTENNA SYSTEMS Short Whip Antenna In the manpack configuration, the PRC1099A is generally used with a short whip antenna. It is very short compared with a resonant antenna on most frequencies in the HF range and must be artificially matched by the antenna tuner. -
Page 72: Ground Systems
50 Ohm disconnected and output is switched to the BNC antenna connector. Use any Antennas 50 ohm coaxial fed antenna with a VSWR of less than 3:1 (preferably 2:1) with the PRC1099A. Antenna Description Resonant Simple, efficient antenna provides good long range coverage. -
Page 73: Figure 6-1. Whip Antenna Configuration
6: Antenna Systems The PRC1099A operates with the RAT7000B tuner through a multiwire Remotely Tuned control cable and 50 ohm coaxial RF cable. The tuner can be located at the Antennas antenna and is convenient for mobile installations. The tuner is rated at 125W and used with the RA100 amplifier. -
Page 74: Figure 6-3. Resonant Dipole Antenna Configuration
6: Antenna Systems Ground Optional PRC1099A Dipole length cut to frequency of operation. Length in feet = F(MHz) Figure 6-3. Resonant Dipole Antenna Configuration Feed RG213 Coax Cable Termination Network UG-255/U “UHF to BNC” PRC1099A Coax Adapter Required Diamond Configuration Figure 6-4. -
Page 75: Figure 6-5. Mobile Configuration With Remote Antenna Tuner
6: Antenna Systems Ground tuner to body #4 AWG (As short as possible) 4.2M Whip PRC1099A in MT-1099A vehicle mount with RA100 amplifier Feed-through insulator Antenna RF lead (as short as possible) Figure 6-5. Mobile Configuration with Remote Antenna Tuner... -
Page 77: Optional Accessories
Only usable at 5W power level with D dry batteries. Cassette does not include batteries. (12V, 3.6 Ah) Note: Other types of batteries can be used with the PRC1099A such as the NiCad, with an output voltage of 12 to 15 Vdc. -
Page 78: Power Cables
Carrying Cases Part Number Description ST-138 Standard military carrying harness with shoulder straps, frame, and securing straps for PRC1099A. CW-503 Accessory carrying bag. For PRC1099A antennas and handset. Attaches to ST-138 harness. LC-2 Tubular backpack frame. Audio Equipment Part Number Description All audio accessories are terminated with twist-lock Mil-Spec connectors. -
Page 79: Manpack And Long Range Antennas
Grounding kit, 2 wire braided 50 ft. each, counter poise/ ground stake to enhance efficiency with short antennas. Whip adapter and feedwire for direct connection of PRC1099A to RA-MAS. Not required when using external automatic antenna tuner. MAR-12 Mobile antenna system. Identical to MAR-16 except consists of three sections. -
Page 80: Amplifiers And Power Supplies
Description RA100-12 100W RF power amplifier 1.6 to 30 MHz. Ruggedized package compatible with MT-1099A vehicle adapter mount and PRC1099A. Transceiver operates from nominal 12 Vdc power source. Order RF and control cables separately. RA100-24 100W RF power amplifier 1.6 to 30 MHz. Same as RA100-12, except operates from nominal 24 Vdc power source. -
Page 81: Antenna Tuners
Description Supplied without interface cables. RAT1000C 1000W automatic digital antenna tuner used with PRC1099A to locate radiating antenna away from radio operator. Can be used with dipoles, lingerers, NVIS, other antennas. RAT7000B 125W automatic digital antenna tuner used with RA100 amplifiers for mobile, marine, fixed and portable installation using whip and long-wire antennas.
Need help?
Do you have a question about the PRC1099A and is the answer not in the manual?
Questions and answers