Table of Contents
Advertisement
Available languages
Available languages
Quick Links
Allesschneider Futura F 6 / F 9
Universal slicer Futura F 6 / F 9
Trancheuse Futura F 6 / F 9
Cortadora de alimentos Futura F 6 / F 9
Tagliatutto Futura F 6 / F 9
Allessnijder Futura F 6 / F 9
Bedienungsanleitung
Operating instructions
Notice d'utilisation
Manual de instrucciones
Istruzioni per l'uso
Bedieningshandleiding
Advertisement
Table of Contents

Related Manuals for Graef Futura F 6


Summary of Contents for Graef Futura F 6
- Page 1 Allesschneider Futura F 6 / F 9 Universal slicer Futura F 6 / F 9 Trancheuse Futura F 6 / F 9 Cortadora de alimentos Futura F 6 / F 9 Tagliatutto Futura F 6 / F 9 Allessnijder Futura F 6 / F 9...
- Page 2 Bedienungsanleitung Operating Instructions Notice d´utilisation Manual de Instrucciones Istruzioni per l’uso Bedieningshandleiding...
-
Page 3: Allesschneider Futura F 6 / F
Sie sich an den mit dem Kauf dieses Allesschnei- Graef-Kundendienst oder an Ihren ders Futura F 6 / F 9 haben Sie eine Fachhandel. gute Wahl getroffen. Sie haben ein anerkanntes Qualitätsprodukt er- Warnhinweise worben. - Page 4 Allesschneider Futura F 6 / F 9 Bestimmungsgemäße Ver- VORSIcht wendung Gefahr durch nicht bestimmungsge- mäße Verwendung! Dieses Gerät ist nicht für den ge- werblichen Gebrauch bestimmt. Von dem Gerät können bei nicht bestimmungsgemäßer Verwendung Dieses Gerät ist dazu bestimmt, im und/oder andersartiger Nutzung Haushalt und ähnlichen Anwendun-...
- Page 5 Allesschneider Futura F 6 / F 9 Gefahr durch elektrischen Unsachgemäßer Reparaturen ● Strom ● Technischer Veränderungen ● Verwendung nicht zugelassener Ersatzteile VORSIcht Übersetzungen werden nach bes- Lebensgefahr durch elektrischen tem Wissen durchgeführt. Wir über- Strom! nehmen keine Haftung für Überset- zungsfehler.
- Page 6 Allesschneider Futura F 6 / F 9 Grundlegende Sicherheits- stimmt durch Personen (ein- schließlich Kindern) mit ein- hinweise geschränkten physischen, Beachten Sie für einen sicheren sensorischen oder geistigen Fä- Umgang mit dem Gerät die folgen- higkeiten oder mangels Erfah- den Sicherheitshinweise:...
- Page 7 Allesschneider Futura F 6 / F 9 Inbetriebnahme Wichtig! Prüfen Sie die Lieferung auf ► Vollständigkeit und auf sicht- Sicherheitshinweise bare Schäden. VORSICHT Melden Sie eine unvollstän- ► dige Lieferung oder Schäden Bei der Inbetriebnahme des infolge mangelhafter Verpa- Gerätes können Personen- und ckung oder durch Transport Sachschäden auftreten!
-
Page 8: Elektrischer Anschluss
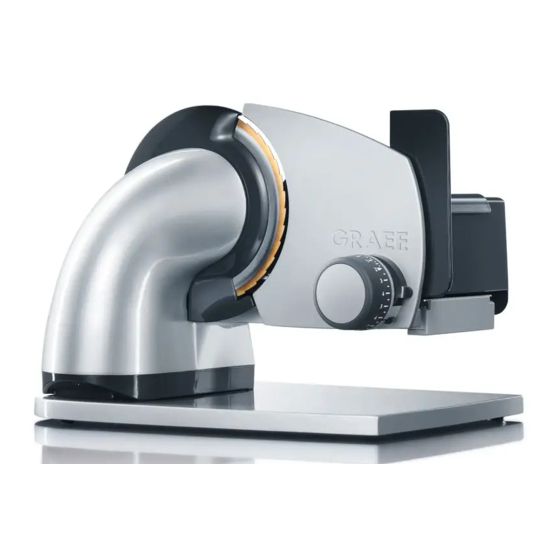
Allesschneider Futura F 6 / F 9 übereinstimmen, damit keine Wichtig! Schäden am Gerät auftreten. Heben Sie wenn möglich die ► Im Zweifelsfall fragen Sie Ihre Originalverpackung während Elektro-Fachkraft. der Garantiezeit des Gerätes Vergewissern Sie sich, dass die ■ auf, um das Gerät im Garantie- Anschlussleitung unbeschä-... - Page 9 Allesschneider Futura F 6 / F 9 Gesamtübersicht Aufbau und Funktion Messerkassette Schneidmesser Anschlagplatte Momentschalter u. Dau- erschalter Einstellknopf Alubodenplatte Restehalter Führungsprofil Kabelfach 10) Schwenkhebel 11) Verriegelungsknopf 12) Arretierungsbolzen 13) GENIO-Schlitten © Gebr. Graef & Co. KG...
-
Page 10: Technische Daten
Allesschneider Futura F 6 / F 9 technische Daten Futura F 6 Futura F 9 Abmessungen 395 x 305 x 280 395 x 305 x 280 (L x B x H) Gewicht ca. 4,9 ca. 4,9 Schnittstärke 0 - 15 0 - 15 Schnitthöhe... - Page 11 Allesschneider Futura F 6 / F 9 Gefahrenquellen unter das Gerät. Schneidgut leicht gegen die An- ‹ WARNUNG schlagplatte drücken und den Das drehende Messer kann Kör- Schlitten gleichmäßig gegen das perteile abschneiden. Gefährdet Messer führen. sind Ihre Finger, besonders der Drücken Sie den Momentschal-...
- Page 12 Allesschneider Futura F 6 / F 9 30° kippen GENIO-Schlitten Die Kippfunktion eignet sich be- Der GENIO-Schlitten hält mit seiner sonders gut zum Schneiden von gefederten Schlittenauflage das Brot, Hartwürsten und Gemüse. Schneidgut stets in der Ausgangs- Mit der Kippfunktion wird die na- position.
- Page 13 Allesschneider Futura F 6 / F 9 Reinigung und Pflege Schneidgutauflage herunter. An- schließend lassen Sie den Bolzen wieder los. In diesem Kapitel erhalten Sie wichtige Hinweise zur Reinigung Zum Entriegeln drücken Sie den und Pflege des Gerätes. Bolzen, die Schneidgutauflage fe- dert nach oben.
- Page 14 Allesschneider Futura F 6 / F 9 Messerabnahme Wichtig! Bitte schrauben Sie von Zeit zu Zeit Die Messerkassette muss ‹ auch einmal das Messer ab und so eingesetzt werden, dass reinigen Sie das Gerät von Innen. der Dom an der Rückseite Besonders dann wenn „saftiges“...
- Page 15 Allesschneider Futura F 6 / F 9 Nehmen Sie die Schneidgutau- sind gemäß Ihrer Kennzeichnung ‹ flage ab, indem Sie diese senk- wiederverwertbar. Mit der Wie- recht stellen und nach oben hin- derverwendung, der stofflichen weg abnehmen. Verwertung oder anderen Formen der Verwertung von Altgeräten,...
-
Page 16: Universal Slicer Futura F 6 / F
Dear customer, Warnings You made the right decision with the purchase of the Futura F 6 / F The following warnings and signal 9 universal slicer. You have acquired words are used in these operating an established quality product. -
Page 17: Customer Service
Universal Slicer Futura F 6 / F 9 • in bed-and-breakfast establish- information, illustrations and de- ments. scriptions in these instructions. With the unit you can slice bread, The manufacturer does not assume ham, sausage, cheese, fruit, vegeta- any liability for damages due to: bles, etc. - Page 18 Universal Slicer Futura F 6 / F 9 Danger due to electric current of the machine is only allowed it has been replaced with a new cAUtION one. Have it installed solely by the manufacturer or its customer serv- Danger of death due to electric cur-...
- Page 19 Universal Slicer Futura F 6 / F 9 Never operate the unit with wet Food holder ■ ● hands. ● Stainless steel tray This unit must be used with the ■ ● Operating instructions carriage and food holder unless Vaseline packs ●...
-
Page 20: Electric Connection
Universal Slicer Futura F 6 / F 9 The electrical safety of the unit ■ important! is only ensured if it is connected If possible, save the original pack- ► to a properly installed protec- ing during the unit's warranty tive conductor system. - Page 21 Universal Slicer Futura F 6 / F 9 Setup and Functioning Overview 1) Blade case 2) Cutting blade 3) Stop plate 4) Quick-action and continuous operation switch 5) Adjustment knob 6) Aluminium baseplate 7) Food holder 8) Guide profile 9) Cable compartment...
-
Page 22: Safety Instructions
Universal Slicer Futura F 6 / F 9 technical data Futura F 6 Futura F 9 Dimensions 395 x 305 x 280 395 x 305 x 280 (L x W x H) Weight ca. 4,9 ca. 4,9 Slice thickness 0 - 15... - Page 23 Universal Slicer Futura F 6 / F 9 Sources of hazards the blade. Press the quick-action switch on ‹ WARNING the adjustment knob. The rotating blade can cut off body parts. Your fingers, espe- cutting with the continu- cially the thumbs, are endan- ous operation switch gered.
- Page 24 Universal Slicer Futura F 6 / F 9 30° tilt size and weight of the items to be sliced, bringing them from the hard anodized aluminium slicing support The tilt function is especially useful into the ideal position. That makes...
- Page 25 Universal Slicer Futura F 6 / F 9 cleaning items for slicing on the carriage. Set the food holder on the rear ‹ Clean the exterior of the unit with of the carriage and put the food a soft, moist cloth. If heavy soiled, a holder onto the items to be sliced.
- Page 26 Universal Slicer Futura F 6 / F 9 important! important! The blade case must be in- Do not clean the slicing sup- ► ‹ serted in such a manner that port in a dishwasher! the dome on the rear of the...
- Page 27 Universal Slicer Futura F 6 / F 9 Disposal Disposing this product at the end of its service life through nor- mal domestic waste is prohibited. The symbol on the product and in the operating instructions points this out. The materials can be recycled in accordance with their markings.
-
Page 28: Trancheuse Futura F 6 / F
En optant pour cette trancheuse vente Graef ou à votre revendeur. Futura F 6 / F 9, vous avez fait le bon choix. Vous avez acheté un produit reconnu pour sa qualité. Nous vous remercions pour votre... - Page 29 Trancheuse Futura F 6 / F 9 Limitation de la responsa- • dans les cuisines, pour le per- sonnel dans les magasins, les bilité bureaux ou ailleurs au travail ; Toutes les informations techniques, • dans les propriétés agricoles ; données et consignes pour l'ins- •...
- Page 30 Trancheuse Futura F 6 / F 9 Après-vente Risque d'électrocution Si votre appareil Graef présente un PRUDENcE dommage, veuillez vous adresser Danger de mort par électrocution ! à votre revendeur ou au service Danger de mort en cas de contact après-vente Graef.
- Page 31 Trancheuse Futura F 6 / F 9 consignes de sécurité de Cet appareil ne peut être uti- ■ lisé par des personnes (y compris base des enfants) aux capacités phy- Pour une utilisation sûre de la siques, sensorielles ou mentales machine, veuillez respecter les réduites ou sans expérience et/...
- Page 32 Trancheuse Futura F 6 / F 9 Mise en service important ! Lors de la livraison, vérifiez si ► la machine est complète et ne consignes de sécurité présente pas de dommages apparents. PRUDENCE En cas de livraison incomplète ►...
- Page 33 Trancheuse Futura F 6 / F 9 mage sur la machine. En cas de important ! doute, renseignez-vous auprès Si possible, conservez l'emballage ► de votre électricien. d'origine durant la période de Veillez à ce que le cordon d'ali- ■...
- Page 34 Trancheuse Futura F 6 / F 9 Vue d’ensemble Cassette de la lame Lame Plaque de butée Touche de fonctionnement instan- tané et en continu Bouton de réglage d’épaisseur Semelle support en aluminium Guide aliments Profilé de guidage Range-cordon 10) Levier de pivotement 11) Bouton de condamnation 12) Tenon d’arrêt...
- Page 35 Trancheuse Futura F 6 / F 9 Montage et fonctionnement caractéristiques techniques Futura F 6 Futura F 9 Dimensions 395 x 305 x 280 395 x 305 x 280 (L x L x H) Poids env. 4,9 env. 4,9 Epaisseur de...
- Page 36 Trancheuse Futura F 6 / F 9 consignes de sécurité coupe avec le bouton de fonctionnement instan- PRUDENcE tané Veuillez respecter les consignes de Posez le morceau à couper sur ‹ sécurité suivantes afin d'éviter les le chariot. dangers et endommagements : Ne touchez pas à...
- Page 37 Trancheuse Futura F 6 / F 9 vous avez entendu le clic. important ! Procédez ensuite comme décrit ‹ Les aliments tendres (par ex. ► sous « Coupe ». le fromage ou le jambon) se coupent plus facilement à l'état Une fois la coupe terminée, ra- ‹...
- Page 38 Trancheuse Futura F 6 / F 9 en position optimale par rapport à important ! la lame, sans aucun effort. Le guide aliments vous permet ► de couper de petits aliments Si vous voulez couper un gros mor- comme par ex. des champi- ceau lourd (par ex.
- Page 39 Trancheuse Futura F 6 / F 9 Du nettoyage Nettoyez la face intérieure de la ‹ lame avec un chiffon humide. Nettoyez les surfaces extérieures important ! de la machine à l'aide d'un chiffon doux et humide. En cas de forte Placez la cassette de la lame ‹...
- Page 40 Trancheuse Futura F 6 / F 9 le ressort à lames. Nettoyez tous les morceaux avec un chiffon humide ou sous le ro- binet. important ! Ne nettoyez pas le support de ► coupe au lave-vaisselle ! Mettez quelques gouttes d'huile exempte de résine ou de vaseline...
- Page 41 Trancheuse Futura F 6 / F 9 Élimination Une fois hors d'usage, ce produit ne doit pas être mis à la poubelle avec les ordures ménagères. C'est ce qu'indique le symbole sur le produit et dans la notice d'utilisation. Les ma- tériaux sont recyclables conformément à...
-
Page 42: Cortadora De Alimentos Futura F 6 / F
Cortadora de alimentos Futura F 6 / F 9 Prólogo puede contemplar todo uso ima- ginable. Para más información o Estimada/o cliente, en caso de problemas que no se traten en este manual de instruc- ha elegido bien al comprar esta... - Page 43 Cortadora de alimentos Futura F 6 / F 9 Limitación de responsabi- • en cocinas para empleados, en tiendas, en oficinas y otros ám- lidad bitos comerciales; Todas las informaciones, datos e • en instalaciones agrícolas; indicaciones técnicas contenidas • por parte de huéspedes en ho-...
- Page 44 Cortadora de alimentos Futura F 6 / F 9 Atención al cliente Peligro por corriente eléc- trica Si su dispositivo Graef tuviera un defecto, le rogamos se dirija a su PREcAUcIÓN tienda especializada o al servicio de ¡Peligro de muerte por corriente atención al cliente de Graef.
- Page 45 Cortadora de alimentos Futura F 6 / F 9 Instrucciones básicas de Este dispositivo no está destina- ■ do a ser utilizado por personas seguridad (incluidos niños) con capacidades Respete las siguientes instruccio- físicas, sensoriales o mentales li- nes de seguridad para manipular el mitadas o falta de experiencia dispositivo con seguridad.
- Page 46 Cortadora de alimentos Futura F 6 / F 9 Puesta en funcionamiento ¡importante! Compruebe si el material ► suministrado está completo y Instrucciones de seguridad presenta daños visibles. PREcAUcIÓN Avisen inmediatamente al ► transportista y al proveedor si el ¡Al poner en funcionamiento el suministro está...
- Page 47 Cortadora de alimentos Futura F 6 / F 9 duda, consulte con su electricista. ¡importante! ■ Cerciórese de que el cable de Si es posible, conserve el emba- ► alimentación no esté dañado y no laje original durante el plazo de quede tendido sobre superficies ca- garantía del dispositivo para po-...
- Page 48 Cortadora de alimentos Futura F 6 / F 9 Estructura y función Vista de conjunto Cartucho de cuchilla Cuchilla Placa de tope Interruptores de movimiento instan- táneo y de movimiento continuado Botón de ajuste Base de aluminio Soporte de restos Perfil guía...
- Page 49 Cortadora de alimentos Futura F 6 / F 9 Datos técnicos Futura F 6 Futura F 9 Medidas (largo x ancho x 395 x 305 x 280 395 x 305 x 280 alto) Peso aprox. 4,9 aprox. 4,9 Grosor de corte...
- Page 50 Cortadora de alimentos Futura F 6 / F 9 Instrucciones de seguridad corte con interruptor de movimiento instantáneo PREcAUcIÓN Coloque el alimento a cortar en ‹ Respete las siguientes indicaciones el carro. de seguridad para evitar peligros y daños materiales: Ajuste el grosor de corte desea- ‹...
- Page 51 Cortadora de alimentos Futura F 6 / F 9 audible. ¡importante! Una vez se ha encajado audib- ‹ Los alimentos blandos (p. ej. ► lemente, el dispositivo se queda queso o fiambre) se cortan mejor apoyado. fríos. Los alimentos blandos se cortan ►...
- Page 52 Cortadora de alimentos Futura F 6 / F 9 siempre se adapta a las caracterí- ¡importante! sticas del alimento a cortar. De esta El soporte de restos le permite ► manera, no puede dar vueltas ni cortar pequeños alimentos moverse, y se puede llevar de ma- como p.
- Page 53 Cortadora de alimentos Futura F 6 / F 9 La limpieza Limpie las partes interiores de la ‹ cuchilla con un paño húmedo. Limpie las superficies exteriores del ¡importante! dispositivo con un paño suave y húmedo. En caso de suciedad per- El cartucho de la cuchilla se ‹...
- Page 54 Cortadora de alimentos Futura F 6 / F 9 locándolo en posición vertical y retirándolo hacia arriba. Ahora podrá retirar también los ‹ muelles de ballesta. Limpie todas las piezas con un paño húmedo o bajo agua corri- ente. ¡importante! ►...
- Page 55 Cortadora de alimentos Futura F 6 / F 9 Eliminación de residuos Este producto no puede ser desechado en la basura domé- stica normal al final de su vida útil. El símbolo indicado en el producto y en el manual de instrucciones así lo indican. Los materiales son reciclables conforme a su identificación.
-
Page 56: Tagliatutto Futura F 6 / F
Per maggiori informazioni o even- Con l'acquisto di questo tagliatutto tuali problemi non dettagliatamen- Futura F 6 / F 9 ha fatto una buona te spiegati nelle presenti istruzioni scelta. Ha acquistato un prodotto per l'uso, vogliate rivolgervi al ser- approvato di elevata qualità. - Page 57 Tagliatutto Futura F 6 / F 9 Impiego appropriato Si esclude qualsiasi pretesa di ri- sarcimento danni attribuibili ad un L'apparecchio non è destinato impiego non appropriato. all'impiego industriale. rischio grava unicamente Questo apparecchio è stabilito per sull'esercente. l'impiego domestico e simili appli-...
- Page 58 Tagliatutto Futura F 6 / F 9 Servizio assistenziale Pericoli derivati da ener- gia elettrica Qualora un apparecchio Graef do- vesse presentare un eventuale di- PRUDENZA fetto, vogliate rivolgervi al vostro Pericolo di morte dovuto a cor- commerciante di fiducia o al servi- rente elettrica! zio assistenziale Graef.
- Page 59 Tagliatutto Futura F 6 / F 9 Avvertenze di sicurezza essere sostituiti esclusivamente utilizzando pezzi di ricambio ori- fondamentali ginali. Solo in questi componenti Per garantire un impiego sicuro è possibile garantire un completo dell'apparecchio si raccomanda di adempimento ai requisiti di sicu- osservare le seguenti informazioni rezza.
- Page 60 Tagliatutto Futura F 6 / F 9 Messa in funzione importante! Completare la fornitura sulla ► completezza e se vi sono Informazioni di sicurezza eventuali danni visibili ester- namente. PRUDENZA Segnalare immediatamente ► Alla messa in funzione dell'ap- allo spedizioniere o fornitore...
- Page 61 Tagliatutto Futura F 6 / F 9 utilizzati presso i centri di raccolta Prima di collegare l'apparecchio, ■ e riciclaggio identificati col »Punto controllare i dati di allacciamento verde«. (tensione e frequenza) sulla tar- ghetta d'identificazione con quelli importante ! della rete elettrica.
- Page 62 Tagliatutto Futura F 6 / F 9 Struttura e funzionamento Panoramica complessiva Cassetta lame Lama Piastra d’arresto Interruttore a scatto e interruttore continuo Manopola di regola- zione Piastra base d’alluminio Supporto residui Profilo di guida Scomparto del cavo 10) Leva oscillante...
- Page 63 Tagliatutto Futura F 6 / F 9 Dati tecnici Futura F 6 Futura F 9 Dimensioni 395 x 305 x 280 395 x 305 x 280 (lun. x lar. x alt.) Peso ca. 4,9 ca. 4,9 Spessore di taglio 0 - 15...
- Page 64 Tagliatutto Futura F 6 / F 9 Informazioni di sicurezza tagliare con l'interruttore a scatto PRUDENZA Appoggiare il prodotto da ta- ‹ Vogliate osservare le seguenti infor- gliare sulla slitta. mazioni di sicurezza, per prevenire qualsiasi pericolo e danni materiali: Regolare lo spessore di taglio ‹...
- Page 65 Tagliatutto Futura F 6 / F 9 bloccato. importante! Procedere a questo punto come ‹ I prodotti morbidi (ad esempio ► descritto al paragrafo „Taglia- formaggio o prosciutto) si lasciano re“. tagliare meglio se refrigerati. I prodotti morbidi sono più facili da ►...
- Page 66 Tagliatutto Futura F 6 / F 9 momento alle particolarità del pro- importante ! dotto da tagliare. Infatti, non può Il supporto residui consente ► sfuggire e può essere condotto il dettaglio di prodotti più sempre senza alcuno sforzo in ma- piccoli, ad esempio funghi o niera ottimale verso la lama.
- Page 67 Tagliatutto Futura F 6 / F 9 Pulizia Pulire la parte interna della lama ‹ solo con un panno umido. Pulire la superficie esterna dell'ap- importante ! parecchio con un panno morbido inumidito. In caso di forte sporci- La cassetta delle lame va ‹...
- Page 68 Tagliatutto Futura F 6 / F 9 Rimuovere l'appoggio del pro- ‹ dotto da tagliare, posizionando- lo in perpendicolare e staccan- dolo poi verso l'alto. A questo punto si può staccare ‹ anche la molla a lamina. Pulire tutti i componenti con un panno umido o sotto l'acqua fluente.
- Page 69 Tagliatutto Futura F 6 / F 9 Smaltimento Questo prodotto, una volta che non serve più, non può essere smaltito nei normali rifiuti domestici. Ciò è indicato dal simbolo sul prodotto e nelle istruzioni per l'uso. I materiali sono riciclabi- li secondo la loro identificazione.
-
Page 70: Allessnijder Futura F 6 / F
Futura F 6 / F 9 hebt u een goede de klantenservice van Graef of uw keus gemaakt. U hebt een erkend speciaalzaak. - Page 71 Allessnijder Futura F 6 / F 9 Reglementair gebruik ook op grond van schade uit niet- reglementaire toepassing zijn uit- Dit apparaat is niet bestemd voor gesloten. bedrijfsmatig gebruik. Het risico draagt uitsluitend de ge- Dit apparaat is bestemd om in de bruiker.
- Page 72 Allessnijder Futura F 6 / F 9 Klantenservice Gevaar door elektrische stroom Mocht het gebeuren, dat uw Graef-apparaat schade vertoont, PAS OP richt u zich dan a.u.b. tot uw spe- Levensgevaar door elektrische ciaalzaak of tot de klantenservice stroom! van Graef.
- Page 73 Allessnijder Futura F 6 / F 9 Fundamentele veiligheids- Dit apparaat is niet bestemd om ■ door personen (met inbegrip van instructies kinderen) met beperkte fysische, Let in het belang van een veilige sensorische of psychische vaar- omgang met het apparaat op de...
- Page 74 Allessnijder Futura F 6 / F 9 Ingebruikname Belangrijk! Controleer de levering ten ► aanzien van volledigheid en Veiligheidsinstructies ten aanzien van zichtbare schade. PAS OP Meld een onvolledige leve- ► Bij de ingebruikname van het ap- ring of schade ten gevolge...
-
Page 75: Elektrische Aansluiting
Allessnijder Futura F 6 / F 9 staan. In geval van twijfel vraagt u Belangrijk! uw elektro-vakkracht. Bewaar indien mogelijk de originele ► ■ Overtuigt u er zich van, dat de verpakking gedurende de garan- aansluitkabel onbeschadigd is en tieperiode van het apparaat om... - Page 76 Allessnijder Futura F 6 / F 9 totaal overzicht Mescassette Snijmes Aanslagplaat Momentschakelaar en continuscha- kelaar Instelknop Aluminiumbodemplaat Restenhouder Geleidingsprofiel Kabelvak 10) Zwenkhendel 11) Vergrendelingsknop 12) Palbout 13) GENIO-slede...
-
Page 77: Technische Gegevens
Allessnijder Futura F 6 / F 9 technische gegevens Futura F 6 Futura F 9 Afmetingen 395 x 305 x 280 395 x 305 x 280 (l x b x h) Gewicht ca. 4.9 ca. 4.9 Snijdikte 0 - 15... - Page 78 Allessnijder Futura F 6 / F 9 Veiligheidsinstructies Snijden met momentscha- kelaar PAS OP Leg het te snijden product op de ‹ Neem de volgende veiligheidsin- slede. structies in acht om gevaren en materiële schade te voorkomen: Stel de gewenste snijdikte in.
- Page 79 Allessnijder Futura F 6 / F 9 apparaat krachtig omhoog, totdat Belangrijk! dit hoorbaar vastklikt. Zacht te snijden product (bijv. ► Pas bij het hoorbare vastklikken ‹ kaas of ham) kan het best is het apparaat beveiligd. gekoeld worden gesneden.
- Page 80 Allessnijder Futura F 6 / F 9 tijde aan de bijzonderheden van Belangrijk! het te snijden product aan. Zo kan De restenhouder maakt het ► het niet wegrollen en kan altijd u mogelijk om kleiner te zonder krachtinspanning optimaal snijden product zoals bijv.
- Page 81 Allessnijder Futura F 6 / F 9 Reiniging en verzorging Mes verwijderen Schroef van tijd tot tijd het mes er In dit hoofdstuk krijgt u belangrijke ook eens af en reinig het apparaat instructies voor het reinigen en ver- van binnen. Met name dan, wan- zorgen van het apparaat.
- Page 82 Allessnijder Futura F 6 / F 9 boven toe afneemt. Belangrijk! Nu kunt u ook de bladveren ‹ De mescassette moet zo ‹ eraftrekken. worden aangebracht, dat de doorn aan de achterkant Reinig alle onderdelen met een van de cassette in de ope-...
- Page 83 Allessnijder Futura F 6 / F 9 Opruimen Dit product mag aan het einde van zijn levensduur niet via het normale huisvuil worden opgeruimd. Het symbool op het pro- duct en in de gebruiksaanwijzing duidt hierop. De materialen zijn volgens hun aanduiding opnieuw te gebruiken. Met het hernieu-...
- Page 84 Gebr. Graef GmbH & Co. KG Donnerfeld 6 59757 Arnsberg...
Need help?
Do you have a question about the Futura F 6 and is the answer not in the manual?
Questions and answers