Table of Contents
Advertisement
Advertisement
Table of Contents

Subscribe to Our Youtube Channel
Related Manuals for LabelTac 4


Summary of Contents for LabelTac 4
- Page 1 LabelTac 4 Setup Guide...
-
Page 2: Table Of Contents
Contents Unboxing What’s in the box Your printer Setup & Install Before you continue... Connecting LabelTac Installing LabelTac drivers Installing templates & symbols Using LabelTac Loading print ribbon Loading tape supply How to make labels LED & button functions Troubleshooting When using die-cut labels... -
Page 3: What's In The Box
What’s in the box LabelTac Printers are professional thermal transfer printing systems, designed for creating custom vinyl labels and signs, in-house, for a variety of applications including: Pipe Marking, Safety, Arc Flash, OSHA, Racks/Warehouses, Tool Identification, Lean & 5S, Kaizen, Kanban, Hazmat, ANSI/ ASME &... -
Page 4: Your Printer
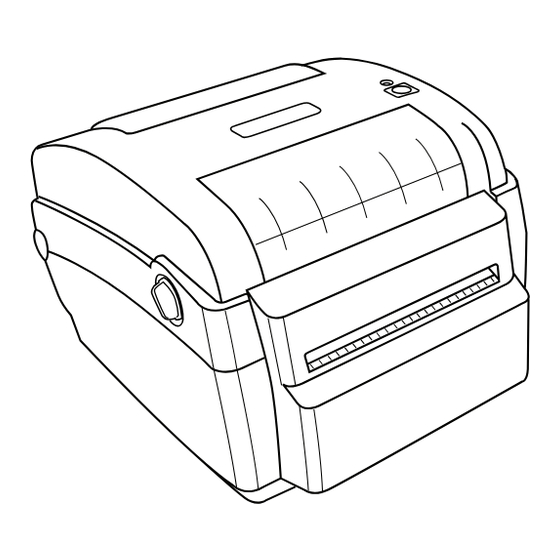
Your printer Your printer (cont’d) Ethernet Port Ribbon Rewind Gear Ribbon Rewind Hub USB 2.0 Port Parallel Port Print Head Ribbon Supply Hub RS-232C Port Power Jack Socket Cover Support Release Power Switch Media Holder Media Holder Lock Switch LED Indicator Alignment Guides Alignment Guide Multi-Function Action Button... -
Page 5: Setup & Install Before You Continue
See pages 7-9 for connection instructions..Let us install LabelTac for you, for free! We offer a quick 5-minute remote installation- Go ahead, let us do the work while you grab a cup of coffee! Call us at (866) 777-1360. Mon-Fri, 6am-3:30pm (PST) Setup &... -
Page 6: Connecting Labeltac
Connect one end of the power cord to the power port on the The LED indicator on the top side of the printer will turn green, back of the LabelTac, and the other end to a power outlet. signaling that the LabelTac is powered on and ready. -
Page 7: Installing Labeltac Drivers
. . . be already selected by default) and click ‘Next’. In the Printer name field, change the name to LabelTac 4. Leave everything else as-is, and click ‘Next’. LabelTac Printers include hundreds of templates and symbols to help you make professional signs and labels quickly and easily. -
Page 8: Using Labeltac Loading Print Ribbon
If installed correctly, the dull side of the ribbon should be exposed and facing you. Close the ribbon access cover, push the green cover support A full print ribbon loading video is available on your LabelTac Install CD under “User to the left to disengage and close the top cover gently. -
Page 9: Loading Tape Supply
Push the green cover support to the left to disengage and close the top cover gently. A full tape supply loading video is available on your LabelTac Install CD under “User Guides & Videos” or online at www.labeltac.com/support. Using LabelTac... -
Page 10: How To Make Labels
Getting started For example- if you want to print a 4”x6” label, simply set your page size in the program’s settings to 4” height and to 6” width. Creating labels and signs with LabelTac is easy-... - Page 11 The LabelTac 4 is a monochrome thermal transfer printer, so Adding: Images & logos when you print your label, the areas of your label that are black You can add images and logos to your labels by “inserting”...
- Page 12 Adding: Industrial symbols You can add industrial symbols (hazard pictograms, warning Stuck on a label design, or new to LabelTac and need a label symbols, NFPA symbols, etc.) to your labels the same way as ASAP? you would add other images (page 19).
-
Page 13: Led & Button Functions
LED & button functions LED & button functions (cont’d) The LabelTac 4 has one button and one 3-color LED indicator. Action button functions While powered on (not printing): Feed material LED indicator While powered on (printing): Pause or resume printing... -
Page 14: Troubleshooting
Open ribbon access cover, cut ribbon from rewind Diagonal lines through print hub and remove used print ribbon from cardboard Start Menu > Devices and Printers > LabelTac 4 > Printing Preferences rewind core. (...or through your program’s print dialog when printing*.) Using a piece of scotch tape, re-attach print ribbon to the bare cardboard rewind core. -
Page 15: When Using Die-Cut Labels
The Product was not used in accordance with CSS specifications and instructions. To switch back to using standard continuous vinyl, simply return to the ‘Printing For full warranty terms and conditions, please visit www.labeltac.com/support. Preferences’ window and change the Media Type back to ‘Continuous’. -
Page 16: Contact Us
Creative Safety Supply phone (866) 777-1360 www.labeltac.com info@labeltac.com email /creativesafetysupply /creativesafety Contact Us... - Page 17 LT4-2.01-11.12...
Need help?
Do you have a question about the 4 and is the answer not in the manual?
Questions and answers