
Related Manuals for Sojet ELFIN IH


Summary of Contents for Sojet ELFIN IH
-
Page 1: User Manual
Edition: C20150526A Handheld High Resolution Inkjet Printer User Manual Sojet Electronics(Xiamen) Co.,Ltd. -
Page 2: Safety Precautions
IMPORTANT To ensure the best printing quality, we recommend using only our specified High Resolution Inkjet Printer of cartridges and the corresponding accessories. Any malfunction or poor printing quality caused by improper use of other kinds of inks or accessories will be not be guarranteed. Safety Precautions There is high voltage inside the machine when it is live. -
Page 3: Table Of Contents
Content Introduction Chapter One: Important Precautions for Using Inkjet Printer 1.1 General Safety Precautions 1.2 Important Operation Precautions Chapter Two: Setup and Installation Instructions 2.1 Parts List 2.2 Battery Charging, Installation and Removal 2.3 Cartridge Installation (42ml) 2.4 Position Wheel Replacement Chapter Three: Inkjet Printer Introduction 3.1 Printer 3.2 Technical Specifications... - Page 4 5.3.4 Add Expiration Date 5.3.5 Add Image LOGO 5.3.6 Add Counter 5.3.7 Add Shift Code 5.3.8 Add Barcode 5.3.9 Add dynamical text 5.3.10 Add dynamical LOGO 5.3.11 Delete Object, Delete Data 5.4 System Management 5.4.1 System Setting 5.4.2 Edit Options 5.4.3 Printing Options 5.4.4 User Management 5.4.5 Special Features...
-
Page 5: Introduction
Please read this manual carefully before you use this equipment. Introduction Thank you for your purchase of Handheld High resolution printer. We want you to get helpful information for your work with this equipment; therefore we would like to explain a little bit about how to use this machine by this user manual by the following content: Important precautions for use of the machine Introduction of printer: Parts and components of the machine... -
Page 6: Chapter One: Important Precautions For Using Inkjet Printer
Chapter One: Important Precautions for Using Inkjet Printer Welcome to use Handheld High resolution printer Printer. In order to protect your personal safety and user rights, ensure correct installation and operation, and full play of the machine, it is important that you read the precautions carefully. -
Page 7: Parts List
Chapter Two: Installation and Setup Instructions This chapter will illustrate how to set up the equipment and how to install an ink cartridge. Firstly please check the machine parts by looking at the packing picture and parts list. Packing Picture: Outer box 2.1 Parts List Once you have unpacked your machine, check to make sure that you have all the parts... -
Page 8: Battery Charging, Installation And Removal
2.2 Battery Charging, Installation and Removal 2.2.1 Battery Charging Battery charging: Battery charging finished: Insert battery into charger. remove battery from charger. Green indicator light: battery Red indicator light: not inserted or battery fully Battery is on charge. charged. 2.2.2 Battery Installation and Removal Battery installation: Put the battery into compartment in Battery removal: press... -
Page 9: Cartridge Installation (42Ml)
2.3 Cartridge Installation (42ml) Cartridge removal: Step 1: Insert cartridge to Open the cartridge printer by an angle of 15 degree. clip, remove cartridge from printer by an angle Step 2: Close the cartridge of 15 degree. clip to secure (see next figure). -
Page 10: Chapter Three: Inkjet Printer Introduction
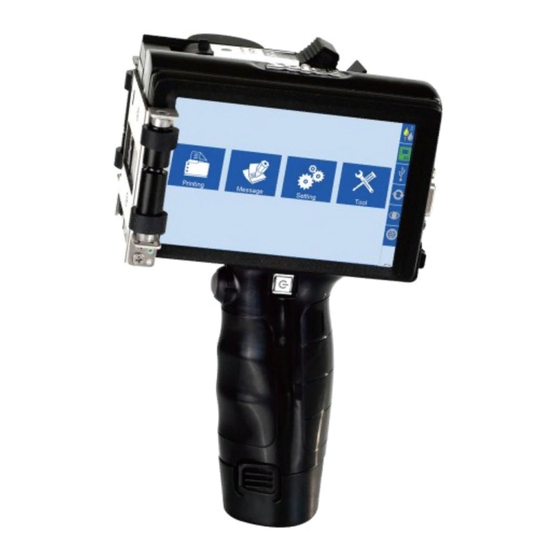
Chapter Three: Inkjet Printer Introduction 3.1 Printer Encoder 5”touch screen Band hole Power switch Handle Battery DB15 port Ethernet port USB port Positioning Wheels Cartridge clip Printhead Print switch Battery lock catch... -
Page 11: Technical Specifications
3.2 Technical Specifications A. Performance Values Item Specifications Note Technical source HP TIJ 2.5 Thermal Ink Jet technology Dimension (H*W*D):143.5*123*236mm Weight 1.15KG AC 90V-240V/50-60HZ; Power input Designed charger Standard come with two large capacity Charging time Quantity rechargeable batteries. approximately hours for full. -
Page 12: Chapter Four: How To Use The Printer And The Check Work Before/After Use
Chapter Four: How to Use the Printer and the Check Work before/after Use In this Chapter, you will learn how to use the printer, including check work before and after use. 4.1 How to Use the Printer Sq # Procedure Instructions cartridge Insert cartridge into the printer stall by an angle of 15 degree, close cartridge clip to... -
Page 13: Chapter Five: Printer Operation Instructions
Chapter Five: Printer Operation Instructions This chapter explains how to operate printer interface, including Printing Management, Data Man- agement, System Management, Tools Management, and Status Bar. 5.1 Main Interface Switch on power, printer starts Setting Management initialization Printing startup. After Status bar Management initialization... -
Page 14: Printing Management
5.2 Printing Management Click on main interface Previe to enter printing management interface (see Figure 2) Scroll bar Click switch to Multi-Files Start Page up Group; printing Page Printing File name Down delay Click switch to single Files & Multi-Files Return Files list;... -
Page 15: Printing Delay
5.2.3 Printing Delay Click , printing delay setting interface appears (see Figure 4) See Appendix 1: Terms and Definitions 1 for more (Figure 4) information. While execute Multi-Files printing, user can set the delay distance for each single file. A. Printing delay default value: 30mm; B. -
Page 16: Data Management
5.3 Data Management or Multiple Files Group. From the main interface click enter the Files Management interface, user can create, edit and delete the file (s) or Multiple Files Group(s); Click switch to Multi-Files Modif Group. Copy Copy Delet Click switch to single files. - Page 17 Click to save data when finish editing, a check box appears to ask “Are you sure you want to save the message? Cancel, Yes, No” If you click “ ”, the machine will remain on editing interface. Note: “MSG001” is default data in system. The system allows maximum 500 files of data (including default “MSG001”) ;...
-
Page 18: Add Text Object
5.3.2 Add Text Object Horizontal Click to add text object, see Figure 9. scale Height Click to enter text editing interface: A. Font: including the default one, totally Text support 2 fonts at same time, the default Edit one and one alternative font. B. -
Page 19: Add Image Logo
Add Image 5.3.5 Click to add object image. Select a logo on file list by page up and down (see Figure 13). Image file list (Figure 13) Note: When there is no image file found, a message box appears to prompt image import (see Figure 14). -
Page 20: Add Shift Code
5.3.7 Add Shift Code to add “shifts code”. Click , 添加班组对象。 Click enter the setting interface: can set shifts interval, start time and shifts interval numbers. Start time A A. Shifts Interval: 9 options: Shifts 0、0.5H、1H、2H、3H、4H、6H、 8H、12H,each option makes a day to the responding shifts number. -
Page 21: Add Barcode
5.3.8 Add Barcode to add object “barcode”. Click Barcode height A. Click to enter barcode edit: Barcode type Barcode type, horizontal scale level, barcode height, barcode text (see Figure 18). Horizontal scale level Barcode text (Figure 18) B. Click to enter barcode adjustment: coordinate location, text orientation, text display/hide, text height, error correction level, white space level... -
Page 22: Add Dynamical Text
5.3.9 Add dynamical text Clip to add dynamic text. A. Clip to to the interface of dynamical text setting with the way of dynamical transmission path or communication protocol . B. Scan printing Port is USB, selection modes are: S1P1: scan one while printing one S1PN:scan one while printing multiples, print to next scan data SNPN:scan multiples while printing... - Page 23 5.3.11 Add Device Information Clip , add device information; Clip , enter device information setting interface, can choose device name and device SN No. Device name can be defined by entering 2.4.5 user management, device SN No. cannot be changed. 5.3.12 Add String Clip to add string.
- Page 24 5.3.13 Delete Object or Delete/Import/copy Data Select an object on data editing interface, click to delete the object, a dialog box appears to prompt if you are sure that you want to delete. Select a file on the list on data management interface, click to delete the file, a dialog box appears to prompt if you sure that you want to delete .
-
Page 25: System Management
5.4 System Management Special Features Click to enter system User management (See Figure 26). System setting Screen (Figure 26) 5.4.1 System Setting Click on system management System interface to enter system setting (see Language Figure 27). System time Screen saver time unit Calendar Type Daylight... -
Page 26: Edit Options
5.4.2 Edit Options Click on system management interface to enter edit options setting interface. Date format A. Click to enter production date and expiration date format setting. New format Note: six common date formats default, forty-four more formats addable for user. Edit format The six default date formats not editable and cannot be deleted. - Page 27 D:clip ,enter the system setting interface. New system The system can be new, modified, and deleted, Modify system system default: DEC-10 decimal (0-9) H36-36 hexadecimal(0-Z) Delet system It can't modify or delet the default system System setting New and edit the system 1.
-
Page 28: Printing Options
5.4.3 Printing Options Click on system management interface to enter printing option setting. A. Click to enter nozzle Nozzle maintenance setting (see Figure 31). maintenance Pre-purge Clean printhead (Figure 31) Note: 1) Pre-purge Mode: 2 modes: both right & left nozzles; the working nozzles only. -
Page 29: User Management
Click on line speed setting Speed interface to run speed test (see Figure 35, 36). Test object length Line speed test: input test object length Run speed test 0~3000mm, click to enter speed test Give up startup interface, then start production line, Save put test object onto production line, the (Figure 35) -
Page 30: Special Features
5.4.5 Special Features on system management interface to enter “Special Features” setting. Click to enter “Continuous A. Click Continuous printing” setting (see Figure 38). printing See Appendix 1: Terms and Continuous output times Definitions 9 for more information. 1) Continuous output times: system default Output 0 (OFF). -
Page 31: Tools Management
5.5 Tools Management Click on main interface to enter About printer tools management interface System record (see Figure 42). Backup Upgrade Image Logo System reset (Figure 42) 5.5.1 Image Management Click to enter image Logo management interface File list of (see Figure 43). -
Page 32: System Backup
5.5.3 System Backup Clip to enter backup management. Clip to enter backup operation interface; Export backup: include message, logo and system setting Clip to enter the backup restore interface; can restore the message, image and setting of USB disk to the device; Data optional: 1、... -
Page 33: System Reset
5.5.6 System Reset Click on tools management interface to enter system reset management (see Figure 48). Click to execute system reset. You need to enter administrator password for permission to reset (Figure 48) execution (see Figure 49). (Figure 49) Note: System reset is to restore all defaults. 1) Restore all the settings to defaults, clear all data and images. -
Page 34: Edit Input Method Options
5.6 Edit Input Method Options A keypad appears when user clicks the editing bar. Keypad of Uppercase, lowercase, numeric, or common symbols for changeover (see Figure 50, 51, 52, 53). A. Uppercase: uppercase keypad is pre-set keypad to appear (see Figure 50). (Figure 50) B. -
Page 35: Status Bar
5.7 Status Bar (See Figure 1) Ink information includes dynamic and static information. Static information includes cartridge serial number, client code, cartridge type. Dynamic information: 1) ink original volume, and prospect print output for current data. 2) Ink remaining percentage, prospect print output for current data. Ink status icons include: information 1) Normal (... - Page 36 Status: Clean Printhead Invalid (grey), while printing going on, this function is invalid. Valid (green), can active this function.
-
Page 37: Chapter Six: Care And Maintenance
Chapter Six: Care and Maintenance Printer is a precision machine. To keep your machine work properly and bring facilitation to your production; to keep your machine in good condition and extend equipment life, it is important to carry out proper care and maintenance on machine from time to time. -
Page 38: Cartridge Care And Maintenance
Chapter Seven: Troubleshooting Note 1: The table below lists the most commonly seen problems and the solutions to each. If there’s any other problem, contact your local dealer or our after-sale service for assistance. Note 2: The table below is for reference only because causes for each problem may differ depending on individual situation such as setup environment, operation demand. -
Page 39: Troubleshooting For Printer
7.2 Troubleshooting for Printer Sr.# Problem Cause Solutions Comment 1. Low battery. Replace a new battery. Printer 2. Battery Remove battery and cannot be connectivity problem. re-install. switched on 3. Equipment or Contact local dealer or battery damage. after-sale service. Click “Start printing”... -
Page 40: Appendix 1: Terms And Definitions
Appendix 1: Terms and Definitions Sr.# Term Definition Comment It is the distance from the point when E.g. Printing delay value is 30mm, photocell senses the printing object Printing delay printer starts printing at 30mm point after to the point when printing starts. the photocell senses the printing object.
Need help?
Do you have a question about the ELFIN IH and is the answer not in the manual?
Questions and answers
Line speed bracket not shown please help me
The line speed for the Sojet ELFIN IH is 0~3000mm, as mentioned in the speed test section.
This answer is automatically generated