Table of Contents
Advertisement
Advertisement
Table of Contents

Related Manuals for Sojet V1H


Summary of Contents for Sojet V1H
-
Page 1: User Manual
Edition: 20170809A04 High Resolution Inkjet Printer User Manual... -
Page 2: Revision History
Revision History Corresponding Version Date Page Revised Brief Description software version 1、Added logo source 30、 47、 2、Added plugin management 2017/3/9 1.0.0.1745 49、50 3、Added encoder information 4、Added photocell information 1、Updated default source list and added Cut Edge feature 2 、 Initial setting: added modify 18、... -
Page 3: Safety Precautions
To ensure the best printing quality, we recommend to use our specified cartridges and the corresponding accessories. Any malfunction or poor printing quality caused by improper use of inks or accessories which are not from Sojet will not be guaranteed. Safety Precautions High voltage inside the machine after electricity connection, Maintenance or disassembly by unqualified or unprofessional person is strictly prohibited, in order to prevent any accidents. - Page 4 Please read manual carefully before you use our inkjet printers. Introduction Thank you for purchasing our high resolution printer. We want you to get helpful information with this machine, please read the manual to learn more about our machine by the following content: Important precautions for use of the machine Introduction of printer: Parts and components of the machine Setup and Installation Instructions: Instructions for Equipment Setup and Cartridge Installation.
-
Page 5: Table Of Contents
Contents Important Precautions for User ......................1 Installation and Setup Instructions ...................... 2 1.1 Parts List ..................................2 1.2 Battery Charging ................................3 1.3 Battery Installation and Removal ........................... 3 1.4 Ink cartridge Installation (42ml) ............................. 3 1.5 Position Wheel Mechanism Replacement ........................4 1.5.1 Dual wheel mechanism removal and installation: .................... - Page 6 4.1.1.2 Object List..............................13 4.1.2 Tool bar ................................14 4.1.3 New Text Message ............................... 15 4.1.4 Add Date/Time ..............................18 4.1.5 Add Counter ............................... 200 4.1.6 Add Shift Object ..............................222 4.1.7 Add Local Image Object ............................23 4.1.8 Add Base Image ..............................25 4.1.9 Add Device Name Object ............................
- Page 7 4.2.5 Edit Message ................................ 45 4.2.6 Copy/Paste/delete Message ..........................45 4.2.7 Delete Message ..............................45 4.3 Printing Management ..............................45 4.3.1 Start/Stop Printing ............................... 45 4.3.2 Printing Report Display ............................46 4.3.3 Printing Delay ............................... 46 4.3.4 Initial Setting ................................ 47 4.3.5 Printing Monitor ..............................
- Page 8 4.7.2 System status ............................... 59 4.7.3 Encoder information ............................59 4.7.4 Photocell information ............................60 4.7.5 USB Status ................................600 4.7.6 Battery Indicator ..............................600 4.7.7 WI-FI Status ................................ 611 4.7.8 Log out ................................611 4.8 Input Method Introduction ............................611 Appendix 1: Terms and Definition .....................
-
Page 9: Important Precautions For User
Important Precautions for User Welcome to use this inkjet printer. In order to protect your personal safety and user rights, ensure correct installation and operation, and full play of the machine, it is important that you read the precautions carefully. Important Installation Precautions ... -
Page 10: Installation And Setup Instructions
Installation and Setup Instructions This chapter illustrates product parts list and installation of equipment and ink cartridge. Packing Pictures Outer box 1.1 Parts List Please check everything with packing list to make sure all required parts in the package when you receive the products. -
Page 11: Battery Charging
1.2 Battery Charging Battery charging: Battery charging finished: Insert battery into Remove battery from charger. charger. Green indicator light: Red indicator light: Battery not inserted or Battery is on charge. battery fully charged. 1.3 Battery Installation and Removal Battery installation: insert the battery into Battery removal: handle and hear... -
Page 12: Position Wheel Mechanism Replacement
1.5 Position Wheel Mechanism Replacement 1.5.1 Dual wheel mechanism removal and installation: Installation: As shown vertically inward install the dual wheel mechanism, and lock the screws. Removal: Take off fixed screws, vertically outward pull the dual wheel mechanism. Well-installed dual wheel mechanism:... -
Page 13: Four-Wheel Mechanism Removal And Installation
1.5.2 Four-wheel mechanism removal and installation Installation: As shown vertically inward install the four-wheel mechanism, and lock the screws. Removal: Take off fixed screws, vertically outward pull the four-wheel mechanism. Well -installed four-wheel mechanism:... -
Page 14: Inkjet Printer Introduction
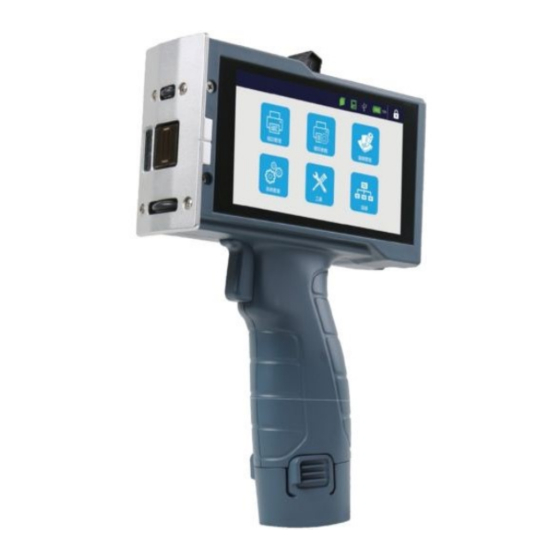
Inkjet Printer Introduction 2.1 Printer 5”touch screen Four-wheel mechanism Switch Handle Battery lock catch Battery Reinstallation button USB port Indicator light Power switch Wristband fixed point... -
Page 15: Technical Specifications
2.2 Technical Specifications 2.2.1 Performance Values Items Specifications Note Technical source HP TIJ2.5 Thermal Ink Jet technology; (H*W*D): 218*52*152mm; Dimension (H*W*D): 218*79*152mm (four-wheel mechanism included ) Weight 0.74kg Specified Battery Power input AC90V-240V, 50-60HZ charger Two standard large capacity rechargeable Quantity batteries. -
Page 16: Features
Automatically identify ink types and optimum printing parameters Ink management Guarantee genuine original HP ink; Automatically measure the status of ink usage Product Certification CE, FCC Working environment: -10℃--55℃; 10%-85%RH Environment requirement Storage environment: -25℃--80℃; 10%-90%RH 2.2.2 Features Items Specification Note Chinese, English, French, German, Spanish, Portuguese, Languages... -
Page 17: Printer Operation Instructions
Printer Operation Instructions 3.1 Power on Make sure the power is on before use printer, press the power switch, then enter the main interface. If the printer screen is not light after turn on, it may be low battery, please charge it with specified charger. -
Page 18: How To Import / Export Data, Images, And Set Parameters
Click 【Tools】 > 【Upgrade】 > 【Software】 , click the button 【Upgrade】 to enter the list of upgrade package. Find your required upgrade installation package in the list, click the in the upper right corner, then you can upgrade. ... -
Page 19: Backup Data / Images / Print Parameters / System Parameters
Delete all original If restored image is If restored image is with the Image images, only keep with the same file same file name as original, restored images name as original then only add non-duplicate files, restored image replace the image with same file name excluded the original and the file name unchanged... -
Page 20: List Function
Function Use Introduction 4.1 Message Management-Standard Mode 4.1.1 List Function 4.1.1.1 Message List Click【Message】>【List】, unfold the message list; Click【List】again to hide the list. List mode switch: Display message in the default way of list, click 【List】, and switch to icon 【Icon】, can switch back to list display mode;... -
Page 21: Object List
Import message: Insert U disk, after device identify U disk, click 【Import】, and then message of U disk: Inkjet/msg will be imported into list automatically; When the import message name same with device, it will popup reminder, and choose whether to continue import according to reminder. needed imported message, click 【Export】... -
Page 22: Toolbar
Align selected objects to the Align selected objects at the left Align selected objects Align selected objects up and centered right and left down Align selected objects to the Align selected objects at the right bottom Align selected objects Align selected objects at vertical distribution transverse distribution ... -
Page 23: New Text Message
【Undo】 : Click once, can undo operation of step forward for one time, maximum can undo 5 steps operation. 【Recover】: After perform one undo command, click Restore key can restore content of revocation. 【Copy】: Click object/source in the preview interface, click 【Copy】 to clipboard. 【Paste】: Paste copy or cut object/source to the preview interface. - Page 24 Added Built source list source list Built Source List: Display the newly built source of this data, 【Default-Text】 【Default-Counter】 【Default-Shift】 【Default-Date time】 are fixed “source” which can be added directly; The list shows up to 50 sources which can drop-down slider to view. 【New】...
- Page 25 line Cut Edge: Set whether the objet with white lace. Paragraph Spacing: Distance between words, you can enter 0-100, one decimal place Leading: The distance between two lines. Input range is limited depending on the canvas Text Alignment Way: Align multiple lines to the left Align Multiple lines centering Align multiple lines to the right...
-
Page 26: Add Date/Time
Name It can be set to Chinese, English, numbers and symbols; cannot exceed 30 characters, empty and rename with added object are not allowed. Finally click Return to save the text object, return to new data interface of previous level. Save Data ... - Page 27 Format List: Display the default formats and newly added formats. New: Click the new pop-up the date format setting keyboard, can choose a custom date format. Format name enter no more than 30 characters, and cannot be input (" \ / : *? "< > |"), and can't be empty, otherwise cannot be saved.
-
Page 28: Add Counter
Expiry date: If only want to add a production date, user may need to set the expiry day to 0; expiry time can switch from day, week, month, year, value within 0-999. Calendar type: Gregorian/ Hirji Pre-zero: 4 choices: 2015/01/01, 2015/_1/_1, 2015/1_/1_, 2015/1/1 ... - Page 29 System List: Show the default and new built system. It can display a maximum of 5 (including the default base) New: Click “new” popup the system editing interface. Enter into the system name and content, click save to save the system to the list.
-
Page 30: Add Shift Object
4.1.6 Add Shift Object Add Shift Source 【Message】>【New】>【New Source】>【Shift】 From the pull-down menu, user can check the already existed shifts, if need to create a new one or 【Edit】 modify any of them, click Show the default and new built shift. Shift List: New: Building new shift Shift... -
Page 31: Add Local Image Object
【Add】 : If need to add another shift, you can input the 【Shift name】 and the 【Time】 , click 【Add】 , the new shift will be added to the list on the left side. 【Shift content list】: Show the current team all content; Maximum user can add 48 shifts. - Page 32 Select the image from the list. Set the name of the local image source: Maximum 30 characters, Chinese or English characters, numbers, symbols, name cannot be blank or overlapped. At last, click 【Return】to save. Add Local Image in New Logo Object ...
-
Page 33: Add Base Image
4.1.8 Add Base Image 【Message】>【New】>【New Source】>【Base Image】 【Type】 : Four base images: Straight line, Rectangle, Circle and Ellipse. Select one of the base images, will be displayed in real-time in the left preview box. 【Edit】: According to the selected base image, display the corresponding settings. Straight line: Length: 1-3000mm. -
Page 34: Add Barcode
【Message】>【New】>【New Source】>【Scan print】 【Edit】: Preview: The contents of the MSG preview, cannot be print out. Can enter any characters except the newline. 【Other】: 【Auto Sleep】: Make the device into the low power state. Default value is 1s, the range is 1-60s. 【Read Time】: Default value is 3s, the range is 0-3600s. - Page 35 【Shortcut】: Can add Text/Counter/Shift/Data Time/Dynamic Text/ Database Text/Device Info/line break into barcode object. (Tip: Add scan source and scan the illegal value, the scan source will change to 00000 in the bar code) Note: Refer to above create text object about add “source”. ...
-
Page 36: Edit Message
4.1.12 Edit Message Click【Message】from the main interface, then click【List】to see all the messages added. Select the message, and click【Edit】 【New Object】: Please refer to New Message 【Edit Object】: select the object need to edit in the list, click【Edit object】 【New Source】: Please refer to New Message 【Edit Source】: Select source in【Source list】, click【Edit Source】. - Page 37 List mode switching: Display message in the default way of list, click 【List】 , and switch to icon 【Icon】, can switch back to list display mode; Select message, click 【Edit】, display mode; Click and enter message editing interface. Expand list width: If the message name is long, and the list display incompletely, click 【Unfold】...
-
Page 38: Object List
effect after save. Select all: Click 【All】 , select all messages in the list automatically, switch button to 【None】 ; 【None】, selected messages will be canceled, then button switch back to【All】. Click Tips: Device maximum can save 500 messages, it can’t continue add or import data after the message reach maximum. -
Page 39: Toolbar
Copy objects Rename objects clipboard Copy-paste or cut objects Delete Objects Select all Objects Select none Expanded List Width: If the object name is long, the list will show incompletely, if only click 【Unfold】 , the list will be expanded, and display completely; Click 【Recover】... -
Page 40: New Message
【Adaptive screen】: Display canvas size in 1:1 ratio. Click 【Tools】again, the toolbar will be hided. Click every time, the preview interface will add one line canvas, multi-line data can be built to maximum 16 lines. Click every time, the preview interface will reduce one line canvas. 4.2.4 New Message 【Message】>【New】>【New object】... -
Page 41: Counter Object
Lock scale: The proportion of font height and width. After select this function, when modify the font width or height, the font will be proportionally adjusted. Tips: If the data location beyond the canvas, it will turn yellow, after saving only the content within the canvas can be printed. ... - Page 42 【Edit】 Carry System: User can select different carry systems, if need to add a new one, click System List: Show the default and new built system. It can display a maximum of 5 (including the default base) New: Click “new”...
-
Page 43: Date/Time Object
【Location】 X axis coordinates: Input range -10-3000mm, you can click buttons to adjust slightly. Y axis coordinates: Input range according to canvas amount limited, also can click buttons to adjust slightly. Width: You can enter 10% to 300%, the greater value, the larger width font. Height: You can enter 10% to 300%, the greater value, the higher font. - Page 44 【Message】>【New】>【New object】>【Date/Time】 【Input】: Input contents represents the date object. 【Routine】: Format: select format from the menu, system has 5 default formats, user can define totally 45 types. The default ones cannot be deleted or modified, default formats include: YYYYMMDD, YYYY/MM/DD, MM/DD/YYYY, HH:mm, Julian day.
- Page 45 Month name Week of Year Name of weekday 24-hour Hour in Day of the year time system Choose date from the format list, and click "edit" popup the Settings interface, can modify and then save. The Edit: default format cannot be modified! Select all All formats in the list was chosen;...
-
Page 46: Shift Object
height, the font will be proportionally adjusted. Tips: If the data location beyond the canvas, it will turn yellow, after saving only the content within the canvas can be printed. 【Rotation】 Rotation: Input range 0-359, also can click buttons to adjust. Mirror: There are None, Horizontal mirror, Vertical mirror three options, click the drop-down button to expand Gradation: Printing darkness can be set within 10-100%. - Page 47 Show the default and new built shift. Shift List: New: Building new shift Shift content list 【Interval】: According to the selected time interval, 24 hours a day is divided into the corresponding number of shifts. For example, the time interval is set to 4H, the system automatically generates 6 shifts (default A-F), and shows in the left list.
- Page 48 【Modify Shift Content】 : select the shift from the list on the left, then edit its content on the right side, 【Add】 will change to【Modify】,click【Modify】to save 【shift name】: Maximum 30 characters, can be Chinese, English letters, numbers or symbols (no special symbols).
-
Page 49: Scan Print Object
Mirror: There are None, Horizontal mirror, Vertical mirror three options, click the drop-down button to expand Gradation: Printing darkness can be set within 10-100%. 【Paragraph】 Spacing: Distance between words, you can enter 0-100, one decimal place Leading: The distance between two lines. Input range is limited depending on the canvas Text Alignment Way: Align multiple lines to the left Multiple lines align centered... -
Page 50: Barcode Object
X axis coordinates: Input range -10-3000mm, you can click buttons to adjust slightly. Y axis coordinates: Input range according to canvas amount limited, also can click buttons to adjust slightly. Width: You can enter 10% to 300%, the greater value, the larger width font. Height: You can enter 10% to 300%, the greater value, the higher font. - Page 51 【Type】: Genre: Select 1Dbarcode, 2D barcode. Type: Select barcode type. 【Specification】 : Note: 1D and 2D barcodes have different settings, user need to select barcode genre firstly. Barcode type Settings Width: Totally 1-16 levels to choose from. 1D Barcode Height: Within the canvas size,1-12.7mm Font: Select barcode text font Font Size: Select barcode text font size.
-
Page 52: Logo Object
【Rotation】 Rotation: Input range 0-359, also can click buttons to adjust. Mirror: There are None, Horizontal mirror, Vertical mirror three options, click the drop-down button to expand Gradation: Printing darkness can be set within 10-100%. 【Name】 It can be set to Chinese, English, numbers and symbols; cannot exceed 30 characters, empty and rename with added object are not allowed. -
Page 53: Edit Message
4.2.5 Edit Message Click【Message】from the main interface, then click【List】to see all the messages added. Select the message, and click【Edit】 After editing, click return, choose save or not. Tips:When the MSG with dynamic source (Counter, Device Info, Date Time, Scan, Shift) has print records, edit this MSG and save it, will prompt to 【Save】... -
Page 54: Printing Report Display
Select the message, and click 【Start】 After start printing, printing report will pop up, 【Start】button change to【Stop】, then after get the sensor signal, message will be printed. Click【Stop】, printing report will disappear, button will go back to【Start】. 4.3.2 Printing Report Display ... -
Page 55: Initial Setting
4.3.4 Initial Setting Note: This function only valid while message contains counter /text source. After printing started, this setting is not settable. 【Print】>【Initial】 Set the current value, index value of counter. Current Value: the value will be printed after start printing, value need to be within the begin value and end value. -
Page 56: Re-Print
Dynamic source information will be displayed by sequence, user may pull down the menu to check if data quantity more than 5pcs. The display sequence can be manually selected: click 【Pull down】, select the data. Click 【Off】, will close the monitor. ... -
Page 57: Printing Parameter
Select the record in the list, click 【Preview】button, can preview the selected record. 4.4 Print Parameter 4.4.1 Print Setting Print Direction: set the printing direction of the printhead: L To R (from left to right), and R To L (from right to left). -
Page 58: Special Printing
Counter Reset: Every time user print a message which contains a counter, system will ask if to reset the counter after this printing, if select “Yes”, then from next printing counter will run from the minimum value, if select “No”, counter will continue from current value. Print Cache: Message quantity saved in system memory, value can be1-20, if set to 1, will print by real time. -
Page 59: User Management
OFF. If screen saver is optioned OFF, screen enters standby status if inactive for the set time. Screen becomes active when there’s alarm or error. Screen brightness: User can set the brightness from 10-100%, default is 30%. Message Mode: Select message management mode, standard mode or simple mode. 4.5.2 User management It allows administrator to assign rights of operation. - Page 60 Create new user Rights Click to get into new user rights setting page. It has 6 rights for new users. Items Features available Print Start/stop printing, Printing delay, Initial, Printing Monitor, and Reprint Direction, Mirror, Nozzle, DPI, Output, Pre-purge, Counter reset, Parameter Cache, Special、Blank line no print Message...
-
Page 61: System Reset
Click 【All】, can select all rights. Click 【None】, cancel all rights. After setting new user info and rights, please click “√”to save. After saving, new user info will be displayed in the list. Edit user info and rights Open user management, select the user info you want to edit (Administrator not included), click and do the edit and save. - Page 62 Click , all options are selected automatically. Click , all selected options are deleted. After selected, click 【Reset】, it will jump out a page requiring to input administrator password. Then the printer will restart automatically. Items can be reset: Module Items Parameters...
-
Page 63: About
4.5.4 About 【System】>【About】 Display company name, website, company logo, software version, hardware version, device SN, and customer code. 4.6 Tools 4.6.1 How to manage local images 【Tools】>【Image】 Preview image Select images and it will show images for preview. Import images ... -
Page 64: How To Upgrade Language/Font/Typewriting
Import picture format: bmp/jpg/png/gif Export images to export images, the default path is(Inkjet/Logo/ ) Insert USB and click Delete images Select images and click to delete images. All selected Click to select all. Cancel selection Click to cancel selection. 4.6.2 How to upgrade language/font/typewriting 【Tools】>【Upgrade】... -
Page 65: Permission
Click 【Upgrade】 to select font from USB to upgrade and after upgrade, the printer will restart. Can upgrade 3 fonts, click【Delete】to delete font Upgrade Input method Insert USB with font file (File stores in USB under: Inkjet\Upgrade\Keyboard\) ... -
Page 66: Plugin Management
Click 【Select All】, all features in the list are checked, can be deleted. Delete registration Click to delete registration. 4.6.4 Plugin Management Insert USB with plug-in file, click 【Add】to select file to add plugin, after add plugin successfully, shows in the list. -
Page 67: System Status
Cartridge icon color Grey: No cartridge Green: Normal Orange: Ink ran up to 95%--warning Red: Empty cartridge or error cartridge Display cartridge info Ink status, Cartridge SN, Client Code, Ink type, Volume, Used percentage, Data points Clean printhead Click to clean printhead when it is not printing. 4.7.2 System status Click to display system status... -
Page 68: Photocell Information
interface appears. 4.7.4 Photocell information Displays photocell connection status, when photocell is connected, click icon, encoder signal test interface appears. Currents Status: Press the print switch, the current status shows OPEN, release the print switch, the current status shows OFF. 4.7.5 USB Status ... -
Page 69: Wi-Fi Status
Green: The remaining power is 20%-100% Yellow: The remaining power is 10%-20% Red: Low battery, it means the battery is less than 10% Precaution: when battery is low, please recharge ASAP. 4.7.8 WI-FI Status Display WI-FI connection status as unconnected (gray) and normally connected (green). - Page 70 Capital letter: shift by Numbers: shift by Symbols: click to shift to symbols; click shift to Chinese symbols.
- Page 71 Chinese: Click to shift from Chinese and English; Chinese typing only workable while system language is Chinese. Spanish: Change the system language to Spanish, long-press a,e, i, o, u, n, system will pop-up the corresponding symbols. 【Cancel】close keyboard, quit without save 【Enter】close keyboard and save...
- Page 72 【Delete】delete the type, long-press will delete all the content in the input box. 【Newline】input in next line.
-
Page 73: Appendix 1: Terms And Definition
Appendix 1: Terms and Definition Term Description Remark Print delay To adjust the distance from the time If set delay distance as 30mm, when photocell detected the object till then it will start to print after printing. 30mm later when photocell detect the object Initial value Initial value from printing...
Need help?
Do you have a question about the V1H and is the answer not in the manual?
Questions and answers