
Related Manuals for JCM Jupiter 2

Summary of Contents for JCM Jupiter 2
- Page 1 Jupiter 2 Standard Deluxe Instruction Manual jcmseating.co.uk j c m s e a t i n g . c o . u k...
-
Page 2: Table Of Contents
Contents Introduction Measurements & Useful Info Seating System Components Important Safety Advice Important Safety Advice - General guidance for use Important Safety Advice - Accessories Important - Chest Harness Adjustment Important - Lap Strap Safety Lap strap fixing points Adjusting Tilt / Prone Push Handle Adjustment Chair Height Adjustment Head Rest Adjustment / Replacement... -
Page 3: Introduction
For further information please do not hesitate to contact us - all contact details are on the back cover of the manual. The Jupiter 2 is designed, manufactured and CE marked to EN12182 Thank you for purchasing our product, we hope... -
Page 4: Measurements & Useful Info
Measurements & Useful Info Jupiter Size 1 Size 2 Standard Size 2 Deluxe Size 3 Number of sizes Age Range 3yrs - 9yrs 8yrs-13yrs 8yrs-13yrs 12yrs-Adult Chassis Footprint Width Overall Footprint Length Overall Height 1070 1265 1160 1365 1160 1365 1090 1165 Seat Depth Single Seat... -
Page 5: Seating System Components
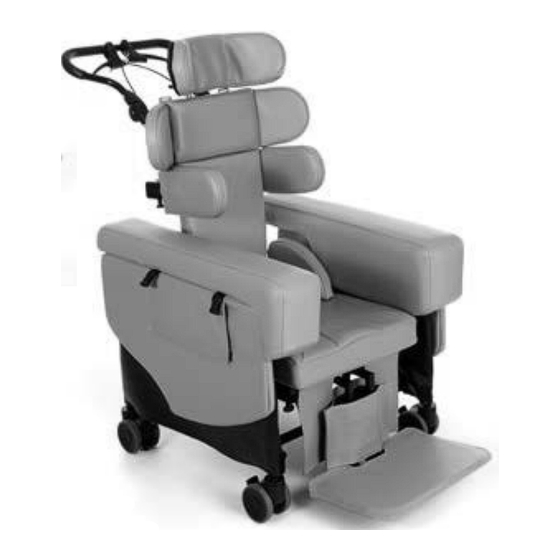
Seating System Components (Deluxe) A Push Handle F Contoured Seat B Headrest G Footrest C Shoulder Protraction Pads H Castors D Lateral Supports Adjustable Arm Rest - Deluxe E Hip Pads... - Page 6 Seating System Components (Standard) A Push Handle F Contoured Seat B Headrest G Footrest C Shoulder Protraction Pads H Castors D Lateral Supports Adjustable Arm Rest - Std E Hip Pads...
-
Page 7: Important Safety Advice
Jupiter externally for a brief period if transferring the chair from one indoor area to another. • Heavy items on the tray will affect stability. The fitting of anything other than the standard JCM tray may substantially affect the stability of the seating system and should therefore be checked before issue. -
Page 8: Important Safety Advice - General Guidance For Use
When re-issuing equipment, it is the customer’s responsibility to ensure that the equipment being supplied is appropriate for the needs of the user taking age, weight, ability, diagnosis, growth and any other factors into account. JCM are happy by appointment to assist with review or re-assessment of any client against intended equipment provision. -
Page 9: Important Safety Advice - Accessories
Important Safety Advice (Accessories) Multi adjustable head support Wings on the head support are ideally set at 45 degrees. Do NOT bring the wings in tight to the head. Ensure that the head support is set in such a way that the child cannot loop their head around the wings and get stuck. -
Page 10: Important - Chest Harness Adjustment
Important - Chest Harness Adjustment GREAT CARE should be taken when fitting a chest harness and the following points should always be followed: • The straps on the harness should never be allowed to move close to or in any way cause an obstruction to the child’s neck. •... -
Page 11: Important - Lap Strap Safety
Important Lap Strap Safety Incorrect fitting of lap straps can put the user at serious risk. When using lap straps we recommend the following points should always be adhered to: Sizing Lap Strap Fitting • • The angle that the hip belt is attached to Measure hip width to determine the belt the seating system has a direct effect on size required. -
Page 12: Lap Strap Fixing Points
Harness and Lap Strap Positioning This diagram shows the recommended positioning of the chest harness and lap straps: All straps & harnesses The cross strap on the Chest Harness Fitting must be securely fitted to chest harness must be the back of the chair. fitted no higher than the sternum (mid chest). -
Page 13: Adjusting Tilt / Prone
Adjustment Tilt / Prone The chair has been designed to offer a substantial variation of positioning and support, which the Tilt / Prone angle and back recline mechanism can help to demonstrate. The chair can be positioned at any point within this range to suit any situation. Tilt / Prone Angle •... -
Page 14: Chair Height Adjustment
Chair Height Adjustment The height of the chair can be adjusted by removing pin (A) from the chair leg and pulling the castor away from the frame. This will reveal extra holes in the chrome work (B), which enable the chair to sit at different heights. When a suitable height has been achieved re-align the relevant hole and re-insert the pin to lock the caster leg... -
Page 15: Head Rest Adjustment / Replacement
Head Rest Adjustment / Replacement Head Rest Height / Replacement • Turning hand wheel (A) anti-clockwise enables you to adjust the height of the head rest by moving it up or down. Re-tighten the hand wheel to secure into place. Head Rest Forward / Rearward &... -
Page 16: Arm Rest Adjustment
Arm Rest Adjustment Arm rest width adjustment - Deluxe model only. • Un-tighten bolts (B) Adjust the arm by either: pulling it outwards, away from the seat frame to expand the seat width or pushing it inwards towards the frame to narrow the seat width. •... -
Page 17: Applying / Releasing Brakes
Applying / Releasing Brakes Applying Brakes Depress lever (A) with your foot. To secure the chair in place you should suppress all the brakes fitted to the wheels on the base. Releasing Brakes To release the brakes you should flick the levers up using the top of your foot. -
Page 18: Lateral Support Positioning
Lateral Support Adjustment Lateral Support Width & Height • Using the 4mm Allen Key T bar supplied, turn bolts (A) 1/2 a turn anti-clockwise to release the lateral support. • Move the lateral support in, out, up or down until the required position has been achieved. •... -
Page 19: Pommel Positioning
Pommel Positioning Horizontal Positioning • Turn lever (A) anti-clockwise to adjust the height positioning of the pommel. (The pommel can be completely removed from the frame using this method and then re-inserted once the child is seated.) • Turn the lever clockwise to fix the pommel securely into place. Vertical Positioning •... -
Page 20: Footplate Adjustment
Footplate Adjustment Vertical position of footplate • Turn levers (A) anti-clockwise to adjust the vertical position. • Extended the footplate to suit the child and provide suitable support and comfort. • Re-tighten the levers to secure into place. Footplate angle •... -
Page 21: Seat Depth Adjustment
Seat Depth Adjustment • Turn bolts (A) anti-clockwise with the 5mm T bar Allen key provided. • Move the backrest forward or backwards until the required seat depth has been achieved. • Turn bolts (A) clockwise to tighten, ensure the bolts are secure and tight. Product Labelling •... -
Page 22: Cleaning & Care
• Check for signs of fatigue wears, replace parts that show signs of wear or repeatedly becoming loose. wear will occur and a thorough inspection is recommended. Fixtures Check arm pads and headrest, replace if worn. Points listed here are generic across the JCM range and do not apply to all products. -
Page 23: Servicing Via Approved Repairer
Who should carry out the service? It is stressed that only a JCM approved repairer or a person with competent training of a Class 1 medical device should carry out this work. -
Page 24: Service Record Log
This log is an important record of usage and care of the product. It is a primary tool in predicting the need for further service and maintenance. It should be completed each time an inspection, service or any other significant manipulation has taken place. JCM Seating Solutions Ltd. will require proof of service for any warranty claims or orders. -
Page 25: Warranty
When making a claim JCM reserve the right to inspect the product and all necessary documentation. Only valid for products purchased after 1st April 2006. Applies only to products exclusively manufactured by JCM. Important JCM Seating Solutions Ltd. will not be held responsible for any damage or injury caused by incorrect use of this product. -
Page 26: Inspecting & Reissuing Of Equipment
Inspecting & Reissuing of Equipment Most JCM Seating Solutions Ltd. products are individually assessed for a client prior to issue. They are handed over in a controlled way to ensure optimum fit and specification, checks are completed and any additional individual verbal instructions given. -
Page 27: Inspecting & Reissuing Of Equipment
Accessories Labelling Check all accessories carefully for damage Any labelling specific to the previous user and potential shortcomings which may should be removed and replaced with pose a risk to the user. labelling specific to the new user. Function Adjustment Ensure that all the functions of the chair Adjustment of the equipment to the are working correctly e.g. - Page 28 © 2016 JCM Seating all rights reserved. Q.A.90 (March 2016)
Need help?
Do you have a question about the Jupiter 2 and is the answer not in the manual?
Questions and answers