Mutsy igo Instruction Manual
Hide thumbs
Also See for igo:
- Instruction manual (76 pages) ,
- Instruction manual (44 pages) ,
- Instruction manual (21 pages)
Table of Contents
Advertisement
Available languages
Available languages
Quick Links
Advertisement
Table of Contents

Subscribe to Our Youtube Channel
Related Manuals for Mutsy igo


Summary of Contents for Mutsy igo
- Page 1 instruction manual...
- Page 6 click!
- Page 7 US I I n s t r u c t i o n m a n u a l M u t s y I g o M o d e d ` e m p l o i M u t s y I g o E S I M a n u a l d e i n s t r u c c i o n e s M u t s y I g o...
-
Page 8: Table Of Contents
Introduction p 03 Introducción p 19 Warnings p 03 Advertencias p 19 Guarantee p 04 Garantía p 20 Maintenance and points for attention p 05 Mantenimiento y puntos de atención p 21 Content of the box p 05 Contenido de la caja p 21 Summery of parts: Listado de piezas: correspondencia... -
Page 9: Introduction P
· WaRNING: Do not use the pram body are available for this product or if you with a mattress thicker than 25 mm / want to stay informed of new Mutsy 0,984 inch. Do not add an additional products then go to www.mutsy.com. -
Page 10: Guarantee P
Mutsy. out permission from the manufacturer · The Mutsy igo has been approved ac- · if the damage is not reported promptly cording to the aSTM F833-13b. (within 2 months) -
Page 11: Maintenance And Points For Attention
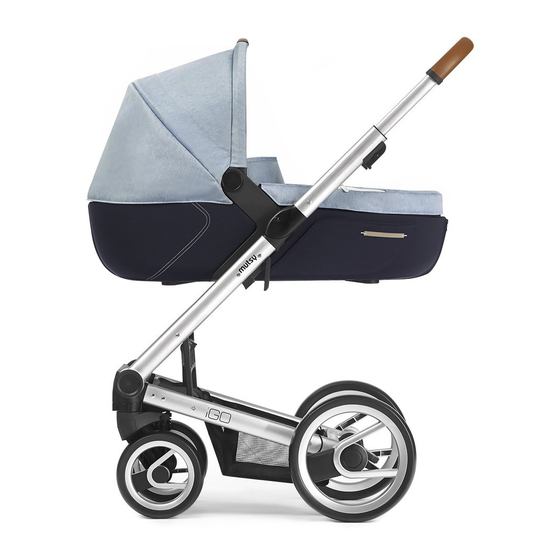
16. bumper bar washing machine or tumble dryer for 17. 5-point safety harness the cleaning. 18. hood · All Mutsy fabrics have been tested on 19. carry handle water resistance however if the pram Orientation gets really wet, the water can pen- etrate the inner and outer fabrics and ·... -
Page 12: The Brake
Pull elling wheels. the folding safeguard (c2) towards you on Pumping up the air tires (IGO accessory: both sides and turn the pushbar forwards rear wheels air tyre set) until the pushbar lies on the frame (c3). - Page 13 English ders of the pram body on wear and tear. baby from the pram body when using · Make sure that the frame has fully been the rain cover. unfolded and the brake blocked during The seat all actions indicated below. ·...
- Page 14 English tachment elements into the frame at- your child can sit up unassisted. tachment points at the same time. · To put the seat in the fully reclined po- · Check that the chair has been attached sition, put the leg rest in its highest po- properly by trying to lift it from the sition (t1) and the backrest of the seat frame.
-
Page 15: The Seat P
English · NB! The chassis cannot be folded with belt is positioned correctly over your the seat facing backwards! child and place both plastic clamps in the central part of the harness attached Unfolding the frame with the seat to the leg piece (x1). ·... - Page 16 English · Slide the adapters in the attachment attached properly by trying to lift it parts and press solidly until you hear from the frame. a click. Remove the Maxi-Cosi car seat from the Place the Maxi-Cosi car seat on the adapters adapters ·...
-
Page 17: Introduction P
Le poids maximum autorisé être informé des nouveaux produits de l’enfant est de 33 lbs (15 kg). Mutsy, visitez www.mutsy.com. · avERTISSEMENT : Le landau ne doit pas avERTISSEMENT être utilisé seul, mais uniquement en combinaison avec le châssis. -
Page 18: Garantie P
Mutsy. partie du corps de votre enfant ne · Le Mutsy IGO est conforme aux normes s’approche des éléments mobiles. aSTM F833-13b et SOR/85-379. · avERTISSEMENT : avant toute utilisation de la poussette, vérifiez le dépliage et... -
Page 19: Entretien Et Points Importants
· les dommages après une modification · Tous les tissus Mutsy ont été testés sur apportée au produit par le client et sans leur imperméabilité, mais par temps de autorisation du fabricant grande pluie, l’humidité... - Page 20 Tirez la sécurité de dépliage (c2) Pomper les pneus à air (accessoire Igo : vers vous sur les deux côtés et tournez kit de pneus à air roues arrière) le guidon vers l’avant jusqu’à...
-
Page 21: Le Frein
Français · Les pneus à air peuvent laisser des du châssis ne sont plus visibles. Véri- traces sur certaines surfaces. fiez la fixation de la nacelle en essayant de soulever la nacelle du châssis. Le frein (i) Retirer la nacelle (l) ·... - Page 22 Français trouve dans le sens de la marche, il replié quand le siège est orienté vers peut être plié/déplié en même temps l’arrière ! que le châssis et n’a donc pas besoin Retirer le siège de poussette (q) d’être retiré. ·...
- Page 23 Français jambes en position haute (t1) et le replié quand le siège est orienté vers dossier du siège dans la position la plus l’arrière ! inclinée possible (t2) Comment déplier le châssis avec le siège · Relâchez les deux boutons-pression sur chaque côté...
- Page 24 Français La ceinture de sécurité à 5 points (x1, x2) lbs., <29 in. (1.8-13.6 kg, <74cm). · Posez votre enfant dans le siège de · Observez toujours les consignes du poussette en vous assurant que les mode d’emploi de votre siège auto jambes de votre enfant se trouvent des Maxi-Cosi avant de l’utiliser.
-
Page 25: Introducción P
6 meses con un estar al día de los nuevos productos peso de hasta 33lbs (15 Kg). Mutsy, vaya a www.mutsy.com. · aDvERTENCIa: Si se usa un asiento para aDvERTENCIaS coche, tenga en cuenta el peso máximo permitido indicado en el producto co- ·... -
Page 26: Garantía P
Mutsy. · aDvERTENCIa: Después de desplegar el · El Mutsy Igo cuenta con la aprobación asiento, suba la barra de seguridad de las normativas aSTM F833-13b y hasta su posición normal antes de colo- SOR/85-379. -
Page 27: Mantenimiento Y Puntos De Atención
· por daños por un mal mantenimiento, · Todos los tejidos Mutsy han pasado descuido, o accidente. las pruebas de resistencia al agua, · si el daño es como consecuencia de... - Page 28 (c2) bajando ra de ambos laterales. la barra para empujar (c3) hasta que se Hinchado de neumáticos (accesorio Igo: desbloquee. Empuje la barra para em- juego de neumáticos para ruedas trase- pujar girándola hasta que esté sobre el ras) bastidor inferior.
-
Page 29: El Freno
Español la presión de aire deseada. La presión y presione el capazo hacia abajo hasta de aire en los neumáticos no debe su- que oiga un clic a ambos lados. perar nunca los 16 psi/1,1 bar. · Compruebe que ya no se vean las su- ·... - Page 30 Español Cómo sacar la silla de paseo (q) · Cuando la silla para el carrito está en la dirección hacia delante, se puede ple- · Deslice los botones de desbloqueo ha- gar y desplegar junto con el bastidor sin cia arriba hasta que se oiga un clic a tener que sacarla antes.
- Page 31 Español respaldo inclinado al máximo (t2). trro (a1) y tira del bastidor superior · Suelte los botones automáticos a cada hasta que el inferior se coloque en su lado del asiento (t3). Abra la cremalle- sitio, haciendo clic (a2) y tira de la ba- ra alrededor del reposapiernas (t4).
- Page 32 Español · Procure que la correa de cadera y hom- dor esté totalmente desplegado y el fre- bros esté bien colocada sobre su hijo e no bloqueado. introduzca ambas piezas de encarte de Cómo colocar los adaptadores Maxi-Cosi tela de la pieza central del cinturón a la en el bastidor (y) pieza de la entrepierna (x1).
- Page 34 Mutsy USA Inc. 391 Lafayette Street Newark, NJ 07105 T 877-546-9230 E usa@mutsy.nl...
Need help?
Do you have a question about the igo and is the answer not in the manual?
Questions and answers