
Related Manuals for Medion life p43028


Summary of Contents for Medion life p43028
- Page 1 12.0 MP Design Digital Camera MEDION LIFE ® ® P43028 (MD 86908) Instruction Manual...
-
Page 2: Overview Of The Appliance
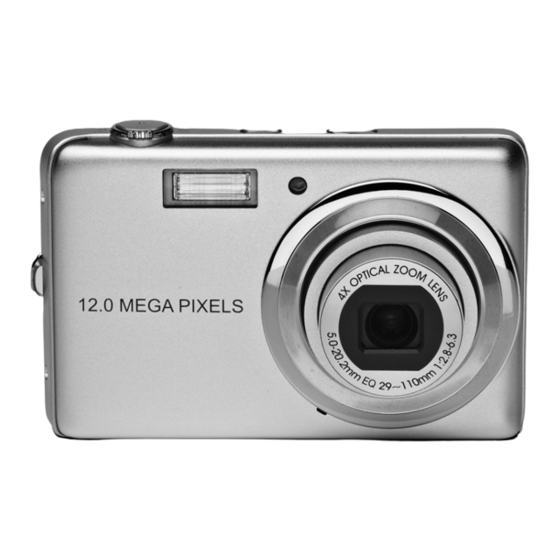
Overview of the appliance Front 1. Flash 2. Display for the automatic release light Flashing: Automatic release switched on 3. Camera lens with a lens barrel 4. Microphone... - Page 3 Rear 5. LC display 6. Operating LED 7. Mode switch 8. SET button / navigation buttons In the Recording mode: Face tracking on / off In the Replay mode: Start/pause playback In the Photo Replay Turns the photo by 90° mode: each time In the menu...
- Page 4 In the Replay mode: Fade OSD information in / out, DISPLAY legend In the Photo Replay Fade OSD information mode: in / out, DISPLAY legend In the menu Go downwards in the menus / sub-menus In the Recording mode: Select the type of flash In the Replay mode: Display the next recording...
- Page 5 : Recycle bin function : Menu button: call up the menu 11. Image stabiliser 12. Zoom rocker button: ; Enlarge or reduce the selection 13. Release button Press it briefly: Establish the focussing range 14. Switch the camera on or off...
- Page 6 Base 15. Battery / SD card compartment cover 16. Mini - USB connection 17. Tripod holder 18. Loudspeaker Side 19. Eye for the carrying loop...
-
Page 7: Table Of Contents
Contents Overview of the appliance ..............1 Contents .................... 6 Safety instructions ................9 Start of operation ................15 Included the box ................15 Charging batteries in the charging device ........16 Inserting the battery ..............18 ... - Page 8 Recording audio clips ..............38 Using the Functions menu ............39 Using the Recording menu ............48 Viewing/seeing recordings ............... 49 Replaying recordings individually ..........49 Replaying recordings as miniatures ..........50 Calendar mode ................50 ...
- Page 9 Memory capacity ................88 Troubleshooting ................89 Maintenance and care ..............92 Disposal ................... 93 Technical specifications ..............94...
-
Page 10: Safety Instructions
Safety instructions About these instructions Read the safety instructions carefully before use. Note the warnings on the appliance and in the operating instructions. Keep the Operating Instructions always within reach. Also pass on these Instructions and the guarantee card under all circumstances if you sell or pass on the device. - Page 11 Dismantling the device could lead to an electric shock. Tests on internal components, modifications and repairs should be carried out by specialists only. Please take the product to an authorised service centre for checks. Separate the battery charging device from the electricity supply if it is not being used.
- Page 12 ATTENTION! There will be the danger of explosion in the case of the improper replacement of the batteries. Only replace the battery by the same or an equivalent type. Check that the contacts in the device and on the battery are clean and clean them if necessary, before inserting the battery.
- Page 13 Precautionary measures Pay attention to the following precautionary measures to avoid damage to your camera and to keep it always in a perfect state: Store it in a dry place This camera is not watertight and will not function faultlessly for this reason, if it is submerged in water or if liquids reach the inside of the camera.
- Page 14 reverse, quickly. Wait to bring the camera into operation until the temperature of the device has adjusted to the surrounding temperature. The use of a transport or plastic bag offers limited protection against fluctuations in temperature. Do not drop the device Strong shocks or vibrations caused during falling can cause malfunctions.
- Page 15 memory card. Otherwise, the memory card may become unstable. Memory cards can become warm during use. Always remove the memory card from the camera carefully. At low temperatures, the capacity of the battery can drop significantly due to the reduced speed of the chemical reactions.
-
Page 16: Start Of Operation
Start of operation Included the box Please check your purchase to ensure all items are included and contact us within 14 days of purchase if any of the following components are missing: You will have received the following with the product that you have acquired: ... -
Page 17: Charging Batteries In The Charging Device
Charging batteries in the charging device You will only be able to charge the lithium-ion battery supplied with the device in the battery charging device supplied. CAUTION! Never try to recharge non-rechargeable batteries. Danger of explosion! Only use the battery charging device supplied with the device to charge the battery. - Page 18 Push the cover supplied with the device onto the charging tray as shown. Plug the charging tray into a 230 V ~ 50 Hz socket. The charging light will shine orange. The charging time is approx. two hours. The charging light will shine green, when the battery has been completely charged.
-
Page 19: Inserting The Battery
Inserting the battery The lithium-ion battery supplied with the camera is necessary to operate it. Switch the camera off. Push the closure of the battery compartment in the direction of the arrow. The battery compartment will open. Push the battery into the battery compartment so that the contacts of the battery lie at the contacts in the battery compartment. -
Page 20: Inserting And Removing Sd Cards
Inserting and removing SD cards The recordings will be stored in the internal memory if no card has been inserted. Please pay attention to the fact that the internal memory is limited. Use an SD memory card to increase the memory capacity for this reason. - Page 21 Press the card downwards briefly, to unlock it, in order to remove it. The card will be pushed out slightly and can be removed. Attaching the hand loop Attach the hand loop for better handling of the camera and for safety reasons.
-
Page 22: First Steps
First Steps Switching on the camera Press the ON/OFF button for 1 to 2 seconds to turn on the camera. The lens will move out, the operating display will shine green and the display will switch on. The camera will be in the Recording mode. Check that the battery is inserted correctly and that it is charged, if the camera does not switch on. - Page 23 Setting the language Select the entry for ‘Language’ in the ‘Settings’ menu with the or the button and press The Speech Selection menu will open. Select the required language with and press Setting the date and the time ...
- Page 24 The date and the time can only be displayed by the camera in the Replay mode. This information will not be printed. The Time setting will remain stored by the internal battery. However, it will be lost if the battery is removed from the camera for more than 48 hours.
-
Page 25: The Recording And Replay Modes
The Recording and Replay modes The Recording mode is active after the camera has been switched on; you will be able to take photos directly. You will also be able to take audio and video clips. You will be able to replay, process and delete photos, audio and video clips in the Replay mode. -
Page 26: Display Outputs
Display outputs Display outputs for the recording The following display outputs are possible in the Recording mode: 1. You can set different types of 5. Recordings still available (at recording ( button); the the current resolution) current type of recording will 6. - Page 27 9. Automatic exposure switched 18. Warning information: Danger of blurring! 10. Image stabiliser switched on 19. Macro setting 11. Shows the saturation 20. Exposure setting 12. Shows the contrast 21. Face recognition 13. Bar chart 22. White balance 14. Setting 23.
-
Page 28: Display Outputs For The Replay Of Photos
Display outputs for the replay of photos The following display outputs are possible in the Replay mode: 1. Display of the mode 7. Memory location (internal (Recording or Replay) memory IN or card) 2. The photo is protected 8. Information about the 3. -
Page 29: Display Outputs For The Replay Of Videos
Display outputs for the replay of videos The following display outputs are possible in the Replay mode for video clips: 1. Display of the mode 8. Information about the (Recording or Replay) recording 2. The video is protected 9. Resolution 3. -
Page 30: Display Outputs For The Replay Of Sound
Display outputs for the replay of sound The following display outputs are possible for sound recordings in the Replay mode: 1. Display of the mode 7. Information about the (Recording or Replay) recording (date and time) 2. The image is protected 8. -
Page 31: Switching Display Outputs On And Off
Switching display outputs on and off You can switch the display on and off, and change them, by pressing DISP button repeatedly. In the Recording mode With the most important With all displays displays With image division lines for Without displays the easier division of the image The screen outputs can vary according to the Recording mode. - Page 32 In the Replay mode Without displays With all displays With the most important displays The display outputs cannot be changed: During the recording and replay of audio and video clips; While a slide show or miniature images are displayed; ...
-
Page 33: Making The First Recordings
Making the first recordings Setting the Recording mode The Recording mode is active automatically when the camera is Auto switched on. , for the automatic Recording mode, will appear above left in the display in the basic status. You will find more about the Recording mode and the symbols on Page 59. -
Page 34: Taking A Photo
Taking a photo Press the Release button down slightly initially, when you see the image on the display. The yellow image cut-out signs will appear red and the operating display will flash, if the auto focus cannot focus. The values for the shutter speed, the aperture and the ISO value, if an ISO value has been set, will appear. - Page 35 Using the stabiliser The stabilizer enables better recordings in poor light conditions; the risk of blurred recordings is reduced. Press the Image Stabiliser button Using flash If the light is insufficient to taking a photo the integrated flash will provide the required extra light.
- Page 36 Do not flash people and animals from a close position. Maintain at least 1 metre distance. Zoom – enlarge or reduce in size The camera has an optical and a digital zoom. The optical zoom is reached by setting the lens; the digital zoom is activated through the Settings menu.
- Page 37 The enlarged image section is enlarged by interpolation in the case of the digital zoom; the picture quality can suffer somewhat because of this. Setting the Focussing mode You can define the type of focussing when you are recording a photo or a video, with this function.
-
Page 38: Making Video Clips
Making video clips Push the Mode Selection switch to the position. Press the Release button to start the recording. The recording time will appear in the display. You will be able to change the picture sections with the –... -
Page 39: Recording Audio Clips
Recording audio clips The microphone is located on the front of the camera, on the left below the lens. Make sure that you do not touch the microphone during a recording. Select the Speech Recording entry under the ‘Recording mode’ setting in the ‘Recording menu’. -
Page 40: Using The Functions Menu
Using the Functions menu The Functions menu enables the significant settings for a recording to be made quickly. The available functions for setting the camera will be shown on the left menu strip. The possible settings of the respective function will be shown in the lower bar. - Page 41 My mode The five most recently used Recording modes will be listed here. Each Recording mode has different setting options. The setting options will change accordingly if you change the Recording mode with the or the button. Resolution - photos The resolution significantly determines the quality of the photo.
- Page 42 Quality You will determine the compression of the data recorded with the quality. The higher the quality, the more memory space the recordings will need. Setting Explanation Superfine Highest quality. Fine Medium quality. Standard Normal quality. Exposure correction (EV) By correcting the exposure values (EV, exposure value) you can adjust pictures that are too dark or too light.
- Page 43 White balance The white balance can correct certain light conditions. Setting Explanation Automatic The white balance will be white balance adjusted automatically. Suitable for recordings in light Daylight daylight. Suitable for recordings in the Cloudy case of a cloudy sky, twilight or shadow.
- Page 44 Setting Explanation object, under the light conditions for which you want to set a white balance, and take a sample photo, to find the correct setting. The left image will show the previous white balance, the centre one will show the actually selected white balance and the right image will show the next possible white balance.
- Page 45 ISO (Light sensitivity) This setting changes the light sensitivity in accordance with the brightness of the photo subject. A higher value will reduce the sharpness of the picture. A lower value will lead to clearer pictures in good light conditions. Setting Explanation Automatic...
- Page 46 Light measuring procedure You can determine the area in which the light measurement for the photo or video recording should take place with this function. Setting Explanation Selects an exposure on the basis Several of the measured results at several points in the recording area.
- Page 47 Colour effects You can use the photo effects to give recordings different tones or artistic effects in the Recording and Replay modes. Setting Explanation Standard No photo effect set. Lifelike The picture will be presented with higher colour and saturation to emphasize the bright colours. Sepia The picture will be presented in nostalgic brown shades.
- Page 48 Video size (resolution - videos) The Video Size setting is only available for the recording of video clips. Setting Size in Picture quality pixels 1280 x 720 HDTV (only possible with Class 6 SDHC cards) 640 x 480 High quality 320 x 240 Standard 640 x 480...
-
Page 49: Using The Recording Menu
Using the Recording menu You can also select the settings for recordings through the Recording menu. You can take more precise information about navigation in the menus and the different settings from the ‘The Recording menu’. -
Page 50: Viewing/Seeing Recordings
Viewing/seeing recordings Replaying recordings individually You can replay the recordings made most recently one after the other in the Replay mode. Push the Mode Selection switch to , to activate the Replay mode. The most recently made recording will appear on the display; the following outputs are possible according to the type: Photo Video... -
Page 51: Replaying Recordings As Miniatures
Replaying recordings as miniatures Press the Zoom button in the direction in the Replay mode, to display up to nine small preview images. You can select a required file with the or the , the direction button. Press the button to display the recording as a full image. - Page 52 Press the button to display the recording as a full image. Press the Zoom button in the direction, to leave the Calendar mode. Zooming in photos You can view individual image sections in the case of photo recordings. ...
-
Page 53: Replaying Video / Audio Clips / Speech Notes
Replaying video / audio clips / speech notes Select the required recording. Press the SET button, to start the replay. Press the or the button during the replay of video clips, to start a fast forward or rewind. ... -
Page 54: Deleting Photos
Deleting photos You can delete photos in the Replay mode or through the Replay menu (see Page 69). You will delete a single recording most quickly with the button in the Replay mode. Select the recording in the Replay mode and press the button. -
Page 55: The Menus
The menus Navigating in the menus Push the Mode Selection switch to the position, if you wish to open the Replay menu. Press the button, to open the menus. Select the setting that you wish to change with the or the direction button. -
Page 56: The Recording Menu
The Recording menu Setting Explanation Recording mode You can select the different Recording modes here. Type of operation You can set the automatic release or select the picture sequence here. 10 sec. – The photo will be taken 10 seconds after the Release button has been pressed. - Page 57 Setting Explanation Sequence (photo sequence) – The camera will take a series of photos as long as you press the Release button down in the case of this setting. Fast series – The camera will take a series of 30 photos in the case of this setting.
- Page 58 Setting Explanation AF light You can set the AF light to automatic operation or to manual operation here. Definition You can make the details of a photo appear sharper or softer here. High – Marks out the photo sharply. Normal – Normal photo sharpness Low –...
- Page 59 Setting Explanation Contrast You can select the contrast here. High – Increases the contrast Normal – Normal contrast Low – Reduces the contrast Digital zoom You can select the digital zoom for some types of operation here. Intellig. zoom – Enlarges and optimizes the photo digitally Standard zoom –...
-
Page 60: Recording Mode
Recording mode You can use the pre-set Recording modes for particular recording situations or subjects. You will save a manual setting through this. The selected mode (with the exception of the Speech Recording mode) will be added at the front position in the Function menu in ‘My Mode’, after you have made your selection. - Page 61 Symbol Setting Explanation Adjusted scene The camera analyzes the recording conditions and switches to the suitable Scenic mode automatically. Portrait Sets the background as less sharp and focuses on the centre. Scenery Suitable for wide sections of landscape. Sunset Strengthens the red tone to record sunsets.
- Page 62 Symbol Setting Explanation Sport Suitable for creating photos in the case of fast movements. Party Suitable for internal photos and parties. Candlelight Creates photos in warm light. Night scene Suitable for portrait photos with a dark portrait background. Skin tones, soft Creates photos with soft transitions and pastel colours.
- Page 63 Symbol Setting Explanation Greenery This function reinforces the colour saturation of green tones. Auction Optimizes the photos for reproduction on Internet platforms (auctions), e. g. VGA resolution (see Page 86). Four different samples can be selected. Capture smiles Uses face recognition to capture a smiling face automatically.
- Page 64 Symbol Setting Explanation Romantic portrait This function uses face recognition to record faces automatically, to create portrait photos without outside support in this way. Auto Focus will be activated automatically if more that two faces are discerned. The camera will start the countdown and will take the photo after the expiry of two seconds.
- Page 65 Symbol Setting Explanation Shutter setting You can establish the shutter speed with this function. Manual exposure You can set the shutter speed and the aperture value with this function. Speech recording Record an audio clip.
- Page 66 Using the Capture Smiles mode The ‘Capture Smiles’ mode will take photos automatically as soon as it discerns a smile. You will activate the ‘Capture Smiles’ mode in this way Select the function in the Recording mode. Focus the camera on the subject. ...
-
Page 67: The Settings Menu
The Settings menu Setting Explanation Sounds You can switch the starting sound off or choose between 3 sounds, switch on the signal sound and sound at release, and set the volume for all sounds here. SAVE ELECTRICTY Save electricity The camera will switch off automatically after the selected time, to save the battery charge. - Page 68 Setting Explanation Date / time You can set the date and the time and select the display format here (see Page 22). Language You can select the language of the menu here (see Page 22). File numbering File numbering You can set the numbering of the files here.
- Page 69 Setting Explanation LCD brightness You can set the brightness of the display here. Bright: The display is brightened Normal: Standard brightness Memory aid You can organize the data on the internal memory here. Format: Formats the current memory, i.e. the memory card or the internal memory. All recordings will be deleted during this.
-
Page 70: The Replay Menu
The Replay menu Setting Explanation Slide show You can have the picture recordings (only photos) run as a slide show (see Page 74). Delete You can delete files no longer needed on the internal memory or the memory card with this function (see Page 75). - Page 71 Setting Explanation Red-eye You can correct photos that have not been correction taken with pre-flash here (see Page 76). You will be able to save the corrected file under a new name or to overwrite the original file. Speech note You can save a speech note for each photo taken (see Page 77)
- Page 72 Setting Explanation Change the size You can reduce the resolution of photos and reduce the size of the file through this (see Page 80). You can save the adjusted file under a new name or overwrite the original file. The resolution of photos in VGA cannot be changed.
- Page 73 Setting Explanation DPOF DPOF stands for Digital Print Order Format. You will be able to establish the printer settings for photos here, if you want to have the photos printed by a photographic studio or a DPOF- compatible printer. You will be able to print the photos directly with a DPOF-compatible printer, without transferring them to a computer in advance.
- Page 74 Setting Explanation Radial soft-focus The radial soft-focus lens is an effect that traces lens out the centre of the photo indistinctly. You will select the soft-focus stage with the or the button. Press to save the photo.
- Page 75 Show a slide show You can have the photos run as a slide show. Select the ‘Slide show’ entry in the Replay menu. The Slide show menu will open. The following settings are available: Select the interval at which the photos should be faded in (1, 3, 5 or 10 seconds).
- Page 76 Protect / unlock or delete an individual file Select ‘Delete’ or ‘Protect’ singly in the sub-menu; the photos will be shown singly on the display. Select a photo with the or the button. Select ‘Protect’ / ‘Unlock’ or ‘Delete’, as soon as the required file is shown on the screen.
- Page 77 Protect / unlock or delete all files Select ‘Protect all?’/ ‘Unlock all’ or ‘Delete all’ in the ‘Delete’ or ‘Protect’ sub-menu. A confirmation message will appear. Select ‘Yes’. You will protect, unlock or delete all files by pressing button.
- Page 78 Overwrite: The new file will be saved by overwriting the old one. Save under: The new file will be saved as a new file. Terminate: The function will be terminated. Press the button to save or terminate the changes. Recording a speech note ...
- Page 79 Colour mode The following effects are available: Symbol Setting Explanation Standard No photo effect will be added. Sepia The photo will be presented in nostalgic shades of brown. Black/white The photo will be presented in black and white. Negative The photo will be presented in reverse tone values.
- Page 80 The respective effect will be used on the photo preview and displayed accordingly. Press the button to store the new file. Adjusting a photo Enlarged photo 4-way display Adjusted size The approximate position of the area to be adjusted Photo area ...
- Page 81 Select between: Overwrite: The new file will be saved by overwriting the old file. Save under: The new file will be saved under a different name, without replacing the old file. Terminate: The function will be terminated. Press the button to save / terminate the changes.
-
Page 82: Connection To A Tv Or Pc
Connection to a TV or PC Displaying recordings on a television device You can replay the recordings of the camera on a television device. Switch the camera and the television device off. Connect the TV cable supplied with the camera to the USB connection of the camera and the video input (yellow) and audio input (white) of the television... -
Page 83: Printing Photos On A Photoprinter
Printing photos on a photoprinter You will be able to print your photos directly through a PictBridge- compatible photoprinter by means of PictBridge. Connect the printer and the camera with the USB cable supplied with the camera. Switch the camera and the photoprinter The camera will discern that a USB device has been connected. -
Page 84: Transferring Data To A Computer
Transferring data to a Computer You will be able to transfer the recordings to a computer. Supported operating systems: Windows XP Windows Vista Windows 7 Using the USB cable Switch the camera off. Connect the USB cable supplied with the camera to the USB connection of the camera and a USB connection on the computer, when the computer is switched on. -
Page 85: Dcf Memory Standard
Double-click on the Media symbol for the camera. Navigate to the ‘DCIM’ directory and to the directory contained in it, if necessary, to display the files (*.jpg = photos; *.avi = sound recordings; *.wav = video recordings). Compare also the directory structure in the memory. -
Page 86: Card Drive
Card drive You will, of course, also be able to copy the recordings to the PC through a card drive, if the PC has such a drive or a card reading device has been connected and if you have saved the recordings on the memory card A card reader will also be... -
Page 87: The Directory Structure In The Memory
The directory structure in the memory The camera will save the photos, videos and audio files on the internal memory or the memory card in three different directories. The following directories will be set up automatically: DICAM .: All the photos, videos and audio files recorded will be saved in this directory. -
Page 88: Installing The Software
numbering’ entry in the ‘Settings’ menu. The file numbering will start again at 0001 in the DSCI1000 directory. Do not attempt to change the directories and files in the directory structure of the camera (rename, etc.). You can destroy the files through this. -
Page 89: Memory Capacity
Memory capacity Size of the memory card 1 GB 2 GB 12 M 1250 1041 2083 1223 2466 4778 9557 The Table gives the number of photos at a selected resolution (e.g. 5 M) that you can save on a memory card with the given size (e.g. 128 MB). -
Page 90: Troubleshooting
Troubleshooting Check the following points if the camera does not function perfectly. Please contact the MEDION Service if the problem remains. The camera will not switch on. The battery has been inserted incorrectly. The battery is empty. Charge it. - Page 91 The subject was outside the setting range of the camera. Use the Macro mode for close photos, if necessary. The image is not shown on the display. An SD card that has accepted photos in a non-DCF mode on another camera has been inserted.
- Page 92 The recordings cannot be transferred to the PC through the USB cable. The camera is not switched on. When the camera is connected to the computer for the first time, no new hardware is found The USB connection of the computer is deactivated in the BIOS. ...
-
Page 93: Maintenance And Care
Maintenance and care Clean the casing, the lens and the display as follows: Clean the camera casing with a soft, dry cloth. Do not use thinners or cleaning solutions that contain oil. This could damage the camera. Remove the dust first with a lens brush, to clean the lens or the display. -
Page 94: Disposal
Disposal Packaging Your camera is packaged to protect it from transportation damage. Packaging is raw material and can be reused or added to the recycling system Appliance Do not throw the device into the normal domestic waste at the end of its useful life under any circumstances. Dispose of it through a local collection point for old devices in an environmentally-friendly way. -
Page 95: Technical Specifications
Technical specifications Pixels: 12 CCD mega pixels Aperture: F = 2.8 ~ 6.3 Shutter speed: 1/2000 ~ 15 s Focal length: f = 5 mm ~ 20.2 mm Optical zoom: 4 times Digital zoom: 5 times LCD monitor: 2.7 " LC Display File format: JPEG (EXIF 2.2), DPOF, AVI, WAV Max.
Need help?
Do you have a question about the life p43028 and is the answer not in the manual?
Questions and answers