Table of Contents
Advertisement
Advertisement
Table of Contents

Summary of Contents for QUIPPLAN Q20
- Page 1 USER MANUAL BICYCLE SX0011.C...
- Page 2 Notes: Messages written in this format are recommendations, interesting information or useful data for a correct use of the bicycle. This manual is updated at the publishing moment. Quipplan keeps the right of modifying it without prior notice. This manual is for all models It is supposed that the user of this bicycle has a general and basic knowledge about the use of bicycles.
-
Page 3: Table Of Contents
CONTENT SAFETY INSTRUCTIONS PREVIOUS INSTRUCTIONS COMPONENTS DESCRIPTION TECHNOLOGIES TECHNICAL SPECIFICATIONS UNPACKING AND ASSEMBLING INSTRUCTIONS DECLARATION OF CONFORMITY QUICK GUIDE FOLDING CONTROL UNIT BATTERY CHARGER BRAKES TRANSMISSION CARE AND MAINTENANCE WARRANTY REVISSIONS SX0011.C SX0011.C... -
Page 4: Safety Instructions
4. Do not dismantle the battery, the motor, the control unit or any other component by yourself. If a component needs to be replaced, please contact your nearest dealer or contact us at www.quipplan-mobility.com. Do not remove the stamp of guarantee; otherwise, it will be cancelled. -
Page 5: Components Description
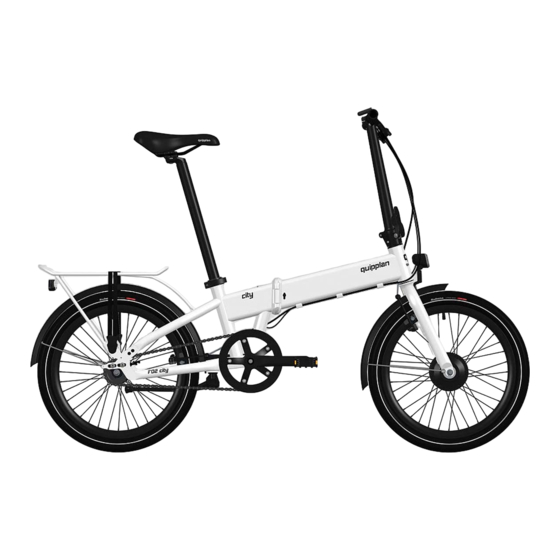
DESCRIPCIÓN DE COMPONENTES COMPONENT DESCRIPTION 16 18 19 1.- Frame 17.- Locker and folding mechanism (on the other side, not seen) 2.- Charging point 18.- Battery (built in the frame) 3.- Saddle 19.- Front wheel 4.- Seatpost 20.- Front wheel hub Motor 5.- Seatpost locker 21.- Fork 6.- Rear Wheel brake... - Page 6 TECNOLOGÍAS TECHNOLOGIES SX0011.C...
-
Page 7: Technologies
TECHNOLOGIES SX0011.C... -
Page 8: Technical Specifications
255 rpm Control System #1 integrated velocity sensor Control System #2 cadence sensor qiE36 IBS32 in bottom bracket * for a medium user in an urban mixed tour at a maximum level of assistance (3) minimum (1) (more info: www.quipplan-mobility.com) SX0011.C... -
Page 9: Unpacking And Assembling Instructions
(s/model). Place all the elements out of the box and verify there are all of them. In case there is something missing, please contact us at www.quipplan- mobility.com. UNPACKING The bicycle is correctly packed in order to protect it during the transport period. Please remove all those protective elements before assemble the bicycle. -
Page 10: Declaration Of Conformity
Registro Mercantil de Navarra, Tomo 1125, Folio 101, Hoja NA-22563, Inscripción 1ª, CIF B-31848179 declares that under our sole responsibility the products: Bicycle EPAC brand: quipplan, models: q20 ó q26 variants: F02 y F02 PLUS, F08 y F08 PLUS, F11 y F11 PLUS or R10 y R10 PLUS, homologated by SGS... -
Page 11: Quick Guide
DECLARACIÓN CE DE CONFORMIDAD QUICK GUIDE PREVIOUS SAFETY VERIFICATIONS 1.1. Verify the battery has an appropriate level of charge. 1.2. Verify that the brakes work properly. 1.3. Verify the correct pressure of the wheels. 1.4. Verify that all the locks from the folding mechanism are closed and blocked. 1.5. -
Page 12: Folding
PLEGADO CONTROL UNIT FOLDING FOLDING 1.1. Step 1: open the seatpost lock, introduce it completely in the frame and close the lock again. 1.2. Step 2: open the frame folding mechanism lock by lifting the internal plastic part. This part secures the lock and it To lift the piece, put the fingers on the piece and push. -
Page 13: Control Unit
PLEGADO CONTROL UNIT PANEL qiE36 LED (Models 1.1. Description of the panel and the buttons Button - Switching the assistance on and off (ON/OFF): - Rising the level of assistance between N0*, N1, N2 y N3 Button ( + ): - Switching the light son and off (pressed for 1 s) - Decreasing the level of... - Page 14 2.4. Support assistance (6 km/h) Once the panel i son, keep the button [ - ] pressed to activate this function. The screen will show the letters PUS. When this mode is on, the bicycle reaches 6 km/h. The support assistance function stops when the button [ - ] is pressed.
- Page 15 The panel shows 7 stages of battery level. When the indicator shows the 5 bars, the battery is full of charge. When the indicator shows any bar, then the battery has no charge. If the indicator flicks, then the level of charge is critic. 2.8.
- Page 16 The panel shows the size of wheel it is configured for in inches. With the buttons [ + ] and [ - ] , select between the following: 16 in, 18 in, 20 in, 22 in, 24 in, 26 in, 28 in and 700C Press the button [M] to sabe and go on or keep it pressed to sabe and escape.
-
Page 17: Battery
SAFETY INSTRUCTIONS Use only the battery qiE36 10.5 Ah Lithium Ion Battery approved by Quipplan in your bicycle Charge the battery only with the charger approved by . When it is not being used, disconnect the charger from the power point and from the battery. - Page 18 Throw the battery away following the local normatives about elimination of contaminating residues. If there is any query about its recycling, ask an official dealer or contact us at www.quipplan-mobility.com. Do not throw the battery away in the dustbin. Do not dismantle or grind the battery. If there are any leak in the battery, avoid the contact with the eyes or skin. If the...
-
Page 19: Charger
For your own safety and in order to avoid possible damages, please read these instructions carefully. The charger must only be used whith the qiE36 10.5 Ah Lithium Ion Battery approved by Quipplan and sent with the bicycle. Its use with other type of batterys might cause damages in the charger and even material and personal injuries. - Page 20 If the power supply cable or the power point makes noise, disconnect the cable from the power point and contact an official dealer. There might be risk of electrical shock. If you see that the charger is damaged, contact an official dealer or contact us at www.quipplan-mobility.com . For throwing it away, do never throw it into the dustbin Do not use a principal power point, a power supply cable or a power point when it is loose or damaged, as there is conflagration and electrical shock risk.
-
Page 21: Brakes
BRAKES INSTALATION AND ADJUSTMENT 1.1. Clean and engrease the pivots of instalation of the fork ad the braces. Install the spring system, the brake, the washer and the screw to each of the pivots (remove the plastic protector from the brakes first). Insert the tip of the spring in the central spof the three spaces. -
Page 22: Transmission
TRANSMISSION BRAKES The electrical bicycles have three different Transmissions Group, depending on the model of the bicycle: Models Transmission Group SRAM Automatix of two velocities integrated in the real wheel hub , activated by chain. The change of gear is made automatically, without activating any control. Modelss Transmission Group SHIMANO Nexus Inter8 of eight velocities integrated in the rear wheel hub, activated by jagged belt CARBON DRIVE from Gates. -
Page 23: Care And Maintenance
Then the wheel is fastened in its right position with the screws of the toe caps and using the recommended PAR. It is important to check that the wheel is settled centered. More details in www.quipplan- mobility.com. 1.4. - Page 24 Description Tightening torque 1.8.1. Bottom bracket 1.8.2. Crank 35-40 N·m 1.8.3. Pedals 25-35 N·m 1.8.4. Rear wheel nut 30-45 N·m 1.8.5. Front wheel nut 25-30 N·m 1.8.6. Saddle fixation screw 18-22 N·m 1.8.7. Leg fixation srew 18-22 N·m 1.8.8. Articulation extension stem screw 18-22 N·m 1.8.9.
-
Page 25: Warranty
The guarantee is applied only to the original owner; therefore, it is not transferable. 2.2. To be valid, it necessary to fill in the Guarantee Activation Register that can be found at www.quipplan- mobility.com. 2.3. To be valid, it is necessary to complete all the official revisions stipulated on the latest page of this manual. -
Page 26: Serial Number
The Serial Number is a unique and non-transferrable code. It is the number scheme that must be used to activate the guarantee in an official dealer or at www.quipplan-mobility.com. As the guarantee is activated, your q20 will be automatically covered by the guarantee q20+ but, aldo, you will have access to more additional services such as: Guarantee for your bicycle . -
Page 27: Revissions
REVISIONES Revisions must be done in official dealers or through our Customer Service at www.quipplan-mobility.com. REVISIONS: First revision @ 100 km Model: Serial No: Purchasing Date: Dealer/Garage: Date: In-Service Date: Revision @ 1000 km Revision @ 2000 km Date: Date:... - Page 28 Ctra. Madrid km 24 - 31350 Peralta (Navarra) www.mobility-quipplan.com | www.quipplan.com info@quipplan.com T. +34 948 025 300 F. +34 948 025 303...
Need help?
Do you have a question about the Q20 and is the answer not in the manual?
Questions and answers