Table of Contents
Advertisement
Quick Links
1
2
A
B
C
D
E
F
1
2
3
69 mm
3
4
5
版本
注:
尺寸 210x142.5mm
材质:70g书写纸
颜色:黑色
装订:共24P,骑马订
型
号
9480RM7239109A
设
计
温惠娟
罗中强/温海平
担当确认
鲍静芳
检
查
营业确认
叶红慧
胡知先
课室审核
莫宪贵
部门批准
惠州华阳通用电子有限公司
6
7
更改内容
:
材
质
2013-5-31
2013-5-31
加工工艺
2013-5-31
2013-5-31
物料编码
2013-5-31
127075005204
2013-5-31
RM7239109A,INSTRUCTION MANUAL
编码描述
6
7
8
日期
签名
A
B
C
D
E
数量
1
单位
mm
比例
1:1
F
规格
A4
页数
1 of 1
8
Advertisement
Table of Contents

Subscribe to Our Youtube Channel
Related Manuals for Domain DM-CR3138USB


Summary of Contents for Domain DM-CR3138USB
- Page 1 版本 更改内容 日期 签名 注: 尺寸 210x142.5mm 材质:70g书写纸 颜色:黑色 装订:共24P,骑马订 69 mm 型 号 材 质 9480RM7239109A 设 计 温惠娟 2013-5-31 罗中强/温海平 担当确认 2013-5-31 加工工艺 数量 鲍静芳 检 查 单位 2013-5-31 营业确认 叶红慧 比例 2013-5-31 胡知先 物料编码 课室审核 2013-5-31 127075005204 莫宪贵...
-
Page 2: Operation Instructions
MP3/MP4/MP5/USB/SD/MMC PLAYER WITH FM/AM TUNER DM-CR3138USB Operation Instructions... -
Page 3: Safety Precautions
Safety Precautions Never expose this unit, amplifier, and Thank you for purchasing this product. speakers to moisture or water for preventing P l e a s e r e a d t h r o u g h t h e s e o p e r a t i n g electric sparks or fires. -
Page 4: Table Of Contents
Contents Safety Precautions .........1 Features ............3 Panel Controls ..........4 Remote Controls..........5 Basic Operation ..........6 Rotary Knob Menu........7-8 Radio Mode ............9 USB/SD/MMC Mode....... 10-13 Device Connections........ 14-16 Installation Guide ........16-18 Anti-Theft System .........18 Troubleshooting ..........19 Specifications ..........20... -
Page 5: Features
Features WMA and MP3 Compatibility Button Operation Explanations Some frequent operations It is possible to playback WMA and MP3 files. 1) Move cursor About WMA The unit can playback WMA data. Windows Media and the Windows logo are trade marks or registered trademarks of Microsoft Corporation in the United States and/or other countries. -
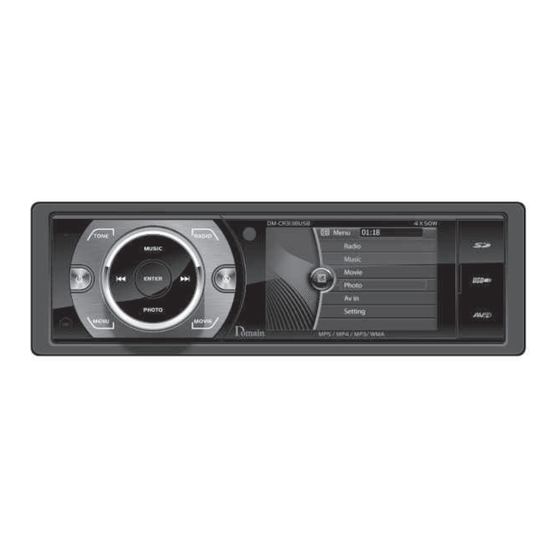
Page 6: Panel Controls
Panel Controls Power on/off: Press to turn on/off the unit. 1. Power on/off 13. - Search the previous station manually, and 2. Press to select Volume-BAS-TRE-BAL-FAD- each press to seek step by step (press EQ-LOUND, rotate the knob to adjust. briefly, in Radio mode). -
Page 7: Remote Controls
Remote Controls Remote Control Operating Range The remote control can operate within a distance of 3~5m. Replacing the lithium battery When the range of operation of the card remote control becomes short or no function, replace the lithium battery with a new one. Make sure the battery polarity replacement is correct. -
Page 8: Basic Operation
Basic Operation Turn on/off the Power 1. Press to turn on the unit. The unit goes back to the last status after power on. 2. Press more than two secnonds to power off. Mute Press the MUTE button to cut the sound. Note: Note: • When some devices are not ready, they... -
Page 9: Rotary Knob Menu
Rotary Knob Menu Each press the TONE button to change the AUDIO mode: Volume/BAS/TRE/BAL/FAD/ Display shows the BALANCE level. EQ/LOUD, rotate the knob to adjust level. BALANCE range: L07 (full left) to R07 (full right). Volume L = left speaker, R = right speaker. Display shows the volume level. -
Page 10: Rotary Knob Menu
Rotary Knob Menu LOUDNESS: ON/OFF Time Mode When listening to music at low volumes, this Rotate the knob on the panel or press feature will selectively boost certain bass and button to set hour and minute. treble frequencies. Each time you press the knob on the front panel or ENTER button on the remote control to select one segment of the clock display: Hour-Minute... -
Page 11: Radio Mode
Radio Mode Accessing Radio Mode Press the RADIO button on the front panel or remote control to switch to the Radio source. 1. Source Indicator 2. Time/Clock 3. Radio Station Frequency 4. AM/FM Band 5. EQ Indicator Selecting a Band Storing Stations Press RADIO once or more to select FM1- - Auto storing... -
Page 12: Usb/Sd/Mmc Mode
USB/SD/MMC Mode USB/SD/MMC Notes 1. Load SD/MMC Card USB functions (flash memory type) MP3 Open the cap, insert the SD/MMC card music play into the slot. The unit will play the music 1. SD/MMC card support automatically. 2. USB flash memory 2 in 1 (SD/MMC) support 3. - Page 13 USB/SD/MMC Mode Accessing USB/SD Card Mode To play files from an SD or USB that is already inserted, choose the SD or USB source. The playback screen is indicated below: 1. Source Indicator 2. Name of the Song Display 3. Audio/Video/Picture Folder 4.
- Page 14 USB/SD/MMC Mode For Video files Entering ID3 Tag 1. Press the MENU button on the panel or This unit supports ID3 tag version 2.0. remote control to display the home menu. For character codes, refer to the table to the 2.
- Page 15 USB/SD/MMC Mode Stop Playback MP3 Playing Order When selected for play, files and folders - During playback, press to pause (Folder Search, File Search or Folder Select) playback. are accessed in the order in which they were - The sound will be muted. written to the media.
-
Page 16: Device Connections
Device Connections Notes of connection If a proper fuse is installed and electrical problems still occur, please contact with • T o avoid short circuit in the electrical any professional car shops for inquiry. system, ensure that the negative battery • D O NOT connect other equipments with the cable is disconnected before installation. - Page 17 Device Connections Wiring Diagram...
-
Page 18: Installation Guide
Installation Guide Device Connections Preparation Using the ISO Connector 1. If your car is equipped with the ISO 1. Disconnect battery connector, then connect the ISO connectors Before you begin, always disconnect the as illustrated. battery negative terminal. 2. F o r c o n n e c t i o n s w i t h o u t t h e I S O connectors, check the wiring in the vehicle carefully before connecting, incorrect Note:... - Page 19 Installation Guide ISO Installation wiring diagram carefully and make certain all connections are secure and insulated This unit has threaded holes in the chassis with wire nuts or electrical tape. After side panels which may be used with the completing the wiring connections, turn the original factory mounting brackets of some unit on to confirm operation (vehicle ignition vehicles to mount the radio to the dashboard.
-
Page 20: Anti-Theft System
Anti-Theft System Installation Guide Reset This unit is equipped with a detachable panel. Panel can be detached and taken with you, helping to deter theft. Remove the panel 1. Press button to switch off the power of the unit. 2. Press button to flip down the panel. -
Page 21: Troubleshooting
Troubleshooting If you suspect something is wrong, immediately switch power off. Immediately stop using it and call the store where you purchased it. Never try to repair the unit by yourself because it is dangerous to do so. Problem Possible cause Solution General Car ignition is not on. -
Page 22: Specifications
Specifications General Power supply: 12VDC (11V-16V), Test voltage 14.4V, negative ground Maximum power output: 50W x 4 channels Continuous power output: 20W x 4 channels (4 10% T.H.D.) Suitable speaker impedance: 4-8ohm Pre-Amp output voltage: 2.0V (Play mode: 1KHz, 0dB, 10K load) Fuse: Dimensions (WxHxD):... - Page 23 P/N: 127075005204...
Need help?
Do you have a question about the DM-CR3138USB and is the answer not in the manual?
Questions and answers