
Related Manuals for LVI MagniLink Mira MLMIRA-AD19


Summary of Contents for LVI MagniLink Mira MLMIRA-AD19
- Page 1 User Manual MagniLink Mira LVI Low Vision International Verkstadsgatan 5 Tel: +46 470 – 727700 E-mail: info@lvi.se 352 46 Växjö SWEDEN Fax: +46 470 – 727725 Internet: www.lvi.se...
-
Page 2: Table Of Contents
CONTENTS GENERAL INFORMATION ..................4 SAFETY INFORMATION ..................5 UNPACKING ......................7 Packaging ......................... 7 Packing ........................7 INSTALLATION ......................8 THE WORK PLACE ....................9 FUNCTIONS ......................10 Features, camera unit .................... 11 Features, reading table ..................13 TROUBLESHOOTING ................... 14 Replacing the lamp .................... - Page 3 The information in this manual has been carefully checked and is believed to be accurate. However, LVI assumes no responsibility for any inaccuracies that may be contained in this manual. In no event will LVI be liable for direct, indirect, special, exemplary, incidental, or consequential damages resulting from any defect or omission in this manual.
-
Page 4: General Information
General information MagniLink Mira is a video magnifier designed for people with visual impairments. The video magnifier offers autofocus, full colour and several artificial colours. There are two versions in the MagniLink Mira family: • MLMIRA-AD19 comes with a 18,5” widescreen (16:9). •... -
Page 5: Safety Information
• If you are unable to restore normal operation by following the operation instructions, do not attempt any further adjustments. Unplug the set and call your dealer or service technician. Only use replacement parts specified by LVI. User Manual 7939408 | MagniLink Mira... - Page 6 • Moving the system from a cold to a warm place may cause condensation (water droplets) on its internal surfaces or on the lens. To avoid condensation, install the system in the room where it is to be used at least 30 minutes before use. Do not expose the system to sudden or extreme changes in temperature.
-
Page 7: Unpacking
• corrugated cardboard • cellular plastic (EPP) • polyethylene (LDPE4) LVI recommends the user to keep all packaging material, to be reused in case of future shipping. Inspect the package for exterior damages. Note that severe damages should be directed to the transport company. Open the box and place the units parts on a table. -
Page 8: Installation
Installation The unit comes fully assembled, the only thing needed is to connect the AC adapter (A), on the back of the camera unit. The device is then ready for use. The AC adapter produce heat and may therefore not be covered! 4.1 Setting the screen position The screen can be tilted forward / backward by holding on both sides of the screen and then tilt the the screen to the desired position . -
Page 9: The Work Place
5. The work place A comfortable work place around your MagniLink is important. It could be useful to keep the following in mind: • The chair should have a back rest • The seat of the chair should be of a height which does not make your legs become numb. -
Page 10: Functions
Functions Here follows an overview of the controls of MagniLink Mira. Next pages have more information, both for camera unit and reading table. User Manual 7939408 | MagniLink Mira... -
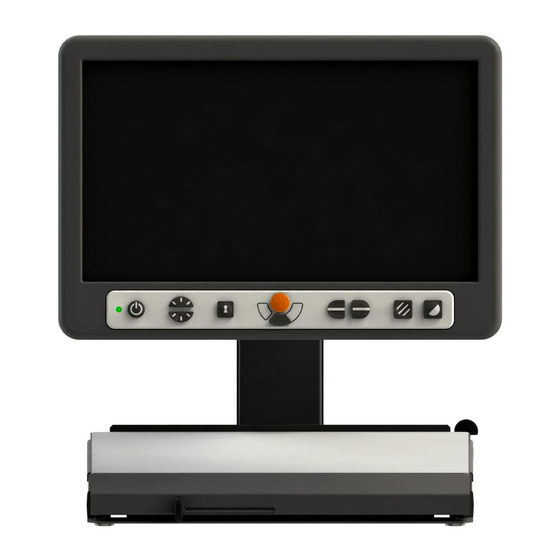
Page 11: Features, Camera Unit
Features, camera unit 1) On/off (standby) 2) Brightness control 3) Autofocus on/off 4) Magnification lever 5) Control for guiding line 6) Option 1: Button for colour picture mode Option 2: Exposure mode Manual/Automatic 7) Button for high contrast with artificial colours 8) Depth direction friction adjustment 9) Sideway direction friction adjustment 1) On/off (standby) - Page 12 6) Option 1: Button for colour picture mode When pushing the button it will show natural colours. Option 2: Exposure mode Manual/Automatic By pressing the button for three seconds, the camera switches from manual to automatic exposure. Pressing the button for another three seconds, switches the camera back to manual exposure.
-
Page 13: Features, Reading Table
Features, reading table 8) Dephtway brake It is used to set the depthway friction. With the brake in near end position, the reading table is unlocked. To increase friction, push the depthway brake towards the back. 9) Sideway brake Is used to set the sideway friction. With the brake in the left end position, the reading table is unbraked. -
Page 14: Troubleshooting
Troubleshooting If nothing happens when turning the system on, check that all connections are correct according to the section “Installation”. If the installation is properly done, turn off the equipment and contact an authorised service technician. Never remove the cover to repair the equipment. If the led on the unit is red, something is wrong with the equipment. -
Page 15: Technical Specifications
Technical specifications MagniLink Mira with 18.5” screen Magnification range 2,8 - 59 x Focusing distance 0 - 55 mm Luminance 300 cd/m² Contrast 1000 : 1 Lamp type Halogen 12V 20W 36° Free space distance 110-220 mm Refresh rate 60 Hz Mains voltage 100-240 V, 50-60Hz Power consumption... - Page 16 MagniLink Mira with 23” screen Magnification range 3,5 - 68 Focusing distance 0 - 55 mm Luminance / Contrast 300 cd/m² Lamp type Halogen 12V 20W 36° Free space distance 110-220 mm Refresh rate 60 Hz Mains voltage 100-240 V, 50-60Hz Power consumption 30 W Weight...
-
Page 17: Fcc Statement (Usa And Canada Only)
• which the receiver is connected. • Consult LVI or an experienced radio/TV technician for help. Caution to the user: The Federal Communications Commission warns the user that changes or modifications of the unit not expressly approved by the party responsible for compliance could void the user´s authority to... - Page 18 Reading Aid Type of equipment: MagniLink Brand name or trade mark: MLMIRA-AD19 Type designation: MLMIRA-AD23 Class 1. Product class: LVI Low Vision International AB Manufacturer: Verkstadsgatan 5 Address: S-352 46 Växjö Sweden Web: http://www.lvi.se +46 470 - 72 77 00...
Need help?
Do you have a question about the MagniLink Mira MLMIRA-AD19 and is the answer not in the manual?
Questions and answers