Table of Contents
Advertisement
Advertisement
Table of Contents

Related Manuals for Partner Tech International RP-800

Summary of Contents for Partner Tech International RP-800
- Page 2 Copyright All rights reserved. No part of this publication may be reproduced, transmitted, transcribed, stored in a retrieval system or translated into any language or computer language, in any form or by any means, electronic, mechanical, magnetic, optical, chemical, manual or otherwise, without our prior written permission.
-
Page 3: Table Of Contents
Table of Contents Read This First ..............4 Important Safety Instructions .............4 Symbols in the User Manual ...............6 Overview ................7 Package Contents ................7 Product Appearance ................8 Indicators and Buzzer ................11 Installation ................12 Connecting to a POS System .............12 Connecting the Power Supply Unit ...........13 Routing the Cables ................14 Powering On the Printer ..............15 Opening the Roll Paper Cover ............15... -
Page 4: Read This First
Read This First Please read the following important safety instructions carefully before using this thermal printer. Failure to observe these instructions may result in personal injuries or damages to this printer. Important Safety Instructions Do not place this printer under direct sunlight or near heat sources, such as in a closed car under sunlight or near a stove. - Page 5 Do not use an unknown power adapter other than the one supplied with this printer. Connecting this printer to an unknown power adapter is very dangerous and may lead to fire or explosion. Do not cut, bend, modify, place heavy objects, or step on the cable of the power adapter.
-
Page 6: Symbols In The User Manual
Symbols in the User Manual Make sure you have read all the notes and warnings mentioned in this User Manual. NOTE: Useful tips or additional information that help you get better use of this printer. CAUTION: HOT!: Do not touch the surface as it can be extremely hot after printing. -
Page 7: Overview
Overview This printer is a point-of-sale (POS) receipt thermal printer. It offers fast printing for both text and graphics, best-in-class reliability, easy-to-use features and dual interfaces. User Manual Please read this carefully before using this printer. Package Contents Check the sales package for the following items. If any item is missing or damaged, contact your place of purchase immediately. -
Page 8: Product Appearance
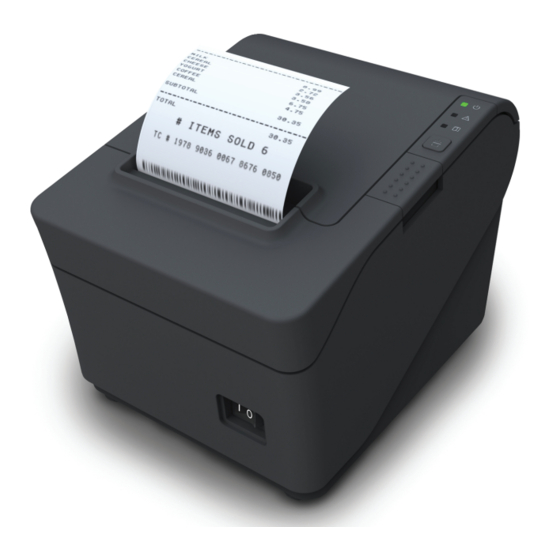
Product Appearance Front View Feed button Roll paper cover indicators ( ⍄ page 11) Cover release button Cutter cover Power switch Button/Switch Function Power on/off the printer. Power switch • I: ON • O: OFF Cover release button Open the roll paper cover. Feed button Feed paper manually. -
Page 9: Rear View
Rear View RJ11 connector Cable collector RS232 USB connector Interface card DC power socket Name Function RJ11 connector Connect the printer to a cash drawer. USB connector Connect the printer to a host computer. DC power socket Connect the power supply unit ( ⍄ page 13) Interface card Connect the printer to a host computer. -
Page 10: Bottom View
Bottom View Mounting holes (NOTE) NOTE: To mount the printer to a wall, aim the mounting holes towards the wall mounting screws on the wall , and hang the printer securely against the wall in the directions illustrated above . Make sure the wall mounting screws are inserted firmly into the mounting holes. -
Page 11: Indicators And Buzzer
Indicators and Buzzer Refer to the following table for the lighting patterns of the indicators, sound behaviors of the buzzer and the meanings they represent. Indicator Status Buzzer Meaning Steadily on N/A The printer is ready. The printer power is off. Power (green) Flashes... -
Page 12: Installation
Installation To get your thermal printer ready for use, complete the following installations step by step. Connecting to a POS System You can connect the printer to a POS system via the USB connector or the interface card. Connecting to a POS System... -
Page 13: Connecting The Power Supply Unit
Connecting the Power Supply Unit WARNING: Before connecting the printer to power, make sure the printer power is switched off and the power ( ⍄ page 15) cord is unplugged from the electric outlet. Failure to do so may result in damage to the power supply unit and the printer. RS232 Connect the female connector of the power cord to the power inlet of the AC adapter. -
Page 14: Routing The Cables
Routing the Cables After you have connected the power cord and other interface cables to the printer, you may need to route these cables properly for safety concerns. Cable collector RS232 Pass the power cord through the cable collector at the rear side of the printer. -
Page 15: Powering On The Printer
Powering On the Printer Flip the Power switch to the ON position. • I: ON • O: OFF Opening the Roll Paper Cover Press the Cover release button to open the roll paper cover. Powering On the Printer... -
Page 16: Installing The Roll Paper
Lift the cover with both hands. WARNING: Do not lift the cover with your fingers near the cutter as its sharp edge may injure your fingers. Installing the Roll Paper This printer can print roll paper with two different widths, 80 mm and 58 mm. - Page 17 Open the roll paper cover. If roll paper is placed inside, remove it from the printer. Place the 80 mm roll paper in the correct direction as illustrated below. 80 mm roll paper Installing the Roll Paper...
- Page 18 Pull out some paper to align it with the edge of the printer, and then close the cover. Installing the Roll Paper...
-
Page 19: Adjusting The Paper Level Sensor
Gently tear off the paper. WARNING: To avoid injuring your fingers, do not place your fingers near the cutter edge when tearing off the paper. Adjusting the Paper Level Sensor This printer contains a paper level sensor that detects the remaining amount of paper by measuring the diameter of the roll paper. - Page 20 Move the detection lever up or down to adjust the paper level sensor. Detection lever Position of the Remaining amount of paper detection lever (estimated outer diameter) Upper 27 mm Lower 24 mm Close the cover. Adjusting the Paper Level Sensor...
-
Page 21: Changing The Paper Width
Changing the Paper Width Open the roll paper cover. If roll paper is placed inside, remove it from the printer. As illustrated below, position the roll paper guide so that it matches the locations of the holes on the tray. Make sure the roll paper guide fully engages the matching holes. - Page 22 Place the 58 mm roll paper in the correct direction. 58 mm roll paper (optional) Changing the Paper Width...
- Page 23 Pull out some paper to align it with the edge of the printer, and then close the cover. Changing the Paper Width...
-
Page 24: Printing A Self-Test Page
Gently tear off the paper. WARNING: To avoid injuring your fingers, do not place your fingers near the cutter edge when tearing off the paper. Printing a Self-test Page The self-test page provides a report about printer status, printer information and status of optional accessories, and is useful when the printer needs service. -
Page 25: Troubleshooting
Troubleshooting None of the LED indicators are lit. • Check whether the power cord is connected firmly to the printer and the electric outlet. ( ⍄ page 13) • Check whether the Power switch is switched on. ( ⍄ page 15) The Error LED indicator lights on or flashes. Please examine the possible causes of errors below: • The roll paper cover is not closed. - Page 26 I want to remove the jammed paper. A cutter jam has occurred. Follow the instructions below carefully. WARNING: FOR YOUR SAFETY, ALWAYS SWITCH OFF THE PRINTER POWER BEFORE HANDLING THE CUTTER. Slightly push to detach the cutter cover from the printer , and then pull out the whole cover Printing a Self-test Page...
- Page 27 Flip the protective film , and turn the knob until the cutter blade returns to its normal position e . Cutter blade Install the cutter cover. Open the roll paper cover and remove the jammed paper. Close the roll paper cover. NOTE: The paper cover cannot be opened if the cutter blade fails to return to its normal position.
-
Page 28: Appendix
Appendix Cleaning the Printer Depending on the roll paper used and frequency of printer usage, paper dust may accumulate on the thermal print head and the roller. In order to maintain the best print quality, please clean the printer case, print head and roller regularly (about every 3 months, or whenever unwanted vertical/horizontal lines appear on the printed roll paper). - Page 29 Gently wipe over the surface of the thermal print head and the roller with the swab. Roller Thermal print head Close the roll paper cover after the solvents have dissipated. Cleaning the Printer Case Use a suitable dust blower to blow off the dust on the printer. Use a slightly dampened cloth to wipe off any smear on the surface of the printer.
-
Page 30: Specifications
Specifications NOTE: The following specifications are subject to change without prior notice. Item Specification Printing method Direct thermal 203 dpi (Support 180 dpi printing by Printing resolution software simulation) Paper loading Easy loading Printing speed 230 mm/s Printing width 72 mm/50.8 mm Roll paper width 79.5 ±...