Table of Contents
Advertisement
Advertisement
Table of Contents

Related Manuals for TRENDnet TEW-809UB


Summary of Contents for TRENDnet TEW-809UB
- Page 1 Cover Page TRENDnet User’s Guide...
-
Page 2: Table Of Contents
Connect to your wireless network using WPS ........7 Windows® OS......................... 7 WPS connection using the built in utility (Virtual Push Button) ........ 7 WPS connection using the hardware push button ........... 8 Mac® OS ........................10 © Copyright 2016 TRENDnet. All Rights Reserved. -
Page 3: Product Overview
Features Product Overview TRENDnet’s AC1900 High Power Dual Band Wireless USB Adapter, model TEW-809UB, upgrades a computer to Wireless AC1900. Quickly connect to a high performance Wireless AC network at 1300 Mbps or to a Wireless N network at 600 Mbps. A high power radio with detachable high gain antennas increase wireless coverage. -
Page 4: Product Hardware Features
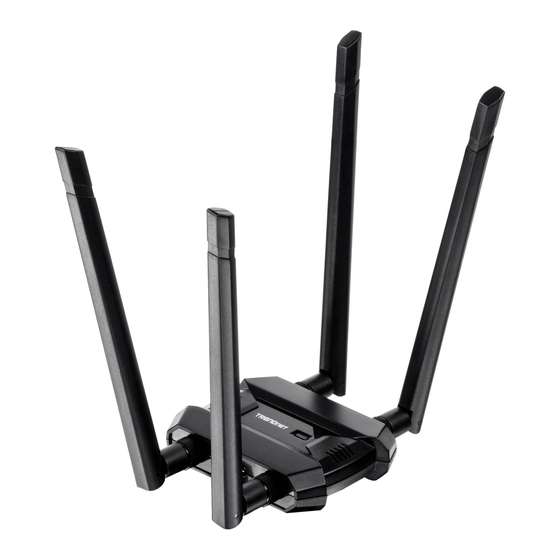
CD-ROM Drive (Driver Installation with included CD) Detachable / Note: If you do not have the included CD-ROM, you can download the utility Adjustable High and drivers from http://www.trendnet.com/support/. Gain Antennas Activity LED Indicator © Copyright 2016 TRENDnet. All Rights Reserved. -
Page 5: Application Diagram
N connectivity to a wireless AC/N network (router/access point) through the use of an available USB 3.0 port on your computer. The detachable high gain antenna allows for flexible adjustment to achieve the best possible wireless coverage and connectivity © Copyright 2016 TRENDnet. All Rights Reserved. -
Page 6: Installing Your Wireless Adapter
Windows® OS Installation Supported operating systems: Windows® 10, 8.1, 8, 7, Vista, XP For any updates, please check the TRENDnet website www.trendnet.com. 1. Insert the included CD-ROM into your computer’s CD-ROM drive. Note: If you do not have the included CD-ROM, you can download the utility and drivers from http://www.trendnet.com/support/. - Page 7 TRENDnet User’s Guide 3. At the installation window, click Next. 4. You will be prompted to accept the end user license agreement. Select I accept the terms of the license agreement and click Next. © Copyright 2016 TRENDnet. All Rights Reserved.
- Page 8 USB 3.0 type A side to the computer’s USB 3.0 port. Note: If you do not receive a security prompt, continue to the next step. If prompted, click Install this driver software anyway. 6. After the process is completed, click Finish. © Copyright 2016 TRENDnet. All Rights Reserved.
- Page 9 9. Attached to the adapter and position the antennas at opposite angles and slightly 10. Click on the wireless icon in the taskbar located in the bottom right corner. away from each other on each as shown for optimal coverage. © Copyright 2016 TRENDnet. All Rights Reserved.
- Page 10 12. Enter the WiFi Key (password) and click Next. 13. The status will display “Connected” to indicate a successful connection. Note: If the connected message does not display, double check your WiFi key (password) and re-enter it. © Copyright 2016 TRENDnet. All Rights Reserved.
-
Page 11: Mac® Os Installation
10.11, the folder will be named “Mac OS 10.6-10.11”. Supported operating systems: Mac® OS 10.6-10.11 For any updates, please check the TRENDnet website www.trendnet.com. 1. Insert the included CD-ROM into your computer’s CD-ROM drive. Note: If you do not have the included CD-ROM, you can download the utility and drivers from http://www.trendnet.com/support/... - Page 12 TEW-809UB TRENDnet User’s Guide 5. At the Introduction window, click Continue. 6. At the Read Me window, click Continue. © Copyright 2016 TRENDnet. All Rights Reserved.
- Page 13 TEW-809UB TRENDnet User’s Guide 7.At the License Agreement window, click Continue. 9.At the Install window, click Install. 8. When prompted, click Agree. © Copyright 2016 TRENDnet. All Rights Reserved.
- Page 14 10. When prompted, enter your Mac® user account password to authorize the install, 12. Once the installation is complete, you will be prompted to restart the computer. click Install Software. Click Restart to restart your computer. 11. When prompted, click Continue Installation. © Copyright 2016 TRENDnet. All Rights Reserved.
- Page 15 14. Attached to the adapter and position the antennas at opposite angles and slightly and the USB 3.0 type A side to the computer’s USB 3.0 port. away from each other on each as shown for optimal coverage. © Copyright 2016 TRENDnet. All Rights Reserved.
- Page 16 13. The wireless adapter icon will change to green WiFi bars to indicate a successful connection. Note: If the connected message does not display, double check your WiFi key (password) and re-enter it. © Copyright 2016 TRENDnet. All Rights Reserved.
-
Page 17: Connect To Your Wireless Network Using Wps
1. Click the WiFi icon in the system tray to scan for available wireless networks. 3. On your wireless router/access point, push the WPS button. Note: Typically, the WPS button hold time is 3-5 sec., then release. For TRENDnet routers/access points, the WPS hardware push button hold time is 3 seconds. If you are using another brand device, you may need to refer to your device documentation for WPS operation. -
Page 18: Wps Connection Using The Hardware Push Button
WPS connection using the hardware push button 1 On your wireless router/access point, push the WPS button. Note: Typically, the WPS button hold time is 3-5 sec., then release. For TRENDnet routers/access points, the WPS hardware push button hold time is 3 seconds. If you are using another brand device, you may need to refer to your device documentation for WPS operation. - Page 19 Note: If the WPS process fails, you will receive not receive a message “Connected”. You will need to attempt the WPS process again. Please refer to your wireless router/access point documentation regarding the operation of WPS. © Copyright 2016 TRENDnet. All Rights Reserved.
-
Page 20: Mac® Os
WPS connection using the built in utility (Virtual Push Button) 1 On your wireless router/access point, push the WPS button. Note: Typically, the WPS button hold time is 3-5 sec., then release. For TRENDnet routers/access points, the WPS hardware push button hold time is 3 seconds. If you are using another brand device, you may need to refer to your device documentation for WPS operation. -
Page 21: Wps Connection Using The Hardware Push Button
WPS process to complete. 1 On your wireless router/access point, push the WPS button. Note: Typically, the WPS button hold time is 3-5 sec., then release. For TRENDnet routers/access points, the WPS hardware push button hold time is 3 seconds. If you are using another brand device, you may need to refer to your device documentation for WPS operation. - Page 22 1. Click on the wireless adapter icon in the top menu bar. to enter the client PIN in your router’s configuration page. In TRENDnet routers, typically, the router configuration section to enter the PIN is under Advanced > Wireless 2.4GHz or 5GHz >...
- Page 23 Note: If the WPS process fails, you will receive not receive a message “Connected”. You may need to attempt the WPS process again. Please refer to your wireless router/access point documentation regarding the operation of WPS. © Copyright 2016 TRENDnet. All Rights Reserved.
-
Page 24: Technical Specifications
802.11ac: -84 dBm (typical) @ 1300 Mbps Explicit Beamforming Wireless Channels Quality of Service 2.4GHz: (FCC) 1-11, (ETSI) 1-13 5GHz: (FCC) 36, 40, 44, 48, 149, 153, 157, 161, 165, (ETSI) 36, 40, 44, 48 © Copyright 2016 TRENDnet. All Rights Reserved. - Page 25 1300Mbps, connect to a 1300 Mbps 802.11ac wireless router or access point. For maximum performance of up to 600Mbps, connect to a 600 Mbps 802.11n wireless router or access point. © Copyright 2016 TRENDnet. All Rights Reserved.
-
Page 26: Troubleshooting
2. Remove the adapter from the computer 1. Verify that the SSID (Network Name) matches your wireless router or access 3. Click the Windows / Start icon, click All Programs, click TRENDnet Wireless Utility point's SSID and then click Uninstall. -
Page 27: Appendix
Setting up wireless security is very important. Leaving your wireless network open and speeds under this encryption type however are limited to 54Mbps. unsecure could expose your entire network and personal files to outsiders. TRENDnet WPA-Auto: This setting provides the router with the ability to detect wireless recommends reading through this entire section and setting up wireless security on your devices using either WPA or WPA2 encryption. - Page 28 *Dependent on the maximum 802.11n data rate supported by the device (600Mbps) icon and click Properties. c. Click Internet Protocol Version (TCP/IPv4) and then click Properties. **Dependent on the maximum 802.11ac data rate supported by the device (1.3Gbps) © Copyright 2016 TRENDnet. All Rights Reserved.
- Page 29 Connect. 4. You may be prompted to enter a security key in order to connect to the network. 5. Enter in the security key corresponding to the wireless network, and click OK. © Copyright 2016 TRENDnet. All Rights Reserved.
- Page 30 Europe – EU Declaration of Conformity device, pursuant to part 15 of the FCC rules. These limits are designed to provide TRENDnet hereby declare that the product is in compliance with the essential requirements reasonable protection against harmful interference in a residential installation. This and other relevant provisions under our sole responsibility.
- Page 31 Limited Warranty TRENDnet User’s Guide TRENDnet tímto prohlašuje, že tento TEW-809UB je ve shodě se Con la presente TRENDnet dichiara che questo TEW-809UB è Česky [Czech] Italiano[Italian] základními požadavky a dalšími příslušnými ustanoveními conforme ai requisiti essenziali ed alle altre disposizioni pertinenti směrnice 2006/95/ES, 2014/35/EU, 2004/108/ES, 2014/30/EU,...
- Page 32 Slovensky a všetkypríslušnéustanoveniaSmernice 2006/95/ES, 2004/108/ES, [Slovak] 2014/35/EU, 2014/30/EU, 2011/65/EU, a REACH (ES) 1907/2006. TRENDnet vakuuttaa täten että TEW-809UB tyyppinen laite on Suomi [Finnish] direktiivin 2006/95/EY, 2014/35/EU, 2004/108/EY, 2014/30/EU, 2011/65/EU, ja REACH (EY) 1907/2006 oleellisten vaatimusten ja sitä koskevien direktiivin muiden ehtojen mukainen.
- Page 33 20 cm doit être maintenue entre l'antenne de cet appareil et toutes les personnes The device, for operation in the band 5150~5250Mhz is only for indoor use to reduce the potential for harmful interference to co-channel mobile satellite systems. © Copyright 2016 TRENDnet. All Rights Reserved.
- Page 34 An RMA number is required in order to initiate warranty service support the event that the RMA unit needs to be replaced, TRENDnet may replace it with a for all TRENDnet products. Products that are sent to TRENDnet for RMA service must refurbished product of the same or comparable model.
- Page 35 OF SUCH DAMAGES, AND LIMITS ITS LIABILITY TO REPAIR, REPLACEMENT, OR REFUND evidence of the original purchaser's date of purchase. Replacement products may be OF THE PURCHASE PRICE PAID, AT TRENDNET'S OPTION. THIS DISCLAIMER OF LIABILITY refurbished or contain refurbished materials. If TRENDnet, by its sole determination, is...
- Page 36 Limited Warranty TRENDnet User’s Guide...
Need help?
Do you have a question about the TEW-809UB and is the answer not in the manual?
Questions and answers