Table of Contents
Advertisement
Available languages
Available languages
Quick Links
ITEM #515975
12V LITHIUM-ION
RIGHT ANGLE
IMPACT DRIVER/
AUTO HAMMER
MODEL HHS1200
CHargE baTTEry bEfOrE fIrST uSE.
ATTACH YOUR RECEIPT HERE
Serial Number _____________________ Purchase Date ______________________
Questions, problems, missing parts? before returning to your retailer, call
our customer service department at 1-877-888-1880, 8:30 a.m.– 5 p.m., EST,
Monday– friday.
Advertisement
Chapters
Table of Contents

Related Manuals for Hammerhead SWITCH HHS1200


Summary of Contents for Hammerhead SWITCH HHS1200
- Page 1 ITEM #515975 12V LITHIUM-ION RIGHT ANGLE IMPACT DRIVER/ AUTO HAMMER MODEL HHS1200 CHargE baTTEry bEfOrE fIrST uSE. ATTACH YOUR RECEIPT HERE Serial Number _____________________ Purchase Date ______________________ Questions, problems, missing parts? before returning to your retailer, call our customer service department at 1-877-888-1880, 8:30 a.m.– 5 p.m., EST, Monday–...
-
Page 2: Table Of Contents
TAbLE Of CONTENTs Product Specifications ........... . 2 Safety Information . -
Page 3: Safety Information
Please read and understand this entire manual before attempting to assemble or operate this product. If you have any questions regarding the product, please call customer service at 1-888-HaMMErHEaD (1-877-888-1880), 8 a.m. - 8 p.m., EST, Monday – friday. WARNING • The operation of any power tool can result in foreign objects being thrown into your eyes,... - Page 4 sAfETY INfORMATION Know the Tool To operate this tool, carefully read this manual and all labels affixed to the impact driver/ auto hammer before using it. Keep this manual available for future reference. Some of the following symbols may be used on this tool. Please study them and their meaning.
- Page 5 sAfETY INfORMATION Electrical safety • Power tool plugs must match the outlet. Never modify the plug in any way. Do not use any adapter plugs with earthed (grounded) power tools. unmodified plugs and matching outlets will reduce risk of electric shock. •...
- Page 6 sAfETY INfORMATION • If devices are provided for the connection of dust extraction and collection facili- ties, ensure these are connected and properly used. use of dust devices can reduce dust-related hazards. Power Tool Use and Care • Do not force the power tool. Use the correct power tool for your application. The correct power tool will do the job better and more safely at the rate for which it was designed. • Do not use the power tool if the switch does not turn it on and off. any power tool that cannot be controlled with the switch is dangerous and must be repaired. • Disconnect the plug from the power source and/or the battery pack from the power tool before making any adjustments, changing accessories, or storing power tools.
-
Page 7: Preparation
sAfETY INfORMATION battery Tool Use and Care • Recharge only with the charger specified by the manufacturer. a charger that is suitable for one type of battery pack may create a risk of fire when used with another battery pack. • Under abusive conditions, liquid may be ejected from the battery; avoid contact. If contact accidentally occurs, flush with water. If liquid contact eyes, additionally seek medical help. -
Page 8: Package Contents
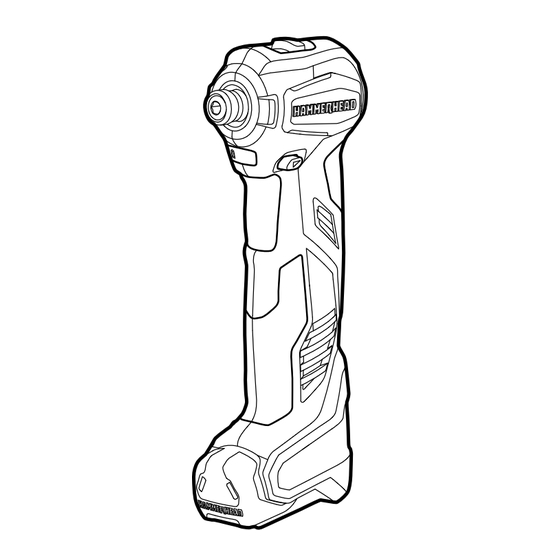
PACKAGE CONTENTs SWITCH™_12V rIgHT aNgLE IMPaCT DrIVEr – auTO HaMMEr... - Page 9 PACKAGE CONTENTs PARTs DEsCRIPTION function switch Sleeve LED work light Variable-speed trigger switch Direction-of-rotation switch Integrated battery auto Hammer adaptor Impact bit SWITCH™_12V rIgHT aNgLE IMPaCT DrIVEr – auTO HaMMEr...
-
Page 10: Operating Instructions
OPERATING INsTRUCTIONs 1. How To Charge NOTICE: The integrated battery is shipped partially charged. before using it the first time, fully charge the battery. a fully discharged battery will normally charge in about 30 minutes in a surrounding temperature between 32°f (0°C) and 131°f (55°C) a. - Page 11 OPERATING INsTRUCTIONs 2. Trigger switch a. To turn the tool ON, depress the trigger switch. b. To turn it Off, release the trigger switch. NOTICE: The variable-speed trigger switch delivers higher speed with in- creased trigger pressure and lower speed with decreased trigger pressure.
-
Page 12: Operating Instructions
OPERATING INsTRUCTIONs 4. LED Worklight a. The LED worklight, located on the head of the tool, illuminates when the trigger switch is depressed. This provides additional light on the surface of the workpiece for operation in lower-light areas. b. The LED worklight will turn off when the trigger switch is fUEL released. - Page 13 OPERATING INsTRUCTIONs 6. Auto Hammer Adaptor The auto hammer adapter permits the tool to be used in the auto hammer function. When not in use, the auto hammer adaptor provided with the tool can be placed in the storage area lo- cated on the base of the tool.
- Page 14 OPERATING INsTRUCTIONs 8. Tightening and Loosening screws and Nuts a. Set the function switch to impact driving mode, marked with “ ” . b. Install the correct bit. c. Position the direction-of-rotation selector to the proper direction. d. Apply just enough pressure to keep the bit engaged on the screw or nut.
- Page 15 WARNING: To avoid possible serious injury, do not exert excessive force on the tool or apply side pressure. Hold the tool firmly while pushing steadily to allow the hammerhead to drive the nail automatically. SWITCH™_12V rIgHT aNgLE IMPaCT DrIVEr – auTO HaMMEr...
-
Page 16: Care And Maintenance
OPERATING INsTRUCTIONs Recommended Nails to Use The tool is versatile for use with a variety of nails. Common and finishing nails from 2d to 8d are recommended for use with this tool. Recommended Nailing Materials for the Impact Driver/Auto-hammer The tool may be used for nailing into all types of woods, wood-like materials, and plaster board. -
Page 17: Warranty
If you believe that the impact driver/auto hammer is defective at any time during the specified warranty period, call HaMMErHEaD support at 1-877-888-1880 to speak with a customer service agent. This warranty does not cover: (1) Part failure due to normal wear or tool abuse (2) any parts have been altered or modified by anyone other than an authorized HaMMErHEaD personnel. - Page 19 arTÍCuLO # 515975 DEsTORNILLADOR ELÉCTRICO DE ÁNGULO RECTO/MARTILLO AUTOMÁTICO DE IÓN DE LITIO DE 12 V MODELO HHS1200 CarguE La baTErÍa aNTES DE uSar POr PrIMEra VEZ. ADJUNTE sU RECIbO AQUÍ Número de serie ___________________ fecha de compra ____________________ ¿Preguntas, problemas, piezas faltantes? antes de volver a la tienda, llame a nuestro Departamento de Servicio al Cliente al 1-877-888-1880, de lunes a viernes de 8:30 a.m.
-
Page 20: Especificaciones Del Producto
ÍNDICE Especificaciones del producto..........20 Información de seguridad . -
Page 21: Información De Seguridad
Lea y comprenda completamente este manual antes de intentar ensamblar u operar este producto. Si tiene preguntas sobre este producto, llame al Servicio al Cliente al 1-888-HaMMErHEaD (1-877-888-1880), de lunes a viernes de 8 a.m. a 8 p.m., hora estándar del Este. - Page 22 INfORMACIÓN DE sEGURIDAD Conozca la herramienta Para operar esta herramienta, lea detenidamente este manual y todas las etiquetas adjuntas al destornillador eléctrico/martillo automático antes de usarlo. Mantenga este manual a mano para referencia futura. Algunos de los siguientes símbolos pueden aparecer en esta herramienta. Estúdielos junto con sus significados. La interpretación correcta de estos símbolos le permitirá operar la herramienta mejor y de manera más segura. sÍMbOLO DEfINICIÓN sÍMbOLO DEfINICIÓN Voltios...
- Page 23 INfORMACIÓN DE sEGURIDAD seguridad eléctrica • Los enchufes de las herramientas eléctricas deben coincidir con el tomacorriente. Nunca modifique el enchufe de ninguna manera. No use ningún adaptador de enchufe con herramientas eléctricas con conexión a tierra (puesta a tierra). Los enchufes sin modificar y los tomacorrientes adecuados reducirán el riesgo de descarga eléctrica. •...
- Page 24 INfORMACIÓN DE sEGURIDAD • Si se proporcionan dispositivos para la conexión de extractores e instalaciones de recolección de polvo, asegúrese de que estén conectados y que se usen correctamente. El uso de dispositivos para polvo puede reducir los peligros relacionados con el polvo. Uso y cuidado de las herramientas eléctricas • No fuerce la herramienta eléctrica. Use la herramienta eléctrica correcta para su aplicación. La herramienta eléctrica correcta hará el trabajo mejor y de manera más segura al ritmo para el que se diseñó. • No use la herramienta eléctrica si el interruptor no la enciende o apaga. Cualquier herramienta eléctrica que no se pueda controlar con el interruptor es peligrosa y se debe reparar.
-
Page 25: Preparación
INfORMACIÓN DE sEGURIDAD Uso y cuidado de las herramientas a batería • Recargue solo con el cargador especificado por el fabricante. Puede que un cargador adecuado para un tipo de batería cause un riesgo de incendio cuando se use con otro paquete de baterías. • Bajo condiciones de maltrato, es posible que se expulse el líquido de la batería. Evite el contacto con este. Si se produce un contacto accidental, enjuague con agua. Si el líquido entra en contacto con los ojos, busque además ayuda médica. El líquido expulsado de la batería puede causar irritación o quemaduras. -
Page 26: Contenido Del Paquete
CONTENIDO DEL PAQUETE SWITCH™_DESTOrNILLaDOr ELÉCTrICO DE ÁNguLO rECTO – MarTILLO auTOMÁTICO DE 12 V... - Page 27 CONTENIDO DEL PAQUETE PIEzAs DEsCRIPCIÓN Interruptor de función Manguito Luz de trabajo LED Interruptor de gatillo de velocidad variable Interruptor de dirección de rotación batería integrada adaptador para martillo automático Punta de impacto SWITCH™_DESTOrNILLaDOr ELÉCTrICO DE ÁNguLO rECTO – MarTILLO auTOMÁTICO DE 12 V...
-
Page 28: Instrucciones De Funcionamiento
INsTRUCCIONEs DE fUNCIONAMIENTO 1. Cómo cargar AVIsO: la batería integrada se envía parcialmente cargada. antes de usarla por primera vez, cargue completamente la batería. una batería completamente descargada, normalmente se cargará en aproximadamente 30 minutos a una temperatura ambiente de entre 0 °C (32 °f) y 55 °C (131 °f) a. - Page 29 INsTRUCCIONEs DE fUNCIONAMIENTO 2. Interruptor de gatillo a. Para ENCENDEr la herramienta, presione el interruptor de gatillo. b. Para aPagarLa, libere el interruptor de gatillo. AVIsO: el interruptor de gatillo de velocidad variable proporciona mayor velocidad con una mayor presión en el gatillo y una menor velocidad con menos presión en el gatillo.
- Page 30 INsTRUCCIONEs DE fUNCIONAMIENTO 4. Luz de trabajo LED a. La luz de trabajo LED, ubicada en el cabezal de la herramienta, se enciende cuando se presiona el gatillo. Esto proporciona iluminación adicional sobre la superficie de la pieza en trabajo para el funcionamiento en áreas con poca iluminación. MEDIDOR b. La luz de trabajo LED se apagará DE COM- cuando se libere el interruptor bUsTIbLE de gatillo.
- Page 31 INsTRUCCIONEs DE fUNCIONAMIENTO 6. Adaptador para martillo automático El adaptador para martillo automático permite usar la herramienta para la función de martillo automático. Cuando no está en uso, el adaptador para martillo automático que se proporciona con la herramienta se puede guardar en el área de almacenaje ubicada en la base de la herramienta.
- Page 32 INsTRUCCIONEs DE fUNCIONAMIENTO 8. Apriete y aflojamiento de tornillos y tuercas a. Coloque el interruptor de función en el modo de destornillador eléctrico, marcado " " . b. Instale la punta de destornillador correcta. c. Coloque selector de dirección de rotación en la dirección correcta. d.
- Page 33 INsTRUCCIONEs DE fUNCIONAMIENTO 9. Martilleo de clavos a. Coloque el interruptor de función en el modo de martillo automático, marcado " ". b. Fije el adaptador para martillo automático a la herramienta. c. Coloque el selector de dirección de rotación hacia la izquierda o hacia la derecha. d.
-
Page 34: Cuidado Y Mantenimiento
INsTRUCCIONEs DE fUNCIONAMIENTO Clavos recomendados para usar Esta herramienta es versátil para su uso con una amplia variedad de clavos. Se recomienda el uso de clavos para acabado de 2d a 8d con esta herramienta. Materiales recomendados para clavar con el destornillador eléctrico/martillo automático Se puede usar la herramienta para clavar en todo tipo de maderas, materiales similares a la madera y tableros de yeso. -
Page 35: Garantía
Cliente de HaMMErHEaD al 1-877-888-1880 para hablar con un agente de Servicio al Cliente. Esta garantía no cubre: (1) falla de las piezas debido al desgaste normal o al maltrato de la herramienta; (2) cualquier pieza alterada o modificada por alguien ajeno al personal...
Need help?
Do you have a question about the SWITCH HHS1200 and is the answer not in the manual?
Questions and answers