
Related Manuals for Aeware in.k600


Summary of Contents for Aeware in.k600
- Page 1 ™ Series of full-function and multi-feature keypads with menu driven interface TechBook Giving full control to wet fingers!
-
Page 2: Table Of Contents
Table of contents overview ..................3 warning ...................4 function description ..............5 icon description ................6 installation - low profi le ................9 - drilling templates ............10 connections ................... 11 main modes ...................12 functions ..................13 spa settings ..................19 keypad settings ................24... - Page 3 in.k600™...
-
Page 4: Overview
™ Advanced series of full-function keypads that give complete control to wet fingers! With its stunning design, Aeware’s® new in.k600™ series of advanced keypads feature a low profile configuration, large LCD displays and menu-driven or streamlined interfaces. With menu- driven models, users can control all functions and programming of not only their spa system but also peripheral accessories like our in.pix™... -
Page 5: Warning
(presence of high voltage), etc. • Only qualified personnel are to service this PRODUCT. There are no user serviceable parts inside. • This PRODUCT is only compatible with Aeware’s® in.pac™ line of products. • This PRODUCT should be installed on a clean flat surface. -
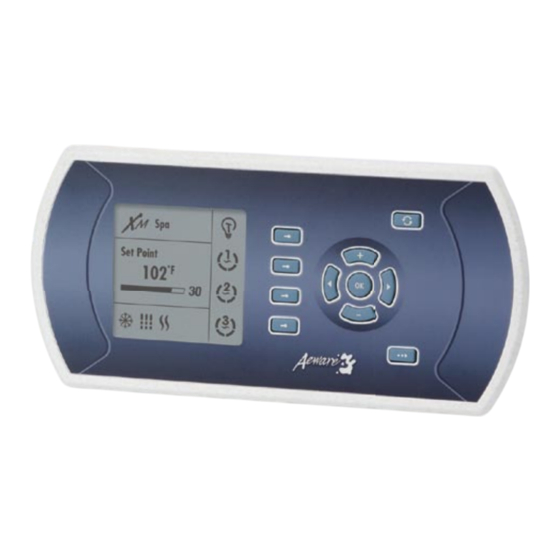
Page 6: Function Description
Multifunction Keys "Mode" Key "Plus" Key increases 1,2, 3, 4 selects mode of "Ok" Key parameter setting operation: Spa, Audio, Each of these four and Options. Also, it allows you to exit any keys helps you programming window... -
Page 7: Icon Description
Warning/Alert icons Operation Mode Menu title AM/PM (˚F/˚C) Light icon Information Display Message prompt Time, temperature & error messages Device status icon Pump icons Progress bar icon Spa system status icons Service icon... - Page 8 Icon Description Light icon The "Light" icon becomes animated when the light is on. The icon animation speed is proportional to the light intensity. Pumps icons The "Pump" indicator numbers light up and their icons become fast animated when pumps are in high speed, slow animated icons when pumps are in low speed.
- Page 9 Icon Description Heater icon The "Heater" icon becomes animated when the heater is on. Progress bar A visual indication of the time remaining before an equipment is turned off or before the end of the standby mode.
- Page 10 Optional wing nuts and spacers To install the in.k600™ low profile, use the drilling template provided in this section. Determine the mounting location and stick the template on chosen location. The user must cut out a rectangular shape opening of 7 .250" by 3.750" according to the template (see illustration).
-
Page 11: Low Profi Le
184.2 mm 7.250" 180.98 mm 7.125" 90.5 mm 3.563" 15.9 mm ø 0.625" TYP. 2X 95.3 mm 3.750" 47.6 mm 1.875" 4.8 mm 92.1 mm R 0.188" TYP. 4x 3.625"... -
Page 12: Connections
Connecting in.k600™ keypad to in.xm™ Main keypad in.k600™ To connect the in.k600™ keypad, simply insert its in.link™ connector into the appropriate keypad connector of the in.xm™ enclosure (as illustrated). To provide additional access- control, an auxiliary keypad is also available (optional). -
Page 13: Main Modes
Main Modes These menus allow access and control of the main devices controlled by the in.k600™ keypad. Spa Mode This menu allows the control of the pumps and light as well as the activation of diverse programming modes. Various icons become animated to let you know present spa status. - Page 14 Spa Mode Sub-Menus...
-
Page 15: Functions
Spa Mode • Select Spa to view Spa menu. This menu allows control of all pumps, blower, waterfalls, spa light, • Press Mode key to display as well as the activation of the Economy and Standby modes. the mode selection window. - Page 16 Water temperature setting Starting Pump 1 Starting Pump 2 Starting Pump 3 • Press Plus/Minus key to • Select Pump 1 to turn • Select Pump 2 to turn • Select Pump 3 to turn select water temperature Pump 1 on.
- Page 17 Starting Light Next menu page *Starting Pump 4 *Starting Pump 5 • Select Light key to turn • Press Next key to display the • Select Pump 4 to turn • Select Pump 5 to turn light on.
- Page 18 *Starting Blower *Starting waterfalls Next menu page Turning Economy on • Select Blower to turn • Select Waterfalls to turn • Press Next key to display the The Economy mode allows you blower on. waterfalls on. next page in the spa menu.
- Page 19 Standby Mode Displaying time Viewing active progress bars Please note that the system When this feature is activated • Press Ok key to display A progress bar is a visual indi- automatically returns to Normal it allows you to stop all pumps the time.
-
Page 20: Spa Settings
Options sub-menus Spa settings This menu allows you to personalize operating settings of your spa such as fi ltration, economy as well as reminder (active maintenance) and warning messages. Keypad settings This menu allows you to activate keypad functions. - Page 21 Setting fi lter cycle start time Setting fi lter cycle duration Setting fi lter cycle frequency Setting fi lter cycles The display will show the Here we set a value for the fi lter Here we set the number of To program the fi...
- Page 22 Setting Economy stop time Setting Economy mode Setting Economy start time • Use key to set hour To program the Economy • Use key to set hour setting. mode, you must enter these setting. parameters: the start time and •...
- Page 23 Setting maintenance Turning reminders on/off Resetting prompt messages Viewing spa reminders reminder prompts • Select Enter option The reminder icon will show up Periodically, the system will • Use key to activate or screen menu to reset message...
- Page 24 Spa warnings Viewing spa warnings Postponing spa warnings This menu allows you to view all The warning icon shows up to • Select the • Select the option to close option to close active warning messages ie:. hot...
- Page 25 Setting keypad display Adjusting contrast Adjusting backlight Normal/Reverse display options Contrast should be set for Adjust to gain more control Also known as negative display, This sub-menu is used to set comfortable viewing. over screen brightness when...
- Page 26 Display orientation This feature inverts the display * to make it readable from inside or outside the spa. To invert display: • Use key to activate or deactivate reverse display. • Select Enter option screen menu to save changes and go back to the main menu.
- Page 27 Setting keypad audio Keypad on/off Turning alarm sound on options To enable/disable key beep: This feature alerts you when an This sub-menu is used to set error condition has occurred. keypad audible options setting • Use key to activate or such as: keypad on/off (key deactivate key beep.
- Page 28 Setting regional settings Setting language Temperature units Selecting time format This sub-menu is used to set • Use key to select Water temperature can be This feature allows you to keypad regional settings such from: English, Francais, Español displayed in °F or °C.
- Page 29 Security options Partial keypad lockout Full keypad lockout Full lock: all keys are disabled. This sub-menu allows you to • Use key to select • Use key to select When the keypad is locked, lockout your keypad to prevent "Partial".
- Page 30 Setting the time • Press Mode key • Use key to set hour setting. • Select Options menu • Use Right key to access • Select Keypad sub-menu minutes option. • Select Clock seting • Use key to set minutes.
-
Page 31: Viewing Info
Viewing information about Viewing information about Viewing information on Viewing information on the system the spa controller heater software keypad software This sub-menu allows you Here the spa controller software Here the heater software Here the keypad software... - Page 32 Upgrading keypad software Resetting keypad programmed values • Use Ok key to start software Here is possible to reset upgrade of the keypad. programmed settings back to original factory values. • Select the • Select the option to abort option to abort upgrading operation.
- Page 33 Audio Mode Sub-menus in.tune™/in.pix™ in.tune™/in.pix™ in.tune™/in.pix™ in.tune™ in.tune™ in.pix™ Radio frequencies broadcast in stereo Dolby Digital Theatre System...
- Page 34 Band Audio Mode Power On/Off Source Selecting radio band • Press Mode key. • Select Power to turn system on In audio mode: In tuner mode: or off. • Select Audio mode. • Select repeatedly SRC to •...
-
Page 35: Tuner Mode
Tuning up or down Auto scan mode Selecting weather band mode Selecting weather station A/PS In tuner mode: In tuner mode: In tuner mode: In tuner mode: • Press Mode key. • Press Mode key. • Press Mode key. -
Page 36: Cd Mode
If you inserted a CD containing MP3 fi les, a different display info will appear if you select Display: Track no. / Playtime – Folder no. Display information Intro scan Repeat / Track no. – Folder name – File name –... - Page 37 Random Track up or down Pause Changing discs In cd mode: In cd mode: In cd mode: In cd mode: • Press Mode key. • Press Mode key. • Press Mode key. • Press Mode key. • Select Audio mode.
-
Page 38: Sound Options
Tone Tone Fader Equalization In all modes: In all modes: In all modes: • Select Tone to select either Balance control: Adjusts the • Select Fader option repeatedly • Successively selecting EQ will (in order): volume, bass, treble,... - Page 39 Volume Up or Down Muting the audio output In all modes: In all modes: • Use key to increase or • Select Mute to render silent the decrease volume. audio output. • Select Mute key again to return...
-
Page 40: Dvd Mode In.pix
Selecting in.pix™ Navigation keys Navigation keys Menu This feature allows to select an In DVD mode: In DVD mode: In DVD mode: external audio/video source such as the in.pix™. • Press to navigate • Use key to navigate •... - Page 41 Stop DVD Zoom DVD language In DVD mode: In DVD mode: In DVD mode: • Use Ok key to select an option • Select Zoom option to enlarge • Select Language option to from the various DVD menus...
-
Page 42: Specifications
General specifications: Environmentals Standards: IP ratings IPX6 Storage temperature: 85°C (185°F) to -30°C (-22°F) Operating temperature: 65°C (149°F) to -20°C (-68°F) Humidity: up to 100% condensing Mechanical Specs Weight: 0.48 Kg (1.05 lbs) Dimensions (W x H x D): Front panel High Profile:... - Page 43 Advanced electronics! Water resistance! Gecko Alliance 9919-100691 450 des Canetons, Quebec City (QC) G2E 5W6 Canada, 1.800.78.GECKO Rev. 12/10 9225 Stellar Court, Corona, CA 92883 USA, 951.667 .2000 © 2010 Groupe Gecko Alliance Inc. www.geckoalliance.com TM trade-marks of/marques de commerce de Groupe Gecko Alliance Inc.
Need help?
Do you have a question about the in.k600 and is the answer not in the manual?
Questions and answers
hello .. xhat means the message rHnF on the screan ? Thanks for your help Marc