
Related Manuals for Brookstone Wireless Cat Ear Headphones


Summary of Contents for Brookstone Wireless Cat Ear Headphones
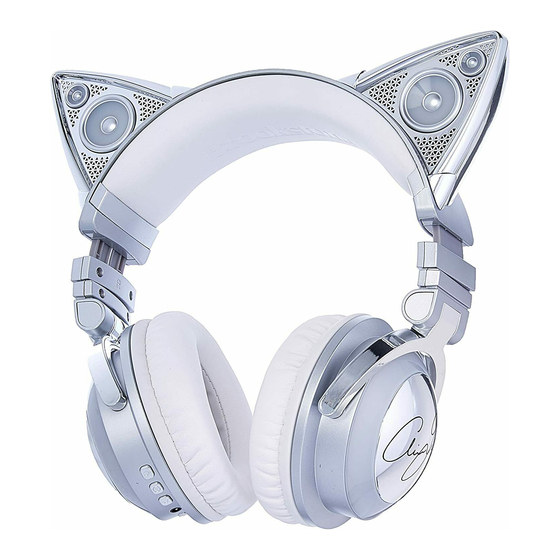
- Page 1 Wireless Cat Ear Headphones ENJOY YOUR MUSIC PRIVATELY OR TURN ON THE EAR SPEAKERS TO SHARE WITH FRIENDS...
-
Page 2: Table Of Contents
TABLE OF CONTENTS CAUTION Warnings and Cautions............1 • T O REDUCE THE RISK OF ELECTRIC SHOCK, DO NOT REMOVE COVER. - Page 3 SAFETY AND HANDLING INFORMATION LITHIUM-ION BATTERY WARNINGS This device contains a non-removable Lithium-Ion battery. The battery must be For maximum product life, do not drop, throw or crush the headphones. Do not expose recycled or disposed of properly. Contact your local waste management office for them to humidity, dust, or operating temperatures outside 32°F to 113°F (0°C to information on battery recycling or disposal. 45°C). SAVE THESE INSTRUCTIONS! WARNING DANGER To reduce the risk of electric shock, burns, fire or injury: 1. C lose supervision is necessary when this appliance/product is used by or near children or mentally disabled individuals. 1. Do not use while bathing or in a shower. 2. U se this unit only for its intended use as described in this manual. 2. D o not place or store unit where it can fall or be pulled into a tub or sink. 3. U nplug this unit during lightning storms or when unused for long periods of time. 3. D o not place in, drop or submerge in water or other liquid. 4. Never drop or insert an object into any opening.
-
Page 4: Fcc Information
FCC INFORMATION 10. N ever operate this unit if it has a damaged cord or plug, if it is not working properly, or if it has been dropped or damaged, or dropped into water. If the unit’ s This equipment has been tested and found to comply with the limits for a Class B power supply cord or plug is damaged, do not attempt to fix it yourself. Digital Device, pursuant to Part 15 of the FCC Rules. These limits are designed 11. T o avoid the risk of electric shock, do not disassemble or attempt to repair the unit. to provide reasonable protection against harmful interference in a residential Incorrect repair can cause risk of electric shock or injury to persons when the unit installation. This equipment generates, uses, and can radiate radio frequency is used. energy and, if not installed and used in accordance with the instructions, may cause 12. D o not operate in the presence of explosive and/or flammable fumes. harmful interference to radio communications. However, there is no guarantee that interference will not occur in a particular installation. 13. N ever remove the plug from the outlet by pulling the power cord. If this equipment does cause harmful interference to radio or television reception, which can be determined by turning the equipment off and on, the user is encouraged to try to correct the interference by one or more of the following measures: • Reorient or relocate the receiving antenna. • Increase the distance between the equipment and receiver. • C onnect the equipment to an outlet on a circuit different from that to which the receiver is connected. • C onsult the dealer or an experienced radio/TV technician for help. This equipment complies with Part 15 of the FCC Rules. Operation is subject to the following two conditions: 1. This equipment may not cause harmful interference. -
Page 5: Location Of Parts And Controls
LOCATION OF PARTS AND CONTROLS LOCATION OF PARTS AND CONTROLS 1. Speaker with Light (2) 5. 3.5mm to 3.5mm Headphone Cord Light On/Off/Choose Color Button 14. Volume - Button with inline microphone 2. Right Ear Cup Light Mode Button 15. Pairing/Charging LED 6. Play/Pause/Track Forward/Track Indicator 3. Ear Cup Light (2) 10. Speakers On/Off Button Back Button 16. Micro USB Input 4. Left Ear Cup 11. Headphone Cord Input 7. Micro USB Charging Cable 17. Bluetooth ®... -
Page 6: Charging The Cat Ear Headphones
CHARGING THE CAT EAR HEADPHONES PAIRING YOUR DEVICE 1. P repare your device to pair using Bluetooth wireless technology, making ® 1. Use the included MICRO USB CHARGING CABLE to charge the headphones sure you are within 33 feet of the headphones. Refer to your device’s owner’s with a USB adapter (5V, 1A or above) (not included). The headphones will be manual for details if necessary. fully charged in approximately 3 hours. 2. Press and hold the BLUETOOTH BUTTON until the PAIRING LED 2. The CHARGING LED INDICATOR is red while the headphones are charging INDICATOR illuminates and four tones sound to turn Bluetooth ® mode on. and turns off when the headphones are fully charged. 3. The PAIRING LED INDICATOR will be solid blue for 5 seconds as the 3. When the headphones’ battery is low, the CHARGING LED INDICATOR headphones search for previously paired devices. If no connection is made will flash red when the headphones are not in Bluetooth ® mode and will flash within 5 seconds, the headphones will enter Bluetooth ® pairing mode. The red and blue when the headphones are in Bluetooth ®... -
Page 7: Listening To Audio
LISTENING TO AUDIO INCOMING CALLS 1. Press and hold the BLUETOOTH BUTTON until the PAIRING LED 1. To answer an incoming call on your device, press the PLAY/PAUSE/TRACK INDICATOR illuminates to turn Bluetooth ® mode on. FORWARD/TRACK BACK BUTTON once. 2. Press the VOLUME + BUTTON to increase audio volume. 2. To ignore an incoming call on your device, press and hold the PLAY/PAUSE/ TRACK FORWARD/TRACK BACK BUTTON until a tone sounds and then 3. Press the VOLUME - BUTTON to decrease audio volume. release. 4. Press the PLAY/PAUSE/TRACK FORWARD/TRACK BACK BUTTON once to 3. To end an active call on your device, press the PLAY/PAUSE/TRACK play or pause audio. FORWARD/TRACK BACK BUTTON once. 5. Press the PLAY/PAUSE/TRACK FORWARD/TRACK BACK BUTTON twice in quick succession to move one track forward. 6. Press PLAY/PAUSE/TRACK FORWARD/TRACK BACK BUTTON three times in quick succession to move one track backward. Note: If there is no audio streaming for 20 minutes, Bluetooth ®... -
Page 8: Selecting Light Colors
SELECTING LIGHT COLORS SELECTING LIGHT MODES 1. Press the LIGHTS ON/OFF/CHOOSE COLOR BUTTON to turn the ear cups 1. Press the LIGHT MODE BUTTON to activate Breathing mode, slow flashing of and speaker lights on. The default color is Light Blue. selected color. 2. Press the LIGHTS ON/OFF/CHOOSE COLOR BUTTON to change the 2. Press the LIGHT MODE BUTTON to activate Transition mode, selected color ear cups and speaker lights to Green. transitions to the next color every 5 seconds. 3. Press the LIGHTS ON/OFF/CHOOSE COLOR BUTTON to change the 3. Press the LIGHT MODE BUTTON to activate Beat mode, selected color beats ear cups and speaker lights to Purple. to audio. 4. Press the LIGHTS ON/OFF/CHOOSE COLOR BUTTON to change the 4. Press the LIGHT MODE BUTTON to activate Strobe mode, fast flashing of ear cups and speaker lights to Orange. selected color. 5. Press the LIGHTS ON/OFF/CHOOSE COLOR BUTTON to change the 5. Press the LIGHT MODE BUTTON to activate Solid mode, selected color is ear cups and speaker lights to Ice. solid. 6. Press the LIGHTS ON/OFF/CHOOSE COLOR BUTTON to change the Note: If there is no beat detected (volume is too low or audio does not have ear cups and speaker lights to Hot Pink. -
Page 9: Using The Headphone Cord
USING THE HEADPHONE CORD 9. To end an active call on your device, press the PLAY/PAUSE/TRACK FORWARD/TRACK BACK BUTTON on the HEADPHONE CORD once. Connect your device to the headphones with the included 3.5MM TO 3.5MM HEADPHONE CORD. Notes: • The HEADPHONE CORD INPUT takes precedence over the Bluetooth 1. Plug the end of the HEADPHONE CORD with two lines into the HEADPHONE ® connection. CORD INPUT on the headphones. 2. Plug the end of the HEADPHONE CORD with three lines into your device. • If there is no audio streaming for 20 minutes, the Cat Ear Speakers are turned off automatically. -
Page 10: Frequently Asked Questions
FREQUENTLY ASKED QUESTIONS How do I pair a new device? The headphones remember the last device paired. If you would like to use another Why won’t audio play? device, pair that device manually. Please refer to page 9 for pairing instructions. Ensure your device is within 33 feet of headphones and reconnect your device to You may need to turn Bluetooth ®... -
Page 11: Specifications
Weight ............ Approx. 1lb (413g) Dimensions.. 6 .75" (171.48mm) (w) x 2.75" (70mm) (d) x 7.63" (93.98mm) (h) ® The Bluetooth word mark and logos are registered trademarks owned by Bluetooth SIG, Inc. and any ® use of such marks by Brookstone are under license. © Brookstone 2016... -
Page 12: Warranty
ONE (1) YEAR LIMITED WARRANTY but Brookstone, in so far as permitted by law, provides these products “as is.” This warranty does not apply to: a) damage caused by failure to follow instructions Brookstone ® warrants this product against defects in materials and/or workmanship relating to product’s use or the installation of components; b) damage caused by under normal use for a period of ONE (1) YEAR from the date of purchase by the accident, abuse, misuse, fire, floods, earthquake or other external causes; c) damage... - Page 13 Find thousands more great ideas online 320538 Merrimack, New Hampshire, USA 03054 • 800-846-3000 • Brookstone.com...
Need help?
Do you have a question about the Wireless Cat Ear Headphones and is the answer not in the manual?
Questions and answers