
Related Manuals for Nikon COOLPIX P600


Summary of Contents for Nikon COOLPIX P600
-
Page 1: Table Of Contents
Quick Start Guide Confirming the Package Contents First Steps Shooting and Playback Using ViewNX 2 Other Functions For Your Safety... - Page 2 Thank you for purchasing the Nikon COOLPIX P600 digital camera. This guide introduces the procedures necessary for first time use of this camera. To ensure proper use, please read and thoroughly understand the information in “For Your Safety” (A34) before using the camera.
- Page 3 Confirming the Package Contents In the event that any items are missing, please contact the store where you purchased the camera. COOLPIX P600 Camera Strap Lens Cap LC-CP29 Digital Camera (with cord) Rechargeable Li-ion Battery Charging AC Adapter USB Cable UC-E21...
-
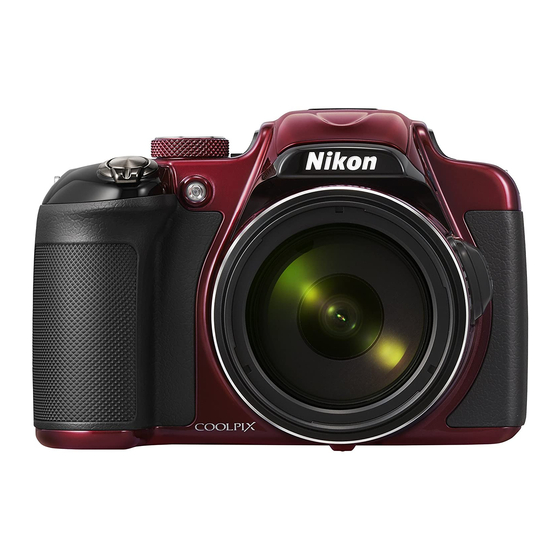
Page 4: Parts Of The Camera
Parts of the Camera 18 19 20 21 Power switch/power-on lamp Side zoom control w (function) button m (flash pop-up) button Mode dial Diopter adjustment control Flash Electronic viewfinder x (monitor) button Shutter-release button s (display) button Zoom control f : wide-angle b (e movie-record) button g : telephoto Command dial... -
Page 5: Confirming The Package Contents
Opening and Adjusting the Angle of the Monitor The orientation and tilt of the monitor can be changed. This is useful when shooting with the camera in a high or a low position, or when taking self-portraits. For normal shooting, fold the monitor against the camera body with the screen facing out (3). -
Page 6: First Steps
First Steps Attaching the Camera Strap and Lens Step Attach the Lens Cap LC-CP29 to the strap, and then attach the strap to the camera. Attach the strap at two places. Lens Cap At times when you are not shooting images, attach the lens cap to the lens to protect it. - Page 7 Insert the Battery and the Memory Card Step .1 Open the battery-chamber/memory card slot cover. .2 Insert the battery. Push the orange battery latch in the direction indicated by the arrow (1), and fully insert the battery (2). The battery locks into place when inserted correctly.
- Page 8 .3 Insert the memory card. Slide the memory card in until it clicks into place. Memory card slot Be Careful to Insert the Memory Card in Correct Direction Inserting the memory card upside down or backwards could damage the camera and the memory card. .4 Close the battery-chamber/memory card slot cover.
- Page 9 Removing the Battery and the Memory Card Turn the camera off and make sure that the power-on lamp and the monitor have turned off, and then open the battery-chamber/ memory card slot cover. High Temperature Caution The camera, battery, and memory card may be hot immediately after using the camera.
-
Page 10: Charge The Battery
Charge the Battery Step .1 Prepare the included charging AC adapter. If a plug adapter* is included with your camera, attach the plug adapter to the plug on the charging AC adapter. Push the plug adapter firmly until it is securely held in place. Once the two are connected, attempting to forcibly remove the plug adapter could damage the product. -
Page 11: Turn The Camera On
.3 Disconnect the charging AC adapter from the electrical outlet and then disconnect the USB cable. Turning On the Camera While the Battery is Charging The camera does not turn on while the charging AC adapter is connected to it even when you press the power switch. Press and hold the c (playback) button to turn on the camera in playback mode and play back images. -
Page 12: And Time
Setting the Display Language, Date, Step and Time When the camera is turned on for the first time, the language-selection screen and the date and time setting screen for the camera clock are displayed. Use the rotary multi selector to select the settings. If you exit without setting the date and time, O will flash when the shooting screen is displayed. - Page 13 .2 Select Yes and press the k button. Time zone and date Choose time zone and set date and time? Cancel .3 Select your home time zone and press the k London Casablanca button. To enable daylight saving time, press H. When the Back daylight saving time function is enabled, W is...
- Page 14 .5 Set the date and time, and press the Date and time k button. Select a field: Press JK (changes 15 05 2014 between D, M, Y, h, and m). Edit the date and time: Press HI. Edit Date and time can also be changed by rotating the multi selector or command dial.
-
Page 15: Shooting And Playback
Shooting and Playback Rotate the Mode Dial and Align the A Step (auto) Icon to the Mark Check the Battery Level and the Number Step of Exposures Remaining Number of exposures 25m 0s 25m 0s 25m 0s remaining* Battery level indicator 1/250 1/250 F5.6... - Page 16 Monitor Display Press the s button to switch between showing and hiding the photo information or shooting information that is displayed in the monitor. Built-in Flash In situations where a flash is needed, such as in dark locations or when the subject is backlit, press the m (flash pop-up) button to raise the flash.
- Page 17 Frame a Picture Step .1 Hold the camera steady. Keep fingers and other objects away from the lens, flash, AF-assist illuminator, microphone, and speaker. .2 Frame the picture. 25m 0s 25m 0s 25m 0s 1/250 1/250 F5.6 F5.6 Using the Zoom Zoom out Zoom in To zoom in closer to the subject: Move...
-
Page 18: Focus And Shoot
Focus and shoot Step .1 Press the shutter-release button halfway. When the subject is in focus, the focus area that includes the subject or focus indicator glows green (multiple focus areas can glow green). When you are using digital zoom, the camera focuses on the subject in the center of the frame and the focus area is not displayed. -
Page 19: Play Back Images
Focusing To set focus and exposure (shutter speed and aperture value), press the shutter-release button halfway. The focus area varies depending on the shooting mode. In A (auto) mode, the camera detects the main subject and focuses on it when the shutter-release button is pressed halfway. If a human face is detected, the camera automatically sets focus priority on it. -
Page 20: Delete Images
Delete Images Step .1 Press the l button to delete the image currently 4/132 4/132 displayed in the monitor. 0112. JPG 0112. JPG 15/05/2014 15:30 15/05/2014 15:30 .2 Use the multi selector HI to select the desired deletion method and Delete press the k button. -
Page 21: Using Viewnx 2
Your Imaging Toolbox Installing ViewNX 2 Step An Internet connection is required. For system requirements and other information, see the Nikon website for your region. .1 Download the ViewNX 2 installer. Start the computer and download the installer from: http://nikonimglib.com/nvnx/ .2 Double-click the downloaded file. -
Page 22: Transferring Images To The Computer
Transferring Images to the Computer Step .1 Choose how images will be copied to the computer. Choose one of the following methods: Direct USB connection: Turn the camera off and ensure that the memory card is inserted in the camera. Connect the camera to the computer using the USB cable. - Page 23 2 Double-click Import File. If the memory card contains a large number of images, it may take a while for Nikon Transfer 2 to start. Wait until Nikon Transfer 2 starts. Connecting the USB Cable The connection may not be recognized if the camera is connected to the computer via a USB hub.
- Page 24 .2 Transfer images to the computer. Click Start Transfer. Start Transfer At default settings, all the images on the memory card will be copied to the computer. .3 Terminate the connection. If the camera is connected to the computer, turn the camera off and disconnect the USB cable.
-
Page 25: Viewing Images
Viewing Images Step Start ViewNX 2. Images are displayed in ViewNX 2 when transfer is complete. Consult online help for more information on using ViewNX 2. Starting ViewNX 2 Manually Windows: Double-click the ViewNX 2 shortcut on the desktop. Mac: Click the ViewNX 2 icon in the Dock. Using ViewNX 2... -
Page 26: Other Functions
Other Functions Functions That Can Be Set Using the Multi Selector Press the multi selector H (m), J (n), I (D), or K (o) while shooting to operate the following functions. Function Description The flash mode can be set when the flash is 1 m Flash mode raised. -
Page 27: Selecting A Shooting Mode
Selecting a Shooting Mode When the mode dial is rotated next to the mark, the camera switches to the corresponding shooting mode shown below. Auto mode A Auto mode Used for general shooting. y, X, s, c (Scene) modes Camera settings are optimized according to the scene that you select. -
Page 28: Recording Movies
j, k, l, m modes Select these modes for greater control over shutter speed and aperture value. M (User settings) mode Setting combinations that are frequently used for shooting can be saved. The saved settings can be immediately retrieved for shooting simply by rotating the mode dial to M. -
Page 29: Release Button
Using Menus (the d Button) Use the multi selector and k button to navigate the menus. Press the d button. The menu that matches the status of the camera, such as shooting or playback menu, is displayed. Unavailable menu items are displayed in gray and cannot be selected. - Page 30 Switching Among Menu Tabs To display a different menu, such as the setup menu, use the multi selector to switch to another tab. Tabs Shooting menu Set up Shooting menu Welcome screen Image quality Image quality Image size Image size Time zone and date Picture Control Picture Control...
- Page 31 Tab Types For Shooting For Playback Shooting menu Playback menu Image quality Quick retouch Image size D-Lighting Picture Control Skin softening Custom Picture Control Filter effects White balance Print order Metering Slide show Continuous Protect j tab: Displays the settings available for the current shooting mode.
-
Page 32: Playback Mode
Playback Mode The following options can be performed in full-frame playback mode. Control Name Main Functions Move toward g (i) to zoom in on the image, and move toward f (h) to display images as thumbnails or the Zoom control calendar. - Page 33 Control Name Main Functions Switch the magnification of an enlarged Command dial image. d (menu) Display and hide the menu. button l (delete) Delete images. button x (monitor) Switch between the monitor and button viewfinder. s (display) Switch the information displayed in the button monitor.
-
Page 34: For Your Safety
Repairs should be performed only by qualified technicians. Should the camera or charging AC adapter break open as the result of a fall or other accident, take the product to a Nikon- authorized service representative for inspection, after unplugging the product and/or removing the battery. - Page 35 Failure to observe this precaution could cause damage or fire. Use the appropriate power supply (battery, charging AC adapter, AC adapter, USB cable) Using a power supply other than those provided or sold by Nikon could result in damage or malfunction. Observe caution when handling the battery The battery may leak, overheat, or explode if improperly handled.
- Page 36 Should the insulation be damaged and the wires become exposed, take it to a Nikon-authorized service representative for inspection. Failure to observe these precautions could result in fire or electric shock.
- Page 37 Use appropriate cables When connecting cables to the input and output jacks, use only the cables provided or sold by Nikon for the purpose, to maintain compliance with product regulations. Handle moving parts with care Be careful that your fingers or other objects are not pinched by the lens cover or other moving parts.
- Page 38 Notices Notices for Customers in Europe CAUTIONS RISK OF EXPLOSION IF BATTERY IS REPLACED BY AN INCORRECT TYPE. DISPOSE OF USED BATTERIES ACCORDING TO THE INSTRUCTIONS. This symbol indicates that electrical and electronic equipment is to be collected separately. The following apply only to users in European countries: This product is designated for separate collection at an appropriate collection point.
-
Page 39: Caring For The Camera
Caring for the Camera To ensure continued enjoyment of this Nikon product, observe the precautions described below in addition to the warnings in “For Your Safety” (A34-37) when using or storing the device. Do Not Drop The product may malfunction if subjected to strong shock or vibration. - Page 40 The monitor is lit by an LED backlight. Should the monitor begin to dim or flicker, contact your Nikon-authorized service representative. About the Manuals Nikon will not be held liable for any damages resulting from the use of this product. Before Taking Important Pictures...
- Page 41 Disposing of Data Storage Devices Please note that deleting images or formatting data storage devices such as memory cards or built-in camera memory does not completely erase the original image data. Deleted files can sometimes be recovered from discarded storage devices using commercially available software, potentially resulting in the malicious use of personal image data.
- Page 42 (products purchased in the EU or EFTA can be used anywhere within the EU and EFTA). Nikon does not accept liability for use in other countries. Users who are unsure as to the original country of sale should consult with their local Nikon service center or Nikon-authorized service representative.
- Page 43 Precautions when Using Radio Transmissions Always keep in mind that radio transmission or reception of data is subject to interception by third parties. Note that Nikon is not responsible for data or information leaks that may occur during data transfer.
- Page 44 AVC Patent Portfolio License This product is licensed under the AVC Patent Portfolio License for the personal and non-commercial use of a consumer to (i) encode video in compliance with the AVC standard (“AVC video”) and/or (ii) decode AVC video that was encoded by a consumer engaged in a personal and non- commercial activity and/or was obtained from a video provider licensed to provide AVC video.
-
Page 45: Trademark Information
Wi-Fi Alliance. Android and Google Play are trademarks or registered trademarks of Google, Inc. All other trade names mentioned in this manual or the other documentation provided with your Nikon product are trademarks or registered trademarks of their respective holders. Notices... - Page 46 Europe Service Warranty Dear Nikon Customer, We thank you for your purchasing this Nikon product. Should your Nikon product require warranty service, please contact the dealer from whom it was purchased or a member of our authorized service network within the sales territory of Nikon Europe BV (Europe/Africa and Russia).
- Page 47 4. This service warranty does not affect the consumer’s statutory rights under applicable national laws in force, nor the consumer’s right against the dealer arising from their sales/purchase contract. Notice: An overview of all authorized Nikon Service Stations can be found online by following this Link (URL = http:// www.europe-nikon.com/service/).
- Page 48 FX4A01(11) 6MN35411-01...
Need help?
Do you have a question about the COOLPIX P600 and is the answer not in the manual?
Questions and answers