Table of Contents
Advertisement
Quick Links
Advertisement
Table of Contents

Subscribe to Our Youtube Channel
Related Manuals for Alcor HDT-4400


Summary of Contents for Alcor HDT-4400
- Page 1 HDT 4400 set-top-box USER MANUAL...
-
Page 2: User Manual
USER MANUAL HDT- 4400 High De nition Digital Receiver Important Safety Instructions 1) Read these instructions. 2) Keep these instructions. 3) Heed all warnings. 4) Follow all instructions. 5) Do not use this apparatus near water. 6) Clean only with dry cloth. 7) Do not install near any heat sources such as radiators ,heat registers. -
Page 3: Package Contents
Warning: ※ The apparatus shall not be exposed to dripping or splashing and that no objects filled with liquids, such as vases, shall be placed on the apparatus. ※ The MAINS plug or an appliance coupler is used as the disconnect device, the disconnect device shall remain readily operable. -
Page 4: Table Of Contents
Table of Contents Front and rear Panel………………………………………………………………………………………………………….……………………………….1 Remote Control……..…………………………………………………………………………………………….…………………………………………….2 System Connection..………………………………………………………………………………………………………………….…………………….4 First time Installation……………………………………………………………………..……………………………………………………….………….5 Basic Operation………………………………………………………………………………………………………………………………………….……….5 Program Settings…….………………………………………………………………………………………………………………………………….……….5 Program Edit………………………………………………………………………………………………………………………………………….6 EPG(Electronic Program Guide)……….…………………………………………………………………………………………………….7 Sorting……….………………………………………………………………………………………………………………………………………….8 LCD(Logical Channel Number)……………………………………………………………………………………………………….……….8 Pictures Setting……….…………………………………………………………………………………………………………………………….…………….8 Resolution….…………………………………………………………………………………………………………………….…………………….8 TV format…..………………………………………………………………………………………………………………………….……………….8 Channel search………….………………………………………………………………………………………………………………………….……………..9 Auto search..………………………………………………………………………………………………………………………..…………….9 Manual search……………………………………………………………………………………………………………………………..………….9 Country……..………………………………………………………………………….………………………………………………………………10 Antenna power..……………………………………………………………………………………………………………………………………10 Time setting……………………………………………………………………………………………………………………………………………………….10 Time offset..……………………………………………………………………………….…………………………………………………………10 Country region..………………………………………………………………………………….…………………………………………………10... -
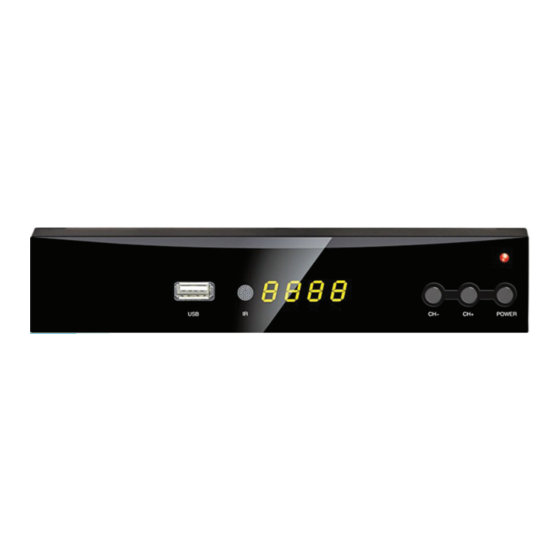
Page 5: Front And Rear Panel
Front and Rear Panel 1.Front Panel 1. POWER BUTTON: Push to turn on/off the main power supply. 2. POWER INDICATOR: When green, unit working; when red, it is in standby. 3. REMOTE CONTROL SENSOR: Used to receive the signal from the remote control. 4. -
Page 6: Remote Control
Remote Control POWER: Switch the receiver in and out of standby mode. <0>-<9>: Numeric keys CH-/CH+: Program changing keys. MENU: Display main menu on TV screen, and press again to disappear menu OK: To confirm current setting, or display channel list in no-menu mode. VOL-/VOL+:To increase/decrease volume;... -
Page 7: Installing The Batteries
Installing the Batteries Remove the battery cover from the rear of the Remote control and place 2xAAA size batteries inside the compartment. Please make sure the battery polarities match the polarity markings inside the compartment. Using the Remote Control To use the remote control, point it towards the front of the digital set top box. The remote control has a range of up to 7 meters from the set top box at an angle of up to 60 degrees. -
Page 8: System Connection
System connection For a basic connection from your set top box to your television set, you can use VIDEO/AUDIO-R/AUDIO-L connection. For a higher quality connection, use a direct HDMI connection, as shown below. Connect a audio amplifier use coaxial is a optional. -
Page 9: First Time Installation
First Time Installation After all connections have been made properly, switch on TV and make sure the unit is connected to the Main power. Press power button to switch the unit on. If you are using the unit for the first time or have restored the unit to factory default, the installation guide menu will appear on your TV screen. -
Page 10: Program Edit
(a) Program Edit To edit your program preferences (lock,skip,favourite,move or delete),you will need to enter the Program Edit Menu.This menu requires a password to access. Enter the default password “000000”. The master unlock password is “888888” Set Favourite Channels You can create a shortlist of favourite programs that you can easily access. Set Favourite TV or Radio program. -
Page 11: Epg(Electronic Program Guide)
Move a TV or Radio Program 1. Select the preferred channel then press the RED button. Amove symbol will appear. 2. Press UP/DOWN to move the channel. 3. Press OK to confirm. 4. Repeat the above steps to move more channels. Lock Program You can lock selected programs for restricted viewing Lock a TV or Radio channel:... -
Page 12: Sorting
Sort your channels from the following options: [By LCN] - Sort the channels in ascending order. [By Service Name] - Sort the channel is in alphabetical order. [By Service ID] - Sort the channels according to the station. [By ONID] - Sort the channels according to ONID. (d) Picture Setting To access the Menu, press MENU then select [Picture] using the RIGHT/LEFT key, The Menu provides options to adjust the video settings. -
Page 13: Channel Search
To access the menu, press MENU and select[Search Channel] using the RIGHT/LEFT keys. This menu provides options to adjust the Search Channel settings. Press UP/DOWN to select an option and press RIGHT/LEFT to adjust the settings (a) Auto Search This option will automatically search for channels and save them once the scanning is complete. All previously saved channels and settings will be deleted. -
Page 14: Country
3. Press OK to start searching channels. IF a channel is found. It is saved and added to the channels list. If channels can not be found during searching. The unit will exit automatically. (c) Country Select your country of residence. (d) Antenna Power Enable Antenna power if an external active antenna is connected. -
Page 15: Osd Language
Select an OSD language. (b) subtitle language select the preferred subtitle language. (c) audio language select the preferred audio language for watching TV channels. if the language is not available, the default program language will be used. (d) digital audio If no sound from audio amplifier which connected to coaxial you can change this setting. -
Page 16: Restore Factory Default
(c) restore factory default Reset your Set Top Box to the Default Factory Settings. In Main Menu select[Restore Factory Default] using the RIGHT/LEFT keys and press OK or RIGHT to select. Enter your password or the default password’000000’ and press OK to confirm. This option will delete all preset channels and settings. The master unlock password is’888888’. -
Page 17: Photo Configuration
(b) Photo configure: -Slide time: adjust slide show interval to 1-8 seconds. -Slide mode: adjust slide show effect as model 0-59 or random. -Aspect ratio: [Keep]:Play picture in its original aspect. [Discard]:Play picture in full screen mode. (c) Movie Configure: -Subtitle specific: Select the subtitle size. - Page 18 You will be able to select from the following two options: mode: view or record If at anytime you wish to delete a scheduled event, you can press the EPG button to view the list of scheduled events. Use the arrow keys on the remote to highlight the event you wish to delete then press the blue button to delete it.
-
Page 19: Trouble Shooting
Trouble Shooting Problems Potential reasons What to do Power isn’t connected Connect the power No picture The power switch is not on Switch on the power DVB-T cable not connected Plug in the DVB-T cable Screen shows “no signal” Aerial cable is faulty Check aerial cable and connections No or incorrect connection with audio cable... -
Page 20: Technical Specifications
Technical Specifications Item Sub Item Parameter System Standard ETSI EN 302755(DVB-T2) VHF:170-230MHZ Input Frequency UHF:470-860MHZ RF Input Lever -78~-20dBm Tuner RF Bandwidth 7MHz and 8MHz Modulation QPSK,16QAM,64QAM,256QAM MPEG4 AVC/H.264 HP@L4 Decoder Format MPEG2 MP@MP.HL Video Output Format 480i/480p/576i/576p/720p/1080i/1080p Output Port HDMI,SCART Decoder Format MPEG-1(layer 1/2/3), WMA, AC3... -
Page 21: Notice About Recycling
Notice about recycling Your product is designed and manufactured with high quality materials and components which can be recycled and reused. This symbol means that electrical and electronic equipment, at heir end-of-life, should be disposed of separately from your household waste. Please dispose of this equipment at your local community waste collection/recycling centre. - Page 22 4400 Forgalmazó / Distributor: Expert Zrt. 1044 Budapest, Óradna u. 12. www.expert.hu, www.alcordigital.com...
Need help?
Do you have a question about the HDT-4400 and is the answer not in the manual?
Questions and answers