
Related Manuals for Dillenger Street Legal Electric Bike Kit


Summary of Contents for Dillenger Street Legal Electric Bike Kit
-
Page 1: User Manual
CONVERSION KIT User Manual Dillenger Street Legal Electric Bike Kit - Samsung Power English Please read through carefully before beginning your conversion... -
Page 2: Thank You
THANK YOU Thank you for purchasing your new Dillenger conversion kit! We know you’ll love it, and with some care it should last for a very long time. Please read through this manual carefully before operating the kit. SAFETY Mechanical Safety Check: Routinely check the condition of your bike. -
Page 3: Item Check List
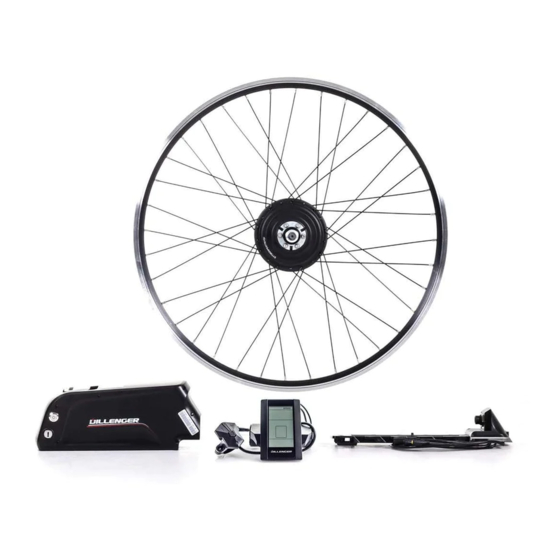
ITEM CHECK LIST Each conversion kit is tested for quality control before shipping to a customer. Before converting your bike, it’s a good idea to lay each of the components out to visiualise how they will come together on your bicycle. Motor wheel Battery, Cradle and Keys Charger... -
Page 4: Table Of Contents
Contents Item check list Install overview Installation process Wheel Install Battery Cradle Installation Handlebar Controls Display Display Continued... Thumb Throttle E-Brake Sensors Removable Pedal Assist Sensor (RPAS) RPAS Continued... Wiring Install Tidy Up Battery Operation Charging Maintenance and Care Trouble Shooting Trouble Shooting Continued... -
Page 5: Install Overview
INSTALL OVERVIEW Remove Contents Take your components out of the box. Remove the protective packaging. Keep track of all the parts that you remove from the box. – Remove the battery and put it on charge. Prepare you bike Make sure you have measured your dropout slots (approx. -
Page 6: Installation Process
INSTALLATION PROCESS Before beginning your conversion, there are a couple things you can do that will make the installation more efficient. Remove your handlebar controls such as your brakes, shifters and grips. Remove your front wheel and install your existing tube, tyre and rim tap (recommended) onto the new electric wheel. -
Page 7: Wheel Install
Wheel Install You will need loosen the axle nuts on your new electric wheel. This will allow the axle to slot into your dropouts. The distance between your dropouts should be around approx. 100mm. Your forks will stretch in and out a certain amount without causing any structural issues. -
Page 8: Battery Cradle Installation
1. Install the battery on a rear rack (contact Dillenger for this option). 2. Use large hose clamps or heavy-duty fasteners to secure the battery cradle on the downtube (not recommended). -
Page 9: Handlebar Controls
Handlebar Controls With the motor, battery, and cradle mounted, it’s time to move on to the easy part. Firstly remove the packaging from the Display, Thumb Throttle and E-Brake Sensor kit. Your handlebars should be just about bare, ready to accept your new controls. -
Page 10: Display Continued
Display Continued... Be careful not to over tighten these fasteners as they are secured by plastic. Once you have the display mounted you can fit the satellite keypad (thumb controls). This is a small module with three buttons to control the display. Up/Down and MODE (on/off). You can download the manual for this separately. -
Page 11: Thumb Throttle
Thumb Throttle Install Start by putting the brake lever back on and tightening it in place. Next, slide the thumb throttle onto your handlebars, usually the right side, however it is up to personal preference which side the throttle goes. Move the throttle to the inside of the handlebars and tighten it in place so it butts up against the throttle. -
Page 12: E-Brake Sensors
E-Brakes Sensors Install This kit comes standard with E-Brake Sensors which are a nifty little invention that enables you to use your existing brake levers. This solves a common issue from previous systems that required the replacement of the brake levers which is more time consuming and also problematic if you have hydraulic brakes or integrated gear shifters. -
Page 13: Removable Pedal Assist Sensor (Rpas)
Removable Pedal Assist Sensor (RPAS) Normally this step would involve the removal of the crank which can be quite complicated. Thanks to Dillenger’s innovative RPAS, this step is now a breeze! To begin, have a look at the black plastic magnet wheel and the way the two halves join together. -
Page 14: Rpas Continued
RPAS Continued... Depending on the style of crank axle you have, you may need to modify the black plastic wheel and remove some of the internal ‘vanes’ of plastic. You may be required to carefully remove a portion of the vanes if required. -
Page 15: Tidy Up
Wiring Install Continued 3. Now connect the Wiring Loom to the controller. These wires are colour coded with a black end plug. 4. The yellow plug from the wiring loom goes to the throttle. 5. The two red plugs from the wiring loom go to the E-Brake sensors. -
Page 16: Battery Operation
The keys are coded so if you loose both you will have to ship your battery back to Dillenger to have the barrel replaced (not ideal!). This battery comes with a USB port, which can be used to charge your mobile phone or anything else similar. -
Page 17: Charging
Charging Charging the battery: 1. Plug the charger into the wall socket/outlet, just like a laptop of mobile phone charger. 2. Check that one of the charger indicator lights glows green 3. Plug the charger, (battery end) into the battery carefully, making sure it is all the way in. -
Page 18: Maintenance And Care
A spoke-tightening tool such as the one including in the Dillenger hub motor conversion toolkit, is ideal. Check the tightness of each spoke ideally after the first 100km and then every 500km. -
Page 19: Trouble Shooting
Trouble Shooting Dillenger’s troubleshooting advice will take you through a logical way to diagnose any issues that may arise during installation and use. Before commencing troubleshooting, disconnect all components. Do not short cut this process. There are countless times a loose plug has caused grief. By disconnecting all the plugs and then reconnecting just the crucial components, this will solve any loose plug issue. -
Page 20: Trouble Shooting Continued
This is not covered under warranty fork dropout axle slots because Dillenger is not the manufacturer of your forks. Fortu- nately headtubes are made to a consistent standard and alterna- tive forks are both readily available and reasonably priced! - Page 21 Please refer to display manual for error code definition and if display needed, report the error code to Dillenger in a service ticket. Check all connections to make sure all the plugs are all the way My kit looses power connected.
- Page 22 • Make sure the tyre pressures are at optimum • Pedal harder when taking off and select the right gear for assisting up hills If you would like to submit a Dillenger service ticket, please go to this URL: https://dillenger.zendesk.com/hc/en-us/requests/new...
-
Page 23: Specifications
SPECIFICATIONS General Model (year) Dillenger Street Legal Electric Bike Kit - Samsung Power 13Ah (2016) Designation Conversion kit Main Use On road, commuting, recreation and leisure Nominal Power 250W/350W Max Speed 32km/h (20mph) restricted to 25km/h in display settings for... -
Page 24: Contact Us
CONTACT US Dillenger Head Office 3/13 Olympic Circuit Southport QLD 4215 AUSTRALIA Tel.: +617 5532 9235 dillenger.zendesk.com www.dillengerelectricbikes.com © Dillenger 2016...
Need help?
Do you have a question about the Street Legal Electric Bike Kit and is the answer not in the manual?
Questions and answers