Table of Contents
Advertisement
Advertisement
Table of Contents

Related Manuals for LG-Ericsson LDP-7024D


Summary of Contents for LG-Ericsson LDP-7024D
- Page 1 Important Safety Information...
- Page 2 Important Safety Information...
- Page 3 Important Safety Information...
-
Page 4: Getting Started
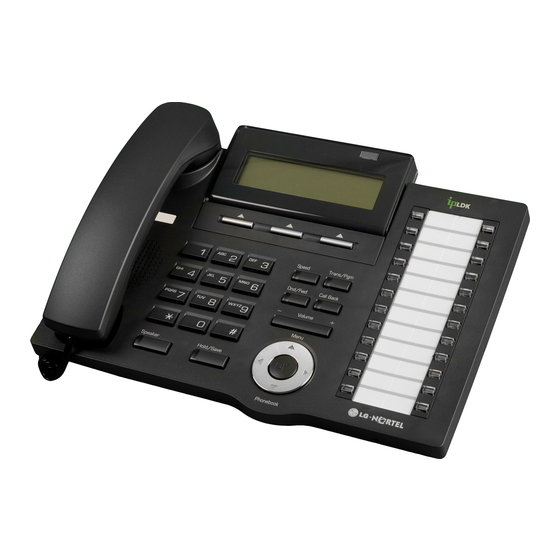
-.16 or 24 Flexible buttons with dual-color LED’s -.Additional Device Port (ADP) for SLT or FAX -.Call Log Feature -.Call Recording Feature – 7024D only (Optional USB Module). -.Hands-Free Solution – 7024D only (Optional Blue- Tooth Module). -.Wall Mountable (Bracket Optional) LDP-7016D LDP-7016D LDP-7024D... - Page 5 Getting Started Input / Output Devices and Buttons Input / Output Devices and Buttons Handset Visual Ringing LED Earphone-Jack Socket Trans/Pgm Button (Ear/Mic Mode) Speaker Flexible Button (Loop Button) Speed Button Call back Button Dnd/Fwd Button Volume Button Speaker Button Hands-free Microphone Hold/Save Button Menu Button...
- Page 6 Getting Started Handset Used for handset call. Earphone-Jack Socket Used to connect optional headset to the phone. Speaker Outputs tones and voice. Speed Button Used to access speed dialing, speed programming, save number redial, and last number redial. DND/Fwd Button The DND (Do Not Disturb) feature blocks all incoming calls.
- Page 7 Getting Started Cable Connection Cable Connection Cable connections A - Connect the telephone cord (curly cord) to the handset and the other end to the A Connect the telephone cord (curly cord) to the handset and the other end to the handset jack at the bottom of the telephone.
- Page 8 Getting Started ADP (Additional Device Port) ADP (Additional Device Port)
- Page 9 Getting Started ADP (Additional Device Port) ADP (Additional Device Port)
- Page 10 Getting Started 1 Placing a Call 1. Placing a Call ICM Line ▶ ▶ talk Lift handset Enter the extension number CO Line CO Line Dial 9 or select ▶ ▶ ▶ CO line flexible talk button. Lift handset Enter the desired phone number 2.
-
Page 11: Navigation Button
3 Soft Buttons & Navigation Button 3 Soft Button 3 Soft Button The 3 Soft Buttons are located on the bottom of the LCD display. The function of each button changes, subject to call status and progress. The current functions are displayed on the LCD screen, directly above each button. -
Page 12: Basic Function
Basic Function By pressing one of the 3 soft buttons you are able to select the indicated function. For instance, if you want to select call pickup (as shown below), press the first button on the left. If there are more than three functions available at any point, an arrow will be displayed on the LCD display. - Page 13 Basic Function 1 2 Conference 1.2 Conference Dial the desired station number. CALL TO 100 (e.g.100) 12 OCT 09 12:00 pm Station 100 answers the call. FLASH Press [CONF] button. CONNECT TO 100 FEB 01 04 05:34 pm TRANS CONF MUTE...
-
Page 14: Off Hook
Basic Function 1 3 Redial 1.3 Redial The last number dialed on an external call is automatically saved in the LAST Number& Redial (LNR) buffer Or Call Log Buffer. Press the [REDIAL] button. STATION 100 (T) 12 OCT 09 12 OCT 09 12:00 pm 12:00 pm REDIAL ... - Page 15 Basic Function 4. Intercom Ring Back MSG : Press to leave a your station number or STATION 100 (T) message. 12 OCT 09 12:00 pm FLASH : Press to disconnect the line and re-seize. FLASH 5 Intercom Busy 5. Intercom Busy C-BACK : Press to leave your station number or BUSY : 100 message.
- Page 16 Basic Function 9. Intercom Talk TRANS : Press to transfer an incoming call to another CALL FROM 104 station. 12 OCT 09 12:00 pm CONF : Press to initiate a conference call. TRANS CONF MUTE MUTE : Press to mute the handset, speakerphone, or headset microphone.
-
Page 17: Call Forward
Basic Function 12 CO Talk 12. CO Talk TRANS : Press to transfer a call to another station. 123456789 CONF : Press to initiate a conference call. LINE 08 00:00:03 MUTE : Press to mute the handset, speakerphone, or TRANS CONF MUTE... -
Page 18: Name Display On My Phone
Basic Function 15 FLEXIBLE BUTTON PROGRAM 15. FLEXIBLE BUTTON PROGRAM • Press the [TRANS/PGM] button • Press the flexible button to be programmed • Enter the desired feature code below table. • Press the [HOLD/SAVE] button to save. *) The following Numbering Plan code can be changed by Admin Programming PGM 113~115 depending on the user’s needs. -
Page 19: Voice Over
Basic Function 18 CALL BACK 18. CALL BACK When a called station is in busy, call back can be requested. BUSY : 100 12 OCT 09 12:00 pm FLASH C-BACK 19. CAMP ON When a called station is in busy, camp-on can be requested. BUSY : 100 12 OCT 09 12:00 pm... -
Page 20: Call Log
Call Log The call log feature enables the LDP phone user to view a log of the last(100) incoming and outgoing calls. The user can scroll through the list of numbers stored, select the number outgoing calls. The user can scroll through the list of numbers stored, select the number and activate a redial to that number. - Page 21 Menu 1 > USER ORGANIZER RING / BGM EXIT Press [Menu] button. 3 > COS/PASSWORD MULTI MESSAGE EXIT Press [Navigation] button. 5 > MOBILE/CONFERENCE ROOM HEADSET/BLUETOOTH EXIT EXIT 7 > STATION ICLID KEYSET INFORMATION EXIT 9 > SYSTEM INFORMATION ATTENDANT PROGRAM EXIT * >...
- Page 22 Menu 1. USER ORGANIZER 1 > USER ORGANIZER RING / BGM EXIT Press [MENU] button Press [MENU] button. Press [OK] or [OK] b tt button. 1 > ANSWER MODE(H/T/P) STATION NAME PROGRAM BACK EXIT Press [Navigation] button. 3 > SET WAKE UP RESET WAKE UP BACK EXIT...
-
Page 23: Station Name Program
Menu 1 1 ANSWER MODE(H/T/P) 1.1 ANSWER MODE(H/T/P) 1> ANSWER MODE(H/T/P) Press [OK] or button. 2 STATION NAME PROGRAM BACK EXIT Select ICM Mode. ENTER ICM ANS MODE (2) ※ There are three types as follows; H(1) T(2) P(3) H(1) HANDSFREE MODE BACK EXIT T(2) TONE MODE... - Page 24 Menu 1 3 SET WAKEUP 1.3 SET WAKEUP Press [OK] or button. 3> SET WAKE UP 4 RESET WAKE UP BACK EXIT Enter the time and select once or repeat (#) ENTER WAKE UP TIME(RPT:#) HH:MM-ONCE 12:00 Press [OK] or button.
- Page 25 Menu 1 5 LANGUAGE PROGRAM 1.5 LANGUAGE PROGRAM Press [OK] or button. 5> LANGUAGE PROGRAM 6 LCD DATE MODE CHANGE BACK EXIT Select language FOR LANGUAGE, DIAL 00-14 ENGLISH (00) Press [OK] or button. BACK EXIT 1.6 LCD DATE MODE CHANGE 5 LANGUAGE PROGRAM Press [OK] or button.
- Page 26 Menu 2 RING / BGM 2. RING / BGM Press [OK] or button. 1 USER ORGANIZER 2> RING / BGM EXIT 1 > ICM RING TYPE PROGRAM CO RING TYPE PROGRAM BACK EXIT Press [Navigation] button. 3 > SET BGM BACK EXIT 2.1 ICM RING TYPE PROGRAM...
- Page 27 Menu 2 2 CO RING TYPE PROGRAM 2.2 CO RING TYPE PROGRAM 1 ICM RING TYPE PROGRAM Press [OK] or button. 2 >CO RING TYPE PROGRAM BACK EXIT Select Keyset ring source 1>KEYSET RING SOURCE 2 MUSIC BELL RING SOURCE Press [OK] or button.
- Page 28 Menu 3 COS / PASSWORD 3. COS / PASSWORD Press [OK] or button. 3> COS / PASSWORD 4 MULTI MESSAGE EXIT 1 > TEMPORAL COS MODE RETRIEVE COS BACK EXIT Press [Navigation] button. 3 > WALKING COS REGISTER PASSWORD BACK EXIT 5 >...
-
Page 29: Walking Cos
Menu 3 2 RESTORE COS 3.2 RESTORE COS TEMPORAL COS MODE Press [OK] or button. 2 > RETRIEVE COS BACK EXIT ENTER CURRENT PASSWORD Press [OK] or button. BACK EXIT PRESS OK / SAVE KEY Press [OK] or button. ******* BACK EXIT ※... - Page 30 Menu 3 4 REGISTER PASSWORD 3.4 REGISTER PASSWORD 3 WALKING COS Press [OK] or button. 4 >REGISTER PASSWORD BACK EXIT ENTER NEW PASSWORD Enter new password. Press [OK] or button. BACK EXIT PRESS OK / SAVE KEY Press [OK] or button.
-
Page 31: Preselected Msg Pgm
Menu 4 MULTI MESSAGE 4. MULTI MESSAGE Press [OK] or button. 3 COS / PASSWORD 4> MULTI MESSAGE EXIT 1 > PRESELECTED MSG PGM SET USER MESSAGE BACK EXIT Press [Navigation] button. 4.1 PRESELECTED MSG PGM 1 > PRESELECTED MSG PGM 1 >... -
Page 32: Mobile-Ext. Enable
Menu 5. MOBILE/CONFERENCE ROOM Press [OK] or button. 5> MOBILE/CONFERENCE ROOM 6 HEADSET/BLUETOOTH EXIT 1 > MOBILE-EXT. ENABLE MOBILE-EXT. NUMBER PGM BACK EXIT Press [Navigation] button. 3 > MOBILE-EXT. CLI PGM CREATE CONFERENCE ROOM BACK EXIT 5 > DELETE CONFERENCE ROOM BACK EXIT 5.1 MOBILE-EXT. - Page 33 Menu 5.2 MOBILE-EXT. NUMBER PGM 1 MOBILE-EXT. ENABLE Press [OK] or button. 2> MOBILE-EXT. NUMBER PGM BACK EXIT Select Mobile Ext. index.(1 or 2) MOBILE-EXT. NUMBER PGM ENTER(1-2), TO CHOOSE BACK EXIT Enter Mobile Phone number with CO Access code. MOBILE-EXT.
- Page 34 Menu 5.4 CREAT CONFERENCE ROOM 3 MOBILE-EXT. CLI PGM Press [OK] or button. 4> CREATE CONFERENCE ROOM BACK EXIT Enter Conference Room Number DIAL ROOM NUMBER ※ Please refer to Feature Numbering Plan in System. BACK EXIT Enter Password for conference room. Or, ENTER NEW PASSWORD Press [OK] or button.
-
Page 35: Headset Ring Mode
Menu 6. HEADSET/BLUETOOTH Press [OK] or button. 5 MOBILE/CONFERENCE ROOM 6> HEADSET/BLUETOOTH EXIT 1 > SPEAKER/HEADSET PGM HEADSET RING PROGRAM BACK EXIT Press [Navigation] button. 3 > REGISTER BLUETOOTH 3 > REGISTER BLUETOOTH BACK EXIT 6.1 SPEAKER/HEADSET PGM 1 > SPEAKER/HEADSET PGM Press [OK] or button. - Page 36 Menu 6.3 REGISTER BLUETOOTH 3 > REGISTER BLUETOOTH Press [OK] or button. BACK EXIT Select 1 for Pairing, 2 for Unpairing, 3 for Paired 1 > PAIRING Information UNPAIRING BACK EXIT 3> PAIRED INFORMATION BACK EXIT ※ BTU module should be installed.
- Page 37 Menu 7 STATION ICLID 7. STATION ICLID Press [OK] or button. 7> STATION ICLID 8 KEYSET INFORMATION EXIT 1 > REGISTER STATION ICLID VIEW STATION ICLID BACK BACK EXIT EXIT Press [Navigation] button. 7.1 REGISTER STATION ICLD 1 > REGISTER STATION ICLID 1 >...
- Page 38 Menu 7 2 VIEW STATION ICLID 7.2 VIEW STATION ICLID 1 REGISTER STATION ICLID Press [OK] or button. 2> VIEW STATION ICLID BACK EXIT Select the list. >01 1234567 Press [SELECT] or button. 02 EMPTY BACK SELECT EXIT Press [DELETE] button to delete LIST. ICLID : 1234567 ROUTE : 101 BACK...
-
Page 39: System Information
Menu 8. KEYSET INFORMATION ※ LDP 7016/7024 does not support this feature. 9. SYSTEM INFORMATION Press [OK] or button. 9> SYSTEM INFORMATION 0 ATTENDANT PROGRAM 0 ATTENDANT PROGRAM EXIT 1 > MPB VERSION DISPLAY VIEW IP ADDRESS VIEW IP ADDRESS BACK EXIT Press [Navigation] button. - Page 40 User Program Codes • Press the [TRANS/PGM] button ▶ Press the flexible button to be programmed • ▶ Press [Trans/Pgm] button again ▶ Enter the desired feature code below table • ▶ Press the [HOLD/SAVE] button to save. CODE FUNCTION CODE FUNCTION Answer mode (H/T/P)
-
Page 41: Entering Characters
Entering characters... -
Page 42: Glossary Of Terms
Glossary of Terms Intercom – describes internal calls within the telephone system CO Line Central Office Line – also known as a trunk line, exchange line or outside line Speed Dial A commonly used number stored in a speed bin for easy access Do Not Disturb –...
Need help?
Do you have a question about the LDP-7024D and is the answer not in the manual?
Questions and answers