Table of Contents
Advertisement
Quick Links
Advertisement
Table of Contents

Related Manuals for Vivitar DVR 850W


Summary of Contents for Vivitar DVR 850W
- Page 1 DVR 850W Underwater Digital Video Camcorder User’s Manual © 2009 Sakar International, Inc. All rights reserved. Windows and the Windows logo are registered trademarks of Microsoft Corporation. All other trademarks are the property of their respective companies.
-
Page 2: Table Of Contents
Connect DVR with PC using USB cable provided ......... 32 Connect DVR with printer using USB cable provided ......33 Install the Vivitar Experience Image Manager Software ......34 Connect your camera to the computer ..........36 Get photos and videos from your camera to your computer ....36 Get started! .................... -
Page 3: Introduction
Introduction Thank you for purchasing the DVR 850W Underwater Digital Video Camcorder. With your camcorder you can shoot video clips and take individual photos. In addition, a SD compatible memory card of up to 8GB can be inserted in order to expand the memory of your DVR camcorder. -
Page 4: Computer System Requirements For Windows Xp
Computer System Requirements for Windows XP To be able to download photos and videos to your PC, you will need the following minimum configuration: Pentium 4 processor or above with Windows XP service pack 2 512 MB RAM, with 100MB of free disk space ... -
Page 5: A Quick Look At Your Digital Video Camcorder
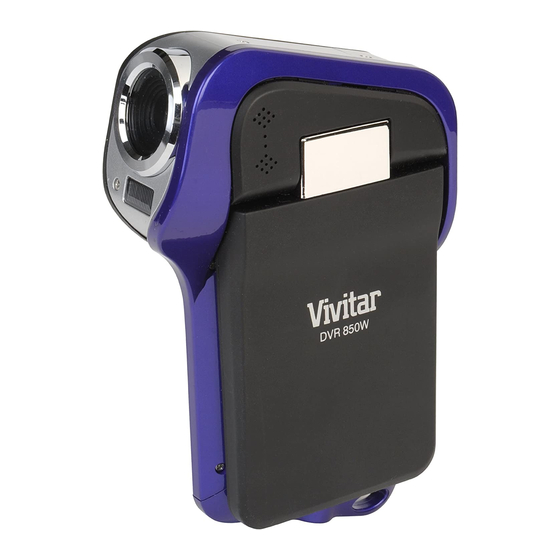
A Quick Look at your Digital Video Camcorder DC mode/Shutter DV mode/Shutter Up/Zoom in Left Right/Flashlight mode OK/Menu Down/Zoom out DC/DV mode LED Li-ion battery charging LED 10. LCD Color display 11. Battery/SD card/USB slot compartment 12. Playback 13. Power on/off 14. -
Page 6: Preparing Your Camcorder For Use
Preparing Your Camcorder for Use Important: Before installing the batteries make sure you are not near water and that your hands are dry Open Battery Door Turn and hold the camcorder with the bottom facing up and the battery door facing you as shown in the diagrams below. - Page 7 Your digital camcorder needs a lithium battery in order to operate. The battery is found separately in the packaging. To install it correctly see the diagram below: Insert the battery in the battery compartment with the correct polarity facing Use the battery clip found in the battery compartment to make sure that the battery is sitting firmly and secure.
-
Page 8: Inserting A Sd Memory Card
Limited internal memory is provided in order to take photos and videos. Use a SD Memory card to expand the memory in order to capture and record many more images. All the images in the built-in memory will not be lost if no SD Memory Card has been inserted in the DVR when battery power is low or when you change your battery. - Page 9 Locate the SD card slot to the left of the battery compartment. Insert the SD memory card correctly in the direction shown. Press the memory card until you hear a “Click” sound. Note: After you insert an SD memory card, the SD card icon will appear on the top left of the LCD, indicating that your SD memory card has been installed successfully.
-
Page 10: Maintenance And Care
Note: Check that the small battery cover lever is returned back to the mark line appearing to the side of the lever as shown on diagram (B) above. Important: It is important that the battery cover be sealed properly before using the camera underwater. Maintenance and Care Before using the video camcorder, please ensure that you read and understand the safety precautions described below:... -
Page 11: Powering On And Setting Dvr Function Control
• Opening the cover of the Camcorder may cause electrical shock and will void your warranty. • Use only the recommended power accessories. Use of power sources not expressly recommended for this equipment may lead to overheating, distortion of the equipment, fire, electrical shock or other hazards Powering on and setting DVR Function Control To power on the camcorder, flip open the LCD Screen. - Page 12 Press the Left/Right/Up/Down arrow buttons on the OK dial to select the Setup icon from the menu icons that appear. Press the OK/Menu button. Press the Left/Right/Up/Down button on the OK dial and select the Language icon submenu option. Press the OK/Menu button. Press the Left/Right/Up/Down button to highlight and select the language you desire.
-
Page 13: Capturing Videos
Press the OK button to save the date and time you selected. 10. Press the DC/DV mode button to close the menu and press it again to exit the Setup mode function. Changing the camcorder`s modes There are four modes in this DVR camcorder. Press the Power button to turn on the camcorder. -
Page 14: Video Setting Options
The video icon will now appear on the top right corner of the LCD. The amount of time left at that resolution and memory appears on the bottom right of the LCD. Aim the camcorder at the subject or object you wish to capture. Press the DV Shutter button again to start shooting. - Page 15 Resolution White Balance Exposure Color Effect Setup To enter the Settings submenu options for the Video mode: Press the OK button. Press the Right/Left/Up/Down button to select the Setting you wish to change from the main menu that appears. Resolution You can select different Video resolutions - VGA 640x480 pixels / QVGA 320x240 pixels.
- Page 16 menu icon. 2. Press the OK button to open the White Balance submenu. 3. Press the Right/Left/Up/Down button to highlight and select the White Balance option icon you desire: Auto /Daylight /Cloudy / Fluorescent Tungsten 4. Press the OK button to confirm, save your choice and exit to the Setting menu.
- Page 17 menu. 6. Press the DV button to revert back to the Video capture mode to start capturing videos with the new exposure setting selected. Note: After selecting your Exposure choice, the corresponding icon will appear on the bottom of the LCD. Color Effect This setting is used to adjust the photo effect of your videos.
- Page 18 Auto Power Off – this power saving mode allows you to select the stand-by time that is activated automatically if the camcorder is left inactive. Press the OK button. Press the Right/Left button to highlight and select one of the icons: 60 Sec/ 180 Sec/ Disable ...
- Page 19 selected. Press the OK button to confirm, save your choice and exit to the Setup mode submenu. TV output – You can use your bigger TV screen to playback and view the images and videos on the camcorder instead of using the LCD screen.
- Page 20 Date / Time – To set the Date and Time that will appear on images. Press the OK button. Press the Right/Left button to select each of the date and time options: YEAR / MONTH / DAY / 24H / HOUR / MINUTE ...
-
Page 21: Capturing Still Photos
NO / YES If you selected YES, the default factory setting will be reset on pressing the OK button. If you selected NO, the camcorder will revert to the Setup mode submenu on pressing the OK button. Language – adjust the camcorder`s language that appears for the menus on the LCD screen ... - Page 22 As the internal memory of the camcorder is limited, the amount of photos that can be captured is limited. Either download the photos to your computer using the Vivitar Experience Image Manager software as described below in the section “Transfer photos and videos to your computer” or insert an SD card to continue taking more photos and videos.
-
Page 23: Photo Setting Options
Photo Setting options In Photo capture mode there are four photo resolutions for you to choose from before capturing your photos (640x480, 2048x1536, 2592x1944 and 3320x2490 pixels). The higher the resolution selected the better the quality of the photo, however higher quality photos use up more memory. You can also enter and change the Flash Setup / Quality / White Balance / Exposure / Self Timer / Color Effect /Date Stamp and Setup Mode. - Page 24 Auto / Forced / Off 4. Press the OK button to confirm, save your choice and exit to the Setting menu. 5. Press the DC button to revert back to the Photo capture mode. 6. Press the DC Shutter button to capture the photo using the flash option that you selected.
- Page 25 5. Press the DC button to revert back to the Photo capture mode. 6. Press the DC Shutter button to capture photos using the quality option that you selected. Resolution You can select different Photo resolutions – VGA 640x480 pixels / 3 Mega Pixels 2048x1536 / 5 Mega Pixels 2592x1944 / 8.1 Mega Pixels 3320x2490.
- Page 26 3. Press the Right/Left/Up/Down button to highlight and select the White Balance option icon you desire: Auto /Daylight /Cloudy /Fluorescent / Tungsten 4. Press the OK button to confirm, save your choice and exit to the Setting menu. 5. Press the DC button to revert back to the Photo capture mode to start capturing photos with the new white balance setting selected.
- Page 27 Note: After selecting your Exposure choice, the corresponding icon will appear on the bottom of the LCD. Selftimer You can include yourself in a photo by using this feature to delay the time between your pressing of the shutter button and when the photo is actually taken.
- Page 28 4. Press the OK button to confirm, save your choice and exit to the Setting menu. 5. Press the DC button to revert back to the Photo capture mode to start capturing photos with the new self timer setting selected. 6.
- Page 29 4. Press the OK button to confirm, save your choice and exit to the Setting menu. 5. Press the DC button to revert back to the Video capture mode to start capturing videos with the new color effect setting selected. Note: The image that appears on the LCD screen now appears with the color effect selected.
-
Page 30: Playback Mode
Setup Mode The DVR setup mode is independent of the video and photo modes and can be accessed from either the DV video menu or the DC camera menu. See the description of the Setup mode as explained at the end of the Video Setting options section of this manual. - Page 31 11. Press the OK button again to cancel the navigation feature. Playback videos: Toggle through the images and videos. Videos in full screen appear with a red square on the top middle of the LCD. Press the OK button to Play the video. Press the OK button to Pause the video and again to continue playing the video.
-
Page 32: Av Mode - Using Your Tv To View Images
11. A “DELETE ALL ARE YOU SURE?” message appears on the LCD with NO and YES choices. 12. Press the Up/Down button to select the option and then select the OK button. 13. If YES is selected All the images in the memory are deleted. Caution: This process is irreversible and the images will be lost forever if they are not firstly downloaded to the computer before deletion. -
Page 33: Connect Dvr With Pc Using Usb Cable Provided
camcorder will be blank. When connected to the TV the camcorder will continue to use and consume battery power. The TV system may affect the quality of the images. Please remember to adjust the display format of the camcorder to the same as that of the TV. -
Page 34: Connect Dvr With Printer Using Usb Cable Provided
When enter into this mode, an icon will appear on the screen. After 3 seconds the camcorder will revert back to the four icons screen automatically. USB power supply In this mode, the camcorder will consume the power of the computer, not the battery power of the camcorder. -
Page 35: Install The Vivitar Experience Image Manager Software
Warning: Do not plug your camera into the computer until the software installation is complete. You must be connected to the internet to install and run the Vivitar Experience Image Manager software. Insert the installation CD into your CD-ROM drive. The installation screen should automatically open. - Page 36 If the window does not appear, open the application’s CD/DVD drive and click on “Setup.bat” to launch the installer. On Macintosh: Click the icon to install the Vivitar Experience Image Manager. If you do not have internet access at the time of inserting the CD-ROM, connect to the internet and then click the “Install Vivitar Experience...
-
Page 37: Connect Your Camera To The Computer
“Next” to continue. 10. On PC only: Let the “Vivitar Experience Image Manager” installer create the folder to where the program will be installed, and then click “Install”. 11. Please wait while the application continues the installation process on your computer. - Page 38 Select the “Get Images” button from the Main menu The “Get media from device” window opens. You can select to download photos, videos or both. Select your camera (removable disk) from the device window. If your camera is the only USB device connected then it will be selected automatically.
-
Page 39: Get Started
Use automatic “Geotagging” with built in Google Maps. For more details on how to use the Vivitar Experience Image Manager open the Help file or click the “Take the Tour” button on the application`s Home page. -
Page 40: Sakar Warranty Card
The camera’s device icon appears on the desktop. Click on the device icon and open the DCIM folder and the folder inside to view the media files. Select the files and drag them into your computer. Optionally, select the files and choose Copy from the Finder’s Edit menu. Then select a folder and choose Paste from the Edit menu. -
Page 41: Technical Specifications
Attention: Service Department 195 Carter Drive Edison, NJ 08817 TECHNICAL SUPPORT For technical support issues please visit our website at www.vivitar.com. You can find manuals, software and FAQ’s at the website. Can’t find what you are looking for? E-mail us at support@vivitar.com and one of our technical support team members will answer your questions. -
Page 42: Trouble Shooting
Auto shutoff Disable, 60Sec, 180 Sec TV out NTSC / PAL Microphone Speaker Recorder Auto Interface USB 2.0 System Windows XP, VISTA or MAC OS X 10.4.6 or higher Requirements Battery Lithium battery 3.7V/>800mAHr Storage Normal Temperature Temperature Working ° 0 - 40 Temperature Trouble Shooting... -
Page 43: Important Note: Using Your Camcorder Underwater
Important Note: Using Your Camcorder Underwater Before Using Camcorder Underwater The DVR 850W can be used to capture photos and videos underwater up to a depth of 10 feet / 3 meters. Do not use your camera below this depth as this may cause water to enter the battery door seal and damage the camera. - Page 44 Do not shake the camera to through off the water. Do not open the battery door until the water is totally dry. Any water that enters the battery compartment will damage the camcorder. If there is little water on the edge of the battery door needs to be dried with a soft cloth carefully, do not let the water go inside battery compartment, SD card compartment or USB port.
Need help?
Do you have a question about the DVR 850W and is the answer not in the manual?
Questions and answers