Advertisement
__
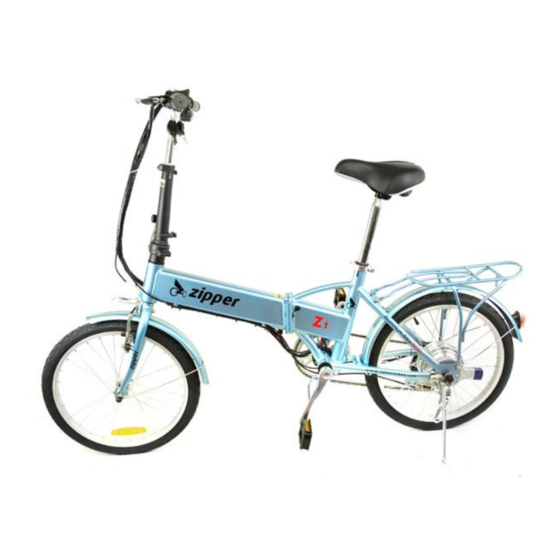
Thank you for purchasing the Z1. Your new Zipper e-bike is made with a strong aluminium alloy frame,
making it light yet durable, and comes with a lithium battery pre -installed, which has a range of up to
40km on a single charge. The Z1 was designed for inner city commuting, built with comfort and style in
mind.
This e-bike features a smart pedal assist system; when you do the pedalling the electric motor works
with you to add more power to the wheels, make travelling much easier. You can also use your electric
bike like a simple scooter, without pedalling just twist the throttle to go. The brakes are pretty clever too,
not only do they act like a normal mechanical bicycle brake, but they will cut power to the motor when
applied, making sure you get the most distance out of your battery life.
With a Zipper e-bike you're in control, whether you want to go for a long bike ride and only want help on
those difficult hills, or if you just need a 10 minute blast to work, with your Zipper you 'll be able to select
just what you need. The folding mechanism allows you to quickly store your bike with ease onc e you
reach your destination, which means no more disassembling your bicycle and carrying the wheels
around.
We cannot guarantee the performance of our couriers, if you receive a Zipper e-bike which
was damaged in transit, please take a picture before assembly and send it to our emai l
address support@zipperbikes.com before use and we'll send the replacement part.
Advertisement

Related Manuals for Zipper Mowers Z1


Summary of Contents for Zipper Mowers Z1
- Page 1 -installed, which has a range of up to 40km on a single charge. The Z1 was designed for inner city commuting, built with comfort and style in mind.
-
Page 2: Table Of Contents
Contents Table Specifications Page 3 User Guide Page 4 Riding Precautions Page 5 Assembling Your E-Bike Page 6 Maintenance Page 9 Cleaning & Regular Maintenance Page 10 Troubleshooting Page 11 Specifications Specifications Specifications... -
Page 3: Specifications
Specifications Brand Zipper Model Bike Specification Tyre Size 20 inch Weight 20kg Size Folding Size 1550×180×1030 800×300×580 Length×Width×Height Length×Width×Height (mm) (mm) Front And Rear Tyre 1045 Frame Aluminum Centre Distance(mm) Alloy Max Load 90kg Max Peed 25km/h Motor Specification Motor Type Brushless Motor 36V250W... -
Page 4: User Guide
User Guide As with all bicycles, a Zipper e-bike must be used and maintained properly in order to function correctly. Please read this manual carefully, as it contains vital safety information to ensure the continued performance of th e bike. If you have any queries, please feel free to contact our customer service department. -
Page 5: Riding Precautions
Riding Precautions 1. Please don’t use the throttle from stationary, as this will use a lot of battery power. Pedalling for around 3-5 cycles should be sufficient, to avoid wasting the power and also protect the battery and motor. You will feel the motor start automatically and then you can use the right hand throttle to increase or decrease assistance. -
Page 6: Assembling Your E-Bike
Assembling Your E-Bike Adjusting The Front Braking System Check the right hand braking handle, there should be full brake pressure when the lever is pressed halfway. If the clearance spacing is different on the left and right pads, you can adjust the adjusting screws on each brake arm until the distance of the two clearances are the same. - Page 7 Installing The Front Wheel Rest the front fork on the hub axle. Use the included washers and nuts to tighten the wheel to the bike. Please note the unique shape of the washers, the latch must be inserted into the hole on the fork, before tightening. If you replace the wheels, please tighten the nuts according to the recommended torque;...
- Page 8 Adjusting The Chain Release the rear hub nut and adjust the position of the hub to adjust the chain tension (the chain slack should be 10~15mm), align the chain wheel with the rear sprocket so that they are in the same straight line, and then tighten the rear hub nut.
-
Page 9: Maintenance
Maintenance Charger 1. Do not use the charger in places of heat, excessive smoke and dust, moisture and direct sunlight. 2. When charging, please keep the charger in a well ventilated room. 3. Do not allow any liquid near the charger and do not insert any metal items. 4. -
Page 10: Cleaning & Regular Maintenance
Cleaning & Regular Maintenance Clean using a soft cloth. Do not apply water directly to rear drum brake, motor and hubs to avoid performance drop or shortening of life expectancy. Do not use steam, a hose pipe or high-pressure water gun to clean. Maintenance Schedule Daily 60 Days... -
Page 11: Troubleshooting
Troubleshooting Problem Analysis Solution No pow er after turning the Electric lock is damaged Replace multifunction throttle pow er key including no lights Line conductor is broken Repair or replace line Battery problem Check battery w ith voltmeter and ensure battery is charged. If no pow er from battery replace.
Need help?
Do you have a question about the Z1 and is the answer not in the manual?
Questions and answers