Advertisement
Congratulations on your purchase of the SSL LoPro10, amplified Under Seat Subwoofer.
It has been designed, engineered and manufactured to bring you the highest level of
performance and quality, and will afford you years of listening pleasure.
Thank you for making a SSL your choice for car audio entertainment!
LoPro10
10" Amplified Under Seat Subwoofer
High & Low Level Input
LED Status Indicator
Subwoofer Phase Control
Soft Remote Turn-0n
Subwoofer Remote Control
Variable Bass Boost
Low Pass Filter
Subsonic Filter
MAX Power: 1200 W x 1
Thermal, Short, Overload and Fuse Protection
Weight: 13 lbs
Advertisement
Table of Contents

Related Manuals for Ssl LoPro10


Summary of Contents for Ssl LoPro10
- Page 1 Congratulations on your purchase of the SSL LoPro10, amplified Under Seat Subwoofer. It has been designed, engineered and manufactured to bring you the highest level of performance and quality, and will afford you years of listening pleasure. Thank you for making a SSL your choice for car audio entertainment! LoPro10 10"...
- Page 2 Introduction The LoPro10, introduces a low-profile active subwoofer, its low enough to easily fit under the seat of your car. This system offers you a quick and easy way to add a high-powered subwoofer to your audio system. Both high-level (speaker level) and low-level (RCA) inputs are present, making this a universal solution for use with any head unit or other input sources.
-
Page 3: What Is Included
When first unpacking your new amplified system, please check that the package contains all of the items below. If something is missing, please contact our Tech Dept. Main Unit LoPro10 Amplified System Accessories Subwoofer Remote Control w/ Cable High-Level Input Harness... -
Page 4: Front Panel Controls And Features
Front Panel Controls and Features ① LED STATUS INDICATOR Blue – On Red –Protection ② SUB PHASE The Sub Phase can be used to adjust for bass response. Each vehicle will be different and should be set for your particular installation. If the bass response “disappears”, flipping the switch should fix and will properly align the phase with the rest of the system. -
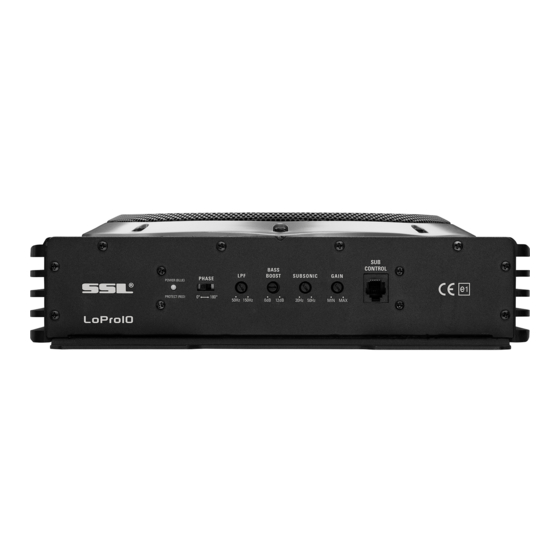
Page 5: Rear Panel Controls And Features
Fuse rating is a total of 25 A, always replace the fuse with the same type and value. ④POWER TERMINALS SSL recommends the use of high quality 8 gauge wiring. The ground should be kept under 3ft (36”). Always scrape away any paint for the ground connection. Ground point should be clean with the correct type of bolt to secure it. - Page 6 RCA Inputs (Low Level) RCA cables are preferred for best audio performance. Installation lengths will vary due to sizes. Always connect with the high-quality cables to avoid any induced noise. NOTE: DO NOT USE/CONNECT BOTH HIGH-LEVEL AND RCA INPUTS AT THE SAME TIME Speaker Input (High-Level) The high-level input(s) should only be used when your receiver lacks RCA Pre-Amp Outputs.
-
Page 7: Power Input Connections
Power Input Connections Connect the ground terminal to the closest point on the chassis of the vehicle. Keep this ground wire to less than 3 ft. (36”) in length. Use a high quality OFC 8 gauge wire. Connect the remote terminal to the remote output of the head unit to “REM” using 16 gauge wire. -
Page 8: Mounting The Subwoofer
Mounting the subwoofer 1. Find a suitable location in the vehicle in which to mount the amplifier. An optional location is shown below: 2. Make sure there is sufficient air circulation around the intended mounting Location. 3. The mounting feet have multiple mounting locations. 4. -
Page 9: Troubleshooting
Troubleshooting If you experience operation or performance problems with this product, compare your installation with the electrical wiring diagrams on the previous pages. If problems persist, read the following troubleshooting guide which may help. If you have any further questions, please give our Tech Department a call. Check to make sure you have a good ground connection Amplifier will not power up Check that the remote input (turn-on) has at least 9VDC... -
Page 10: Specifications
Specifications Maximum Power 1200 W < 0.1% S/N Ratio >88db Frequency Response 15 Hz - 150 Hz Input Sensitivity 200 mV - 6 V Low Pass Filter 50 Hz – 150 Hz @ 12dB/Oct Subsonic Filter 20 Hz – 50 Hz @ 6dB/Oct Bass Boost @ 45 Hz 0 to +12 dB...
Need help?
Do you have a question about the LoPro10 and is the answer not in the manual?
Questions and answers