
Related Manuals for MRC DA-130N


Summary of Contents for MRC DA-130N
- Page 1 INSTRUCTION MANUAL FOR DA-130N Portable Density/Specific Gravity Meter PLEASE READ THIS MANUAL CAREFULLY BEFORE OPERATION 3, Hagavish st. Israel 58817 Tel: 972 3 5595252, Fax: 972 3 5594529 mrc@mrclab.com MRC.VER.02-11.10...
-
Page 3: Table Of Contents
4.3 Rear view ................................7 4.4 Display window ..............................8 4.5 Operating unit ..............................9 5. Preparation for measurement by DA-130N......................10 5.1 Loading the battery ............................10 5.2 Setting the sampling nozzle ..........................11 5.3 Setting the memo pad............................11 5.4 Preliminary test .............................. - Page 4 9. Application of data processing..........................26 9.1 Storage of measuring data..........................26 9.1.1 Auto saving ..............................26 9.1.2 Manual storage ............................26 9.2 Making saved data .............................26 9.3 Deletion of stored data............................26 9.4 Display of measurement data and external output .....................27 9.5 Setting external output............................28 9.5.1 Data output to a personal computer via infrared communication ...............28 9.5.2 Data output to Printer..........................30 9.5.3 Data output to PC via RS-232C........................31...
-
Page 5: Safety Precautions
Safety Precautions Always observe these signs and introductions. You must observe cautionary messages and warnings in order to protect yourself as well as prevent others from physical injury or property damages. Warning! This symbol means prohibition of an This symbol means "Danger of severe injury act. - Page 6 Caution! Do not use a battery other than specified or mix new and old batteries. Danger exists of battery heated and leaking, causing fire, burn and contamination of the enviroment. Caution! Do not heat or break the battery or discard it in water or in flame. Danger exists of battery explosion, causing fire, injury and contamination of the enviroment.
-
Page 7: Introduction
1. Introduction We appreciate your patronage purchasing product the DA-130N Portable Density Specific Gravity Meter. By easy operation, you can obtain density and relative gravity of liquid as well as various concentrations. Please read this manual thoroughly before you use for actual measurement. -
Page 8: About The Manual
2. About the manual It is recommended to keep this manual near your system in order for quick reference. Here in below, some important messages are described for your safety, security and assurance. 1. Where there exists a danger of physical injury or possible death Warning! Danger of physical injury or possible death if the warning is ignored. -
Page 9: Supplied Parts
3. Supplied parts Make sure you have received all the necessary parts in the carton box. If you should find any missing part or broken parts, immediately contact your local dealer. Supplied parts list Part code Part name Remarks 98-319-0004 (1) Alkaline dry cell 2 pcs LR03G/1.5V... -
Page 10: Parts Configuration
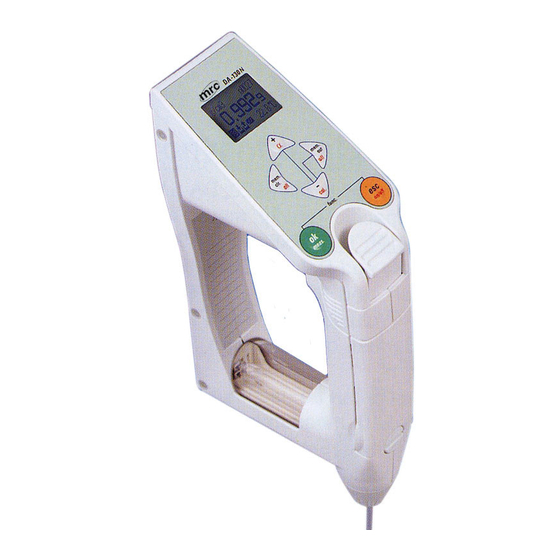
4. Parts configuration 4.1 Front view (1) Display window (2) Operating key (3) Sample discharging lever (4) Syringe cover (5) Screw stopper (6) Nozzle screw (7) Sampling nozzle 4.2 Side view (8) Sample intake lever (9) Intake lever stopper (10) Built-in syringe (11) Measuring cell... -
Page 11: Rear View
4.3 Rear view (12) Battery cover (13) Infra red receiver/transmitter... -
Page 12: Display Window
4.4 Display window Results screen Memory clear screen (3) (4) (5) (6)(7) (8) (10) (11) Shows unit for measurement data. Shows measurement data in preset unit. Shows sample name (a to z or space) Normal display shows sample number. Error number will appear in case of error. Appears when Stability is set at Auto (automatic stability sense mode). -
Page 13: Operating Unit
4.5 Operating unit (1) [mem.clr./all] key : Key to put “*” mark to identify data when data is output externally. When pressed for more than 2 seconds, all data can be cleared. Also this key shifts the cursor to the left for numerical entry. (2) [+/α] key: Key to move the cursor upward on selection. -
Page 14: Preparation For Measurement By Da-130N
5. Preparation for measurement by DA-130N 5.1 Loading the battery Set the dry cells in the battery holder. Use alkaline dry cells (size “AAA”). Insert the cell while paying attention to the polarity direction. Remove the battery cover by pulling it out. -
Page 15: Setting The Sampling Nozzle
5.2 Setting the sampling nozzle Attach the supplied sampling nozzle as illustrated: • Screw the sampling nozzle with the washer into the nozzle screw, and screw it in clockwise until it is securely fixed. • Use your hand to avoid stripping the screw thread. Caution! Do not use a tool like pliers. -
Page 16: Preliminary Test
5.4 Preliminary test Leave temperature unit (Celsius), measurement unit (g/cm ) and mode (Field) as initial value. Sample in pure water using the syringe. • After the measuring cell is filled with sample liquid, make sure there is no air bubble in the cell. Even a small bubble would deviate the results. -
Page 17: Setting Temperature Unit, Measuring Unit And Mode
6. Setting temperature unit, measuring unit and mode 6.1 Temperature unit Select Celsius or Fahrenheit. While pressing [esc] key, press [ok/meas.] key to show Function screen. Select <Temp. Unit> by [ + ], [ − ] key. Select temperature unit with [ + ], [ − ] key and confirm by [ok/meas.] key. 6.2 Measuring unit While pressing [esc] key, press [ok/meas.] key to show Function screen. - Page 18 It is necessary to configure temperature compensation coefficient of sample and converted temperature in advance. 10 coefficients for temperature compensation can be stored. Comp. No. : Select out of 10 stored values. Comp. Temp : Set compensation temperature. α× 1000 : Set value of (Temp.
- Page 19 (5) Measurement of API degree Measurement of density or API degree compensated in temperature to 15 ° C or 60 ° F for the product group A, B or D. Selection of temperature, 15 ° C or 60 ° F, will be automatically made when setting the temperature unit. Product group A: Crude oil [Measurement of density: API A (Density) Measurement of API degree: API A (Degree)]...
- Page 20 (10) Measurement of Plato degree Measurement of Plato degree at 20 ° C from density obtained at measurement temperature (11) Measurement of Proof degree Measurement of Proof degree at 60 ° F from density obtained at measurement temperature Proof degree is one of the units for alcohol content, and there is US Proof and British Proof. Each of them is different in conversion degree.
-
Page 21: Configuration Of Measurement Mode
6.3 Configuration of measurement mode Configuration of stability sense and data storage method While pressing [esc] key, press [ok/meas.] key to show Function screen. Select <Measure Mode> with [ + ], [ − ] key. Press [ok/meas.]. Custom Field Labo Sample Name : Single alphabet (space, a to z) can be used for identification. -
Page 22: Actual Measurement
7. Actual measurement 7.1 Cautions on measurement • When sample temperature and ambient temperature differ significantly, the upper left corner on display blinks. Here it blinks When difference in temperature between sample in the cell and ambient comes within approximately ± 5 ° C, it stops blinking. If the measurement data is going to be saved manually, not automatically, you have to wait until the data is stabilized after blinking stops. -
Page 23: Sample Measurement
(e.g. Sulfuric acid). If the syringe should be forced to be moved in this solidification state, it would scratch the inner surface, causing a possible leakage of a sample inside DA-130N. 7.2.1.2 Start measurement Only when is displayed (Stability:Auto), start measurement with [ok/meas.] key. -
Page 24: The Use Of Commercially Available Plastic Syringe
7.2.2 The use of commercially available plastic syringe 7.2.2.1 Sampling 1. Lower the sample discharging lever to the bottom. 2. Push the intake lever stopper upward to lock it. 3. Remove the screw stopper with a coin. Do not lose the screw stopper. -
Page 25: Calibration Of Measuring Cell
8. Calibration of measuring cell 8.1 Calibration with pure water (1) Set STD Calib. Mode at “Off” on Function <Calib.Mode>. (2) Press [esc] key 2 times to return to Main screen. (3) Sample pure water Note: Make sure that there is no air bubble in the measuring cell. (4) The measuring cell with pure water can be calibrated automatically with the key entry as follows: Press [cal.] key for more than 2 seconds to show inversed CALIB(Water) on display, showing calibration with pure water is in progress. -
Page 26: Calibration With Standard Liquid
8.2.1 Calibration with standard liquid of which density is known The measurement precision of DA-130N as specified can be usually maintained with pure water, however, if more precision is preferred, calibrate with standard liquid of which density is known within the range. -
Page 27: How To Dry The Cell
: Air discharge rate 1 to 2L/min (a pump for tropical fish can be used) Desiccant tube : silica gel 5 to 10g in tube Connect the above to DA-130N as illustrated below: For 4mm tubes of inside diameter Desiccant tube Empty container Air pump (1) Thoroughly clean the measuring cell with pure water. -
Page 28: Procedure Of Calibration With Air
When the optional manual pump is used to dry the cell. (1) Before connecting the kit, clean the cell with pure water and ethylalcohol. (2) Press the sample discharging lever all the way down, and push the sample intake lever upward to lock (3) With the adapter for the syringe attached, connect the kit as illustrated below, and feed air forcefully and manually. -
Page 29: Calibration Of Displayed Temperature
Note! Be sure to set the ‘STD Calib. Mode’ to “Off” in the Function menu (Calib. Mode) before performing calibration with air. 8.4 Calibration of displayed temperature Ordinarily, there is no need for calibration since the instrument has been calibrated in plant before shipment. -
Page 30: Application Of Data Processing
9. Application of data processing 9.1 Storage of measuring data The maximum number of data which can be stored in DA-130N memory is 1100 samples. 9.1.1 Auto saving Set ‘Memory In’ for “Custom” mode at “Auto” of Function <Meas. Mode>. -
Page 31: Display Of Measurement Data And External Output
9.4 Display of measurement data and external output You can recall the stored measurement data on display again, or output to the optional printer or PC. • How to recall a measurement data on display 1. Press [mem.out] key to blink the sample number on upper right corner. Here it blinks 2. -
Page 32: Setting External Output
9.5.1 Data output to a personal computer via infrared communication The DA-130N can transmit data to a personal computer with an infrared optical communication feature. For this purpose, install the data acquisition computer software (Mini Term). (It can be reached from our website ( ). - Page 33 The infrared ray lined PC (4) Select “IrDA”(infrared transmission) on Function-<Interface> of DA-130N. (5) Press [mem.out] key on DA-130N to show the measurement results, and press [ok/meas.] key to blink . The data will be output to PC as well as appear on the screen display.
-
Page 34: Data Output To Printer
(98-029-0007) and polar converter (98-404-0007). The optional stand (98-029-0006) will help you easily set up infrared receiving unit of DA-130N. An example of setting the stand and an IDP-100 printer is described here in this manual. Install the main unit and infrared RS converter onto the stand as shown, and connect the polar converter (98-404-0007) to IDP-100 Printer, and then, connect the infrared RS converter. -
Page 35: Data Output To Pc Via Rs-232C
RS converter (98-029-0007) as well as the data acquisition software (Mini Term). (It can be reached from our website (www.mrclab.com). Click “PRODUCT,” then click “DA-130N (Portable Model)” in the Density/Specific Gravity Meter section. The “Data communication Software for Portable Analyzer” (98-439-0062) can be downloaded from there.) The optional stand (98-029-0006) will help you easily set up infrared receiving unit of DA-130N. -
Page 36: Other Useful Functions
10. Other useful functions The DA-130N features various functions such as conversion of data unit or external data output. With [esc] key pressed, push [ok/meas.] key to show Function screen. Move the cursor with [ + ], [ − ] key and confirm by [ok/meas.] key. -
Page 37: Adjust Brightness Of Lc Display; Setting Of Backlight: On/Off
10.2 Adjust brightness of LC display; Setting of Backlight: on/off • Backlight: on/off Can set conditions for on/off of backlight. Auto off : Automatically turn off about 5 seconds after keying in for turning on. Always off : Keep turning-off status. •... -
Page 38: Set Date
10.5 Set Date DA-130N features a date setting and the set date can be output to a printer or a PC with measurement results. Display the Function screen display by ‘[esc]+[ok/meas.]’key combination. Select <Date & Time> using [ + ] or [ − ] key. -
Page 39: Power Source
11. Power source This unit is powered by 2 alkaline dry cells of 1.5V LR03 (size AAA). When the batteries become exhausted, the mark will appear on the display. The normal life of the cell is 90 hours. If not in use, turn off the power. 11.1 Change the battery The two AAA alkaline dry cells are housed in the back of the display unit. -
Page 40: Maintenance
12. Maintenance Replacement of the built-in syringe • Before replacement, repeat sampling to thoroughly clean up the line system. • The interval of replacement depends on the nature of sample or frequency of measurements. How to change the syringe: Press down the sample discharging lever all the way, and remove the syringe cover by pulling it toward you as illustrated. -
Page 41: Cautions In Use
Cautions in use This instrument is designed rigid enough to endure measurement work on site, however, if you handle the unit under any of the following conditions, it may malfunction or need to be repaired. This unit is not explosion-proof. Do not use it in such an area. (1) The unit has a not-sophisticated drip-proof construction (IP54), however, care must be taken not to have it drip wet. -
Page 42: Parts List
14. Parts list Consumables · Options Operation manual Basic operation Alkali manganese Battery case 98- 595- 0492 manual dry cell 98- 319- 0005 98- 595- 0490 (4pcs/set) 98- 319- 0004S Operation manual Memo pad (10sheets/set) 98- 594- 0003S Built- in syringe 98- 560- 0024 Nozzle screw 98- 560- 0103... - Page 43 Option Part code Part name Remarks Sketch IDP-100-20 100V IDP-100 IDP-100-21 1 set 120V Impact dot printer IDP-100-22 230V...
-
Page 44: Troubleshooting
15. Troubleshooting 15.1 Error messages and their remedies Error No. Error Remedies E-01 Calibration error ⋅ Sample water again (1) No filling measuring cell with pure water ⋅ Sample water again (2) Air bubble in the cell ⋅ Check jointed parts (3) Air leak from joints ⋅... -
Page 45: Exhibit No Repeatability On Measured Value Or Show Deviation On Measured Value
15.2 Exhibit no repeatability on measured value or show deviation on measured value START Is sample uniform? Stir sample to make it uniform (Sample with separated lipuid phase results in deviating measurements) Are air bubbles in sample? Take another sample by proper sampling Has measureing cell stain? Rinse measuring cell well... -
Page 46: Technical Data
16. Technical data Type and model DA-130N Portable Density/Specific Gravity Meter Measuring method Natural Oscillation type Measurement object Liquid sample test materials Range 0.0000 ~ 2.0000 g/cm Precision ±0.001 g/cm Resolution 0.0001 g/cm 0 ~ 40.0 °C Temperature range Display contents... -
Page 47: Warranty And After-Sale Service
17. Warranty and After-Sale Service (1) We thank you very much for purchasing our product. The product you have purchased passed strict factory inspection and testing prior to shipment, and maintenance service is performed under the quality system, however, if any defective parts or malfunctions should be found due to Manufacturer's craftsmanship, installation or insufficient description of operating manual, the quality is guaranteed for one year after the date of purchase by free of charge repair except for consumable parts, provided that the instrument or the parts have been... -
Page 48: Appendix 1: Density Of Pure Water (0~40°C)
Appendix 1: Density of pure water (0∼40°C) Temp. Density Temp. Density Temp. Density Temp. Density (°C) (g/cm (°C) (g/cm (°C) (g/cm (°C) (g/cm 0.99984 0.99990 0.99961 0.99799 0.99534 0.99994 0.99950 0.99777 0.99503 0.99996 0.99938 0.99754 0.99471 0.99997 0.99925 0.99730 0.99438 0.99996 0.99910 0.99705...
Need help?
Do you have a question about the DA-130N and is the answer not in the manual?
Questions and answers