Table of Contents
Advertisement
Quick Links
Advertisement
Chapters
Table of Contents
Troubleshooting

Related Manuals for ANATEL A643a


Summary of Contents for ANATEL A643a
- Page 1 Operator Manual ANATEL A643a TOC ANALYZER...
- Page 1 To View Available Anatel A643a at SSLLC.com Please Click Here. Operator Manual ANATEL A643a TOC ANALYZER...
-
Page 3: Table Of Contents
Anatel A643a - Table of Contents 3 of 220 Table of Contents Introduction The Anatel A643a TOC Analysis System ..........14 Anatel A643a Analyzer Features ............15 Operational Overview ................16 Instrument Installation General Information ................19 Pre-Installation Procedures..............20 2.2.1... -
Page 3: Table Of Contents
Anatel A643a - Table of Contents 3 of 220 Table of Contents Introduction The Anatel A643a TOC Analysis System ..........14 Anatel A643a Analyzer Features ............15 Operational Overview ................16 Instrument Installation General Information ................19 Pre-Installation Procedures..............20 2.2.1... - Page 4 4 of 220 Table of Contents - Anatel A643a Anatel A643a Setup General Information ................51 Factory Defaults..................51 Password Security ................. 54 Display Units ..................56 The Auto TOC Mode................59 5.5.1 Auto TOC Software Setup ............62 5.5.2 Auto TOC Printout ..............
- Page 4 4 of 220 Table of Contents - Anatel A643a Anatel A643a Setup General Information ................51 Factory Defaults..................51 Password Security ................. 54 Display Units ..................56 The Auto TOC Mode................59 5.5.1 Auto TOC Software Setup ............62 5.5.2 Auto TOC Printout ..............
- Page 5 11.2 Hardware Setup ................... 145 Serial Communications 12.1 General Information ................147 12.2 Hardware Setup ................... 147 12.3 Anatel A643a Command Set ............... 149 12.3.1 Mode Set Commands ............. 149 12.3.2 Parameter Set Commands ............. 150 12.3.3 Data Read Commands ............151 12.3.4 Log Commands ..............
- Page 5 11.2 Hardware Setup ................... 145 Serial Communications 12.1 General Information ................147 12.2 Hardware Setup ................... 147 12.3 Anatel A643a Command Set ............... 149 12.3.1 Mode Set Commands ............. 149 12.3.2 Parameter Set Commands ............. 150 12.3.3 Data Read Commands ............151 12.3.4 Log Commands ..............
- Page 6 6 of 220 Table of Contents - Anatel A643a Troubleshooting 14.1 General Information ................175 14.2 Alarm Codes ..................175 14.3 Troubleshooting ................... 178 14.3.1 Draining the Instrument ............181 14.4 Sensor Diagnostics ................182 14.4.1 Electronics Tests ..............183 14.4.2 ................
- Page 6 6 of 220 Table of Contents - Anatel A643a Troubleshooting 14.1 General Information ................175 14.2 Alarm Codes ..................175 14.3 Troubleshooting ................... 178 14.3.1 Draining the Instrument ............181 14.4 Sensor Diagnostics ................182 14.4.1 Electronics Tests ..............183 14.4.2 ................
- Page 7 • Read the Anatel A643a TOC Analyzer Operator Manual thoroughly before installing or operating the instrument. Although the A643a is designed for rugged use, it is still an instrument that should be cared for and maintained as described in this manual.
- Page 7 • Read the Anatel A643a TOC Analyzer Operator Manual thoroughly before installing or operating the instrument. Although the A643a is designed for rugged use, it is still an instrument that should be cared for and maintained as described in this manual.
- Page 8 A643a TOC Analyzer Warnings and Cautions CAUTION: It is extremely important that the A643a TOC Analyzer be plumbed correctly to ensure proper sample flow through the instrument and, consequently, accurate analysis results. The Outlet Tubing must be 10 feet in length and cannot terminate more than 3 feet below the Analyzer.
- Page 8 A643a TOC Analyzer Warnings and Cautions CAUTION: It is extremely important that the A643a TOC Analyzer be plumbed correctly to ensure proper sample flow through the instrument and, consequently, accurate analysis results. The Outlet Tubing must be 10 feet in length and cannot terminate more than 3 feet below the Analyzer.
- Page 9 The CE Marking applies only to 230 VAC instruments and has been affixed on the devices according to the EU Directives noted above. The A643a TOC Analyzer complies with those parts of 21 CFR, Part 11 concerning the collection, retention, access and retrieval of data as electronic records. The instrument uses no electronic signature(s), thus those parts of the rule referring to electronic signature(s) are not applicable.
- Page 9 The CE Marking applies only to 230 VAC instruments and has been affixed on the devices according to the EU Directives noted above. The A643a TOC Analyzer complies with those parts of 21 CFR, Part 11 concerning the collection, retention, access and retrieval of data as electronic records. The instrument uses no electronic signature(s), thus those parts of the rule referring to electronic signature(s) are not applicable.
- Page 10 Reference Document: IEC 417–5019 WARNING The UV lamp used for oxidation by the Anatel A643a emits ultraviolet radiation and contains small amounts of mercury vapor. When replacing it, dispose of the expired UV lamp in accordance with applicable local regulations. Hach Ultra accepts used lamps for proper disposal.
- Page 10 Reference Document: IEC 417–5019 WARNING The UV lamp used for oxidation by the Anatel A643a emits ultraviolet radiation and contains small amounts of mercury vapor. When replacing it, dispose of the expired UV lamp in accordance with applicable local regulations. Hach Ultra accepts used lamps for proper disposal.
- Page 11 Anatel A643a - Manual Overview 11 of 220 CAUTION: When replacing the battery, ensure that the positive (+) indicator on the battery is inserted at the positive end of battery holder. CAUTION: Use the grounded power cord provided and do not clip the ground pin.
- Page 11 Anatel A643a - Manual Overview 11 of 220 CAUTION: When replacing the battery, ensure that the positive (+) indicator on the battery is inserted at the positive end of battery holder. CAUTION: Use the grounded power cord provided and do not clip the ground pin.
- Page 12 • Edition 9, December 2002, Anatel Corporation • Edition 10, March 2003, Anatel Corporation • Edition 11, November 2006, Anatel Corporation • Edition 12, June 2007, Hach Ultra Analytics, Inc. Acknowledgements • Anatel is a registered trademark of Danaher Corporation. Anatel Operator Manual...
- Page 12 • Edition 9, December 2002, Anatel Corporation • Edition 10, March 2003, Anatel Corporation • Edition 11, November 2006, Anatel Corporation • Edition 12, June 2007, Hach Ultra Analytics, Inc. Acknowledgements • Anatel is a registered trademark of Danaher Corporation. Anatel Operator Manual...
-
Page 13: Introduction
13 of 220 Introduction The Anatel A643a TOC Analyzer, a recent generation of on-line instrumentation, are designed to specifically address pharmaceutical industry needs. Building on the proven success of Hach Ultra’s line of TOC Analyzers, the Anatel A643a–S and Anatel A643a–P Analyzers offer measurement capabilities which meet the requirements of the United States Pharmacopeia (USP). -
Page 14: The Anatel A643A Toc Analysis System
65 °C to an acceptable level for TOC analysis. Under most operating conditions, sample water of up to 65 °C can be routed directly to the Anatel A643a for TOC analysis. For sample water temperatures greater than 65 °C, a heat exchanger is required for analysis. -
Page 15: Anatel A643A Analyzer Features
15 of 220 Fig 1-2 : A-Net RS-485 Local Area Network Anatel A643a Analyzer Features Anatel A643a TOC Analyzers offer several unique advantages in the monitoring of ultrapure water systems: Calibration and The Anatel A643a Analyzer can be calibrated with from one to three Validation TOC standards using Anatel’s pre-packaged Calibration Standards. -
Page 16: Operational Overview
The Anatel A643a also can be set to alarm at USP recommended uncompensated conductivity levels. Local Area The ability to link as many as eight Anatel A643a Analyzers to a single Networking (LAN) C80 Controller provides timely readings of TOC levels even at the most Capability distant and crucial areas of the water system. -
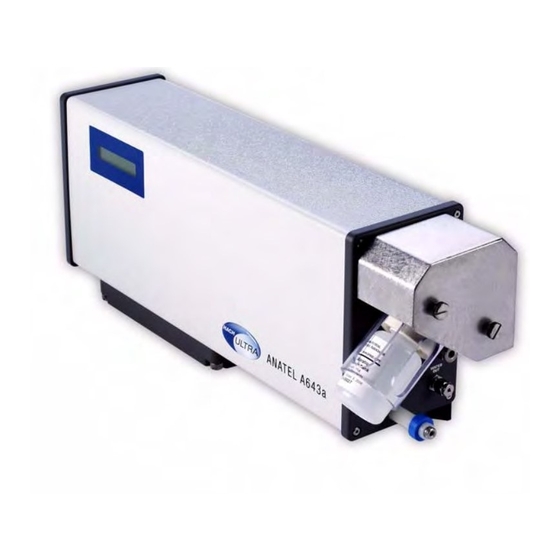
Page 17: Fig 1-3 : Anatel A643A-P Toc Analyzer Components
Anatel A643a - Introduction 17 of 220 Fig 1-3 : Anatel A643a–P TOC Analyzer Components Anatel Operator Manual... -
Page 17: Fig 1-3 : Anatel A643A-P Toc Analyzer Components
Anatel A643a - Introduction 17 of 220 Fig 1-3 : Anatel A643a–P TOC Analyzer Components Anatel Operator Manual... - Page 18 18 of 220 Introduction - Anatel A643a Anatel Operator Manual...
- Page 18 18 of 220 Introduction - Anatel A643a Anatel Operator Manual...
-
Page 19: Instrument Installation
Instrument Installation General Information All models of the Anatel A643a Analyzer are designed to provide a flexible method of monitoring ultrapure water systems. The basic Anatel A643a–S configuration consists of an Analyzer and a C80 Controller. These two components are combined with a printer on the Anatel A643a–P to form a portable analysis system. -
Page 20: Pre-Installation Procedures
Controller and its associated Anatel A643a–S Analyzer (these connections are internal to the Anatel A643a–P). Each Anatel A643a–S Analyzer and C80 Controller is supplied with a 3-foot local cable, a twin BNC “tee” connector, and a passive terminator. The C80 Controller also includes a 10-foot trunk cable to facilitate communications connections. -
Page 21: Fig 2-1 : Passive Terminator
Fig 2-1 : Passive Terminator 5) Plug both components into an AC power source. A power cord is integral to Anatel A643a Analyzers; power is supplied to the C80 Controller through a 9 VDC wall mounted transformer that attaches similar to the communications connections. -
Page 22: Software Setup
With communications established, define the System Time on the C80 Controller and give the Anatel A643a–S a Sensor Name. The same programming should be performed on stand- alone Anatel A643a–P Analyzers to assure that they are operating properly. -
Page 22: Software Setup
With communications established, define the System Time on the C80 Controller and give the Anatel A643a–S a Sensor Name. The same programming should be performed on stand- alone Anatel A643a–P Analyzers to assure that they are operating properly. -
Page 23: Fig 2-6 : System Time Screen
Anatel A643a - Instrument Installation 23 of 220 4) Specify System Time and press Enter to display that parameter screen. The programmed Date is displayed numerically in a month/day/year format; the Time in an hour:minute format. A block cursor begins flashing to highlight the initial interval of the date. -
Page 24: Fig 2-9 : Current Time Display
Note: Default: Serial Number The first step in setting up an Anatel A643a Analyzer is to name it so that it can be identified on displays and printouts. Up to 13 alphanumeric characters may be assigned to name the instrument. It is suggested that the Analyzer’s Sensor Name be chosen based on its location, function or other relevant designation. -
Page 25: Fig 2-12 : Analysis Setup Selections
Anatel A643a - Instrument Installation 25 of 220 To name an Anatel A643a Analyzer: 1) With Sensor Setup highlighted on the Setup Menu, press Enter. Analysis Setup: Display/Print: Sensor Name: Diagnostics: Fig 2-12 : Analysis Setup Selections 2) Specify Sensor Name and press Enter to display that parameter screen. The first line of the display identifies the chosen Analyzer by its Channel ID Number. -
Page 26: Hardware Installation
2.3.1 Mounting The C80 Controller and the Anatel A643a–S Analyzer are the only system components that require stationary mounting. The Anatel A643a–P Analyzer is designed to stand vertically on its feet, allowing these portable instruments to move to different locations easily and perform spot analyses. -
Page 27: Fig 2-17 : Controller Mounting Dimensions
CAUTION: Do not expose the Anatel A643a Analyzer to a caustic atmosphere, as may be present in a DI regeneration area or near an acid waste sump; exposure will corrode electronic circuitry and damage analysis components. If an Analyzer must be installed in a hazardous area, it must be... -
Page 28: Fig 2-18 : Anatel A643A-S Mounting Template
Instrument Installation - Anatel A643a Fig 2-18 : Anatel A643a–S Mounting Template The Anatel A643a–S Analyzer is secured using two 1/4" mounting brackets located on the rear of the instrument in conjunction with two 1/4" tie-down tabs positioned along its bottom. The mounting dimensions for the Analyzer are shown below. -
Page 29: Plumbing Connections
Fig 2-19 : Anatel A643a–P Orientation The following plumbing, communications and power connections are identical for the Anatel A643a–S and Anatel A643a–P Analyzers. Note: The terms “Anatel A643a” and “Analyzer” in th following instructions refer generally to all A643a TOC Analyzer models. 2.3.2 Plumbing Connections Sample connections are made through a 1/4”... -
Page 30: Fig 2-20 : High-Purity Water System
A length of 1/4” PFA (perfluoroalkoxy resin) sample tubing and a length of 1/8” OD polypropylene drain tubing are supplied with each Anatel A643a Analyzer. The suitability of any sample tube to the sample temperature and pressure should be determined prior to plumbing the instrument. -
Page 31: Fig 2-21 : Anatel A643A Analyzer
4) Hand-tighten the compression nut taking care not to pull on the tubing. 5) Mark both the compression nut and the WATER IN connector as a reference for tightening the nut. 6) Tighten the compression nut 1-1/4 turns to secure the connection. Fig 2-21 : Anatel A643a Analyzer Anatel Operator Manual... -
Page 32: Fig 2-22 : Anatel A643A Water I/O Connections
32 of 220 Instrument Installation - Anatel A643a Fig 2-22 : Anatel A643a Water I/O Connections 7) Repeat step 2 through step 5 to attach the 10-foot 1/8” OD polypropylene drain tubing to the WATER OUT port. Run the open end to a gravity feed drain. -
Page 33: Communications Connections
Anatel A643a system component for installation, relocation or repair. The C80–Anatel A643a–S interface must be configured as a single trunk line with local cabling no longer than three feet in length, although the trunk line can extend a total of 3000 feet (not including local cable drops). -
Page 34: Fig 2-23 : Anatel A643A Analyzer (Bottom View)
1) Make sure the Analyzer is turned OFF and disconnected from its power source. 2) Remove the I/O Connector Block from the bottom of the Anatel A643a analyzer by loosening the four retaining screws. A medium flat blade screwdriver may be required. -
Page 34: Fig 2-23 : Anatel A643A Analyzer (Bottom View)
1) Make sure the Analyzer is turned OFF and disconnected from its power source. 2) Remove the I/O Connector Block from the bottom of the Anatel A643a analyzer by loosening the four retaining screws. A medium flat blade screwdriver may be required. - Page 35 Anatel A643a Network connections via the twinaxial BNC cable. The C80 Controller and the Anatel A643a–S are supplied with a 3-foot length of local A-Net cable; cable for the Anatel A643a–P Analyzers is provided in their installation kits.
- Page 35 Anatel A643a Network connections via the twinaxial BNC cable. The C80 Controller and the Anatel A643a–S are supplied with a 3-foot length of local A-Net cable; cable for the Anatel A643a–P Analyzers is provided in their installation kits.
-
Page 36: Power Connections
Instrument Installation - Anatel A643a 2.3.4 Power Connections AC Power for each Anatel A643a Analyzer is provided via its IEC 320 power receptacle and molded power cord. The cord plugs into a standard AC power source (see “Specifications and Accessories” on page 191 for specific requirements). -
Page 37: Fig 2-25 : Manual Menu
Fig 2-27 : Special Modes Menu 6) Use the Up and Down Keys to specify Clean. 7) Press Enter to place the Anatel A643a in its Self-Clean Mode of operation, then press Esc twice to return to the normal display. -
Page 37: Fig 2-25 : Manual Menu
Fig 2-27 : Special Modes Menu 6) Use the Up and Down Keys to specify Clean. 7) Press Enter to place the Anatel A643a in its Self-Clean Mode of operation, then press Esc twice to return to the normal display. -
Page 38: Fig 2-28 : Print Menu
8) With the Anatel A643a sufficiently cleaned, automatic TOC analysis can be initiated. Press the Menu Key to access its Manual Mode. -
Page 38: Fig 2-28 : Print Menu
8) With the Anatel A643a sufficiently cleaned, automatic TOC analysis can be initiated. Press the Menu Key to access its Manual Mode. -
Page 39: Network Installation
One C80 controller, for example, can oversee as many as seven additional A643a analyzers, or a single A643a may be linked to eight controllers. Regardless of the instrument combination, an A-Net network must consist of at least one C80 Controller and one A643a analyzer. -
Page 40: Controller Address
Note: Default: Address 9 Like A643a Analyzers, each C80 Controller also must have its own unique address on the Network for identification and reporting functions. The Sensor address is pre-configured at the factory to a default of “9,” but may have to be changed in order to avoid a Network conflict. -
Page 41: Network Setup
Anatel A643a - Network Installation 41 of 220 Fig 3-4 : Controller Address Screen To change the Controller’s A-Net address: 1) While holding the Setup Key down, cycle the Controller’s power by removing, then restoring, its power connection (on an A643aS or A643aP, simply turn the Sensor OFF and then back ON). -
Page 42: Fig 3-5 : A-Net Communications Connections
A643a-S Analyzers A643a-P Analyzers • Maximum of eight C80 Controllers • Maximum of eight A643a Sensors Note: It is recommended that once the Network communications have been established with all instruments, the System Time be again set as described in “System Time”... -
Page 43: Network Connections
Sensor and can be found in its installation kit. Note: The stationary A643a-S Analyzer is shipped with the local cable already installed. Note: Always disconnect the instrument from its power source before attempting to access internal components. -
Page 43: Network Connections
Sensor and can be found in its installation kit. Note: The stationary A643a-S Analyzer is shipped with the local cable already installed. Note: Always disconnect the instrument from its power source before attempting to access internal components. - Page 44 44 of 220 Network Installation - Anatel A643a 6) Replace the metal strain relief plate. 7) Replace the I/O Connector Block on the bottom of the Sensor, taking care not to pinch any wires, and secure it in place by tightening the thumbscrews.
- Page 44 44 of 220 Network Installation - Anatel A643a 6) Replace the metal strain relief plate. 7) Replace the I/O Connector Block on the bottom of the Sensor, taking care not to pinch any wires, and secure it in place by tightening the thumbscrews.
-
Page 45: C80 Controller Setup
General Information The C80 Controller provides the user interface with the various Analyzers, furnishing data displays and access to individual Anatel A643a parameters. The Controller is a stand-alone unit or an integral component of the Anatel A643a–P Analyzer. User interaction with the C80 Controller is through a consistent interface. Its 4-line by 16-character display affords full functionality for interacting with its associated Anatel A643a Analyzers, allowing the user to manage their operation individually. -
Page 46: Operational
• An “X” in instrument display and printout examples represents any number or character. • While an Edit Mode is employed to change Anatel A643a parameter values, there is no temporary screen. All parameter changes are made in real time and the displayed values are those that are saved. -
Page 47: Fig 4-2 : Contrast Adjustment
Anatel A643a - C80 Controller Setup 47 of 220 Fig 4-2 : Contrast Adjustment To adjust the Controller’s display contrast: 1) With any Channel View displayed, press the Setup Key and its menu selections are presented. 2) Use the Up and Down Keys to specify C80 Setup. -
Page 48: View Options
C80 Controller Setup - Anatel A643a View Options The View Key determines the type of Anatel A643a information that is presented in the Controller’s LCD display. Two data display formats are offered: 1) Detailed readings for a single Analyzer including the current TOC, trend, profile type, conductivity (or resistivity), and temperature values. -
Page 49: The Multichannel View
Anatel A643a - C80 Controller Setup 49 of 220 Fig 4-7 : Single Channel View 4.5.2 The Multichannel View Multichannel is the initial default view when a C80 Controller is managing more than one instrument. This network display affords a summary listing of all its associated Analyzers to provide an overview of several aspects of the monitored process. -
Page 50: The Channel Display
50 of 220 C80 Controller Setup - Anatel A643a 4.5.3 The Channel Display The Chnl Key furnishes general information about the instrument including its Model and Serial Number, operational mode and current state. These Channel data are accessible either from the Single Channel View, or by using the Up and Down Keys to identify the desired Analyzer in the Multichannel View and then pressing Chnl. -
Page 51: Anatel A643A Setup
69). Factory Defaults Anatel A643a Analyzers are shipped from the factory equipped with a set of default parameter values so that they can generate data as soon as they have been installed and powered up. A list of the Analyzer’s current parameter settings is available through the Print Setup menu selection (see “Printouts”... -
Page 51: Anatel A643A Setup
69). Factory Defaults Anatel A643a Analyzers are shipped from the factory equipped with a set of default parameter values so that they can generate data as soon as they have been installed and powered up. A list of the Analyzer’s current parameter settings is available through the Print Setup menu selection (see “Printouts”... - Page 52 52 of 220 Anatel A643a Setup - Anatel A643a Factory Defaults (Continued) Table 5-1 : Outputs mA Range: 4 to 20mA TOC Zero-Scale: 0 ppb TOC Full-Scale: 1000 ppb Conductivity Zero-Scale: 0 µS/cm U Conductivity Full-Scale: 20 µS/cm U Temperature Zero-Scale: 5 °C...
- Page 52 52 of 220 Anatel A643a Setup - Anatel A643a Factory Defaults (Continued) Table 5-1 : Outputs mA Range: 4 to 20mA TOC Zero-Scale: 0 ppb TOC Full-Scale: 1000 ppb Conductivity Zero-Scale: 0 µS/cm U Conductivity Full-Scale: 20 µS/cm U Temperature Zero-Scale: 5 °C...
-
Page 53: Fig 5-1 : Factory Defaults Menu
Anatel A643a - Anatel A643a Setup 53 of 220 Fig 5-1 : Factory Defaults Menu To reset the instrument’s factory default parameters: 1) With the desired Analyzer selected in any View, press the Setup Key. 2) Use the Up and Down Keys to specify Sensor Setup. -
Page 53: Fig 5-1 : Factory Defaults Menu
Anatel A643a - Anatel A643a Setup 53 of 220 Fig 5-1 : Factory Defaults Menu To reset the instrument’s factory default parameters: 1) With the desired Analyzer selected in any View, press the Setup Key. 2) Use the Up and Down Keys to specify Sensor Setup. -
Page 54: Password Security
The Anatel A643a allows two levels of password security: a Supervisor who has access to all functions and an Operator who can alter everything but the password entries and the Log Setup Menu (see “Internal Log”... -
Page 54: Password Security
The Anatel A643a allows two levels of password security: a Supervisor who has access to all functions and an Operator who can alter everything but the password entries and the Log Setup Menu (see “Internal Log”... -
Page 55: Fig 5-5 : Setting Supervisor Password Screen
Anatel A643a - Anatel A643a Setup 55 of 220 3) Press Enter to access its submenu. 4) Specify Display/Print from among the available selections and press Enter to display its options. 5) Specify Set Password and press Enter. 6) Use the Up and Down Keys to specify Supervisor ID and press Enter to display that screen. -
Page 56: Display Units
21) Repeat the selection procedure to define the other password characters. 22) With the correct password displayed, press Esc to continue with full instrument access. It is suggested that when changes to the Anatel A643a have been completed, press View to exit this setting and safeguard access. -
Page 57: Fig 5-10 : Display Units Menu
6) Use the Up and Down Keys to select the desired format. Fig 5-11 : Display Units Screen The A643a TOC Analyzer software can report the actual or temperature-compensated conductivity (or resistivity) of the sample water. Compensated values are displayed as if the solution was being measured at 25 °C: Compensated conductivities are displayed as µS C. -
Page 58: Fig 5-12 : Uncompensated Conductivity Display
In addition to reporting the uncompensated values, they are monitored for limit excursions. The Anatel A643a Analyzer compares the uncompensated conductivity value to a set of USP (United States Pharmacopeia) limits and issues an alarm if the corresponding limit is exceeded (see “Uncompensated Conductivity Alarms”... -
Page 59: The Auto Toc Mode
3) Press Enter to enable the Auto TOC Mode. Fig 5-14 : Auto TOC Mode Selection In this mode, water analyses are conducted automatically by the Anatel A643a using a patented procedure. TOC measurement uses a microprocessorcontrolled photocatalytic process in conjunction with conductivity detection. The initial conductivity of the water sample is determined to establish a reference value. -
Page 60: Fig 5-15 : Analysis Time Line
60 of 220 Anatel A643a Setup - Anatel A643a the resulting change in conductivity is used to calculate the concentration of Total Organic Carbon present in parts per billion (ppb). The Auto TOC analysis process is comprised of three successive stages: the Sample, Oxidation and Idle Times. -
Page 61: Fig 5-17 : P1-Type Oxidation Curve
Anatel A643a - Anatel A643a Setup 61 of 220 Conductivity (microsiemens) Time (minutes) Fig 5-17 : P1-Type Oxidation Curve Abrupt changes in the Profile Type can indicate a change in water chemistry. For example, a change from a P2 to a P3 Profile Type at a TOC level of 10 ppb, indicates a contamination shift towards more complex compounds. -
Page 62: Auto Toc Software Setup
5.5.1 Auto TOC Software Setup There are several parameters which define Anatel A643a operation in the Auto TOC Mode. These variables include setting the Sample and Cycle Times, as well as the instrument’s Sample Mode setting. These time parameters are accessed through the instrument’s Times &... -
Page 63: Fig 5-21 : Sample Time
Note: Default: 1 Minute The Sample Time is the period during which water flows through the Anatel A643a’s measurement cell prior to oxidation. This ensures that a discrete and representative water sample is oxidized during each analysis. The interval is user-selectable from 00:00:00 to 17:59:59 and a proper setting helps assure accurate and timely analysis results. -
Page 64: Fig 5-22 : Sample Time Screen
64 of 220 Anatel A643a Setup - Anatel A643a the Sample Time must be limited, the setting should allow a 60 mL sample flow through the instrument with an additional 25 mL for each meter of 1/4” tubing traveled. Measure the flow through the instrument during the preoxidation Sample Time and calculate the time necessary for this volume of water. -
Page 65: Fig 5-25 : The Cycle Time Screen
If the Cycle Time exceeds the period required for the combined sample and oxidation steps, the Anatel A643a defaults to an Idle state until the next analysis is scheduled to begin. If the specified Cycle Time is less than the combined sample and oxidation times, the next analysis begins immediately. -
Page 66: Fig 5-27 : Change Cycle Time
66 of 220 Anatel A643a Setup - Anatel A643a 1 SENSOR NAME Cycle Time 00:30:00 h:mm:ss to change Fig 5-27 : Change Cycle Time Note: To assure continuous analyses, set the Cycle Time to 0. 6) Press Enter to retain the setting. -
Page 66: Fig 5-27 : Change Cycle Time
66 of 220 Anatel A643a Setup - Anatel A643a 1 SENSOR NAME Cycle Time 00:30:00 h:mm:ss to change Fig 5-27 : Change Cycle Time Note: To assure continuous analyses, set the Cycle Time to 0. 6) Press Enter to retain the setting. -
Page 67: Fig 5-29 : Sampling Mode Screen
5.5.1.4 Cycle Modes Note: Default: TOC & Idle The Anatel A643a can report the conductivity (or resistivity) and temperature of the sample water during the instrument’s Idle Time (see “Cycle Time” on page 65), if desired, through the Cycle Modes. For example, a one-hour Cycle Time may require 15 minutes for TOC analysis;... -
Page 68: Fig 5-30 : Cycle Modes
68 of 220 Anatel A643a Setup - Anatel A643a Fig 5-30 : Cycle Modes To enable Cycle Modes data reporting: 1) With the desired instrument selected in any View, press the Setup Key. 2) Use the Up and Down Keys to specify Sensor Setup and press Enter. -
Page 68: Fig 5-30 : Cycle Modes
68 of 220 Anatel A643a Setup - Anatel A643a Fig 5-30 : Cycle Modes To enable Cycle Modes data reporting: 1) With the desired instrument selected in any View, press the Setup Key. 2) Use the Up and Down Keys to specify Sensor Setup and press Enter. -
Page 69: Auto Toc Printout
69 of 220 5.5.2 Auto TOC Printout Note: Default: Continuous Fig 5-32 : Sample TOC Printout The TOC printout furnishes the following Anatel A643a Analyzer information: TOC Printout Information Table 5-2 : Sensor Model Number of the instrument. The Serial Number of the instrument. -
Page 70: Fig 5-33 : Auto Toc Printout
70 of 220 Anatel A643a Setup - Anatel A643a TOC Printout Information (Continued) Table 5-2 : Sensor TREND [PPB/HR] The TOC directional trend in ppb over the last hour. COND (or RESIS) The conductivity (or resistivity) of the sample if it is temperature-uncompensated. -
Page 71: The Purge Mode
10) Press Esc repeatedly to exit this function and return to the normal display. The Purge Mode In the Purge Mode, the Anatel A643a’s internal sample valve is open to permit sample water to continuously flow through its measurement cell. This action provides a method of reporting the conductivity (or resistivity) and temperature values on the Controller’s display and on local... -
Page 72: Purge Printouts
72 of 220 Anatel A643a Setup - Anatel A643a Fig 5-37 : Selecting the Purge Mode 5.6.1 Purge Printouts Note: Default: Timed / 1 Minute As with the Auto TOC Mode, there are two potential Purge Print intervals: Timed generates a purge printout at user-specified intervals;... -
Page 72: Purge Printouts
72 of 220 Anatel A643a Setup - Anatel A643a Fig 5-37 : Selecting the Purge Mode 5.6.1 Purge Printouts Note: Default: Timed / 1 Minute As with the Auto TOC Mode, there are two potential Purge Print intervals: Timed generates a purge printout at user-specified intervals;... -
Page 73: Fig 5-38 : Purge Printout
Anatel A643a - Anatel A643a Setup 73 of 220 Fig 5-38 : Purge Printout Note: Conductivity is shown as “COND uS/cm” if it is temperature compensated. To specify a Purge Print interval: 1) With the desired instrument selected in any View, press the Setup Key to display its submenu. -
Page 74: Fig 5-40 : Timed Purge Print Screen
74 of 220 Anatel A643a Setup - Anatel A643a • Timed generates a printout at the specified interval (Default: 1 Minute). • Paper Saver generates a printout when the difference in conductivity values between the current and the previous analysis cycle exceeds a specified percentage. -
Page 75: The Manual Mode
10) Press Esc repeatedly to exit this function and return to the normal display. The Manual Mode Analysis and reporting functions are continuous when the Anatel A643a is in the Auto TOC Mode. There are times, however, when manual control over the instrument’s analysis is desirable. -
Page 76: Grab Samples
Anatel A643a Setup - Anatel A643a 5.7.1 Grab Samples Off-line grab samples are accommodated by the Anatel A643a. Samples from various sources, such as in a laboratory setting, can be analyzed. Up to three analyses of a single sample may be performed using this procedure. -
Page 76: Grab Samples
Anatel A643a Setup - Anatel A643a 5.7.1 Grab Samples Off-line grab samples are accommodated by the Anatel A643a. Samples from various sources, such as in a laboratory setting, can be analyzed. Up to three analyses of a single sample may be performed using this procedure. -
Page 77: Fig 5-46 : Analysis Cycle Results
Anatel A643a - Anatel A643a Setup 77 of 220 8) Remove the sample vessel when prompted and install the appropriate sample vial, making sure it is securely seated. CAUTION: Use extreme care when installing and removing the sample vessel and vials. Contact with the exposed needle could cause serious injury. -
Page 78: On-Line Samples
Anatel A643a Setup - Anatel A643a Fig 5-48 : Grab Sample Printout 5.7.2 On-Line Samples The Anatel A643a can perform individual analyses of on-line samples, with sampling controlled by the user. Fig 5-49 : On-Line Samples To conduct an on-line sample measurement: 1) With the desired Analyzer selected in any View, press the Manual Key to access its menu selections. -
Page 79: Fig 5-51 : Sample Time Interval
Anatel A643a - Anatel A643a Setup 79 of 220 6) Press Enter to initiate a single analysis. Sampl reflects the Sample Time interval specified in the Analyzer’s setup (see “Sample Time” on page 63). Note this if the sample interval is to be matched. The instrument’s analysis State and values are reported as soon as they become available. -
Page 79: Fig 5-51 : Sample Time Interval
Anatel A643a - Anatel A643a Setup 79 of 220 6) Press Enter to initiate a single analysis. Sampl reflects the Sample Time interval specified in the Analyzer’s setup (see “Sample Time” on page 63). Note this if the sample interval is to be matched. The instrument’s analysis State and values are reported as soon as they become available. - Page 80 80 of 220 Anatel A643a Setup - Anatel A643a Anatel Operator Manual...
- Page 80 80 of 220 Anatel A643a Setup - Anatel A643a Anatel Operator Manual...
-
Page 81: Calibration And Validation
Controller or through a local or network printer. Note: The Anatel A643a is calibrated at the factory before shipment. It is not necessary to perform a TOC Calibration prior to placing the instrument into service. Proper calibration of the Anatel A643a is critical to maintaining optimum instrument performance. -
Page 82: Toc Calibration
Refer to Standard Operating Procedure (SOP) #643–1/1A for complete instructions on performing this procedure. Calibration ensures the accuracy of the TOC values obtained by the Anatel A643a Analyzer. TOC values are determined by measuring the change in conductivity of a high-purity water sample as its organic compounds are oxidized to carbon dioxide inside the instrument’s... -
Page 83: Fig 6-2 : Calibration Standard Criteria
Note: The Anatel A643a TOC Analyzer was designed to be calibrated by the user. Anatel provides pre-packaged reagents to assist the user in simplifying the calibration process and to easily comply with USP TOC Method <643>. -
Page 83: Fig 6-2 : Calibration Standard Criteria
Note: The Anatel A643a TOC Analyzer was designed to be calibrated by the user. Anatel provides pre-packaged reagents to assist the user in simplifying the calibration process and to easily comply with USP TOC Method <643>. -
Page 84: Fig 6-3 : Calibration Purge Mode
84 of 220 Calibration and Validation - Anatel A643a Thermistor 15 Micron Needle Sample Filter Valve Valve 1 Process Check Water Analysis Valve Calibration Inlet Cell Valve Sample Check Valve 2 Valve Air Inlet Pump Bypass Filter Check Valve Sample... -
Page 84: Fig 6-3 : Calibration Purge Mode
84 of 220 Calibration and Validation - Anatel A643a Thermistor 15 Micron Needle Sample Filter Valve Valve 1 Process Check Water Analysis Valve Calibration Inlet Cell Valve Sample Check Valve 2 Valve Air Inlet Pump Bypass Filter Check Valve Sample... -
Page 85: Fig 6-5 : Remove Instrument Vessel
Anatel A643a - Calibration and Validation 85 of 220 Fig 6-5 : Remove Instrument Vessel CAUTION: Use extreme care when installing and removing the sample vessel and vials. Contact with the exposed needle could cause serious injury. 13) Press Enter to view the average of the blank replicates, which establishes the reference for the calibration, then press it again to continue. -
Page 86: Fig 6-7 : Toc Calibration Results
86 of 220 Calibration and Validation - Anatel A643a Fig 6-7 : TOC Calibration Results 17) Press Enter to accept the new calibration and initiate a printout of the data. If the percent change in the slope exceeds ±15% of factory calibration, the calibration is deemed “unacceptable.”... -
Page 87: Toc Validation
The intent of validation is to check the accuracy of the calibration, thereby ensuring that the Anatel A643a measures samples reliably. Validation can be either a single-point analysis or multipoint analysis and the standard concentrations are user-selected. -
Page 87: Toc Validation
The intent of validation is to check the accuracy of the calibration, thereby ensuring that the Anatel A643a measures samples reliably. Validation can be either a single-point analysis or multipoint analysis and the standard concentrations are user-selected. -
Page 88: Fig 6-10 : Validation Standard Criteria
88 of 220 Calibration and Validation - Anatel A643a CAUTION: Some instrument surfaces may be hot if the sample water is hot. Allow surfaces to cool before touching. 7) After specifying a given ppb concentration level, press Enter to highlight the concentration value. -
Page 89: Fig 6-11 : Analysis Replicates
Anatel A643a - Calibration and Validation 89 of 220 Rep #1 = xxx ppb Rep #2 = xxx ppb Rep #3 = xxx ppb Press Enter Fig 6-11 : Analysis Replicates 12) Press Enter to view the average of the blank replicates, which establishes the reference for the validation, then press it again to continue. -
Page 90: Fig 6-15 : Sample Single-Point Toc Validation Printout
90 of 220 Calibration and Validation - Anatel A643a 15) Press Enter three times. Each time Enter is pressed, the next validation level results are averaged then reported in the form of a ppb response and deviation percentage. The instrument passes the validation test if all responses have a deviation of less than 15% from the given standard value. -
Page 91: Conductivity Calibration
Conductivity Calibration Conductivity calibration provides a confirmation of the accuracy of the conductivity values reported by Anatel’s on-line Total Organic Carbon instrumentation. The calibration consists of determining the instrument’s meter accuracy by installing a NIST-traceable resistor and then verifying the cell constant by measuring a solution of known conductivity according to USP Method <645>. -
Page 92: Fig 6-19 : Remove Shroud
92 of 220 Calibration and Validation - Anatel A643a CAUTION: In a networked environment (see “Network Installation” on page 39), it is important to confirm the instrument’s Serial Number before proceeding. Operation of the wrong Analyzer could result in water leakage from the sample vessel when it is removed during this procedure. -
Page 93: Fig 6-21 : Remove Resistor
Anatel A643a - Calibration and Validation 93 of 220 10) Remove the resistor at the prompt. Also replace the shroud, tighten the screws fingertight to secure it and replace the protective plug. Specify the value of the conductivity standard found on the Certificate of Analysis and press Enter. -
Page 94: Fig 6-22 : Conductivity Calibration Results
94 of 220 Calibration and Validation - Anatel A643a Fig 6-22 : Conductivity Calibration Results 13) Discard the results or press Enter to save the test results and initiate a printout of the data at the prompt. If the results exceed the test criteria, the calibration is “unacceptable.”... -
Page 95: System Suitability
95 of 220 System Suitability System suitability provides a confirmation of the performance and efficiency of Anatel’s on-line Total Organic Carbon instrumentation. The procedure compares the average of a series of TOC measurements from an easy-to-oxidize working standard (in the form of sucrose) to the average of a corresponding series of measurements of a hard-tooxidize system suitability solution (in the form of 1,4-benzoquinone). -
Page 96: Fig 6-25 : Certificate Of Analysis Values
96 of 220 Calibration and Validation - Anatel A643a Fig 6-25 : Certificate of Analysis Values 7) Use the Up and Down Keys to scroll until the sucrose standard value found on the Certificate of Analysis is displayed. Enter “C of A"... -
Page 96: Fig 6-25 : Certificate Of Analysis Values
96 of 220 Calibration and Validation - Anatel A643a Fig 6-25 : Certificate of Analysis Values 7) Use the Up and Down Keys to scroll until the sucrose standard value found on the Certificate of Analysis is displayed. Enter “C of A"... -
Page 97: Fig 6-27 : Analysis Replicates
Anatel A643a - Calibration and Validation 97 of 220 Rep #1 = xxx ppb Rep #2 = xxx ppb Rep #3 = xxx ppb Press Enter Fig 6-27 : Analysis Replicates 12) Press Enter to view the average of the blank replicates, which establishes the reference for the test, then press it again to continue. -
Page 98: Fig 6-29 : Adjust Alarm Limit
98 of 220 Calibration and Validation - Anatel A643a Note: Because the sucrose and 1,4-benzoquinone standards cannot be made to exactly 500 ppb, the reported sucrose and 1,4-benzoquinone responses are corrected with the Certificate of Analysis values as follows: ⎛... -
Page 99: Data History
Anatel A643a - Calibration and Validation 99 of 220 Data History The results of Anatel A643a calibration and validation procedures are available for review or printout at any time through the Data History Menu. Fig 6-31 : Data History To access saved data: 1) With the desired Analyzer selected in any View, press the Manual Key to access its menu selections. -
Page 100: Fig 6-34 : Data History Screen
7) The option of printing the test data for the most recent or all (up to five) tests will be given. The last five test results for each test category are retained in the Anatel A643a’s Data History regardless of whether they passed or failed. The Last Accepted test that passed also is saved. -
Page 101: Anatel A643A Alarms
Alarm Setup Note: Default: TOC Alarm/500 ppb The Alarm Setup parameter enables the alarm limits for the Anatel A643a and, in the case of a TOC alarm, defines the limit at which the indication is triggered. Fig 7-1 : Alarm Setup... -
Page 101: Anatel A643A Alarms
Alarm Setup Note: Default: TOC Alarm/500 ppb The Alarm Setup parameter enables the alarm limits for the Anatel A643a and, in the case of a TOC alarm, defines the limit at which the indication is triggered. Fig 7-1 : Alarm Setup... -
Page 102: Fig 7-2 : Alarm Setup Menu
102 of 220 Anatel A643a Alarms - Anatel A643a To access the Analyzer’s Alarm Setup parameters: 1) With the desired Analyzer selected in any View, press the Setup Key to display its menu selections. Sensor Setup: System Setup: C80 Setup:... -
Page 102: Fig 7-2 : Alarm Setup Menu
102 of 220 Anatel A643a Alarms - Anatel A643a To access the Analyzer’s Alarm Setup parameters: 1) With the desired Analyzer selected in any View, press the Setup Key to display its menu selections. Sensor Setup: System Setup: C80 Setup:... -
Page 103: Fig 7-6 : Alarm Setup Menu
Anatel A643a - Anatel A643a Alarms 103 of 220 1 SENSOR NAME TOC Alarm: Cond Alarm Fig 7-6 : Alarm Setup Menu TOC Alarm Triggers an alarm indication when the Analyzer’s reported TOC reading exceeds its specified limit. Cond Alarm Triggers an alarm when the instrument’s uncompensated conductivity... -
Page 104: Beeper Setup
104 of 220 Anatel A643a Alarms - Anatel A643a 11) Again use the Up and Down Keys to scroll until the desired value is displayed. 12) Press Enter to retain the pair’s setting. 13) Repeat the editing process with the other pair of digits, if necessary, to specify the Analyzer’s TOC Alarm Limit (0000 to 1000 ppb). -
Page 105: Alarm Reporting
Fig 7-12 : C80 Alarm Beeper Screen Alarm Reporting The most common Anatel A643a fault condition is an Analyzer that measures a TOC value greater than its specified TOC Alarm setting (see “Alarm Setup” on page 101). There are several ways an alarm condition is reported: •... -
Page 106: Uncompensated Conductivity Alarms
106 of 220 Anatel A643a Alarms - Anatel A643a In the example, the LED indicating the instrument on Channel #4 has changed from green to flashing red, indicating a TOC excursion. The user can acknowledge the alarm and display its summary status by pressing the AKey. -
Page 107: Fig 7-14 : Alarm Setup
Anatel A643a - Anatel A643a Alarms 107 of 220 Fig 7-14 : Alarm Setup To access an Anatel A643a’s Alarm Setup parameters: 1) With the desired Analyzer selected in any View, press the Setup Key to display its menu selections. -
Page 107: Fig 7-14 : Alarm Setup
Anatel A643a - Anatel A643a Alarms 107 of 220 Fig 7-14 : Alarm Setup To access an Anatel A643a’s Alarm Setup parameters: 1) With the desired Analyzer selected in any View, press the Setup Key to display its menu selections. -
Page 108: Alarm Acknowledgement
Anatel A643a Alarms - Anatel A643a When the uncompensated limit is exceeded, an alarm is generated and several things occur: • The LED corresponding to the Anatel A643a Analyzer’s Channel ID flashes red on all of its associated C80 Controllers. -
Page 108: Alarm Acknowledgement
Anatel A643a Alarms - Anatel A643a When the uncompensated limit is exceeded, an alarm is generated and several things occur: • The LED corresponding to the Anatel A643a Analyzer’s Channel ID flashes red on all of its associated C80 Controllers. -
Page 109: Fig 7-17 : Acknowledged Sensor Alarm
Analyzers can be observed by pressing the Alarm Key repeatedly. If no fault conditions exist for a particular instrument, “No Codes” is reported. The Alarm Key also is used to acknowledge Anatel A643a Codes. When an Analyzer problem is detected, it displays the following information: Line 1 The affected instrument’s Channel ID and its userentered Name. -
Page 109: Fig 7-17 : Acknowledged Sensor Alarm
Analyzers can be observed by pressing the Alarm Key repeatedly. If no fault conditions exist for a particular instrument, “No Codes” is reported. The Alarm Key also is used to acknowledge Anatel A643a Codes. When an Analyzer problem is detected, it displays the following information: Line 1 The affected instrument’s Channel ID and its userentered Name. - Page 110 110 of 220 Anatel A643a Alarms - Anatel A643a Anatel Operator Manual...
- Page 110 110 of 220 Anatel A643a Alarms - Anatel A643a Anatel Operator Manual...
-
Page 111: Printer Output
Printer Output General Information All Anatel A643a Analyzers are equipped with an output port for a local printer, although the 643a–P is already equipped with an integral printer. Automatic hardcopy reports are generated periodically, although printouts detailing individual Analyzer and global Network information can be produced on demand through the Print Key. -
Page 112: Fig 8-1 : External Printer Wiring
112 of 220 Printer Output - Anatel A643a Anatel A643a Connector Block NET+ TxD1 (White with Blue Stripe) RxD1 NET– Data Serial TxD2 RTS1 (Blue with White Stripe) Busy Printer RxD2 CTS1 NET+ (Signal Ground) (Seiko DPU-414) NET– DB-9 Connector... -
Page 112: Fig 8-1 : External Printer Wiring
112 of 220 Printer Output - Anatel A643a Anatel A643a Connector Block NET+ TxD1 (White with Blue Stripe) RxD1 NET– Data Serial TxD2 RTS1 (Blue with White Stripe) Busy Printer RxD2 CTS1 NET+ (Signal Ground) (Seiko DPU-414) NET– DB-9 Connector... - Page 113 Anatel A643a - Printer Output 113 of 220 Preset DIP Switches (Continued) Table 8-1 : DIP Switch 2 Switch Setting Function 40-Column Printing Backup Font Enabled Normal Characters Zero = Slash International Character Set = USA International Character Set = USA...
- Page 113 Anatel A643a - Printer Output 113 of 220 Preset DIP Switches (Continued) Table 8-1 : DIP Switch 2 Switch Setting Function 40-Column Printing Backup Font Enabled Normal Characters Zero = Slash International Character Set = USA International Character Set = USA...
-
Page 114: Software Setup
Note: Default: Data & Audit Each Anatel A643a Analyzer’s onboard log protects against data loss by chronologically recording any events. An Audit Only selection in the Log Setup Menu records power cycles, alarm codes and parameter changes. The default setting of Data & Audit also stores analysis results and Purge Mode data. -
Page 115: Fig 8-2 : Log Setup
Anatel A643a - Printer Output 115 of 220 Fig 8-2 : Log Setup To access Log information: 1) With the desired Analyzer selected in any View, press the Print Key to access its submenu. 2) Select Sensor Print and then press Enter to display that menu. -
Page 115: Fig 8-2 : Log Setup
Anatel A643a - Printer Output 115 of 220 Fig 8-2 : Log Setup To access Log information: 1) With the desired Analyzer selected in any View, press the Print Key to access its submenu. 2) Select Sensor Print and then press Enter to display that menu. -
Page 116: Fig 8-4 : Print Range
116 of 220 Printer Output - Anatel A643a If a Print Range has been specified, there may a slight delay before the default Range is displayed, depending on how full the data log is. During this delay, ?? is displayed in Range fields. -
Page 116: Fig 8-4 : Print Range
116 of 220 Printer Output - Anatel A643a If a Print Range has been specified, there may a slight delay before the default Range is displayed, depending on how full the data log is. During this delay, ?? is displayed in Range fields. -
Page 117: Printouts
Anatel A643a - Printer Output 117 of 220 13) To change the Log Setup to include or exclude analysis and purge data, scroll down to that function and press Enter. Fig 8-6 : Log Setup Screen 14) Use the Up and Down Keys to scroll to the appropriate selection and press Enter. -
Page 117: Printouts
Anatel A643a - Printer Output 117 of 220 13) To change the Log Setup to include or exclude analysis and purge data, scroll down to that function and press Enter. Fig 8-6 : Log Setup Screen 14) Use the Up and Down Keys to scroll to the appropriate selection and press Enter. -
Page 118: Fig 8-8 : Printouts Screen
118 of 220 Printer Output - Anatel A643a TOC Printout “TOC Calibration” on page 82 TOC Validation “TOC Validation” on page 87 Conductivity Calibration “Conductivity Calibration” on page 91 System Suitability “System Suitability” on page 95 Fig 8-8 : Printouts Screen 4) Use the Up and Down Keys to specify the desired Printout function. -
Page 119: Fig 8-9 : Setup Printout
Anatel A643a - Printer Output 119 of 220 Fig 8-9 : Setup Printout Fig 8-10 : Factory Printout Anatel Operator Manual... -
Page 119: Fig 8-9 : Setup Printout
Anatel A643a - Printer Output 119 of 220 Fig 8-9 : Setup Printout Fig 8-10 : Factory Printout Anatel Operator Manual... - Page 120 120 of 220 Printer Output - Anatel A643a Anatel Operator Manual...
- Page 120 120 of 220 Printer Output - Anatel A643a Anatel Operator Manual...
-
Page 121: Analog Outputs
4-20 mA port. This current output may be converted to a voltage if desired by inserting a conversion resistor into the wiring scheme. Software settings determine the analog output range in addition to its corresponding zero-scale and fullscale values. A user-specified signal also may be output to designate Anatel A643a Analyzer alarms. 9.2.1... -
Page 122: Fig 9-1 : Current And Voltage Output Wiring
Always disconnect the instrument from its power source before attempting to access internal components. 1) Turn the Anatel A643a Analyzer OFF and disconnect the power cord from its source. 2) Remove the I/O Connector Block from the bottom of the Analyzer by loosening its four screws. -
Page 123: Software Setup
2) Defining the associated zero-scale and full-scale values that establish the resolution of that signal. 3) Establishing the signal that is to be output in the event of an Anatel A643a alarm. 4) Activating the DAC Calibration Output, if desired. -
Page 123: Software Setup
2) Defining the associated zero-scale and full-scale values that establish the resolution of that signal. 3) Establishing the signal that is to be output in the event of an Anatel A643a alarm. 4) Activating the DAC Calibration Output, if desired. -
Page 124: Fig 9-4 : Sensor Setup Menu
124 of 220 Analog Outputs - Anatel A643a Analysis Setup: Display/Print: Sensor Name Diagnostics: Fig 9-4 : Sensor Setup Menu 4) Specify Analysis Setup and then press Enter to access its submenu. 5) Specify Analog Setup and press Enter to display its parameter options. -
Page 125: Fig 9-7 : Dac Range Menu
The DAC mA Range internally defines the span (4 to 20 or 0 to 20 mA) of the analog output that is presented at the Anatel A643a’s 4–20 mA port. The lower and upper limits of the chosen range correspond to the Zero-Scale and Full-Scale TOC values. -
Page 125: Fig 9-7 : Dac Range Menu
The DAC mA Range internally defines the span (4 to 20 or 0 to 20 mA) of the analog output that is presented at the Anatel A643a’s 4–20 mA port. The lower and upper limits of the chosen range correspond to the Zero-Scale and Full-Scale TOC values. -
Page 126: Fig 9-9 : Dac Range Menu
126 of 220 Analog Outputs - Anatel A643a 9.2.2.3 TOC Output Range Note: Defaults: Zero-Scale – 0000 ppb Full-Scale – 1000 ppb These settings define the lower and upper ppb limits proportional to the DAC mA Range setting. The analog signal generated at the conclusion of each analysis is converted to a scaled TOC value for display and reporting purposes. -
Page 127: Fig 9-12 : Zero-Scale Toc Data
Anatel A643a - Analog Outputs 127 of 220 6) Again use the Up and Down Keys to scroll the pair until the desired value is displayed. 7) Press the Esc Key to retain the setting. 8) Repeat the editing process with the other pair of digits if necessary to display the desired value. -
Page 128: Fig 9-15 : Dac Error Output Menu
The user may select from among three states to be output when a condition is encountered which causes the Anatel A643a to abort its current analysis. This fixed signal is global for all analog outputs and can be used externally to report an alarm condition. -
Page 129: Optional Conductivity/Resistivity & Temperature Outputs
Resistivity DAC: P/N FG2006702 Temperature DAC: P/N FG2006802 The necessity for an analog output to report the Anatel A643a’s conductivity (or resistivity) and temperature values is addressed through external Digital-to-Analog Converter (DAC) Modules. A separate DAC Module is required for each desired analog output. Anatel supplies pre- programmed, prewired DAC Modules to forward this processed information to a data acquisition system, remote meter or other analog input device. -
Page 130: Fig 9-18 : External Dac Wiring
These auxiliary analog connections are made on the Analyzer’s I/O Connector Block as follows: 1) Turn the Anatel A643a Analyzer OFF and disconnect the power cord from its source. 2) Remove the I/O Connector Block from the bottom of the Analyzer by loosening its four screws. -
Page 131: Software Setup
2) Specifying the analog output range. 3) Defining the associated zero-scale and full-scale values that establish the resolution of that signal. 4) Establishing the signal that is to be output in the event of an Anatel A643a alarm. 9.3.2.1 External DAC Module... -
Page 131: Software Setup
2) Specifying the analog output range. 3) Defining the associated zero-scale and full-scale values that establish the resolution of that signal. 4) Establishing the signal that is to be output in the event of an Anatel A643a alarm. 9.3.2.1 External DAC Module... -
Page 132: Fig 9-20 : Setup Menu
132 of 220 Analog Outputs - Anatel A643a To enable/disable the External DAC Module interface: 1) With the desired Analyzer selected in any View, press the Setup Key to display its menu. Sensor Setup: System Setup: C80 Setup: Gateway Setup: Fig 9-20 : Setup Menu 2) Use the Up and Down Keys to specify Sensor Setup. -
Page 133: Fig 9-23 : Dac Ma Range Screen
The DAC mA Range internally defines the span (4 to 20 or 0 to 20 mA) of the analog output that is presented at the Anatel A643a’s digital-to-analog (DAC) port. Note that this setting is global for all analog outputs including the external DAC modules as well as the internal DAC. -
Page 134: Fig 9-25 : Conductivity/Resistivity Output Setup
134 of 220 Analog Outputs - Anatel A643a 9.3.2.3 Conductivity/ Resistivity Output Note: Defaults: Zero-Scale – 00 µS/cm Full-Scale – 20 µS/cm The DAC Zero-Scale and Full-Scale settings define the upper and lower limits that are proportional to the DAC mA Range setting. The analog signal is converted to a scaled... -
Page 135: Fig 9-27 : Zero-Scale Uncompensated Conductivity Display
Anatel A643a - Analog Outputs 135 of 220 Fig 9-27 : Zero-Scale Uncompensated Conductivity Display 4) Use the Up and Down Keys to scroll in single increments until the desired value is displayed. 1 SENSOR NAME Zero-Scale Cond 01 uS/cm U... -
Page 136: Fig 9-30 : Full-Scale Toc Data
136 of 220 Analog Outputs - Anatel A643a 1 SENSOR NAME Full-Scale Cond 15 uS/cm U to change Fig 9-30 : Full-Scale TOC Data 9) Press Esc twice to retain the Full-Scale Res/Cond setting and return to the DAC Range Menu. -
Page 136: Fig 9-30 : Full-Scale Toc Data
136 of 220 Analog Outputs - Anatel A643a 1 SENSOR NAME Full-Scale Cond 15 uS/cm U to change Fig 9-30 : Full-Scale TOC Data 9) Press Esc twice to retain the Full-Scale Res/Cond setting and return to the DAC Range Menu. -
Page 137: Fig 9-33 : Zero-Scale Temp Data
Anatel A643a - Analog Outputs 137 of 220 1 SENSOR NAME Zero-Scale Temp 25 °C to change Fig 9-33 : Zero-Scale Temp Data 5) Press Esc twice to retain the Zero-Scale Temp setting and return to the DAC Range Menu. -
Page 137: Fig 9-33 : Zero-Scale Temp Data
Anatel A643a - Analog Outputs 137 of 220 1 SENSOR NAME Zero-Scale Temp 25 °C to change Fig 9-33 : Zero-Scale Temp Data 5) Press Esc twice to retain the Zero-Scale Temp setting and return to the DAC Range Menu. - Page 138 138 of 220 Analog Outputs - Anatel A643a Anatel Operator Manual...
- Page 138 138 of 220 Analog Outputs - Anatel A643a Anatel Operator Manual...
-
Page 139: 10 Digital Inputs & Outputs
Digital input and output connections are made on the instrument’s I/O Connector Block as follows: 1) Turn the Anatel A643a Analyzer OFF and disconnect the power cord from its source. 2) Remove the I/O Connector Block from the bottom of the Analyzer by loosening its four screws. -
Page 140: Digital Inputs
Digital Inputs 10.2 Both of the digital inputs perform specific Anatel A643a functions, allowing total control over its operation as well as synchronization with the rest of the process. The first set of inputs is used to initiate an analysis from an external device. The analysis is based on the instrument’s specified Sample Time and Cycle Time settings. -
Page 141: 10.2.2 Software Setup
Fig 10-1 : Typical Digital Input Wiring 10.2.2 Software Setup The Digital Control parameter must be enabled for the Anatel A643a to accept any digital input signals. This software switch is accessed through the Manual Key and, once enabled, displays r/c in conjunction with the Analyzer’s displayed TOC readings to indicate that the instrument is operating under remote control. -
Page 142: Digital Outputs
Digital Outputs 10.3 The digital outputs also transmit specific Anatel A643a information. The first digital output reports the instrument’s current TOC alarm status and can be used to trigger an alarm indication or similar response. The second digital output reports the state of the Analyzer’s... -
Page 143: 10.3.1 Hardware Setup
Anatel A643a - Digital Inputs & Outputs 143 of 220 10.3.1 Hardware Setup Both digital outputs are 8.5 mA current sinks which share a common negative terminal. They are designed to drive solid state relay inputs and have a compliance range from 5 to 30 VDC. -
Page 143: 10.3.1 Hardware Setup
Anatel A643a - Digital Inputs & Outputs 143 of 220 10.3.1 Hardware Setup Both digital outputs are 8.5 mA current sinks which share a common negative terminal. They are designed to drive solid state relay inputs and have a compliance range from 5 to 30 VDC. - Page 144 144 of 220 Digital Inputs & Outputs - Anatel A643a Anatel Operator Manual...
- Page 144 144 of 220 Digital Inputs & Outputs - Anatel A643a Anatel Operator Manual...
-
Page 145: 11 12 Vdc Bias Output
Bias connections are made to the instrument’s I/O Connector Block as follows: 1) Turn the Anatel A643a Analyzer OFF and disconnect the power cord from its source. 2) Remove the I/O Connector Block from the bottom of the Analyzer by loosening its four screws. -
Page 145: 11 12 Vdc Bias Output
Bias connections are made to the instrument’s I/O Connector Block as follows: 1) Turn the Anatel A643a Analyzer OFF and disconnect the power cord from its source. 2) Remove the I/O Connector Block from the bottom of the Analyzer by loosening its four screws. -
Page 146: Fig 11-1 : Bias Connections
146 of 220 12 VDC Bias Output - Anatel A643a TxD1 NET+ NET– RxD1 RTS1 CTS1 NET+ NET– TxD2 OUT+ RxD2 OUT– COM+ TxD3 IN1* RxD3 IN2* OUT1* +12V OUT2* COM– Isolated Non-Isolated Strain Relief Plate Fig 11-1 : Bias Connections... -
Page 146: Fig 11-1 : Bias Connections
146 of 220 12 VDC Bias Output - Anatel A643a TxD1 NET+ NET– RxD1 RTS1 CTS1 NET+ NET– TxD2 OUT+ RxD2 OUT– COM+ TxD3 IN1* RxD3 IN2* OUT1* +12V OUT2* COM– Isolated Non-Isolated Strain Relief Plate Fig 11-1 : Bias Connections... -
Page 147: 12 Serial Communications
Interface connections are made on the instrument’s I/O Connector Block as follows: 1) Turn the Anatel A643a Analyzer OFF and disconnect the power cord from its source. 2) Remove the I/O Connector Block from the bottom of the Analyzer by loosening its four screws. -
Page 148: Fig 12-1 : Serial Wiring
148 of 220 Serial Communications - Anatel A643a Serial Device or Anatel A643a Host Computer Connector Block TxD1 RxD1 9-Pin NET+ TxD1 "D" RTS1 RxD1 NET– Connector RTS1 CTS1 CTS1 NET+ NET– TxD2 OUT+ RxD2 OUT– COM+ TxD3 IN1* RxD3... -
Page 148: Fig 12-1 : Serial Wiring
148 of 220 Serial Communications - Anatel A643a Serial Device or Anatel A643a Host Computer Connector Block TxD1 RxD1 9-Pin NET+ TxD1 "D" RTS1 RxD1 NET– Connector RTS1 CTS1 CTS1 NET+ NET– TxD2 OUT+ RxD2 OUT– COM+ TxD3 IN1* RxD3... -
Page 149: Anatel A643A Command Set
Anatel A643a Analyzers respond to either uppercase or lowercase commands. The Anatel A643a Analyzer will respond with an “OK>” prompt after the command has been accepted. In addition, Data Read and Parameter Set commands elicit a reply that consists of one or more numeric or text values, each delimited by at least one space, and terminated by a carriage return, linefeed pair (ASCII 13,10;... -
Page 150: 12.3.2 Parameter Set Commands
Serial Communications - Anatel A643a 12.3.2 Parameter Set Commands Issuance of the “HR” command displays or sets the user-defined Anatel A643a parameters. When issued without arguments, the Analyzer’s current settings are displayed; issued with arguments, the specified parameters are changed for the Analyzer and a printout is generated documenting the modification. -
Page 151: 12.3.3 Data Read Commands
The Data Read functions return multiple values, the string terminated with a <cr><lf>. Note: If the Anatel A643a Analyzer is in an operational mode that does not generate a TOC result (modes 6 through 12), the TOC, TOC Alarm Percentage, TOC Trend, Profile (Curve) Type and Oxidation Time are not returned. -
Page 152: 12.3.4 Log Commands
152 of 220 Serial Communications - Anatel A643a Data Read Commands Table 12-3 : Command Function Comment Read Analyzer Data Returns one line of time stamped data from when the unit began oxidation: mm/dd/yyyy, hh:mm, mode, state, TOC in ppb, alarm percentage, trend in ppb/hr, resistivity in MΩ-cm, temperature in... -
Page 153: 12.3.5 Data History Commands
Anatel A643a - Serial Communications 153 of 220 12.3.5 Data History Commands The Data History commands return the results of the most recent calibration and validation procedures performed on the instrument. Data History Command Table 12-5 : Command Function Comment Conductivity Calibration History Up to five calibrations are displayed. -
Page 153: 12.3.5 Data History Commands
Anatel A643a - Serial Communications 153 of 220 12.3.5 Data History Commands The Data History commands return the results of the most recent calibration and validation procedures performed on the instrument. Data History Command Table 12-5 : Command Function Comment Conductivity Calibration History Up to five calibrations are displayed. - Page 154 154 of 220 Serial Communications - Anatel A643a Anatel Operator Manual...
- Page 154 154 of 220 Serial Communications - Anatel A643a Anatel Operator Manual...
-
Page 155: 13 Anatel A643A Maintenance
The UV lamp is turned on to oxidize any organic contaminants, which subsequently are flushed from the instrument by the sample flow. Note: The Anatel A643a Analyzer must have the sample vessel attached and be on-line with sample pressure so that there is flow through the instrument. Anatel... -
Page 156: Fig 13-1 : Manual Menu
156 of 220 Anatel A643a Maintenance - Anatel A643a To place an Anatel A643a in the Self-Clean Mode: 1) With the desired Analyzer selected in any View, press the Manual Key to display its menu. 1 SENSOR NAME Modes: Manual Samples:... -
Page 156: Fig 13-1 : Manual Menu
156 of 220 Anatel A643a Maintenance - Anatel A643a To place an Anatel A643a in the Self-Clean Mode: 1) With the desired Analyzer selected in any View, press the Manual Key to display its menu. 1 SENSOR NAME Modes: Manual Samples:... -
Page 157: Preparatory Maintenance Procedures
Analyzer to avoid potential electrostatic damage to any of its internal components. 2) Turn the Anatel A643a Analyzer OFF and disconnect the power cord from its AC source. 3) To disconnect the inlet tubing, loosen its compression fitting with a 9/16" wrench. The outlet fitting is loosened using a 7/16"... -
Page 158: Uv Lamp Maintenance
The ultraviolet (UV) lamp in the A643a TOC Analyzer requires periodic replacement to ensure accurate analyses. The Anatel A643a logs UV lamp usage based on its total hours of operation. Anatel recommends replacement of the UV lamp every six months to ensure uninterupted operation due to lamp degradation. -
Page 158: Uv Lamp Maintenance
The ultraviolet (UV) lamp in the A643a TOC Analyzer requires periodic replacement to ensure accurate analyses. The Anatel A643a logs UV lamp usage based on its total hours of operation. Anatel recommends replacement of the UV lamp every six months to ensure uninterupted operation due to lamp degradation. - Page 159 Anatel A643a - Anatel A643a Maintenance 159 of 220 The Anatel Anatel A643a UV Lamp Replacement Kit is designed for on-site maintenance and contains the following parts: • Ultraviolet Lamp Assembly • Air Filters (2 each) • 5/64" Hex Driver (Allen Wrench) •...
- Page 159 Anatel A643a - Anatel A643a Maintenance 159 of 220 The Anatel Anatel A643a UV Lamp Replacement Kit is designed for on-site maintenance and contains the following parts: • Ultraviolet Lamp Assembly • Air Filters (2 each) • 5/64" Hex Driver (Allen Wrench) •...
-
Page 160: 13.4.1 Uv Detect Technology
13.4.1 UV Detect Technology An A643a analyzer equipped with UV Detect will automatically monitor the output of the UV lamp and alert when the UV output is indicative of a failing lamp or if the lamp has failed completely and can no longer support proper oxidation. -
Page 161: 13.4.2 Replacing The Uv Lamp
2) Stop sample water flow to the instrument. 3) The UV Lamp is located at the Water I/O end of the Anatel A643a. Disconnect the water inlet (9/16" nut) and outlet (7/16" nut) tubing. It is not necessary to remove the inlet prefilter assembly from the WATER IN port. -
Page 162: Fig 13-7 : Loosening The Uv Lamp Bracket
162 of 220 Anatel A643a Maintenance - Anatel A643a 6) Loosen the two Phillips head screws holding the UV lamp bracket to the Analyzer’s cell assembly about 1-1/2 turns. Do not remove the screws. Fig 13-7 : Loosening the UV Lamp Bracket 7) Pull the UV lamp straight out of the housing and remove it from the cell assembly. -
Page 163: Fig 13-9 : Prior Uv Lamp Assembly Design With Adapter Plugs
Anatel A643a - Anatel A643a Maintenance 163 of 220 Adapter Plugs Fig 13-9 : Prior UV Lamp Assembly Design with Adapter Plugs 9) Insert the new UV Lamp Assembly from the Replacement Kit into the housing in the cell. Fig 13-10 : Inserting the New UV Lamp Assembly 10) Turn the UV Lamp so that its arrow aligns with the center of the upper bracket screw as shown. -
Page 164: Fig 13-12 : Inserting The Uv Lamp Connector
Water Out port. 19) Plug the AC power cord into its supply and turn the Anatel A643a Analyzer ON. The Analyzer’s internal counter tracks UV lamp usage. It must be reset each time a new lamp is installed in order to accurately report when light intensity has diminished below recommended levels. -
Page 165: Fig 13-13 : Lamp Setup
Anatel A643a - Anatel A643a Maintenance 165 of 220 Fig 13-13 : Lamp Setup To reset the instrument’s UV Lamp counter: 20) Select the appropriate Analyzer in any View and press Setup to access its submenu. 21) Specify Sensor Setup and press Enter. -
Page 165: Fig 13-13 : Lamp Setup
Anatel A643a - Anatel A643a Maintenance 165 of 220 Fig 13-13 : Lamp Setup To reset the instrument’s UV Lamp counter: 20) Select the appropriate Analyzer in any View and press Setup to access its submenu. 21) Specify Sensor Setup and press Enter. -
Page 166: Air Filter Cleaning
Note: Replacement Kit: P/N FG7013501 Each Anatel A643a Analyzer is equipped with air filters which can become clogged over time, reducing performance and stressing components. The filters should be checked periodically and cleaned when necessary to guarantee unobstructed air flow through the instrument. The frequency of air filter cleaning depends on the ambient environment in which the instrument is located. -
Page 167: Fig 13-16 : 26-Pin Connectors
Anatel A643a - Anatel A643a Maintenance 167 of 220 Removing the existing battery will erase the Anatel A643a’s parameter settings. Print them (see “Printouts” on page 117) if they differ from the factory settings so they can be restored after the battery is replaced. -
Page 168: Fig 13-18 : Replace Battery
168 of 220 Anatel A643a Maintenance - Anatel A643a 6) Check the battery with a voltmeter. A voltage of 3.2 to 3.6 VDC is normal; less than 3.0 VDC and the lithium battery should be replaced. Note: When replacing the battery, ensure that the positive (+) indicator on the battery is inserted at the positive end of battery holder. -
Page 169: Fig 13-19 : Pin #1
For Access 643P Analyzers, the connector is the leftmost set of pins at the end of the processor board; for Anatel A643a Analyzers, it is the rightmost set of pins. In either case, the black dotted line (indicating Pin #1) on the ribbon cable should be on the right side. -
Page 170: Inlet Filter Replacement
Always disconnect the instrument from its power source before attempting to access internal components. To replace the 15 Micron Inlet Filter: 1) Disconnect the A643a TOC Analyzer’s AC power cord from its supply source. 2) Turn off the (user-supplied) isolation valve or otherwise stop sample flow to the instrument. -
Page 171: Fig 13-20 : Inline Filter Assembly
4 through step 7 have already been performed at Anatel. In this case, the Inlet Filter appears as shown. Skip to step 5) Slide the nut on the outlet end of the Filter with the threads facing out. 6) Slide the collar on the outlet end of the Filter so that it fits inside the nut. The flat edge of the collar should face down inside the nut. -
Page 172: Printer Paper Replacement
The printer’s red OFFLINE LED flashes when the paper roll runs out. Note: If paper has run out and the Anatel A643a has sent data to the printer, the green ONLINE LED also flashes. The data are output with their time and date stamps when the new paper roll is installed and the printer is placed back on-line. -
Page 173: Fig 13-22 : Printer Paper Roll
Anatel A643a - Anatel A643a Maintenance 173 of 220 To replace the printer paper roll: 1) Cut the lead end of the paper roll so that the edge is straight. Fig 13-22 : Printer Paper Roll 2) Turn the power to the printer ON. -
Page 173: Fig 13-22 : Printer Paper Roll
Anatel A643a - Anatel A643a Maintenance 173 of 220 To replace the printer paper roll: 1) Cut the lead end of the paper roll so that the edge is straight. Fig 13-22 : Printer Paper Roll 2) Turn the power to the printer ON. - Page 174 174 of 220 Anatel A643a Maintenance - Anatel A643a Anatel Operator Manual...
- Page 174 174 of 220 Anatel A643a Maintenance - Anatel A643a Anatel Operator Manual...
-
Page 175: 14 Troubleshooting
General Information 14.1 In addition to the standard self-tests conducted by the Anatel A643a during its analyses, an extended diagnostic and reporting facility is incorporated to inform the user about the nature of a problem. Alarm Codes, in conjunction with user-initiated diagnostic tests, serve to isolate the source of the problem. -
Page 175: 14 Troubleshooting
General Information 14.1 In addition to the standard self-tests conducted by the Anatel A643a during its analyses, an extended diagnostic and reporting facility is incorporated to inform the user about the nature of a problem. Alarm Codes, in conjunction with user-initiated diagnostic tests, serve to isolate the source of the problem. - Page 176 176 of 220 Troubleshooting - Anatel A643a Anatel A643a Alarm Codes Table 14-1 : ElectroMechanical Alarm Codes — Code Instrument Display Indication See Guide Anatel Possible ROM performance issue. Call the Service Department. See Guide Anatel Possible RAM performance issue. Call the Service Department.
- Page 176 176 of 220 Troubleshooting - Anatel A643a Anatel A643a Alarm Codes Table 14-1 : ElectroMechanical Alarm Codes — Code Instrument Display Indication See Guide Anatel Possible ROM performance issue. Call the Service Department. See Guide Anatel Possible RAM performance issue. Call the Service Department.
- Page 177 Anatel A643a - Troubleshooting 177 of 220 Anatel A643a Alarm Codes (Continued) Table 14-1 : Analysis Alarm Codes— Code Instrument Display Indication See Guide Anatel Possible hardware performance issue. Call the Service Department. Anatel See Guide Possible hardware performance issue. Call the Service Department.
- Page 177 Anatel A643a - Troubleshooting 177 of 220 Anatel A643a Alarm Codes (Continued) Table 14-1 : Analysis Alarm Codes— Code Instrument Display Indication See Guide Anatel Possible hardware performance issue. Call the Service Department. Anatel See Guide Possible hardware performance issue. Call the Service Department.
-
Page 178: Troubleshooting
Replacement” on page 166). A Code 18 or Code 137 alarm indicates faulty communications; check A-Net wiring and contact Anatel if the problem persists. The following alarms warrant a general check to verify that the isolation valve is open and the instrument’s sample valve is functional. -
Page 179: Fig 14-1 : Failure Identified
In some cases, the accuracy of the reported TOC value may be affected by the presence of certain ions. This condition occurs primarily in water with less than 5 megohm-cm resistivity. If it persists, the sample water is unsuitable for Anatel A643a analysis. 37/38 Temperatures outside the range of 5 °C to 95 °C are considered hardware failures. -
Page 179: Fig 14-1 : Failure Identified
In some cases, the accuracy of the reported TOC value may be affected by the presence of certain ions. This condition occurs primarily in water with less than 5 megohm-cm resistivity. If it persists, the sample water is unsuitable for Anatel A643a analysis. 37/38 Temperatures outside the range of 5 °C to 95 °C are considered hardware failures. - Page 180 180 of 220 Troubleshooting - Anatel A643a The following limits apply to each of the Anatel A643a’s Calibration tests. If the limits are exceeded, a message is logged and printed, and the results of the test will not be saved.
- Page 180 180 of 220 Troubleshooting - Anatel A643a The following limits apply to each of the Anatel A643a’s Calibration tests. If the limits are exceeded, a message is logged and printed, and the results of the test will not be saved.
-
Page 181: 14.3.1 Draining The Instrument
181 of 220 14.3.1 Draining the Instrument It is extremely important to drain the Anatel A643a of all water whenever the instrument is removed from its source for two reasons: • When the Analyzer is removed from service for temporary or long term storage (longer than a month), any water remaining in the measurement cell is a medium for bacteria growth. -
Page 182: Sensor Diagnostics
Fig 14-2 : Sensor Diagnostics To perform Anatel A643a diagnostics: 1) With the suspect Analyzer selected in any View, press the Setup Key to access its menu selections. -
Page 182: Sensor Diagnostics
Fig 14-2 : Sensor Diagnostics To perform Anatel A643a diagnostics: 1) With the suspect Analyzer selected in any View, press the Setup Key to access its menu selections. -
Page 183: 14.4.1 Electronics Tests
The Analyzer’s electronic diagnostics are divided into Voltage, Memory/Alarm and Display/ Print tests. To conduct a diagnostic test on any of the Anatel A643a’s electronic systems: 1) With the Analyzer’s Diagnostics Menu displayed, specify Electronics and press Enter to access its options. Each of the Electronics Menu selections offers two diagnostic... -
Page 184: Cell Tests184
Troubleshooting - Anatel A643a 14.4.2 Cell Tests These tests facilitate manual control of the Anatel A643a’s ultraviolet lamp, as well as its sample valves and pump and calibration resistor. Diagnostics testing interrupts the current TOC analysis; normal analysis resumes upon termination of the test. -
Page 185: 14.4.3 I/O Tests
800-866-7885 800-866-7885 14.4.3 I/O Tests These diagnostics verify the operation of the Anatel A643a’s serial and digital I/O circuits. An external loopback connector is required for these tests and should be attached to the appropriate Analyzer port. To check operation of the I/O connections: 1) With the Analyzer’s Diagnostics Menu displayed, specify I/O and press Enter to... -
Page 186: Fig 14-7 : I/O Diagnostics Screen
Fig 14-9 : Digital I/O Loopback Wiring 14.4.3.1 DAC Output Test The analog signal that the Anatel A643a sends to an optional external DAC module can be verified over the chosen output range. Simply attach a multimeter to the module’s input terminals to monitor the accuracy of the instrument’s display. -
Page 187: Fig 14-10 : Dac Output Test Screen
Anatel A643a - Troubleshooting 187 of 220 To test the DAC output: 1) With the Analyzer’s I/O Diagnostics Menu displayed, specify DAC Out Test and press Enter. Fig 14-10 : DAC Output Test Screen 2) Use the Up and Down Keys to specify the desired mA output. The available selections are within the minimum and maximum values over the specified range (4–20 or 0–20) -
Page 187: Fig 14-10 : Dac Output Test Screen
Anatel A643a - Troubleshooting 187 of 220 To test the DAC output: 1) With the Analyzer’s I/O Diagnostics Menu displayed, specify DAC Out Test and press Enter. Fig 14-10 : DAC Output Test Screen 2) Use the Up and Down Keys to specify the desired mA output. The available selections are within the minimum and maximum values over the specified range (4–20 or 0–20) - Page 188 188 of 220 Troubleshooting - Anatel A643a Anatel Operator Manual...
- Page 188 188 of 220 Troubleshooting - Anatel A643a Anatel Operator Manual...
-
Page 189: Appendix A:service Procedures
Appendix A: Service Procedures Return Procedures To return the A643a TOC Analyzer for service, first obtain a returned material authorization number (RA#). The RA# is necessary for any instrument that requires repair or calibration by an authorized service center. Include the RA# on the shipping label when the instrument is returned. -
Page 189: Appendix A:service Procedures
Appendix A: Service Procedures Return Procedures To return the A643a TOC Analyzer for service, first obtain a returned material authorization number (RA#). The RA# is necessary for any instrument that requires repair or calibration by an authorized service center. Include the RA# on the shipping label when the instrument is returned. - Page 190 190 of 220 Service Procedures - Anatel A643a Anatel Operator Manual...
- Page 190 190 of 220 Service Procedures - Anatel A643a Anatel Operator Manual...
-
Page 191: Appendix B:specifications And Accessories
25 °C. At a minimum, the Anatel A643a System consists of a single Analyzer and a C80 Controller. The maximum configuration may contain up to 8 Analyzers and 8 Controllers in addition to a host computer and associated input/output devices. -
Page 191: Appendix B:specifications And Accessories
25 °C. At a minimum, the Anatel A643a System consists of a single Analyzer and a C80 Controller. The maximum configuration may contain up to 8 Analyzers and 8 Controllers in addition to a host computer and associated input/output devices. - Page 192 192 of 220 Specifications and Accessories - Anatel A643a Conductivity (Purge) Mode Conductivity Mode: Temperature Compensated to 25 °C or Uncompensated Conductivity Range: 0.05 to 150 µS/cm (@ 25 °C) Display Resolution: 0.01 µS/cm Resistivity Range: 0.01 to 18 M.-cm (@ 25 °C) Display Resolution: 0.1 to 14.9 M.-cm,...
- Page 192 192 of 220 Specifications and Accessories - Anatel A643a Conductivity (Purge) Mode Conductivity Mode: Temperature Compensated to 25 °C or Uncompensated Conductivity Range: 0.05 to 150 µS/cm (@ 25 °C) Display Resolution: 0.01 µS/cm Resistivity Range: 0.01 to 18 M.-cm (@ 25 °C) Display Resolution: 0.1 to 14.9 M.-cm,...
-
Page 193: Anatel A643A-S Analyzer
Anatel A643a - Specifications and Accessories 193 of 220 B.1.1 Anatel A643a–S Analyzer Note: P/N FG1002701 The Anatel A643a–S is the basic component in the TOC Analysis System. Fig B-1 : Anatel A643a–S TOC Analyzer Display Main: 1-line x 16-character Super-Twist LCD Backlighting:... -
Page 194: Anatel A643A-P Analyzer
Anatel A643a–P Analyzer Note: P/N FG1002801 The Anatel A643a–P combines a C80 Controller, handle, feet, the standard Analyzer and a 40-column thermal printer to provide a complete and integrated portable TOC analysis system. Fig B-2 : Anatel A643a–P TOC Analyzer Display —... -
Page 195: C80 Controller
Anatel A643a - Specifications and Accessories 195 of 220 Physical Analysis Cell Volume: 0.4 mL Power: 100 to 240 VAC ±10%, 50/60 Hz Power Consumption: 2 Amps max. @ 120 VAC, 1 Amp max. @ 230 VAC Fuse: 3 Amp, 250 VAC Fast-Blow... -
Page 195: C80 Controller
Anatel A643a - Specifications and Accessories 195 of 220 Physical Analysis Cell Volume: 0.4 mL Power: 100 to 240 VAC ±10%, 50/60 Hz Power Consumption: 2 Amps max. @ 120 VAC, 1 Amp max. @ 230 VAC Fuse: 3 Amp, 250 VAC Fast-Blow... -
Page 196: Fig B-3 : C80 Controller
196 of 220 Specifications and Accessories - Anatel A643a Fig B-3 : C80 Controller Displays Main: 4-line x 16-character Super-Twist LCD Channel: 8 Bi-color (red/green) LEDs Physical Operating Temperature: 0°C to 40°C (32°F to 104°F) Maximum Relative Humidity: 90% RH... -
Page 197: Accessories
P/N FG2009401 The Seiko Instruments Model DPU-414 Type II is a 40-column thermal printer. It can operate as a standalone reporting device with the Anatel A643a–S and is integrated into the design of the Anatel A643a–P. The Anatel A643a–P printer’s onboard NiCad battery is not field-replaceable: contact Anatel for replacement. -
Page 197: Accessories
P/N FG2009401 The Seiko Instruments Model DPU-414 Type II is a 40-column thermal printer. It can operate as a standalone reporting device with the Anatel A643a–S and is integrated into the design of the Anatel A643a–P. The Anatel A643a–P printer’s onboard NiCad battery is not field-replaceable: contact Anatel for replacement. - Page 198 198 of 220 Specifications and Accessories - Anatel A643a Physical Dimensions: 160 mm W x 170 mm L x 66.5 mm D (6.3” W x 6.7” L x 2.6” D) Connections Interface: RS232 Serial, 1200 Baud To order these materials, contact a local Hach Ultra representative or contact the factory at 800-866-7889 or +1-541-472-6500.
- Page 198 198 of 220 Specifications and Accessories - Anatel A643a Physical Dimensions: 160 mm W x 170 mm L x 66.5 mm D (6.3” W x 6.7” L x 2.6” D) Connections Interface: RS232 Serial, 1200 Baud To order these materials, contact a local Hach Ultra representative or contact the factory at 800-866-7889 or +1-541-472-6500.
-
Page 199: Appendix C:certifications
Anatel A643a - Certifications 199 of 220 Appendix C: Certifications Overview This section contains the Declaration of Conformity certificate. For more information, contact a local Hach Ultra representative or contact the factory at 800-866-7889 or +1-541-472-6500. Anatel Operator Manual... -
Page 200: Declaration Of Conformity
DECLARATION OF CONFORMITY DECLARATION DE CONFORMITE, ÜBEREINSTIMMUNGSERKLÄRUNG, DICHIARAZIONE DI CONFORMITÀ, DECLARACION DE CONFORMIDAD MODEL: Anatel Access 643 Total Organic Carbon (TOC) Analyzer model(s): Modèle, Modell, Modello, Modelo A643a-S with C80 Controller and DPU-414 Thermal Printer A643a-P TOC600 with C80 Controller and DPU-414 Thermal Printer FG1002701 with FG1000302 and FG2009401 PART NO.:... -
Page 201: Appendix D:anatel A643A Menu Flowcharts
Anatel A643a - Anatel A643a Menu Flowcharts 201 of 220 Appendix D: Anatel A643a Menu Flowcharts Anatel Operator Manual... -
Page 201: Appendix D:anatel A643A Menu Flowcharts
Anatel A643a - Anatel A643a Menu Flowcharts 201 of 220 Appendix D: Anatel A643a Menu Flowcharts Anatel Operator Manual... - Page 202 202 of 220 Anatel A643a Menu Flowcharts - Anatel A643a Anatel Operator Manual...
- Page 202 202 of 220 Anatel A643a Menu Flowcharts - Anatel A643a Anatel Operator Manual...
- Page 203 Anatel A643a - Anatel A643a Menu Flowcharts 203 of 220 Anatel Operator Manual...
- Page 203 Anatel A643a - Anatel A643a Menu Flowcharts 203 of 220 Anatel Operator Manual...
- Page 204 204 of 220 Anatel A643a Menu Flowcharts - Anatel A643a Anatel Operator Manual...
- Page 204 204 of 220 Anatel A643a Menu Flowcharts - Anatel A643a Anatel Operator Manual...
-
Page 205: Appendix E:material Data Safety Sheets
Note: Hach Ultra cannot address all health and safety issues associated with using the Anatel 643a Analyzer. Inherent dangers include the handling of hazardous chemicals. It is strongly recommended that you read the Operator Manual thoroughly before installing or operating the instrument. -
Page 205: Appendix E:material Data Safety Sheets
Note: Hach Ultra cannot address all health and safety issues associated with using the Anatel 643a Analyzer. Inherent dangers include the handling of hazardous chemicals. It is strongly recommended that you read the Operator Manual thoroughly before installing or operating the instrument. - Page 206 206 of 220 Material Data Safety Sheets - Anatel A643a Anatel Operator Manual...
- Page 206 206 of 220 Material Data Safety Sheets - Anatel A643a Anatel Operator Manual...
- Page 207 Anatel A643a - Material Data Safety Sheets 207 of 220 Anatel Operator Manual...
- Page 207 Anatel A643a - Material Data Safety Sheets 207 of 220 Anatel Operator Manual...
- Page 208 208 of 220 Material Data Safety Sheets - Anatel A643a Anatel Operator Manual...
- Page 208 208 of 220 Material Data Safety Sheets - Anatel A643a Anatel Operator Manual...
- Page 209 Anatel A643a - Material Data Safety Sheets 209 of 220 Anatel Operator Manual...
- Page 209 Anatel A643a - Material Data Safety Sheets 209 of 220 Anatel Operator Manual...
- Page 210 210 of 220 Material Data Safety Sheets - Anatel A643a Anatel Operator Manual...
- Page 210 210 of 220 Material Data Safety Sheets - Anatel A643a Anatel Operator Manual...
-
Page 211: Appendix F:glossary
Anatel A643a - Glossary 211 of 220 Appendix F: Glossary Several of the terms used throughout this Operator Manual have specific meaning within high- purity water applications. These unique terms include: Conductivity A measure of the ability to conduct current through water. Conductivity, very low with high-purity deionized water, is the reciprocal of resistivity and is measured in microsiemens per centimeter (µS/cm). -
Page 211: Appendix F:glossary
Anatel A643a - Glossary 211 of 220 Appendix F: Glossary Several of the terms used throughout this Operator Manual have specific meaning within high- purity water applications. These unique terms include: Conductivity A measure of the ability to conduct current through water. Conductivity, very low with high-purity deionized water, is the reciprocal of resistivity and is measured in microsiemens per centimeter (µS/cm). - Page 212 212 of 220 Glossary - Anatel A643a Anatel Operator Manual...
- Page 212 212 of 220 Glossary - Anatel A643a Anatel Operator Manual...
- Page 213 Anatel A643a - Annex 213 of 220 Annex Tables and illustrations Fig 1-1 : The Anatel A643a–P Portable TOC Analyzer........13 Fig 1-2 : A-Net RS-485 Local Area Network ..........15 Fig 1-3 : Anatel A643a–P TOC Analyzer Components ........17 Table 2-1 : Preparatory and installation issues ..........
- Page 213 Anatel A643a - Annex 213 of 220 Annex Tables and illustrations Fig 1-1 : The Anatel A643a–P Portable TOC Analyzer........13 Fig 1-2 : A-Net RS-485 Local Area Network ..........15 Fig 1-3 : Anatel A643a–P TOC Analyzer Components ........17 Table 2-1 : Preparatory and installation issues ..........
- Page 214 214 of 220 Annex - Anatel A643a Fig 4-1 : C80 Controller Display ..............45 Fig 4-2 : Contrast Adjustment ................ 47 Fig 4-3 : C80 Setup Selections ..............47 Fig 4-4 : C80 Setup Submenu ............... 47 Fig 4-5 : C80 Contrast Adjustment Screen ............
- Page 214 214 of 220 Annex - Anatel A643a Fig 4-1 : C80 Controller Display ..............45 Fig 4-2 : Contrast Adjustment ................ 47 Fig 4-3 : C80 Setup Selections ..............47 Fig 4-4 : C80 Setup Submenu ............... 47 Fig 4-5 : C80 Contrast Adjustment Screen ............
- Page 215 Anatel A643a - Annex 215 of 220 Fig 5-35 : TOC Print Format ................71 Fig 5-36 : Paper Saver Print Screen ..............71 Fig 5-37 : Selecting the Purge Mode ............... 72 Table 5-3 : Purge Printout Reports ..............72 Fig 5-38 : Purge Printout..................
- Page 215 Anatel A643a - Annex 215 of 220 Fig 5-35 : TOC Print Format ................71 Fig 5-36 : Paper Saver Print Screen ..............71 Fig 5-37 : Selecting the Purge Mode ............... 72 Table 5-3 : Purge Printout Reports ..............72 Fig 5-38 : Purge Printout..................
- Page 216 216 of 220 Annex - Anatel A643a Fig 6-28 : System Suitability Results ............... 97 Fig 6-29 : Adjust Alarm Limit................98 Fig 6-30 : Sample System Suitability Printout..........98 Fig 6-31 : Data History ..................99 Fig 6-32 : Show TOC Cal.................
- Page 216 216 of 220 Annex - Anatel A643a Fig 6-28 : System Suitability Results ............... 97 Fig 6-29 : Adjust Alarm Limit................98 Fig 6-30 : Sample System Suitability Printout..........98 Fig 6-31 : Data History ..................99 Fig 6-32 : Show TOC Cal.................
- Page 217 Anatel A643a - Annex 217 of 220 Fig 9-8 : mA Range Screen ................. 125 Fig 9-9 : DAC Range Menu................126 Fig 9-10 : Zero-Scale TOC Screen ..............126 Fig 9-11 : Zero-Scale TOC Menu..............126 Fig 9-12 : Zero-Scale TOC Data ..............
- Page 217 Anatel A643a - Annex 217 of 220 Fig 9-8 : mA Range Screen ................. 125 Fig 9-9 : DAC Range Menu................126 Fig 9-10 : Zero-Scale TOC Screen ..............126 Fig 9-11 : Zero-Scale TOC Menu..............126 Fig 9-12 : Zero-Scale TOC Data ..............
- Page 218 Fig 13-12 : Inserting the UV Lamp Connector ..........164 Fig 13-13 : Lamp Setup ................... 165 Fig 13-14 : Resetting the Lamp Counter............165 Fig 13-15 : Anatel A643a Air Filters ..............166 Fig 13-16 : 26-Pin Connectors ................. 167 Fig 13-17 : Lithium Battery................167 Fig 13-18 : Replace Battery ................
- Page 218 Fig 13-12 : Inserting the UV Lamp Connector ..........164 Fig 13-13 : Lamp Setup ................... 165 Fig 13-14 : Resetting the Lamp Counter............165 Fig 13-15 : Anatel A643a Air Filters ..............166 Fig 13-16 : 26-Pin Connectors ................. 167 Fig 13-17 : Lithium Battery................167 Fig 13-18 : Replace Battery ................
-
Page 219: User Notes
Anatel A643a - User Notes 219 of 220 User Notes Anatel Operator Manual... -
Page 219: User Notes
Anatel A643a - User Notes 219 of 220 User Notes Anatel Operator Manual... - Page 220 220 of 220 User Notes - Anatel A643a end of the book Anatel Operator Manual...
- Page 220 220 of 220 User Notes - Anatel A643a end of the book Anatel Operator Manual...
Need help?
Do you have a question about the A643a and is the answer not in the manual?
Questions and answers