Table of Contents
Advertisement
Quick Links
Advertisement
Table of Contents

Related Manuals for Yamaha MonitorMix


Summary of Contents for Yamaha MonitorMix
-
Page 1: User Guide
User Guide MonitorMix User Guide... -
Page 2: Introduction
• Copying or modifying the software or reproduction of this document, by any means, whether in whole or in part, is expressly forbidden without the written consent of Yamaha Corporation. • Yamaha Corporation makes no representations or warranties with regard to the use of the software and documentation and cannot be held responsible for the results of the use of the software and this document. -
Page 3: Table Of Contents
ABOUT screen ..............20 Wi-Fi settings on your smart device ........5 Troubleshooting MonitorMix settings Offline demo mode..............8 Selecting a mixer and starting operation ......... 8 Configuring and using PINs............10 PIN settings ................10 PIN use ...................11 MonitorMix User Guide... -
Page 4: Operating Environment
Nexus 4/5/6/7/9/10/5X/6P is recommended for Android Supported mixers and firmware Yamaha Digital Mixing Console CL/QL series V4.00 or later, TF series V1.12 or later Wi-Fi settings Configure Wi-Fi access point as instructed in the manual provided with your device. While no special settings are required, we recommend setting up WPA2 or a similar form of security to prevent illicit access to your network from an external source. -
Page 5: Preparation
(Do not connect the Ethernet cable to the WAN port) Wi-Fi settings on your smart device Configure settings on your smart device using DHCP or a static IP address. Tap the [Settings] icon on the Home screen. Select [Wi-Fi]. MonitorMix User Guide... - Page 6 Wi-Fi access points. Enter the password if asked. For iOS users, tap the [Information] button for the Wi- Fi access point. For Android users, tap the [Advanced options] button on the password entry screen. MonitorMix User Guide...
- Page 7 • Make sure that the same subnet is set for the IP address as that set for the mixer unit. • If DHCP settings cannot be applied after performing step 5 above, check the settings for the DHCP server in use. You can also use a static IP address and configure OS settings. MonitorMix User Guide...
-
Page 8: Monitormix Settings
Offline demo mode Tap [Offline Demo] on the SELECT MIXER screen to use application features even when MonitorMix is not connected to a mixer (offline). The level meter will not appear in this mode. This mode assumes that you are connected to a TF5 AUX9/10. Additionally, while you are able to edit... - Page 9 If the number of MonitorMix connected to a mixer already exceeds the maximum allowed (10), a block mark will appear on the left of the IP address. Selecting a mixer with a block mark and pressing the [Connect] button will result in an error message indicating that connection is refused.
-
Page 10: Configuring And Using Pins
Setting and changing PINs are done in advance on the mixer. Navigate from the SETUP screen to the NETWORK screen of TF series and CL/QL series mixers, then select “PIN for MonitorMix” to set PINs. The PIN Authentication screen will appear when selecting a mixer with PIN settings on the SELECT MIXER screen. -
Page 11: Pin Use
Performers receive a smart device with MonitorMix running, and proceed to adjust monitor mix levels. If a performer receives a smart device that is not running MonitorMix, the performer can tap the [Resume] button on the SELECT MIXER screen to automatically connect using the previously set PIN and bus. -
Page 12: Screen Areas
Shows the SCENE number and name. This display will update when a scene recall is performed in the mixer. [GROUP] button Tap to display the PERSONAL GROUP & ORDER screen (page 16). [SETTINGS] button Tap to display the SETTINGS screen (page 19). MonitorMix User Guide... -
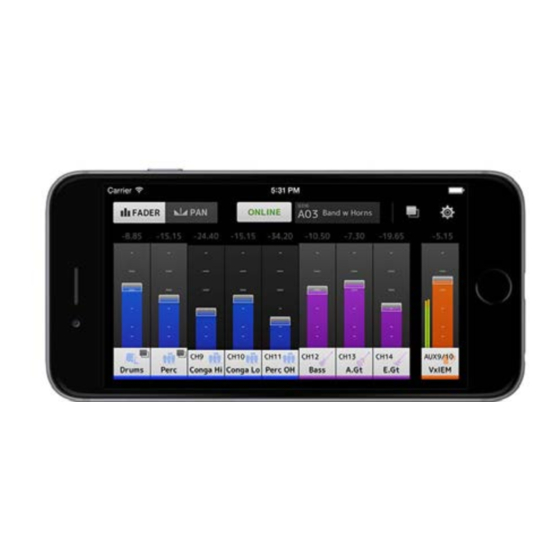
Page 13: Fader Screen
Two level meters are displayed when using a stereo bus (L/R), and one level meter is displayed when using a monaural bus. Meter positions are fixed at post ON (immediately after the mixer’s ON button). MonitorMix User Guide... -
Page 14: Using Grouped Channels
The group master channel allows you to control levels for all grouped channels while maintaining the same relative level balance between each channel. Grouping of channels is configured on the PERSONAL GROUP & ORDER screen (page 16). Group master channel MonitorMix User Guide... -
Page 15: Pan Screen
• The PAN control bar will not appear if your monitor bus is stereo and the BUS TYPE is FIXED. PAN mode BALANCE mode Bus balance bar Adjusts left and right balance levels for the entire monitor bus. The orange bar shows the balance position. The green line shows the center position. MonitorMix User Guide... -
Page 16: Personal Group & Order Screen
[Edit] button By tapping this button when the group master channel is selected, the GROUP NAME screen, where you can edit group master channel information, will be displayed. MonitorMix User Guide... - Page 17 FADER screen. [Share] button Settings configured on the PERSONAL GROUP & ORDER screen to other smart devices with MonitorMix installed. Select either Mail, AirDrop (iOS), or Bluetooth (Android) as the means of sharing these settings. Selecting Mail will launch the email software on your device to send the settings file as an attachment (file extension .mgi).
-
Page 18: Group Name Screen
[Edit] button is pressed. Tap the color button to show the screen used to select a group channel color. Tap the icon button to show the screen used to select a group channel icon. MonitorMix User Guide... -
Page 19: Settings Screen
SETTINGS screen Allows you to configure user settings and to check version information. Configured settings are stored on the device where MonitorMix is installed, and will be kept even when closing MonitorMix. Fader Cap Shows/hides the fader switch. Fader Sensitivity Sets the sensitivity when dragging the fader range. -
Page 20: About Screen
ABOUT screen Shows software version information and the software license. The License option will not appear for versions not using open source software. MonitorMix User Guide... -
Page 21: Troubleshooting
Android version of the app (OS 6.0 or later) • Check the Settings > Apps > Gmail > Permissions > Storage is ON on your Android device. Manual Development Group © 2016 Yamaha Corporation Published 09/2016 MW-A0 MonitorMix User Guide...
Need help?
Do you have a question about the MonitorMix and is the answer not in the manual?
Questions and answers