Advertisement
Advertisement
Table of Contents

Related Manuals for DigiTech DC-1120


Summary of Contents for DigiTech DC-1120
- Page 1 Model:DC-1120 Compact 5W UHF CB Radio Instruction Manual...
- Page 3 Introduction Use of the citizen band radio service is licensed in Australia by ACMA Radio communications (Citizen Band Radio Stations) Class Licence and in New Zealand by MED General User Radio Licence for Citizens Band Radio. Operation is subject to NOTE conditions contained in those licences.
-
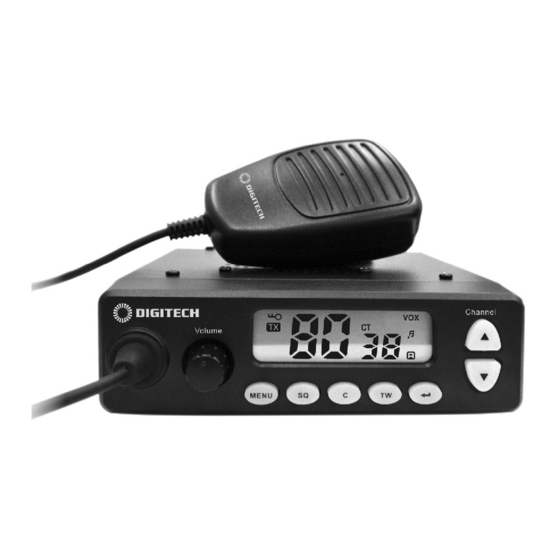
Page 4: Controls And Indicators
Controls and Indicators Front View Channel Volume MENU Rear View DC 13.8V ANT. EXP. SP. 1. Microphone connection 2. Power ON/OFF and Volume Knob 3. MENU button 4. Squelch button 5. Call button 6. Triple watch button 7. Confirm button 8. - Page 5 Controls and Indicators 14. Channel Down Button 15. Channel Up Button 16. PTT - Push To Talk Button 17. Microphone 18. RJ45 Type plug 19. MIC Jack cover...
-
Page 6: Lcd Display
LCD Display A. Keypad LOCK B. TX Icon - is lighted when the radio is in transmit mode C. RX Icon - is lighted when the radio is in receive mode TW Icon - Triple Watch function VOX - Hands-free use REP Icon -is lighted on when repeater function is switched on Keypad Beep Tone Stop Watch function... - Page 7 Included with Radio Standard Microphone Instruction manual Microphone Hanger, Mounting cradle, Screws & Washers Screws & Washers DC Power Cord...
-
Page 8: Installation
Installation Connecting the Microphone The microphone uses a miniature 6 pin style plug and socket. To connect the microphone: 1. Push the MIC plug at the end of the microphone cord into the MIC jack Volume until the connection locks into place. Gently tug the MIC cord to test that the connection is locked. -
Page 9: Mounting The Mic Hanger
Mounting the MIC Hanger The Microphone Hanger comes in two parts. How and where you mount the MIC hanger will determine which parts to use. Conventional Mounting with Screws Use the front part of the MIC hanger only. Locate a suitable mounting position, mark and drill two 3mm holes. -
Page 10: Operation
Operation Turning on the radio Rotate the ON/OFF volume knob clockwise to turn ON and adjust the volume, the radio is then going to self-inspection. A series of tones will indicate the radio is on and full screen displayed 1 second. If it is the first time to turn on the radio, the default parameter as below: Parameter Default setting... - Page 11 Only use the repeater function when a long distance communication via the Ÿ local repeater facility is specifically required. Unless it is necessary, to avoid operation on locally used repeater input channels (channels 31 to 38 and channels 71 to 78) or locally used repeater receiving channels (channels 1 to 8 and channels 41 to 48) is recommended.
- Page 12 Monitor 1. Press and hold the button more than 2 seconds to activate the Monitor Function, you will hear background noise and possible weak signal from the unit, when you released less than 5 seconds to return. 2. Press and hold the button more than 5 seconds to extended monitor;...
- Page 13 CTCSS code setting The radio has 38 CTCSS private codes available. Different CTCSS tones may be associated to different channels. To choose the desired CTCSS code, please proceed as follow. 1. Press button one time, the CTCSS code number blinks on the LCD display.
- Page 14 Memory setting 1. Press button five times, until the icon is displayed and channel number is blinking. 2. Press button to select desired channel, then press button to confirm the channel. The most channel you can store 20 channels. Channel scanning Channel scan performs searches for active signals in an endless loop from channels.
- Page 15 Call Tone setting Call tone can only be transmitted once (not more than 3 sec) in any 60 sec period. It means that the unit will not transmit a call tone more than once no matter how many times you press the button within a minute.
- Page 16 Stop Watch Setting Press button thirteen times, until 00:00 indications and icon will start blinking on the LCD display. 1. Press button to start the timer. 2. Press button to stop the timer 3. Press button again to re-start. Key Lock Press and hold the button for 2 seconds to activate/deactivate the Key Lock feature, the...
-
Page 17: Channel Table
Channel Table Frequency Frequency Frequency Channel Channel Channel (MHZ) (MHZ) (MHZ) Number Number Number 476.4250 477.1000 476.7875 476.4500 477.1250 476.8125 476.4750 477.1500 476.8375 476.5000 477.1750 476.8625 476.5250 477.2000 476.8875 476.5500 477.2250 476.9125 476.5750 477.2500 – 476.6000 477.2750 62 + – 476.6250 477.3000 –... -
Page 18: Ctcss Frequency Table
* Channel 5 and 35 are for emergency calling. Please do not use these sub-channels in non-emergency cases. + Speech telephony is inhibited on Channel 22 and 23. * Channel 1-8 and 31-38, 41-48 and 71-78 are used as repeater channels with 750kHz offset. - Page 19 DCS Frequency Table Channel Octal Channel Octal Channel Octal Channel Octal Number Code Number Code Number Code Number Code -17-...
Need help?
Do you have a question about the DC-1120 and is the answer not in the manual?
Questions and answers