Table of Contents
Advertisement
Advertisement
Table of Contents

Related Manuals for FoodSaver V4980


Summary of Contents for FoodSaver V4980
- Page 1 Owner’s Manual V4980 Model...
- Page 2 www.FoodSaver.com...
-
Page 3: Important Safeguards
..Welcome ..Product Features ..“How To” Section Make a Bag from a FoodSaver Vacuum Sealing Roll ® Vacuum Seal with FoodSaver Vacuum Sealing Bags ®... -
Page 4: Important Tips
® heat process of canning. Perishables still need to be refrigerated or frozen. Read the User Manual carefully for operating For best results, use only with FoodSaver Bags, ® instructions. Read all instructions in this Containers and Accessories. manual before use. - Page 5 System has helped millions of households keep food fresh longer in the refrigerator, After registering your product, you’ll have freezer and pantry. The FoodSaver system ® exclusive access to special sale items for is designed to remove air and extend freshness up to five times longer than online registrants only.
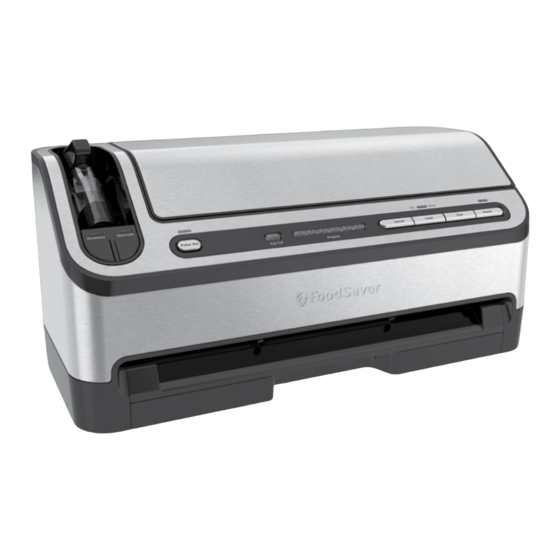
- Page 6 Product Features FoodSaver V4980 Model ® A. Controls and Indicator Lights Indicate current setting and vacuum progress for added control. D. Seal Button CrushFree Instant Seal feature. ™ Stops vacuum cycle and seals to prevent crushing delicate items. E. Vacuum Progress Display Green lights signal progression of the vacuuming process.
- Page 7 I. Appliance Door Opens to access Built-in Roll Storage and Cutter. J. Built-in Roll Storage For storage of FoodSaver ® Vacuum Sealing Rolls. K. Roll Cutter Bar Simplifies making custom-sized bags. L. Bag Cutter M. Auto Bag Sensing Simply insert open end of bag...
-
Page 8: Control Panel
Button Button Display Button The user-friendly, intuitive control panel makes it easy for you to get the most out of your FoodSaver System: ® Accessory Mode Button Press to achieve best vacuum for accessories (See page 12). Push Accessory Mode Button to begin vacuum process. - Page 9 ™ Press to immediately stop the vacuum process and begin sealing the bag. This prevents crushing delicate items such as bread, cookies and pastries. 2. Press to create a seal when making bags from a FoodSaver Roll. ® 3. Press to create a seal on multilayer film bags (such as a potato chip bag) to keep food sealed air-tight.
- Page 10 How to... Make a Bag from a FoodSaver Roll ® 1. Open appliance door (I) and place roll into Roll Storage Fig. 1 (Fig. 1). For best results, insert roll with material flap down. 2. Lift up Roll Cutter Bar (K) and place bag material beneath the cutter bar (Fig.
- Page 11 NOTE: Appliance will time out after a couple of minutes if vacuum cannot be reached. Go to www.foodsaver.com for additional hints, tips, instructional videos and information about how to purchase FoodSaver parts and accessories.
- Page 12 NOTE: Do not reuse Zipper Bags after heating in the microwave. Do not put Zipper Bags in the Dishwasher. FoodSaver FreshSaver Containers ® ® 1. Prepare container according to FoodSaver Accessory Guidelines, which ® are included with accessory purchases. 2. Pull Retractable Handheld Sealer from appliance. Place end over gray circle on container.
- Page 13 Twist tab while inserting to ensure a tight fit. 3. Push Accessory Button to begin vacuum process. Motor will run until vacuum process is complete. (To Marinate, follow instructions found in “How to Marinate with your FoodSaver Appliance” section of this Guide on page 14.) ®...
- Page 14 Marinate with your FoodSaver Appliance ® Your FoodSaver Vacuum Sealing System has a special Quick Marinate ® Cycle which will last about ten minutes. The FoodSaver Quick Fig. 1 ® Marinating Canister (not included) is the perfect FoodSaver accessory ®...
- Page 15 Care and Cleaning of your Vacuum Sealer To Clean Appliance: Press Power Button and remove Power Cord Push In from electrical outlet. Do not immerse in liquid. Tabs Slide out Drip Tray Drawer (P). Remove Drip Tray for cleaning by pulling up on the two side tabs. Check Lower Gasket (O) around Drip Tray (P) to make sure it is free from food materials.
- Page 16 IMPORTANT: Vacuum sealing is NOT a substitute for refrigeration or freezing. Any perishable foods that require refrigeration must still be refrigerated or frozen after vacuum sealing. www.FoodSaver.com...
- Page 17 4-inch room you normally leave between contents To reheat foods in a microwave in a FoodSaver ® and seal. Simply cut sealed edge and remove Bag, always cut corner of the bag before placing cheese.
- Page 18 You can also place the food in its original bag inside a FoodSaver Bag, or use a FoodSaver normal. Store in refrigerator. ® ®...
- Page 19 Simply follow the directions to vacuum seal items using FoodSaver Bags, ® Canisters and Accessories. • To keep emergency kits safe and dry, vacuum seal flares, batteries, flashlights, matches, candles, first aid kits, extra food and other necessities.
- Page 20 Storage Guide: Meat, Cheese, Vegetables, Fruits Recommended Storage Life Where FoodSaver with FoodSaver Normal ® ® Foods to Store Bag/Accessory Bag/Accessory Storage Life Meat Beef, Pork, Lamb Freezer FoodSaver 2-3 years 6 months ® Ground Meat Freezer FoodSaver 1 year 4 months ®...
- Page 21 Storage Guide: Baked Goods, Coffee, Snacks and Liquids Recommended Storage Life Where FoodSaver with FoodSaver Normal ® ® Foods to Store Bag/Accessory Bag/Accessory Storage Life Baked Goods Bagels, Bread, Freezer FoodSaver 1-3 years 6-12 months ® Pastries Nuts Almonds, Pantry...
- Page 22 Vacuum Pump is • If making a bag from a roll, make sure one end of bag is sealed. running, (See “How to Make a Bag from a FoodSaver Vacuum Sealing Roll” on page 10.) ® but bag is not •...
- Page 23 1 lemon, cut into wedges (optional) 1/4 teaspoon salt Cooking Directions: Combine lemon juice, oil, lemon peel, oregano, garlic, salt and pepper in FoodSaver Quick Marinator. ® Place lid on container. Turn knob to Open/Marinate and attach Accessory Hose. Press Marinate Button.
- Page 24 3/4 teaspoon salt, divided 1 flank steak (1 1/2 pounds) Cooking Directions: Whisk oil and vinegar in medium glass bowl. Place steak in FoodSaver Quick Marinator; spread with ® garlic. Sprinkle 1⁄2 teaspoon salt and 1⁄2 teaspoon pepper over steak. Spoon 2 tablespoons vinegar mixture over steak.
- Page 25 2 cloves garlic, minced 2 tablespoons dry sherry Cooking Directions: Combine soy sauce, sherry and garlic in FoodSaver Quick Marinator. Add salmon; turn to coat. ® Place lid on container. Turn knob to Open/Marinate and attach Accessory Hose. Press Marinate Button.
- Page 26 Gradually add banana mixture to flour mixture, beating just until moistened Pour into prepared pan. Bake 45 minutes or until toothpick inserted into center comes out clean. Cool in pan 15 minutes. Remove to wire rack; cool completely. www.FoodSaver.com...
- Page 27 Sunbeam Products, Inc. doing business as Jarden Consumer Solutions, or if in Canada, Sunbeam Corporation (Canada) Limited doing business as Jarden Consumer Solutions (collectively “JCS ”) warrants that from the date of purchase, this product will be free from defects in material and workmanship provided this product is used with FoodSaver ®...
- Page 28 If you register on our website, you will have the opportunity to receive special bag and accessory introductory offers. Refer to the registration card inside the box. For important safety information and helpful tips, please visit us at www.foodsaver.com to get tips on vacuum sealing and order FoodSaver brand accessories, bags and rolls, ®...
Need help?
Do you have a question about the V4980 and is the answer not in the manual?
Questions and answers
Our V4980 is working but doesn’t create seal as tightly as before. I have cleaned the vacuum seals with water which helps for a few minutes. Do I need to purchase replacement seals? And if so, where can I purchase them?