Table of Contents
Advertisement
A
B
技 术 要求
1.
2.
3.
C
借 ( 通 ) 用件登记
描
图
描
校
旧底图总号
底图总号
处数
标记
设 计
签
字
审 核
日
期
工 艺
标准化
1
:
印 刷颜 色 为
PANTONE BLACK C,
彩色图 片 也 按黑白 印 刷
规 格为
A5
如 果供 应 商 的 排版 需 要加 空 白页 请加 在 最后 。
签 名
更改文件号
校 对
审 定
批 准
日 期
1
,
用户 手册
DWIB60(9348D)
CATA
日 期
阶 段 标 记
00
REV.
数
量
重
1
1
共
张
2
英国
比 例
105G双 铜
量
广东美的集团股份有限公司
美的洗涤电器制造有限公司
1
第
张
2
A
B
C
D
D
Advertisement
Table of Contents

Subscribe to Our Youtube Channel
Related Manuals for Cata DWIB60


Summary of Contents for Cata DWIB60
- Page 1 规 格为 如 果供 应 商 的 排版 需 要加 空 白页 请加 在 最后 。 借 ( 通 ) 用件登记 描 图 描 校 用户 手册 旧底图总号 DWIB60(9348D) 英国 CATA 底图总号 处数 标记 签 名 日 期 比 例...
- Page 2 DWIB60 CNA TRADING APPLIANCES Customer Service I n case of diffic ulty please call the Custome r Service Help line on our hel pline number. When calling customer service, please ensure you have the model and serial nu mber t o hand.
-
Page 3: Table Of Contents
Dear Custome r, Please carefully read this manual before using the dishwasher, it will help y ou to use and maintain the dishwasher pro perly. Keep it to refer to it at a later date. Control Panel...........3 Pass it on to any subsequent owner of the appliance. Dishwasher Features........ - Page 4 WARNING! When using your dishwasher, follow the precautions listed below: This appliance must be grounded. In the e vent of a Improper connection of the earth can result in t he malfunction or breakd own, grounding will reduce risk of an electric shock. the risk o f an electric shock by providing a path Check wit h a qualif ied electrician or service of least resistance of electric current.
-
Page 5: Control Panel
Dispose of the dishwashe r packaging material correctly. All packaging materials ca n be recycle d. Plastic parts are marked w ith the stan dard interna tional abbreviations: for p olyethylene, e.g. shee t wrapping m aterial for polystyren e, e.g. padd ing material polyoxymethy lene, e.g. -
Page 6: Control Panel
To get the best performance from your dishwasher, read all operating instructions before using it for the first time. D WI B6 0 ON/OFF Bu tton: To turn on/off the power supply. Program indicator light : When you select the washing pro gram, the corresponding light will display . -
Page 7: A、Water Softener
Before using your dishwasher for the first time: Set the water softener Pour 1/2 litre of water inside the salt container and then fill with dishwasher salt Fill the rinse aid dispenser Fill with detergent The water softener must be set manually, using the water hardness dia l. The water softener is d esigned t o remove minerals and salts from the water, which would have a de trimental or advers e effect on the operation of t he appliance. -
Page 8: Rinse Aid Dispenser
Alwa ys use t he salt int ended f or use wit h di shwash er. The s alt conta iner is located beneath the lower baske t and should b e fill ed as explain ed in the followi ng: Attention! Only use salt s pecifically designed for the use in dishwashe rs! Eve ry oth er type o f salt not specifical ly designed for the use in a dishwasher, espec ially table sa lt, will... -
Page 9: Adjusting Rinse Aid Dispenser
When to Refill the Rinse Aid Dispenser If there is no rinse-aid warning light in the co ntrol pan el, you c an judge the amou nt of rinse-aid by the colou r of the optical lev el indicator "C" located next to the cap. When the rinse-aid conta iner is fu ll, the wh ole indicator will b e dark .A s the rins e-aid diminish es, the s ize of the dark dot decreases. -
Page 10: Concentrated Detergent
Detergents with its chemical in gredients are necessary to remove dirt and transport it out of the dishwasher. Most o f the commercial quality detergents are suitable for this purpo se. Concentrated Detergent Based on their chemical composition , detergents can be split in two basic types: conventional, alkaline detergents with caustic components low alkaline concentrated detergents w ith natural enzymes The use of“norm al”... -
Page 11: Fill In Detergent
Fill in detergent Fill the detergent dispense r with detergent. The marking indicates the dosing levels , as illustrat ed on the right: The location o f main w ash cycle detergen t, “MI N”mean s approximately 20g of detergent. The location o f pre-wa sh cycle d etergent , approximately 5g of detergent Please observe th e manufa cturers dosing and storage... -
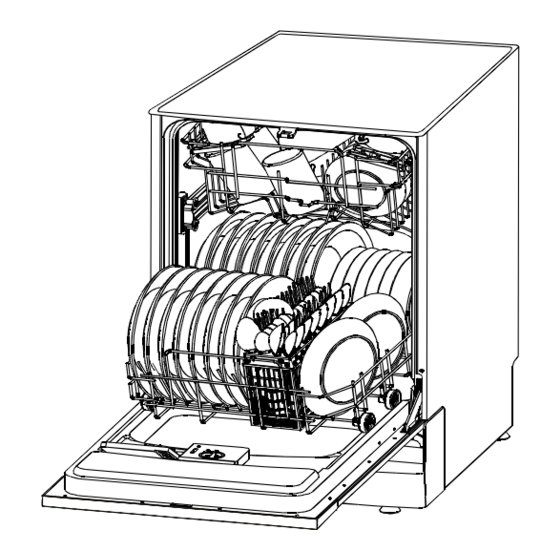
Page 12: Attention Before Or After Loading The Dishwasher Baskets
For best pe rformanc e of the dishwasher, follow these loading guidelines. Fe atures and appearance of baske ts and cutlery baskets may v ary from your mod el. Attention before or after Loading the Dishwasher Baskets Scrape off any large amounts of leftover food. S often rem nants of burnt food in pans. Place objects in the dishwasher in following way: 1.Items su ch as cups, glasses, pots/pans, etc. -
Page 13: Loading The Lower Basket
Loading the Lower Basket We recomm end that you place large items which are most difficult to clean into the lower basket: po ts, pans, lids, serving dishes and bowls, as shown in the figure below. It is preferable to place serving dishes and lids on the side of the rack s in o rder to avoid blocking the rotation of the top spray arm. -
Page 14: Cutlery Basket
Cutlery Basket Cutlery sh ould be p laced in t he cutlery basket w ith the ha ndles at the bottom. If the rack has side baskets, the spoons should be loaded separately into the appropriat e slots, es pecially long utensils should be placed in the horizonta l position at the front of the upper bas ket as shown in the picture. -
Page 15: Possible Causes
shes and ite ms of cutlery must not lie ins ide one a nother, or cover each other avoid damage to glas ses, they must not touch Load large item s which are most difficult to clean into the low er rack he upper rack is designed to hold more delicate and lighter dishware such as gla sses, coffee and tea cups Attention! -
Page 16: Wash Cycle Table
Pre- wash(50℃) Pre- wash For the heaviest soiled loads, such as pots,pans,casserole Wash (65 ℃) Intensive Rinse 5/25 g. dishes and dishes that have 13 0 1.55 Rinse been sitting with dried food on them for a while. Rinse (55 ℃) Drying Pre- wash(50℃) For normally soiled lo ad s,... -
Page 17: Turning On The Appliance
Turning on the Appliance Starting a wash cycle ... 1 Pull o ut the lo wer and upper basket, load the dishes and push them back. It is re commended tha t the low er basket is loaded f irst, then the upper one (see the section entitled " Loading the Dishwasher " ). 2 Pour in the detergent (see the section entitled "... -
Page 18: Unloading The Dishwasher
Open the door carefully. Hot dishes are sensitive to knocks. The dishes should therefore be allowed to cool dow n around 15 minutes before removing from the app liance. Open the dishwashe r's door, leave it ajar and wait a few m inutes be fore remo ving the dishes. In this way they w ill be coo ler and the drying will be imp roved. -
Page 19: Caring For The Dishwasher
Filter assembly For bes t performance and results, t he filter assembly must be cleaned. T he filter e fficiently removes food particles from the wash water, allow ing it to be recycled during the cycle. For best performance and results, the filt er must be cleaned regularly . -
Page 20: Installation Preparation
To clean the edg e around the door, you shou ld use only a soft warm, damp cloth. To avo id penetra tion of water into the door lock and electrical components, do not use a spray cleaner of any kind. Never use a spray c leaner to clean the door panel as it may damage the door loc k and electrical com ponents. -
Page 21: Aesthetic Panel's Dimensions And Installation
【Figure1】 90 ° 90 ° Cabinet dimensions Less than 5mm between the top 820mm of dishwasher and 580mm cabinet and the Electrical, drain and water supply line outer door aligned entrances to cabinet. Space between cabinet bottom and floor 600 mm 【Figure2】... - Page 22 Install the two top hooks and the two lower hooks onto the decor door and put the top hooks into the slot of the outer door of dishwasher(see figure 4a). Lock the decor door onto the outer door of the dishwasher by sliding it downwards so that the upper and lower hooks engage. After positioning the panel , finally fix the panel onto the outer door using the screws and bolts provided.(see figure 4b) .
-
Page 23: Tension Adjustment Of The Door Spring
Tension adjustment of the door spring ● The door springs are set at the factory to the proper tension for the outer door only. When the decor door panel is installed, you will have to adjust the door spring tension. Rotate the adjusting screw to drive the adjustor to strain or relax the steel cable(see figure 5). -
Page 24: Dishwasher Installation Steps
Dishwasher installation steps ● Install the furniture door to the outer door of the dishwasher using the brackets provide d. Refer to the template for positioning of the brackets. Adjust the tension of the door springs b y using an Allen key turning in a clockwise motion to tighten the left and right door sp rings. - Page 25 The dishwasher must be level for proper dish rack operation and wash performance. Place level on door and rack track inside the tub as shown to check that the dishwasher is level. Level the dishwasher by adjusting the four levelling feet individually. When , pl s pay attention not to let the dishwasher tip over.
-
Page 26: Positioning The Appliance
For models not fitted with a safety inlet hose, in order to prevent continual water pres sure in the inlet hose, please turn off the water supply after each use. Connect the cold water supply hose to a threaded 3/4(inch) connector and make sure that it is fastened tightly in place. -
Page 27: Error Codes
Fuse blown, or the Re place fuse or reset circuit breaker. Re move any other appliances sharing the same circuit with the dishwasher circuit breaker has tripped Power supply is not Make sure the dishwa sher is turned on a nd the door is closed securely. - Page 28 The dishes were not Se e notes in " Loading the Dishwasher B askets ". loaded correc tly. The programme was Se lect a more intensive programme. not powerful enough. Se e" Wash Cycle Table ". Not enough detergent Us e more detergent, or change your detergent. was dispensed.
-
Page 29: Dimensions
Height : 820mm(adjustable+60mm) Width : 595mm Depth : 540mm Voltage connected load : See rating label Water pressure: 0.04-1.0MPa Hot water connection : Max 60 ℃ Power supply: See rating label Capacity: 12 place settings...
Need help?
Do you have a question about the DWIB60 and is the answer not in the manual?
Questions and answers
Eco light flashing and beeping rapidly after working perfectly for 7years?