
Related Manuals for Spytec Zetta ZN62


Summary of Contents for Spytec Zetta ZN62
- Page 1 Zetta ZN62 WiFi Intelligent Security Camera-SpyTec User Manual Last Modified on 06/09/2016 4:02 pm EDT...
-
Page 2: What's In The Box
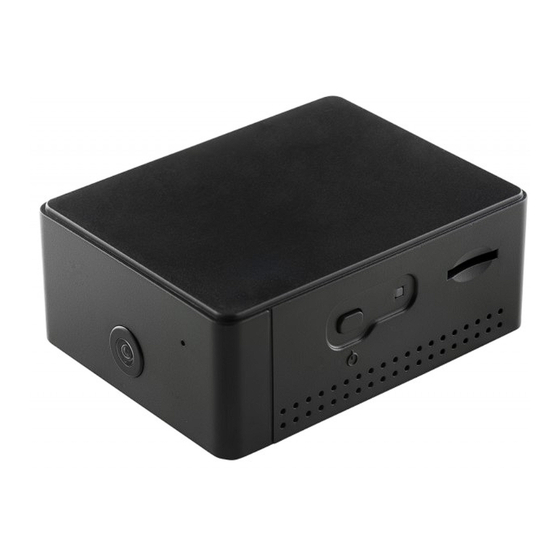
WI-FI INTELLIGENT SECURITY CAMERA USER GUIDE T hank you for choosing the SpyT ec Zetta ZN62 Wi-Fi Intelligent Security Camera. T he pocket-size video camera streams a live video view to one or more mobile devices. Using the Android or iOS control app on your mobile device, you can remotely record high-definition (720p) video and take photos that are all saved to the camera’s memory card. -
Page 3: Getting Started
Getting Started T he ZN62 must be first set up using its mobile app on your Android or iOS device through a Wi-Fi network. T he camera will not operate until setup is complete. Charging the Battery T he fastest way to charge the ZN62 is by plugging the AC adapter into a wall outlet or power strip while the other end of the cable is connected to the USB port on the camera. - Page 4 App and Camera Setup Install the “Attez” app. Download the Attez ZN62 Wi-Fi cam app from the Google Play Store or the Apple App Store into your Android- or iOS-based mobile device. Power on the ZN62. When using the ZN62 for the first time, hold the power button until the green LED turns on followed by the orange LED.
-
Page 5: Router Mode
launch the Attez app by tapping the Attez icon on your mobile device. Once the Attez app is opened, touch “Add new cam,” then OK.T he ZN62 cam ID will be retrieved automatically. You can assign a cam name to the ZN62 such as “Living Room” or “Front Door” or “Mikecam.”... - Page 6 to damage or lose. Keep your eye on the card as you insert the edge with the eight gold contacts pointed up into the slot while the camera’s bottom indicia plate rests on a flat surface. Push the card in until it snaps into place.
- Page 7 Terminology AP mode T he ZN62 acts as an access point (also referred to as a hot spot) in which a smartphone wirelessly connects directly to the camera when you choose Attez from the phone’s list of available Wi-Fi networks. Live View and camera control is enabled from the mobile device. In this mode, Internet access is disabled.
-
Page 8: Led Indicators
Import cam You can invite another user to connect to the ZN62 by providing the Cam ID, user- name and password to the user. LED Indicators T here are two multi-colored light emitting diodes on the camera. T he one next to the USB port is called the Charging LED. - Page 9 T ouch the Live View tab followed by the name of the camera you’ve installed. If you’re commanding several cameras each positioned at a different vantage point, pick one at a time to view and control. T hough you can see only one Live View at a time on a mobile screen, you can switch between cameras to start or stop video recordings or take photographs.
-
Page 10: Live View Controls
mobile devices at once. Note: T hough triggered from your mobile device, video recordings and still images are saved to the microSD card inside each camera. Subsequently, you can use the Download tab in the app to copy files wirelessly to your mobile device. Or you can use the USB cable to transfer files from the camera to a computer. - Page 11 You’ll see exactly what the camera is seeing from your smartphone or tablet. Unlike the picture shown here with the Live View in portrait mode, the view better fills your screen if you turn your mobile device sideways to landscape mode. T ouch the red Record button to start a video recording.
- Page 12 saved to the memory card in the camera. If the camera has been placed upside down, touch the Vertical Flip icon on the right. Note: T he date and elapsed time are superimposed on video recordings. You cannot disable this feature or adjust the format.
- Page 13 T ouching the Download tab reveals a list of video and image files in each camera. When you touch the empty box to the right of a file, a check mark appears. You can then copy the file to your mobile device. A time-elapsed slider will appear on your mobile screen revealing the progress of the download.
- Page 14 via the USB cable. Keep in mind that with Loopback Recording, you don’t have to manually delete files. T he oldest files will be automatically overwritten once card capacity is reached. Loopback recording is also referred to as loop or circular recording. Loopback recording cannot be disabled. Setting Timed Recordings You can use the Attez app to program blocks of time in which the ZN62 will automatically record video.
- Page 15 T ouch the gear icon to the right of the camera you want to program. From the list of settings, choose the Record gear icon. A screen will appear showing rows of start and end times. Choose a row by touching an On/Off square on the right.
-
Page 16: Setting Notifications
Programmed recordings can be set purely by time period. Or you can add one or two triggers so that the camera only records during those times when the mic picks up a voice or the lens detects motion. T o add a mic trigger, touch the black icon so that it turns green. T o add a motion trigger, touch the black running man icon so that it turns green. - Page 17 Whether the app’s Live View from the camera is running or you’ve programmed the camera to record video at set intervals with one or more triggers, you can have the camera send you instant notifications when triggered. From the Setting menu, choose Push notification. T hen choose the Motion trigger or Voice trigger or both.
- Page 18 detected by the camera’s lens or voices are picked by the camera’s microphone. Upon hearing the doorbell, you may want to look at the Live View to see what all the commotion is about. Note: You cannot substitute another type of notification for the doorbell sound effect. If you find push notifications annoying and less than helpful, use the Attez app to disable one or both notification triggers.
- Page 19 Playing Videos and Photos on a Computer Make sure you’ve turned off the power on the ZN62 before plugging the camera into your computer with the included USB cable. Upon connecting to the PC, the Power LED will glow orange and the Status LED green.
-
Page 20: Voice Trigger
feature cannot be disabled. For videos and photographs you want to save indefinitely, make sure to wirelessly download them to your mobile device or transfer them to your computer using the USB cable. Alternatively, swap out memory cards you want to archive before they fill up completely. Scheduled Recording Set the time to automatically start/stop recordings on a 24-hour cycle. -
Page 21: Simultaneous Operation
progress. Still images sport 1280 by 720 pixels and are saved as JPEG files. Note: As with video recordings, photo images are saved to the memory card in the camera. Subsequently, they can be wirelessly downloaded to your mobile device or transferred by USB cable to your computer. - Page 22 range can be global. Can I use a browser on my desktop computer to see the camera’s Live View and control recording? What should you do if the ZN62 does not respond? Press and hold the Power and Reset buttons (on the bottom of the ZN62) at the same time for about 4 seconds and the camera will reboot.
- Page 23 How do I reset the camera to the factory defaults? While the ZN62 is powered on, press and hold the Mode key (on the bottom of the camera) until the orange status LED glows. Delete the cam from the app and install the camera again. Can the Live View from the ZN62 be seen by more than one smartphone or tablet? Up to eight devices can be deployed, but the video may not be smooth.
-
Page 24: Additional Tips
at least 10Mbp. A workaround is to reduce the Live View streaming resolution. You can change the camera’s default Live View resolution from high- definition (1280 x 720) to VGA (640 x 480) or QVGA (320 x 240). T he resolution recorded to the microSD card stays high-def, but the lower-quality live video streaming to your mobile screen will be more fluid. -
Page 25: Windows Users
won’t wipe out any data. But if the card has been in use, keep in mind hat any data stored on the card will be lost during formatting. You can also insert once of these cards into the camera’s memory slot until a click is heard and connect the camera to your PC using the included USB cable. - Page 26 download the upgrade_zetta.zip file. Bug fix: 1. Sometimes it is difficult to connect from the Internet, so make sure you have an optimized network connection. 2. Check if the reason you can’t connect to the router is because the SSID name or password contains special characters: the SSID name has “# \”...
-
Page 27: Specifications
11. After upgrading, the ZN62 will be in AP (hot-spot) mode. Delete the camera in your Attez app, then reinstall the camera. It should be good to go. Specifications Lens Fixed Wide angle 160° diagonal, 115° horizontal, 87° vertical Sensor 1 MP (1280 x 960) Saved video resolution 1280 x 720 (720p) -
Page 28: Fcc Regulation
Weight 4.1 oz. (116 g) FCC Regulation T his device complies with part 15 of the FCC Rules. Operation is subject to the fol- lowing two conditions: 1. T his device may not cause harmful interference, and 2. T his device must accept any interference received, including interference that may cause undesired operation. -
Page 29: Warranty
Warranty T his Limited Warranty applies to physical goods sold by ST I and lasts for a period of one year from the date of sale of the device. T his Limited Warranty covers any manufacturing defects to the device or accessories encountered by normal use.
Need help?
Do you have a question about the Zetta ZN62 and is the answer not in the manual?
Questions and answers