Axis P3354 Installation Manual
Fixed dome
Hide thumbs
Also See for P3354:
- Installation manual (127 pages) ,
- User manual (63 pages) ,
- Datasheet (4 pages)

Related Manuals for Axis P3354


Summary of Contents for Axis P3354
- Page 1 AXIS P33/-V Series Fixed Dome Network Camera AXIS P3354 AXIS P3364-V AXIS P3365-V AXIS P3367-V AXIS P3384-V Installation Guide...
- Page 2 Using an unshielded network cable (UTP) – This technology embodied in the product described in this equipment (not valid for AXIS P3354 or AXIS P3364–V) has document. In particular, and without limitation, these been tested using an unshielded network cable (UTP) and...
- Page 3 FAQ database. が、この装置がラジオやテレビジョン受信機に近 Search by product, category, or phrase 接して使用されると、 受信障害を引き起こすこと • report problems to Axis support staff by logging in to があります。 取扱説明書に従って正しい取り扱い your private support area をして下さい。 本製品は、シールドネットワーク • chat with Axis support staff ケーブル(STP)を使用して接続してください。また...
-
Page 5: Hazard Levels
AXIS P33/-V Series Fixed Dome Network Camera Safety Information Read through this Installation Guide carefully before installing the product. Keep the Installation Guide for future reference. Hazard Levels DANGER Indicates a hazardous situation which, if not avoided, will result in death or serious injury. -
Page 6: Safety Instructions
TICE • The Axis product shall be used in compliance with local laws and regulations. • To use the Axis product outdoors, or in similar environments, it shall be installed in an approved outdoor housing. • Store the Axis product in a dry and ventilated environment. -
Page 7: Dome Cover
WARNING • Risk of explosion if the battery is incorrectly replaced. • Replace only with an identical battery or a battery which is recommended by Axis. • Dispose of used batteries according to local regulations or the battery manufacturer's instructions. -
Page 9: Installation Steps
This Installation Guide provides instructions for installing AXIS P3354/AXIS P3364-V/P3365-V/P3367-V/P3384-V Fixed Dome Network Camera on your network. For other aspects of using the product, see the User Manual available at www.axis.com. Installation Steps 1. Make sure the package contents, tools and other materials necessary for the installation are in order. -
Page 10: Hardware Overview
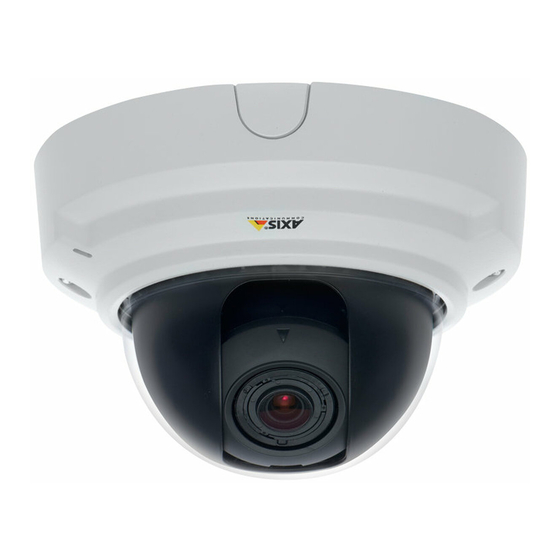
AXIS P33/-V Series Fixed Dome Network Camera Hardware Overview Note Note that AXIS P3354 does not support audio or I/O functionality. Camera unit Network connector (PoE) Audio out Audio in Control button LED indicators I/O connector Built-in microphone SD memory card slot 10. -
Page 11: Mounting Bracket
AXIS P33/-V Series Fixed Dome Network Camera Mounting Bracket Note The mounting bracket is available as an optional accessory. LED Indicators Note • The Status LED can be configured to be unlit during normal operation. To configure, go to Setup > System Options > Ports & Devices > LED. See the online help for more information. -
Page 12: Connectors And Buttons
Flashes green/amber during firmware upgrade. Connectors and Buttons For specifications and operating conditions, see page 14. Note Note that AXIS P3354 does not support audio or I/O functionality. Network Connector RJ45 Ethernet connector with Power over Ethernet (PoE). NO TICE... - Page 13 When a signal is received the state changes and the input becomes active (shown under System Options > Ports & Devices). Audio Connector The Axis product has the following audio connectors: • Audio in (pink) – 3.5 mm input for a mono microphone, or a line-in mono signal.
-
Page 14: Specifications
AXIS P33/-V Series Fixed Dome Network Camera • Connecting to an AXIS Video Hosting System service or AXIS Internet Dynamic DNS Service. For more information about these services, see the User Manual. Specifications Operating Conditions The Axis product is intended for indoor use. - Page 15 AXIS P33/-V Series Fixed Dome Network Camera Function Notes Specifications 0 V DC 0 V DC (-) DC output Can be used to power auxiliary equipment. 3.3 V DC Note: This pin can only be used as power out. Max load = 50 mA...
-
Page 16: Connection Diagrams
Install the Hardware Note • This Axis product can be mounted with the cables routed through or along the wall. • This product can be fitted with a metal conduit for protecting the cabling when the cables are routed along the wall. -
Page 17: Replace Clear/Smoked Dome Cover (Optional)
5. Complete the Installation Replace Clear/Smoked Dome Cover (Optional) The Axis product is supplied with an optional dome. To replace the dome cover: 1. Loosen the four screws under the dome cover that hold the dome in place. 2. Replace the old dome with the new. Make sure the rubber gasket sits securely in place and tighten the screws. -
Page 18: Mount The Camera Using A Mounting Bracket (Not Included)
AXIS P33/-V Series Fixed Dome Network Camera 2. Route and connect all required cables. These include the network cable and may include external input/output devices and the active speaker/external microphone. 3. Attach the camera unit to the wall using screws and plugs appropriate for the wall material. - Page 19 AXIS P33/-V Series Fixed Dome Network Camera Mounting bracket Network cable M4x8 screw Adjust the Position of the Lens The lens can be rotated and tilted to cover a certain area of interest and adjust the live view image. Rotate the Lens Note The marking on the lens cover is by default oriented facing upwards (wall mount).
- Page 20 4. Once satisfied, gently tighten the locking screw to secure the lens holder’s position. Tilt the Lens NO TICE TICE TICE Valid for AXIS P3365–V/P3367–V/P3384–V: The lens should not be tilted more than 90°, this may cause damage to the product. Follow the instructions below.
- Page 21 AXIS P33/-V Series Fixed Dome Network Camera 90° Locking screw Lens holder Lens Screws 1. Open the Live View page, see Access the Product on page 23. 2. Loosen the two screws. 3. Check the Live View page and tilt the lens to the desired position.
-
Page 22: Complete The Installation
AXIS P33/-V Series Fixed Dome Network Camera Complete the Installation 1. If the cables are routed along the wall, remove the side lid from the camera’s dome cover. Side lid Dome cover 2. Rotate the black shield inside the dome cover so it does not cover the lens. -
Page 23: Access The Product
The installation is now complete. Access the Product AXIS IP Utility and AXIS Camera Management are recommended methods for finding Axis products on the network and assigning them IP addresses in Windows®. Both applications are free and can be downloaded from www.axis.com/techsup The product can be used with most operating systems and browsers. -
Page 24: Further Information
Further Information The User Manual is available at www.axis.com Visit www.axis.com/techsup to check if there is updated firmware available for your network product. To see the currently installed firmware version, go to Setup > About. Visit Axis learning center www.axis.com/academy for useful trainings, webinars, tutorials and guides. -
Page 25: Niveaux De Risques
AXIS P33/-V Series Fixed Dome Network Camera Informations sur la sécurité Lisez attentivement ce guide d'installation avant d'installer l'appareil. Conservez le guide d'installation pour toute référence ultérieure. Niveaux de risques DANGER Indique une situation dangereuse qui, si elle n'est pas évitée, entraînera le décès ou des blessures graves. - Page 26 • Le produit Axis doit être utilisé conformément aux lois et règlementations locales en vigueur. • Pour pouvoir utiliser le produit Axis à l'extérieur, ou dans des environnements similaires, il doit être installé dans un boîtier d'extérieur homologué. • Conserver ce produit Axis dans un environnement sec et ventilé.
-
Page 27: Couvercle De Dôme
AXIS P33/-V Series Fixed Dome Network Camera La batterie doit être remplacée uniquement en cas de besoin, et pour ce faire, contactez l'assistance technique d'Axis à l'adresse www.axis.com/techsup et obtenir de l'aide. AVERTISSEMENT • Risque d'explosion si la batterie est remplacée de façon incorrecte. -
Page 29: Procédures D'installation
Kit de fixation suspendu conforme à la norme IP51 • Dôme noir • Boîtier arrière destiné au conduit de l'AXIS T94H01P • Support de fixation (spécifique à la région) • Kit de suspension • Supports AXIS T91 Pour plus d'informations sur les accessoires disponibles, consultez le site www.axis.com... -
Page 30: Aperçu Du Matériel
AXIS P33/-V Series Fixed Dome Network Camera Aperçu du matériel Note Notez que le modèle AXIS P3354 ne prend pas en charge la fonction audio ou E/S. Caméra Connecteur réseau (PoE) Sortie audio Entrée audio Bouton de commande Voyants LED Connecteur E/S Microphone intégré... - Page 31 AXIS P33/-V Series Fixed Dome Network Camera Support de fixation Note Le support de fixation est également disponible en option. Voyants Note • Le voyant d'état peut être éteint pendant le fonctionnement normal. Pour ce faire, rendez-vous dans Setup > System Options > Ports & Devices > LED (Configuration >...
-
Page 32: Connecteurs Et Boutons
Connecteurs et boutons Pour les caractéristiques et les conditions d'utilisation, consultez page 34. Note Notez que le modèle AXIS P3354 ne prend pas en charge la fonction audio ou E/S. Connecteur réseau Connecteur Ethernet RJ45 avec l'alimentation par Ethernet (PoE). - Page 33 AXIS P33/-V Series Fixed Dome Network Camera A A A VIS Valable pour les modèles AXIS P3365–V, AXIS P3367–V et P3384–V : les réglementations locales ou les conditions environnementales et électriques dans lesquelles le produit est utilisé peuvent nécessiter l’utilisation d’un câble réseau blindé...
-
Page 34: Caractéristiques Techniques
• Réinitialisation du produit aux paramètres d’usine par défaut. Cf. page 44. • Connexion au service du Système d'hébergement vidéo AXIS ou au service AXIS Internet Dynamic DNS. Pour plus d'informations sur ces services, reportez-vous au Manuel de l'utilisateur. Caractéristiques techniques Conditions d'utilisation L'appareil Axis est uniquement destiné... -
Page 35: Consommation Électrique
AXIS P3367-V 6,2 W Connecteurs Note Notez que le modèle AXIS P3354 ne prend pas en charge la fonction audio ou E/S. Connecteur d'E/S Bloc terminal à 4 broches. 2 3 4 Pour un exemple de schéma, consultez Schémas de connexion page 36. - Page 36 AXIS P33/-V Series Fixed Dome Network Camera Connecteur audio Connecteurs audio 3,5 mm (stéréo) 1 Pointe 2 Anneau 3 Manchon Masse Entrée audio Entrée micro/ligne Sortie audio Masse Sortie ligne (mono) Schémas de connexion Connecteur d'E/S 0 V CC (-) Sortie CC 3,3 V, maxi.
-
Page 37: Installation Du Matériel
4. Réglage de la mise au point et du zoom 5. Fin de l’installation Remplacement du couvercle de dôme fumé ou non fumé (en option) La caméra Axis est fournie avec un dôme en option. Pour remplacer le couvercle du dôme :... -
Page 38: Montage De La Caméra Directement Sur Le Mur
AXIS P33/-V Series Fixed Dome Network Camera 1. sous le couvercle du dôme, dévissez les quatre vis qui maintiennent le dôme en place. 2. Remplacez l’ancien dôme par le nouveau. Assurez-vous que le joint en caoutchouc est bien en place et serrez les vis. - Page 39 AXIS P33/-V Series Fixed Dome Network Camera 5. Insérez la carte mémoire SD (en option). 6. Fixez la caméra au support de fixation à l’aide des deux vis (non fournies). Support de fixation Câble réseau Vis M4 x 8 Ajuster la position de l’objectif Vous pouvez pivoter l'objectif et l'incliner afin de couvrir une certaine zone d'intérêt et d'ajuster...
- Page 40 4. Une fois que vous avez terminé, serrez délicatement la vis de verrouillage pour bien maintenir le porte-objectif en position. Inclinez l'objectif A A A VIS Valable pour les modèles AXIS P3365–V/P3367–V/P3384–V : L'objectif ne doit pas être incliné de plus de 90°, cela pourrait endommager le produit. Suivez les instructions ci-dessous.
- Page 41 AXIS P33/-V Series Fixed Dome Network Camera 90° Vis de verrouillage Porte-objectif Objectif 1. Ouvrez la page Visualisation en direct, reportez-vous à Utilisez le produit page 43. 2. Dévissez les deux vis. 3. Consultez la page Visualisation en direct et inclinez le porte-objectif pour atteindre la position souhaitée.
-
Page 42: Fin De L'installation
AXIS P33/-V Series Fixed Dome Network Camera Ouvrez la page Focus Adjustment (Réglage de la mise au point) dans l'interface Web sous Setup (Configuration) > Basic Setup (Configuration de base) > Focus & Zoom (Mise au point & zoom) et suivez les instructions à l'écran. Utilisez la fenêtre d’image pour régler le zoom et la mise au point. -
Page 43: Utilisez Le Produit
L'installation est maintenant terminée. Utilisez le produit Si vous souhaitez rechercher des produits Axis sur le réseau ou leur affecter des adresses IP sous Windows®, nous recommandons l’utilisation des applications AXIS IP Utility et AXIS Camera Management. Ces deux applications sont gratuites et peuvent être téléchargées depuis www.axis.com/techsup... -
Page 44: Réinitialisation Aux Paramètres D'usine Par Défaut
Pour connaître la version du microprogramme actuellement installée, reportez-vous à la page Setup > About (Configuration > À propos de). Visitez le centre de formation en ligne Axis sur le site www.axis.com/academy pour en savoir plus sur les formations, les webinaires, les tutoriels et les guides. -
Page 45: Weitere Nachrichtenstufen
AXIS P33/-V Series Fixed Dome Network Camera Sicherheitsinformation Lesen Sie das Installationshandbuch sorgfältig durch bevor sie das Produkt installieren. Bewahren Sie das Installationshandbuch für zukünftige Zwecke auf. Gefährdungsstufen GEFAHR Weist auf eine gefährliche Situation hin, die, falls nicht verhindert, zu Tod oder schweren Verletzungen führt. - Page 46 Produkts, wenn ein Batteriewechsel erforderlich ist. Weitere Informationen über den Serverbericht finden Sie auf den Setup-Seiten des Produkts, oder wenden Sie sich an den Axis Support. Die Batterie sollte nur bei Bedarf ersetzt werden. Wenden Sie sich in diesem Fall an den Axis Support unter www.axis.com/techsup.
- Page 47 AXIS P33/-V Series Fixed Dome Network Camera WARNUNG • Explosionsgefahr bei fehlerhaftem Batteriewechsel. • Die Batterie darf nur durch eine identische Batterie oder eine von Axis empfohlene Batterie ersetzt werden. • Verbrauchte Batterien sind gemäß den örtlichen Vorschriften oder den Anweisungen des Herstellers zu entsorgen.
-
Page 49: Optionales Zubehör
AXIS P33/-V Series Fixed Dome Network Camera Installationsanleitung In dieser Anleitung wird die Installation der unbeweglichen Dome-Netzwerk-Kameras AXIS P3354/AXIS P3364-V/P3365-V/P3367-V/P3384-V in Ihrem Netzwerk beschrieben. Weitere Informationen zur Verwendung dieses Produkts finden Sie im Benutzerhandbuch unter www.axis.com. Installationsschritte 1. Stellen Sie sicher, dass die Packungsinhalte, Werkzeuge und andere notwendige Materialien für die Installation in Ordnung sind. -
Page 50: Übersicht Über Die Hardware
AXIS P33/-V Series Fixed Dome Network Camera Übersicht über die Hardware Beachten Beachten Sie, dass die AXIS P3354 keine Audio- oder E/A-Funktionen unterstützt. Kameraeinheit Netzwerkanschluss (PoE) Audioausgang Audioeingang Steuertaste LED-Anzeigen E/A-Anschluss Eingebautes Mikrofon SD-Speicherkarteneinschub 10. Wandschrauben (2 Stück) 11. Lüfterausgangsanschluss... - Page 51 AXIS P33/-V Series Fixed Dome Network Camera Montagehalterung Beachten Die Montagehalterung ist als optionales Zubehör erhältlich. LEDs Beachten • Die Status-LED kann so eingestellt werden, dass sie während des Normalbetriebs nicht leuchtet. Diese Konfiguration können Sie unter Setup > System Options > Ports &...
- Page 52 Gelb Blinkt grün/gelb bei der Firmware-Aktualisierung. Anschlüsse und Tasten Für die technischen Daten und Betriebsbedingungen siehe Seite 54. Beachten Beachten Sie, dass die AXIS P3354 keine Audio- oder E/A-Funktionen unterstützt. Netzwerkanschluss RJ-45-Ethernetanschluss mit Power over Ethernet (PoE). HINWEIS HINWEIS HINWEIS Gilt für AXIS P3354 und AXIS P3364–V:...
- Page 53 Status und der Eingang wird aktiviert (siehe System Options > Ports & Devices (Systemoptionen > Anschlüsse & Geräte)). Audioanschlüsse Das Axis-Produkt ist mit den folgenden Audioanschlüssen ausgestattet: • Audioeingang (rosa) – 3,5-mm-Anschluss für ein Monomikrofon oder ein Monosignal. •...
-
Page 54: Technische Daten
Produkt Max. Power over Ethernet 5,9 W AXIS P3354 AXIS P3364-V IEEE 802.3af/802.3at Typ 1 Klasse 2 AXIS P3384-V AXIS P3365-V 4,2 W AXIS P3367-V 6,2 W Anschlüsse Beachten Beachten Sie, dass die AXIS P3354 keine Audio- oder E/A-Funktionen unterstützt. - Page 55 AXIS P33/-V Series Fixed Dome Network Camera E/A-Anschluss 4-poliger Anschlussblock für: • Zusatzstromversorgung (Gleichstromausgang) 2 3 4 • Digitaleingang • Digitalausgang • 0 V DC (-) Funktion Kon- Hinweise Technische Daten takt 0 V DC 0 V DC (-) Gleichstrom- Kann für die Stromversorgung von...
- Page 56 AXIS P33/-V Series Fixed Dome Network Camera 3.3 V max 50 mA Audioanschlüsse 3,5-mm- Audioanschlüsse (stereo) 1 Spitze 2 Ring 3 Schaft Audioeingang Masse Mikrofon-/Leitungseingang Audioausgang Masse Leitungsausgang (mono)
-
Page 57: Installieren Der Hardware
Digitalausgang 0 bis max. 40 V DC, Open Drain, 100 mA Installieren der Hardware Beachten • Bei der Montage dieses Axis Produkts können Sie die Kabel entweder durch die Wand oder entlang der Wand führen. • Sie können die Netzwerk-Kamera mit einer Kabelführung aus Metall zum Schutz der Kabel... -
Page 58: Austauschen Der Klaren/Getönten Kuppelabdeckung (Optional)
4. Einstellen von Fokus und Zoom 5. Abschluss der Installation Austauschen der klaren/getönten Kuppelabdeckung (optional) Das Axis Produkt wird mit einer optionalen Kuppel geliefert. So tauschen Sie die Kuppelabdeckung aus: 1. Lösen Sie die vier Schrauben unter der Kuppelabdeckung, die die Kuppel an ihrer Position halten. -
Page 59: Montage Der Kamera Direkt An Der Wand
AXIS P33/-V Series Fixed Dome Network Camera Montage der Kamera direkt an der Wand 1. Bohren Sie mithilfe der Bohrschablone zwei Löcher in die Wand. 2. Verlegen Sie alle benötigten Kabel und schließen Sie sie an. Hierzu gehören das Netzwerkkabel sowie die Kabel für externe Eingabe-/Ausgabegeräte und für den Aktivlautsprecher bzw. - Page 60 AXIS P33/-V Series Fixed Dome Network Camera Montagehalterung Netzwerkkabel M4x8-Schraube Einstellen der Objektivposition Das Objektiv kann gedreht und gekippt werden, sodass ein ausgewählter Bereich als Live-Bild dargestellt wird. Drehen des Objektivs Beachten Die Markierung auf der Objektivabdeckung weist standardmäßig nach oben (Wandmontage).
- Page 61 4. Wenn die richtige Ausrichtung erreicht ist, schrauben Sie die Feststellschraube vorsichtig wieder fest, um den Objektivhalter zu arretieren. Neigen des Objektivs HINWEIS HINWEIS HINWEIS Gilt für AXIS P3365–V/P3367–V/P3384–V: Das Objektiv darf nicht mehr als 90° geneigt werden, andernfalls kann das Produkt beschädigt werden. Befolgen Sie dazu die folgenden Anweisungen.
- Page 62 AXIS P33/-V Series Fixed Dome Network Camera 90° Feststellschraube Objektivhalter Objektiv Schrauben 1. Öffnen Sie die Seite Live View (Live-Ansicht), siehe Access the Product on page 23. 2. Lösen Sie die beiden Schrauben. 3. Überprüfen Sie die Seite Live View (Live-Ansicht) und neigen Sie das Objektiv in die gewünschte Position.
-
Page 63: Abschluss Der Installation
AXIS P33/-V Series Fixed Dome Network Camera Öffnen Sie über die Weboberfläche unter Setup (Einrichtung) > Basic Setup (Grundeinstellungen) > Focus & Zoom (Fokus und Zoom) die Seite Focus Adjustment (Fokus einstellen) und befolgen Sie die Bildschirmanweisungen. Stellen Sie mit dem Bildfenster Fokus und Zoom ein. Weitere Informationen hierzu finden Sie in der Online-Hilfe. -
Page 64: Zugriff Auf Das Produkt
Die Installation ist damit abgeschlossen. Zugriff auf das Produkt Für die Suche nach Axis Produkten im Netzwerk und zur Zuweisung einer IP-Adresse unter Windows® werden AXIS IP Utility und AXIS Camera Management empfohlen. Beide Anwendungen sind kostenlos und können von unserer Website unter www.axis.com/techsup heruntergeladen werden. -
Page 65: Zurücksetzen Auf Werkseinstellungen
Unter www.axis.com/techsup finden Sie Firmware-Aktualisierungen für Ihre Netzwerkprodukte. Um die aktuell installierte Firmware-Version zu sehen, gehen Sie auf Einrichten > Über. Besuchen Sie das Axis-Schulungszentrum www.axis.com/academy für anregende Schulungen, Webinare, Lernprogramme und Anleitungen. Gewährleistung Informationen zur Gewährleistung der Axis Produkte und hierzu verbundene Informationen, finden Sie unter www.axis.com/warranty/... -
Page 67: Livelli Di Pericolo
AXIS P33/-V Series Fixed Dome Network Camera Informazioni di sicurezza Leggere con attenzione questa guida all'installazione prima di installare il dispositivo. Conservare questo documento per usi futuri. Livelli di pericolo PERICOLO Indica una situazione pericolosa che, se non evitata, provoca morte o lesioni gravi. - Page 68 • Durante il trasporto del dispositivo Axis, utilizzare l'imballaggio originale o equivalente per evitare danni al dispositivo. Batteria Il prodotto Axis utilizza una batteria al litio da 3,0 V BR/CR2032 come alimentazione per il suo real-time clock (RTC) interno. In condizioni normali questa batteria avrà una durata minima di cinque anni.
- Page 69 • Rischio di esplosione se la batteria viene sostituita in modo errato. • Sostituire solo con una batteria identica o una batteria consigliata da Axis. • Smaltire le batterie usate in base alle normative locali o alle istruzioni del produttore della batteria.
-
Page 71: Procedure Di Installazione
Guida all'installazione La presente Guida all'installazione fornisce le istruzioni necessarie per installare la telecamera di rete a cupola fissa AXIS P3354/AXIS P3364-V/P3365-V/P3367-V/P3384-V nella rete in uso. Per ulteriori informazioni sull'utilizzo del dispositivo, consultare la Guida per l'utente disponibile all'indirizzo www.axis.com. -
Page 72: Panoramica Dell'hardware
AXIS P33/-V Series Fixed Dome Network Camera Panoramica dell'hardware Nota Nota: il modello AXIS P3354 non supporta la funzione audio o I/O. Unità telecamera Connettore di rete (PoE) Uscita audio Ingresso audio Pulsante di comando Indicatori LED Connettore I/O Microfono incorporato Alloggiamento per schede di memoria SD 10. -
Page 73: Staffa Di Montaggio
AXIS P33/-V Series Fixed Dome Network Camera Staffa di montaggio Nota La staffa di montaggio è disponibile come accessorio opzionale. Indicatori LED Nota • Lo status del LED può essere configurato per essere spento durante il normale funzionamento. Per configurarlo, selezionare Setup > System Options > Ports & Devices >... -
Page 74: Connettori E Pulsanti
Connettori e pulsanti Per le specifiche e le condizioni di funzionamento, consultare pagina 76. Nota Nota: il modello AXIS P3354 non supporta la funzione audio o I/O. Connettore di rete Connettore Ethernet RJ45 con Power over Ethernet (PoE). A A A VVISO... - Page 75 SD) e fare clic su Unmount (Smonta). Questo dispositivo supporta schede di memoria SD/SDHC/SDXC (scheda di memoria non inclusa). Per i consigli sulla scheda SD, visitare il sito Web www.axis.com. Pulsante di comando Per l'ubicazione del pulsante di comando, vedere Panoramica dell'hardware alla pagina 72.
-
Page 76: Dati Tecnici
• Ripristino del dispositivo alle impostazioni predefinite di fabbrica. Consultare pagina 86. • Collegamento a un servizio AXIS Video Hosting System o AXIS Internet Dynamic DNS Service. Per ulteriori informazioni su questi servizi, consultare il Manuale Utente. Dati tecnici Condizioni di funzionamento Il dispositivo Axis è... - Page 77 AXIS P33/-V Series Fixed Dome Network Camera Funzione Note Specifiche 0 V CC 0 V CC (-) Uscita CC Il pin può essere utilizzato anche per 3,3 V CC alimentare una periferica ausiliaria. Carico massimo = 50 mA Nota: usare questo pin solo come uscita alimentazione.
-
Page 78: Schemi Delle Connessioni
Ingresso digitale da 0 a max 40 V CC, open-drain, 100 mA Installazione dell'Hardware Nota • Questo dispositivo Axis può essere montato installando i cavi attraverso la parete o lungo di essa. • Questo dispositivo può essere munito di una canalina metallica per proteggere i cavi nel... -
Page 79: Sostituzione Della Copertura Della Cupola Trasparente/Fumé(Opzionale)
5. Completamento dell'installazione Sostituzione della copertura della cupola trasparente/fumé(opzionale) Il dispositivo Axis viene fornito con una cupola opzionale. Per sostituire la copertura a cupola: 1. Allentare le quattro viti che fissano la cupola in posizione sotto la copertura. 2. Sostituire la cupola esistente con quella nuova. Assicurarsi che la guarnizione in gomma sia ben salda e serrare le viti. - Page 80 AXIS P33/-V Series Fixed Dome Network Camera 2. Collegare tutti i cavi richiesti, incluso il cavo di rete e talvolta anche i collegamenti a dispositivi di input/output esterni e all'altoparlante attivo/microfono esterno. 3. Fissare la telecamera alla parete utilizzando viti e tasselli idonei al materiale della parete.
- Page 81 AXIS P33/-V Series Fixed Dome Network Camera Staffa di montaggio Cavo di rete Vite M4x8 Regolazione della posizione dell'obiettivo L'obiettivo può essere ruotato e inclinato per coprire una determinata area di interesse e regolare le immagini dal vivo. Rotazione dell'obiettivo Nota Il contrassegno sul coperchio dell'obiettivo è...
- Page 82 4. Stringere delicatamente la vite di arresto per bloccare il porta-obiettivo nella posizione desiderata. Inclinazione dell'obiettivo A A A VVISO VVISO VVISO Valido per AXIS P3365–V/P3367–V/P3384–V: L'obiettivo non deve essere inclinato di oltre 90° poiché il dispositivo potrebbe danneggiarsi. Seguire le istruzioni riportate qui sotto.
- Page 83 AXIS P33/-V Series Fixed Dome Network Camera 90° Vite di arresto Porta-obiettivo Obiettivo Viti 1. Aprire la pagina Live View (Immagini dal vivo) e vedere Accedere al dispositivo alla pagina 85. 2. Allentare le due viti. 3. Controllare la pagina Live View (Immagini dal vivo) e inclinare l'obiettivo nella posizione desiderata.
-
Page 84: Completamento Dell'installazione
AXIS P33/-V Series Fixed Dome Network Camera Aprire la pagina Focus Adjustment (Regolazione messa a fuoco) nell'interfaccia Web in Setup (Configurazione) > Basic Setup (Configurazione di base) > Focus & Zoom (Messa a fuoco e zoom) e seguire le istruzioni visualizzate. Utilizzare la finestra di regolazione delle immagini per impostare la messa a fuoco e lo zoom. -
Page 85: Accedere Al Dispositivo
A questo punto l'installazione è completata. Accedere al dispositivo AXIS IP Utility e AXIS Camera Management sono i metodi consigliati per trovare i dispositivi Axis in rete e assegnare loro un indirizzo IP in Windows®. Queste applicazioni sono entrambe gratuite e possono essere scaricate da www.axis.com/techsup... -
Page 86: Ripristino Dei Valori Predefiniti Di Fabbrica
Setup (Impostazioni) > About (Informazioni su). Visitare il Centro di apprendimento Axis alla pagina www.axis.com/academy per servizi di formazione utili, webinar, tutorial e guide. Informazioni sulla garanzia Per informazioni sulla garanzia del dispositivo Axis e informazioni ad esso relative, consultare la pagina www.axis.com/warranty/... -
Page 87: Niveles De Peligrosidad
AXIS P33/-V Series Fixed Dome Network Camera Información de seguridad Lea esta Guía de instalación con atención antes de instalar el producto. Guarde la Guía de instalación para poder consultarla en otro momento. Niveles de peligrosidad PELIGRO Indica una situación peligrosa que, si no se evita, provocará... -
Page 88: Instrucciones De Seguridad
Batería Este producto de Axis utiliza una batería de litio BR/CR2032 de 3,0 V como fuente de alimentación del reloj interno en tiempo real. En condiciones normales, esta batería durará un mínimo de cinco años. - Page 89 ADVERTENCIA • La sustitución incorrecta de la batería implica riesgo de explosión. • Sustituya la batería por una batería idéntica u otra batería recomendada por Axis. • Deseche las baterías usadas de conformidad con la normativa local o las instrucciones del fabricante.
-
Page 91: Pasos De La Instalación
Guía de instalación Esta Guía de instalación incluye las instrucciones necesarias para instalar la cámara de red domo fija AXIS P3354/AXIS P3364-V/P3365-V/P3367-V/P3384-V en su red. Para conocer otros aspectos de uso del producto, consulte el Manual del usuario, disponible en www.axis.com. -
Page 92: Información General Del Hardware
AXIS P33/-V Series Fixed Dome Network Camera Información general del hardware Nota Tenga en cuenta que la AXIS P3354 no admite funciones de audio o E/S. Unidad de cámara Conector de red (PoE) Salida de audio Entrada de audio Botón de control... -
Page 93: Soporte De Montaje
AXIS P33/-V Series Fixed Dome Network Camera Soporte de montaje Nota El soporte de montaje se encuentra disponible como accesorio opcional. Indicadores LED Nota • Se puede configurar el LED de estado para que se apague durante el funcionamiento normal. Para ello, vaya a Setup > System Options > Ports & Devices > LED (Configuración >... -
Page 94: Conectores Y Botones
Para conocer las especificaciones y las condiciones de funcionamiento, vea página 96. Nota Tenga en cuenta que la AXIS P3354 no admite funciones de audio o E/S. Conector de red Conector Ethernet RJ45 con alimentación a través de Ethernet (PoE). - Page 95 (se indica en System Options > Ports & Devices (Opciones del sistema > Puertos y dispositivos)). Conector de audio El producto de Axis integra los siguientes conectores de audio: • Entrada de audio (rosa): entrada de 3,5 mm para micrófono mono, o entrada de línea de señal mono.
-
Page 96: Especificaciones
Alimentación a través de Ethernet 5,9 W AXIS P3364-V IEEE 802.3af/802.3at Tipo 1 Clase 2 AXIS P3384-V AXIS P3365-V 4,2 W AXIS P3367-V 6,2 W Conectores Nota Tenga en cuenta que la AXIS P3354 no admite funciones de audio o E/S. - Page 97 AXIS P33/-V Series Fixed Dome Network Camera Conector de E/S Bloque de terminales de 4 pines 2 3 4 Para ver un ejemplo del diagrama, consulte Diagramas de conexión en la página 98. Notas Especificaciones Función 0 V CC 0 V CC (-)
-
Page 98: Instalación Del Hardware
Salida digital: de 0 a 40 V CC máx., colector abierto, 100 mA Instalación del hardware Nota • Este producto de Axis puede montarse tendiendo los cables a través de la pared o sobre esta. • Este producto también puede equiparse con un conducto metálico para proteger el... -
Page 99: Sustitución De La Cubierta Del Domo Transparente/Ahumada (Opcional)
Sustitución de la cubierta del domo transparente/ahumada (opcional) El producto de Axis se suministra con una cubierta opcional. Para sustituir la cubierta del domo: 1. Afloje los cuatro tornillos de debajo de la cubierta del domo que fijan el domo en su posición. - Page 100 AXIS P33/-V Series Fixed Dome Network Camera Montaje de la cámara directamente en la pared 1. Utilice la plantilla de perforado para realizar dos orificios en la pared. 2. Tienda y conecte todos los cables necesarios. Se incluye el cable de red y puede incluir dispositivos de entrada/salida externos y el micrófono externo/altavoz activo.
- Page 101 AXIS P33/-V Series Fixed Dome Network Camera Soporte de montaje Cable de red Tornillo M4x8 Ajuste de la posición del objetivo El objetivo se puede girar e inclinar para cubrir una determinada área de interés y ajustar la imagen de la vista en directo.
- Page 102 4. Una vez comprobado esto, apriete con cuidado el tornillo de bloqueo para fijar la posición del soporte del objetivo. Inclinación del objetivo A A A VISO VISO VISO Válido para AXIS P3365–V/P3367–V/P3384–V: el objetivo no debe inclinarse más de 90°; hacerlo puede ocasionar daños en el producto. Siga las instrucciones indicadas a continuación.
- Page 103 AXIS P33/-V Series Fixed Dome Network Camera 90° Tornillo de bloqueo Soporte del objetivo Objetivo Tornillos 1. Abra la página Live View (Vista en directo), vea Acceso al producto en la página 105. 2. Afloje los dos tornillos. 3. Consulte la página Live View (Vista en directo) e incline el objetivo hasta la posición deseada.
-
Page 104: Finalización De La Instalación
AXIS P33/-V Series Fixed Dome Network Camera Abra la página Focus Adjustment (Ajuste del enfoque) en la interfaz web en Setup (Configuración) > Basic Setup (Configuración básica) > Focus & Zoom (Enfoque y zoom) y siga las instrucciones en pantalla. Utilice la ventana de imagen para ajustar el enfoque y el zoom. Vea los archivos de la ayuda en línea para obtener más información. -
Page 105: Acceso Al Producto
Acceso al producto Se recomiendan AXIS IP Utility y AXIS Camera Management como métodos para buscar los productos de Axis en la red y asignarles direcciones IP en Windows®. Ambas aplicaciones son gratuitas y pueden descargase de www.axis.com/techsup El producto se puede utilizar con la mayoría de los sistemas operativos y navegadores. Los navegadores recomendados son ®... -
Page 106: Restablecimiento A La Configuración Predeterminada De Fábrica
Visite el centro de aprendizaje de www.axis.com/academy para consultar guías, tutoriales, seminarios web y cursos que pueden resultarle útiles. Información de garantía Para obtener más detalles sobre la garantía del producto Axis y la información relacionada con ella, consulte www.axis.com/warranty/... - Page 107 AXIS P33/-V Series Fixed Dome Network Camera 安 安 安 全 全 全 情 情 情 報 報 報 本製品を設置する前に、このインストールガイドをよくお読みください。 インス トールガイドは、後で参照できるように保管しておいてください。 危 危 危 険 険 険 レ レ レ ベ ベ ベ ル ル ル 回避しない場合、死亡または重傷につながる危険な状 危 危 危 険 険 険...
- Page 108 AXIS P33/-V Series Fixed Dome Network Camera 安 安 安 全 全 全 手 手 手 順 順 順 注 注 注 記 記 記 • 本製品は、お使いになる地域の法律や規制に準拠して使用してください。 • 本製品を屋外またはそれに準じる環境で使用する場合は、認定済みの屋外用 筐体に収納して設置する必要があります。 • 本製品は乾燥した換気のよい環境に保管してください。 • 本製品に衝撃または強い圧力を加えないでください。 • 本製品を不安定なブラケット、表面、または壁に設置しないでください。 • 本製品を設置する際には、適切な工具のみを使用してください。 電動工具を 使用して過剰な力をかけると、製品が損傷することがあります。...
- Page 109 AXIS P33/-V Series Fixed Dome Network Camera 警 警 警 告 告 告 • バッテリーは、正しく交換しないと爆発する危険があります。 • 交換用バッテリーとしては、同一品またはAxisが推奨するバッテリーのみを 使用してください。 • 使用済みバッテリーは、地域の規制またはバッテリーメーカーの指示に 従って廃棄してください。 ド ド ド ー ー ー ム ム ム カ カ カ バ バ バ ー ー ー 注 注 注 記 記 記...
- Page 111 AXIS P33/-V Series Fixed Dome Network Camera イ イ イ ン ン ン ス ス ス ト ト ト ー ー ー ル ル ル ガ ガ ガ イ イ イ ド ド ド このインストールガイドでは、AXIS P3354/AXIS P3364‑V/P3365‑V/P3367‑V/P3384‑V固 定ドームネットワークカメラをお使いのネットワークにインストールする手順につい www.axis.com て説明します。 製品の使用の詳細については、Axisのホームページ ( でユーザーズマニュアルを参照してください。...
- Page 112 AXIS P33/-V Series Fixed Dome Network Camera www.axis.com 利用可能なアクセサリーについては、 を参照してください ハ ハ ハ ー ー ー ド ド ド ウ ウ ウ ェ ェ ェ ア ア ア の の の 概 概 概 要 要 要 注意 AXIS P3354は音声機能やI/O機能に対応していないことに注意してください。...
- Page 113 AXIS P33/-V Series Fixed Dome Network Camera 12. ドームカバー 取 取 取 り り り 付 付 付 け け け ブ ブ ブ ラ ラ ラ ケ ケ ケ ッ ッ ッ ト ト ト 注意 取り付けブラケットがオプションアクセサリーとして用意されています。 LED イ イ イ ン ン ン ジ ジ ジ ケ ケ ケ ー ー ー タ タ タ ー ー ー...
- Page 114 AXIS P33/-V Series Fixed Dome Network Camera ネ ネ ネ ッ ッ ッ ト ト ト ワ ワ ワ ー ー ー ク ク ク LED 説 説 説 明 明 明 緑 100 Mbit/sネットワークに接続している場合、点灯し ます。 ネットワークパケットを送受信した場合、点 滅します。 黄 10 Mbit/sネットワークに接続している場合、点灯し...
- Page 115 AXIS P33/-V Series Fixed Dome Network Camera 注 注 注 記 記 記 AXIS P3365–V、AXIS P3367–V、およびP3384–Vで有効: 本製品を使用する場所の地域条例、環境、電気的条件によっては、シールド ネットワークケーブル (STP) の使用が推奨または必須になります。 本製品を ネットワークに接続して屋外または電気的に厳しい環境に配線する場合は、 用途に合ったネットワークケーブルを使用してください。 ネットワーク装置 がメーカーの指示どおりに設置されていることを確認します。 法的要件につ Electromagnetic Compatibility (EMC) on page 2 いては、 を参照してください。 I/O コ コ コ ネ ネ ネ ク ク ク タ タ タ...
- Page 116 AXIS P33/-V Series Fixed Dome Network Camera SD カ カ カ ー ー ー ド ド ド ス ス ス ロ ロ ロ ッ ッ ッ ト ト ト 注 注 注 記 記 記 • SDカード損傷の危険があります。 SDカードの挿入と取り外しの際には、鋭 利な工具を使用したり、過剰な力をかけないでください。 • データ損失の危険があります。 データが破損しないように、SDカードは...
- Page 117 AXIS P33/-V Series Fixed Dome Network Camera 消 消 消 費 費 費 電 電 電 力 力 力 製 製 製 品 品 品 最 最 最 大 大 大 AXIS P3354 Power over Ethernet 5.9 W AXIS P3364‑V IEEE 802.3af/802.3at Type 1 Class 2...
- Page 118 AXIS P33/-V Series Fixed Dome Network Camera 音 音 音 声 声 声 コ コ コ ネ ネ ネ ク ク ク タ タ タ 3.5 mm音声コネク タ (ステレオ) 3 スリー 1 チップ 2 リング ブ 音 音 音 声 声 声 入 入 入 力 力 力...
- Page 119 AXIS P33/-V Series Fixed Dome Network Camera ハ ハ ハ ー ー ー ド ド ド ウ ウ ウ ェ ェ ェ ア ア ア の の の 設 設 設 置 置 置 注意 • 本製品は、ケーブルを壁に沿わせたり、壁の中を通して配線し、設置す ることができます。 • ケーブルを壁に沿って配線する場合、ケーブルを保護する金属コンジットを...
- Page 120 AXIS P33/-V Series Fixed Dome Network Camera ク ク ク リ リ リ ア ア ア / / / ス ス ス モ モ モ ー ー ー ク ク ク ド ド ド ー ー ー ム ム ム カ カ カ バ バ バ ー ー ー を を を 交 交 交 換 換 換 す す す る る る ( ( ( オ オ オ プ プ プ シ シ シ ョ ョ ョ ン ン ン ) ) ) 本製品では、オプションのドームカバーを用意しています。...
- Page 121 AXIS P33/-V Series Fixed Dome Network Camera 2. ネットワークケーブルや、必要に応じて、I/Oおよび音声ケーブルも壁と 取り付けブラケットの穴を通して配線します。 3. 壁の材質に適した2本のネジやプラグを使用して、取り付けブラケットを 壁に取り付けます。 4. ケーブルをカメラユニットに接続します。 5. SDメモリーカードを装着します (オプション)。 6. 2本のネジ (非付属品) を使用して、カメラユニットを取り付けブラケット に装着します。 取り付けブラケット ネットワークケーブル M4x8ネジ レ レ レ ン ン ン ズ ズ ズ の の の 位 位 位 置 置 置 の の の 調 調 調 整 整 整...
- Page 122 AXIS P33/-V Series Fixed Dome Network Camera 固定ネジ レンズホルダー マーク (デザインA) マーク (デザインB) 2. 固定ネジを緩めます。 3. ラ ラ ラ イ イ イ ブ ブ ブ ビ ビ ビ ュ ュ ュ ー ー ー ページを確認し、レンズホルダーを回してレンズを90°または 180°回転させます。 4. 確認後、固定ネジを静かに締め、レンズホルダーの位置を固定します。 レ レ レ ン ン ン ズ ズ ズ の の の チ チ チ ル ル ル ト ト ト...
- Page 123 AXIS P33/-V Series Fixed Dome Network Camera 90° 固定ネジ レンズホルダー レンズ ネジ 125ページの、製品へのアクセス 1. ラ ラ ラ イ イ イ ブ ブ ブ ビ ビ ビ ュ ュ ュ ー ー ー ページを開き、 を参照して ください。 2. 2本のネジを緩めます。 3. ラ ラ ラ イ イ イ ブ ブ ブ ビ ビ ビ ュ ュ ュ ー ー ー ページを確認し、レンズを希望する位置までチルトさせます。...
- Page 124 AXIS P33/-V Series Fixed Dome Network Camera [Setup ( ( ( 設 設 設 定 定 定 )] )] )] > [Basic [Basic Setup Setup ( ( ( 基 基 基 本 本 本 設 設 設 定 定 定 )] )] )] > [Focus [Focus &...
- Page 125 AXIS P33/-V Series Fixed Dome Network Camera 黒いシールド 3. ゴム製ガスケットがドームカバーにしっかり固定されていることを確認 します。 4. 乾いた柔らかい布でドームを拭い、埃と指紋を除去します。ブロワーを使 用して、レンズから埃を吹き飛ばします。 5. ドームカバーを取り付け、ネジを締めます。 6. ドームカバーを取り付け、カメラのフォーカスが適切であることを確認 します。 これで、カメラの設置は完了です。 製 製 製 品 品 品 へ へ へ の の の ア ア ア ク ク ク セ セ セ ス ス ス...
- Page 126 AXIS P33/-V Series Fixed Dome Network Camera 工 工 工 場 場 場 出 出 出 荷 荷 荷 時 時 時 の の の 設 設 設 定 定 定 に に に リ リ リ セ セ セ ッ ッ ッ ト ト ト す す す る る る...
- Page 128 Installation Guide Ver. M1.2 AXIS P33/-V Series Fixed Dome Network Camera Date: May 2015 © Axis Communications AB, 2012 - 2015 Part No. 62588...
Need help?
Do you have a question about the P3354 and is the answer not in the manual?
Questions and answers