Table of Contents
Advertisement
Quick Links
• This child restraint is certified for use in motor vehicles and
aircraft.
• Please read all instructions in this manual and on product
labels before use.
• Keep instructions for future use. Store instructions on back
of carrier or in base.
• Failure to follow these instructions and product labels
can result in serious injury or death in a crash.
• Read all instructions before use of the infant carrier.
WARNING
Instructions
for use
i
CA-EN
Advertisement
Table of Contents

Related Manuals for Hauck prosafe 35


Summary of Contents for Hauck prosafe 35
- Page 1 Instructions for use CA-EN • This child restraint is certified for use in motor vehicles and aircraft. • Please read all instructions in this manual and on product labels before use. • Keep instructions for future use. Store instructions on back of carrier or in base. WARNING • Failure to follow these instructions and product labels can result in serious injury or death in a crash. • Read all instructions before use of the infant carrier.
- Page 2 Recommended use - For use with infants 1,8 kg to 15,9 kg (4 to 35 lbs) and height 81,3 cm (32 inches) or less. Car Seat 81.3 cm 1.8 -15.9 kg (32 in) (4 - 35 lbs) or less Infant Insert with Foam 1.8 -5.0 kg Insert Infant Insert (4 -11 lbs) Infant Insert without Foam 10 kg (22 Insert lbs) or less Infant Insert with foam insert must be used with infant weighing 5,0 kg (11 lbs) or less. CA-EN...
-
Page 3: Table Of Contents
TABLE OF CONTENTS USE RECCOMMENDATIONS REGISTRATION WARNING + GENERAL SAFETY INFORMATION OVERVIEW OF BASE OVERVIEW OF INFANT CARRIER CHOOSING A VEHICLE SEATING LOCATION DETERMINING THE BEST INSTALLATION METHOD OVERVIEW OF UNIVERSAL ANCHORAGE SYSTEM (UAS) OVERVIEW OF VEHICLE SEAT BELT SYSTEMS UNSAFE VEHICLE SEAT BELT SYSTEMS + SEATING BASE INSTALLATION WITH UNIVERSAL ANCHORAGE SYSTEM (UAS) PROPER INSTALLATION - UNIVERSAL ANCHORAGE SYSTEM (UAS) 33 CA-EN... - Page 4 TABLE OF CONTENTS REMOVING BASE FROM VEHICLE - UNIVERSAL ANCHORAGE SYSTEM (UAS) 34 BASE INSTALLATION WITH VEHICLE SEAT BELT SECURING THE BASE WITH VEHICLE SEAT BELT SECURING THE BASE WITH VEHICLE LAP/SHOULDER BELT SECURING THE BASE WITH VEHICLE LAP BELT ONLY PROPER INSTALLATION - VEHICLE SEAT BELT REMOVING BASE FROM THE VEHICLE - VEHICLE SEAT BELT ATTACHING THE INFANT CARRIER TO THE BASE RELEASING THE INFANT CARRIER FROM BASE CARRIER INSTALLATION WITHOUT BASE CA-EN...
- Page 5 TABLE OF CONTENTS CARRIER INSTALLATION WITH VEHICLE LAP/SHOULDER BELT INSTALLATION WITH LOCKING CLIP CARRIER INSTALLATION WITH VEHICLE LAP BELT ONLY CHECK FOR PROPER INSTALLATION - CARRIER WITHOUT BASE AIRCRAFT INSTALLATION INFANT INSERT CROTCH STRAP POSITIONING SHOULDER STRAP HEIGHT ADJUSTMENT SECURING YOUR CHILD PINCH TEST CARRY HANDLE ADJUSTMENT TUCK AWAY CANOPY IMPORTANT CHECKS ATTACHING TO A STROLLER CA-EN...
- Page 6 TABLE OF CONTENTS RELEASING FROM A STROLLER SEAT PAD REMOVAL INFORMATION SEAT PAD INSTALLATION INFORMATION CLEANING IMPORTANT INFORMATION/ WARRANTY CUSTOMER SERVICE CA-EN...
-
Page 7: Use Reccommendations
USE RECOMMENDATIONS Children should remain rear-facing for as long as possible within the maximum weight and height limits for the car seat. Discontinue use of this child restraint when either the child‘s weight or height exceeds the specified limits below. This child restraint is for use by children who meet BOTH requirements below: WEIGHT REQUIREMENTS: 1,8 kg - 15,9 kg (4 lbs- 35 lbs) Infant Insert is required for use with smaller infants weighing 1,8 kg - 5,0 kg (4 lbs - 11 lbs). -
Page 8: Registration
Child restraints could be recalled for safety reasons. You must register this restraint to be reached in a recall. Send your name, address, email address if available, and the restraint’s model number and manufacturing date to: HAUCK FUN FOR KIDS, 212A Wilkinson Road Brampton, Ontario L6T 4M4 or call 1-877-428- 2545. For recall information go to www.prosafe.com, call Transport Canada at 1-800-333-0371, or log onto www.tc.gc.ca/roadsafety/safedrivers-... -
Page 9: Warning + General Safety Information
WARNING + GENERAL SAFETY INFORMATION WARNING DEATH OR SERIOUS INJURY CAN OCCUR • Failure to follow the warnings and informa- tion in these instructions and on product labels could result in serious injury to your child or other vehicle occupants. • According to accident statistics, children are safer when properly restrained in the rear vehicle seating positions than in the front seating positions. • Child restraint systems should be securely belted to the vehicle, even when they are not occupied, since in a crash an unse- cured child restraint system may injure other occupants. • Use only in rear-facing position when using it in the vehicle. WARNING DO NOT place rear-facing child seat on front seat with an active frontal airbag. DEATH OR SERIOUS INJURY can occur. - Page 10 WARNING + GENERAL SAFETY INFORMATION WARNING • NEVER place this child restraint on a front seat with an active frontal AIRBAG. An airbag can strike a rear-facing infant restraint with enough force to crack the shell and seriously injure or kill an infant. Refer to the vehicle owner’s manual before installing this child restraint in a seating position with side airbags. • Snugly adjust the belts provided with this child restraint around your child. • Use only with children who weigh between 1,8 kg - 15,9 kg (4 and 35 lbs) and whose height is 81,3 cm (32 inches) or less. • Infant insert must be used with infants 5,0 kg (11 lbs) or less. • Secure this child restraint with the vehicle‘s child restraint anchorage system (UAS) if available or with a vehicle seat belt. • SUFFOCATION HAZARD: Infant carrier can roll over on soft surfaces and suffo- cate child. NEVER place carrier on beds, sofas, or other soft surfaces. CA-EN...
- Page 11 WARNING + GENERAL SAFETY INFORMATION WARNING STRANGULATION HAZARD: • Children have STRANGLED in loose or partially buckled harness straps. Fully restrain the child even when carrier is used outside the vehicle. • NEVER leave child in carrier when straps are loose or undone. • NEVER place carrier near window where cords from blinds or drapes can strangle a child. • NEVER hang strings on or over the carrier or attach strings to handle. • NEVER place items with a string around a child’s neck, such as hood strings, pacifier cords, etc. CA-EN...
- Page 12 WARNING + GENERAL SAFETY INFORMATION WARNING FALL HAZARD: • Child’s activity can move carrier. • NEVER place carrier on counter tops, tables, or any other elevated surface. • DO NOT use on shopping carts. • NEVER leave child unattended. • DO NOT use the infant carrier if it is dama- ged or broken, expired (over 7 years from date of manufacture), missing instructions, missing parts, or if the straps are cut, fra- yed, or damaged in any way. • DO NOT use this child restraint system if it has been in a vehicle crash. • DO NOT use clothing or blankets that interfere with fastening or tightening the harness. INSTEAD place a blanket over the child after being properly secured in the harness. • DISCONTINUE using this child restraint if the the top of the child’s head is less than 2,5cm (1 inch) from the top of the seat back. • DO NOT use this child restraint in a ve- hicle seating position where it cannot be tightly secured and stay tightly secured.
- Page 13 WARNING + GENERAL SAFETY INFORMATION WARNING • DO NOT install in vehicle seats that face the rear of the vehicle or side facing seats that face the side of the vehicle. • DO NOT modify this restraint. Minor modifications can change the way a child restraint performs in a crash. • DO NOT leave loose objects, e.g. cups, toys, bags, umbrellas, etc., in the vehicle because they can become deadly projec- tiles in a crash. • DO NOT take child out of the child restraint while the vehicle is moving. • DO NOT allow children to play with this child restraint. It is not a toy. CA-EN...
- Page 14 WARNING + GENERAL SAFETY INFORMATION WARNING • DO NOT use any accessories, pads, toys, or other products supplied by other manufacturers, known as “non-regulated products,” unless approved and tested by Hauck. • ALWAYS keep harness fastened and snu- gly adjusted when child is in carrier. • AVOID BURNS: ALWAYS check all sur- faces of restraint before securing your child. In warm weather, child restraints can become very hot. Hot surfaces can burn your child. • ALWAYS properly store UAS connectors and UAS belt when not in use. • Register your child restraint with the ma- nufacturer. • This child restraint is for use in passenger cars, multi-purpose vehicles (vans and SUVs), trucks, and school buses that have vehicle seat belt systems. CA-EN...
-
Page 15: Overview Of Base
OVERVIEW OF BASE Back of Base Belt Path Vehicle Belt Lock Off/ Base Recline Openings (2) Adjustment (Locked) UAS Belt Routing UAS Belt Tabs (2) UAS Belt Adjuster Recline Indicator Instruction Manual/ UAS Storage Compartment UAS Connectors Front of Base CA-EN... - Page 16 OVERVIEW OF BASE Belt Lock Off Belt Path Upper Lever Openings (2) Belt Lock Off Lower Lever Back of Base Front of Recline Base Adjustment Foot Red Recline Indicator Instruction Manu- RECLINE INDICATOR 10 kg al/UAS Storage (22lbs) or less Compartment OVER 10 kg (22lbs) CA-EN...
-
Page 17: Overview Of Infant Carrier
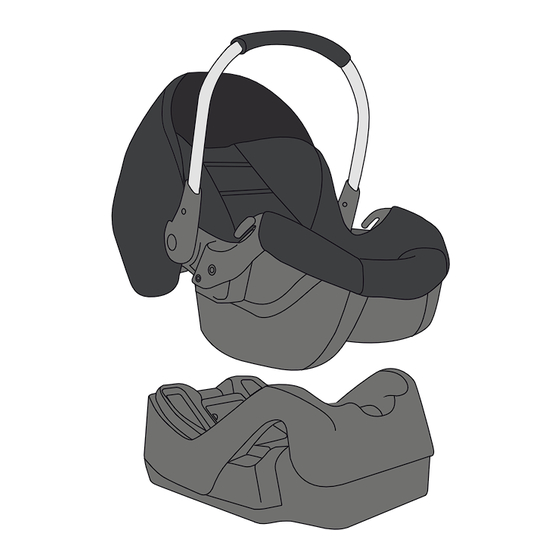
OVERVIEW OF INFANT CARRIER Shoulder Shoulder Straps Strap Slots Chest Clip Harness Buckle Buckle Tongue Crotch Harness Infant Strap Release Insert Harness Button Adjuster (Under Strap Pad) CA-EN... - Page 18 OVERVIEW OF INFANT CARRIER Carry Handle Carrier Release Handle Belt Path Guides (2) Handle Adjustment Button Infant Insert Pocket for Foam Insert (for use with Foam Insert infants 1,8 kg to 5,0 kg (4 lbs - 11 lbs) CA-EN...
- Page 19 OVERVIEW OF INFANT CARRIER Carrier Release Handle tton Sewn Loops on Metal Harness Harness Straps Plate CA-EN...
-
Page 20: Choosing A Vehicle Seating Location
CHOOSING A VEHICLE SEATING LOCATION PLEASE READ THE FOLLOWING INFORMATION BEFORE INSTALLING THIS CHILD RESTRAINT! The safest seating position is one that works best for your specific car seat, family and vehicle. When determining whether the infant car seat can be used with UAS in the rear center seating position, it is critical that you refer to your vehicle owner’s manual. If the carrier does not install securely in the rear center... - Page 21 CHOOSING A VEHICLE SEATING LOCATION Before installing this child restraint you must determine the method of installation and the best vehicle seating position for that method. This child restraint can be installed either using (Lower Anchors and Tethers for Children) or a Vehicle Seat Belt. Vehicle Seat Belt UAS Lower...
-
Page 22: Determining The Best Installation Method
DETERMINING THE BEST INSTALLATION METHOD At this point take out your VEHICLE OWNER’S MANUAL. You will need this to look up different features in your vehicle that might affect the secure installation of a car seat. WARNING • NEVER place a rear-facing child restraint in a seating position with an active frontal air bag. BASE INSTALLATION UAS Installation Lap/Shoulder Belt (pg. 30) Installation (pg. 39) CA-EN... - Page 23 DETERMINING THE BEST INSTALLATION METHOD Lap Belt Only Installation (pg. 42) CARRIER INSTALLATION WITHOUT BASE Lap Belt Only Lap/Shoulder Installation Installation (pg. 55) (pg. 51) CA-EN...
-
Page 24: Anchorage System (Uas)
OVERVIEW OF UAS Most vehicles manufactured after September 1, 2002 are equipped with (universal anchorage system) (Lower Anchors and Tethers for Children). Check your vehicle owner’s manual to determine UAS compatible seating positions. Greater than 22 inches (56 cm) Outboard Lower Anchors Inboard Lower Anchors Outboard Lower Anchors NOTE: In order to use the rear center seating position with UAS, the center seating position must be identified as a UAS use position in the vehicle owners manual or the distance between the inboard lower anchors must be 56 cm (22”) or... - Page 25 OVERVIEW OF UAS If spacing between the lower anchors is greater than 56 cm (22“) or if the seating position is not approved by the vehicle manufacturer then use the vehicle seat belt for installation or for UAS use move to another vehicle seating position. WARNING • NEVER place more than one UAS connec- tor on the vehicle UAS anchor bar unless specifically allowed by the vehicle manuf- acturer. CA-EN...
-
Page 26: Overview Of Vehicle Seat Belt Systems
OVERVIEW OF VEHICLE SEAT BELT SYSTEMS If you do not use UAS to secure the child restraint you must use a Vehicle Seat Belt System. Seat belt systems vary by make, model, and year of your vehicle. You must check your vehicle and the vehicle owners manual to identify the type of seat belt system in the seating position where the car seat will be installed. There are some vehicle belts that will NOT work with this child restraint or that require additional steps. CHECK YOUR VEHICLE OWNER’S MANUAL for information regarding your vehicle seat belt system(s). This child restraint is compatible with most vehicle seat belt systems. CA-EN... - Page 27 OVERVIEW OF VEHICLE SEAT BELT SYSTEMS Green box with check mark = vehicle seat belt can be used to install this car seat. Red box with X = vehicle seat belt that cannot be used to install this car seat. Vehicle Seat (Lap Only Belt) Vehicle Seat (Lap/ Shoulder Belt) Webbing...
-
Page 28: Unsafe Vehicle Seat Belt Systems + Seating
UNSAFE VEHICLE SEAT BELT SYSTEMS + SEATING WARNING DEATH OR SERIOUS INJURY CAN OCCUR • CHECK YOUR VEHICLE OWNER’S MANUAL or information regarding your vehicle seat belt system(s). Not all vehicle seat belts work with this child restraint. DO NOT use this child restraint with the following seat belt systems: Lap belts with emergency Motorized (automatic) Lap/Shoulder with locking retractor two retractors Vehicle seatbelt forward Door mounted Inflatable of seat bight DO NOT use this child restraint with the following vehicle seats: Vehicle seats that face Vehicle seats that face rear of the vehicle side of the vehicle CA-EN... -
Page 29: Base Installation With
BASE INSTALLATION WITH UAS WARNING • UAS belt must be tightly adjusted and stay tightly adjusted around base. • Proper seat back recline is required: - Too upright can cause breathing difficulty. - Too reclined can cause ejection in a crash. LEVELLING THE BASE STEP 1: Place the base rear-facing on the vehicle seat so the rear of the base is contacting the vehicle seat back. STEP 2: If the vehicle seat back is adjustable, adjust the seat back into the upright position or the position specified in the vehicle owner‘s manual. - Page 30 BASE INSTALLATION WITH UAS STEP 4: Release the upper Lock Off Lever to lock the Recline Adjustment Foot in place and set the base down onto the vehicle seat. STEP 5: Check that the red recline indicator is aligned with the recline position for your child’s weight and adjust if necessary. NOTE: Proper seat recline is achieved when the red indicator inside the recline indicator is aligned with the green line identified as “10 kg (22 lbs) or less” or “Over 10 kg (22 lbs)” that applies based on your infant‘s weight. NOTE: If proper angle cannot be achieved with the recline adjustment foot, then pool noodles or a rolled towel may be used under the base to properly recline the seat.
- Page 31 BASE INSTALLATION WITH UAS STEP 6: Lock the Recline Adjustment Foot in place by rotating the upper Lock Off Lever down and lock it in place by rotating the the lower Lock Off Lever up. Proper seat recline is achieved when the red indicator inside the recline indicator is aligned with the green line identified as “10 kg (22 lbs) or less” or “Over 10 kg (22 lbs)” that applies based on your infant‘s weight. SECURING BASE WITH UAS STEP 1: Locate the UAS belt in the Instruction Manual/UAS storage compartment. STEP 2: Slide the UAS belt out through the belt path opening on the base and attach the connector to the vehicle lower anchor bar (1).
- Page 32 BASE INSTALLATION WITH UAS STEP 3: Slide the other end of the UAS belt out through the belt path opening on the opposite side of the base and attach to the vehicle UAS lower anchor bar. You will hear it “click”. Pull on the connector to check that it is locked onto the vehicle lower anchor bar. STEP 4: Check that UAS belt is not twisted. STEP 5: Tighten UAS belt around base, while pushing down and back on the base to push the base onto the seat bight (1) (crease of the vehicle seat) pull on the free end of the UAS belt to tighten the belt (2).
- Page 33 PROPER INSTALLATION - UAS CHECK FOR A PROPER INSTALLATION Base must not move more than 25 mm (1 inch) side to side at the belt path. UAS belt is not twisted. UAS belt is tightly adjusted and stays tightly adjusted around base. Recline angle is correct (Recline indicator must be lined up with correct line for the child‘s weight, readjust if necessary). RECLINE INDICATOR 10 kg (22lbs) or less OVER...
-
Page 34: Removing Base From Vehicle
REMOVING BASE FROM VEHICLE - UAS REMOVING BASE FROM VEHICLE STEP 1: Press the red button on each of the UAS connectors (1) while pulling the connector from the vehicle anchor (2). STEP 2: Store UAS belt and UAS connectors in Instruction Manual/UAS storage compartment. WARNING • Always store UAS belt and connectors in Instruction Manual/UAS Storage Compart- ment when not in use. • UAS belt must be routed under UAS belt routing tabs on belt lock off and must NOT interfere with operation of locking hooks. CA-EN... - Page 35 REMOVING BASE FROM VEHICLE - UAS UAS belt MUST be routed under red UAS belt routing tabs when stored. UAS Belt UAS Belt UAS Adjuster Connector Instruction Manual/ Instruction UAS Storage Manual/ Compartment Cover UAS Storage Compartment CA-EN...
-
Page 36: Base Installation With Vehicle Seat Belt
BASE INSTALLATION WITH VEHICLE SEAT BELT WARNING • Vehicle seat belts must be tightly adjusted and stay tightly adjusted around base. • Inflatable seat belts are NOT compatible with this child restraint. • Proper seat back recline is required: - Too upright can cause breathing difficulty. - Too reclined can cause ejection in a crash. LEVELLING THE BASE STEP 1: Check that the UAS belt and connectors are properly stored in the Instruction Manual/ UAS Storage Compartment. STEP 2: Place the base rear-facing on the vehicle seat so the rear of the base is contacting the vehicle seat back. - Page 37 BASE INSTALLATION WITH VEHICLE SEAT BELT STEP 4: Open the vehicle belt lock off by rotating the lower lock off lever down (1), rotate the upper lock of lever up into the open position (2), lift the back of the base and push out on the upper lock off lever to unlock the recline adjustment foot (3), and allow the recline adjustment foot to move down into the extended position (4). STEP 5: Release the upper Lock Off Lever to lock the Recline Adjustment Foot in place and set the base down onto the vehicle seat. STEP 6: Check that the red recline indicator is aligned with the recline position for your child‘s weight and adjust if necessary. Proper seat recline is achieved when the red indicator inside the recline indicator is aligned with the green line identified as “10 kg (22 lbs) or less” or “Over 10 kg (22 lbs)” that applies based on your infant‘s weight. CA-EN...
- Page 38 BASE INSTALLATION WITH VEHICLE SEAT BELT NOTE: If proper angle cannot be achieved with recline adjustment foot, then pool noodles or a rolled towel may be used under the base to properly recline the seat. RECLINE INDICATOR 10 kg (22lbs) or less OVER 10 kg (22lbs) Red recline indicator CA-EN...
-
Page 39: Securing The Base With Vehicle Seat Belt
SECURING THE BASE WITH VEHICLE SEAT BELT SECURING THE BASE WITH VEHICLE SEAT BELT To secure base with a vehicle lap/shoulder belt, follow steps 4A-8A. To secure base with a vehicle lap belt only, follow steps 4B-8B. SECURING WITH A VEHICLE LAP/SHOULDER BELT STEP 4A: Open the vehicle belt lock off by rotating the lower lock off lever down (1), rotate the upper lock off lever up into the open position (2). - Page 40 SECURING THE BASE WITH VEHICLE SEAT BELT STEP 5A: Slide the vehicle lap/shoulder belt through both belt path openings making sure the lap and shoulder portions of the belt are centered within the lock off, then buckle the vehicle seat belt. STEP 6A: Tighten vehicle lap belt around base - while pushing down and back on the base to push the base into the seat bight (crease of the vehicle seat) (1) and pull on the shoulder belt to tighten the lap belt around the base (2). STEP 7A: While holding the shoulder belt tight, center the shoulder belt and lap belt in the lock off and lock the belt in place by rotating the upper section lock off down (1) and then the lower section up (2) into the locked position.
- Page 41 SECURING THE BASE WITH VEHICLE SEAT BELT Note: Before closing the lock-off door, make sure the vehicle seat belt is central through the lock-off. STEP 8A: Check that the base is securely installed and the vehicle belt stays securely adjusted around the base. Base should not move more than 2,5 cm (1 inch) side to side at the belt path. If the lap/shoulder belt does not stay tightly adjusted around the base try reinstalling with the lap/shoulder belt and lock off, or try installing with a locking clip (pg. 52) or move to another seating position in the vehicle.
- Page 42 SECURING THE BASE WITH VEHICLE SEAT BELT SECURING WITH A VEHICLE LAP BELT ONLY STEP 4B: Open the vehicle belt lock off by rotating the lower lock off lever down (1), rotate the upper lock off lever up into the open position (2). STEP 5B: Slide the vehicle lap belt through both belt path openings making sure the lap belt is centered within the lock off and then buckle the vehicle belt. STEP 6B: Tighten vehicle belt around base - while pushing down and back on the base to push the base into the seat bight (crease of the...
- Page 43 SECURING THE BASE WITH VEHICLE SEAT BELT STEP 7B: Center the vehicle seat belt into lock off and rotate the upper section lock off down (1) and then the lower section down (2) to lock belts into position. NOTE: Before closing the lock-off door, make sure the vehicle seat belt is central through the lock-off. CA-EN...
- Page 44 SECURING THE BASE WITH VEHICLE SEAT BELT STEP 8B: Check that the base is securely installed and the vehicle belt stays securely adjusted around the base. Base should not move more than 2,5 cm (1 inch ) side to side at the belt path. If the lap belt does not stay tightly adjusted around the base try reinstalling with the lap belt or move to another seating position in the vehicle.
-
Page 45: Proper Installation - Vehicle Seat Belt
PROPER INSTALLATION - VEHICLE SEAT BELT CHECK FOR PROPER INSTALLATION The lock-off must ALWAYS be used when installing with a vehicle seat belt. Base must not move more than 2,5 cm (1 inch) side to side at the belt path. Vehicle belt is not twisted. Vehicle belt is tightly adjusted and stays tightly adjusted around base. Recline angle is correct. (Recline indicator must be lined up with correct line for the child‘s weight, readjust if necessary) RECLINE INDICATOR... -
Page 46: Removing Base From The Vehicle - Vehicle Seat Belt
REMOVING BASE FROM THE VEHICLE REMOVING BASE FROM THE VEHICLE SEAT BELT STEP 1: Unbuckle vehicle seat belt. STEP 2: Open the vehicle belt lock off by rotating the lower lock off lever down (1), rotate the upper lock off lever up into the open position (2). STEP 3: Slide vehicle belt out through belt path openings. CA-EN... -
Page 47: Attaching The Infant Carrier To The Base
ATTACHING THE INFANT CARRIER TO THE BASE ATTACHING THE INFANT CARRIER TO THE BASE WARNING • Infant Carrier must be securely locked onto base. Always lift infant carrier to check that infant carrier is locked onto base. STEP 1: Lower the carrier onto the base until a click is heard (1). STEP 2: Check for a secure connection on both sides by pulling up on carry handle (2). NOTE: Handle must be locked in one of the five (5) adjustment positions. CA-EN... -
Page 48: Releasing The Infant Carrier From Base
ATTACHING THE INFANT CARRIER TO THE BASE Check steps below for secure attachment of carrier to base: Lift up on carry handle to confirm carrier is locked onto base. Carry handle is locked in any of the five (5) adjustment positions. RELEASING THE INFANT CARRIER FROM THE BASE STEP 1: Adjust the carry handle into the carry position. STEP 2: Pull the carrier release handle on the back of the carrier (1) and lift carrier off base (2). CA-EN... -
Page 49: Carrier Installation Without Base
CARRIER INSTALLATION WITHOUT BASE WARNING • Vehicle seat belt must be tightly adjusted around and stay tightly adjusted around carrier. • Proper seat back recline is required: - Too upright can cause breathing difficulty. - Too reclined can cause ejection in a crash. When the car seat carrier is installed in a vehicle without the base, a vehicle seat belt must be used to secure the car seat. First the car seat must be leveled properly and then installed with either a vehicle lap/shoulder belt or lap belt only as described in this section. LEVELLING THE CARRIER STEP 1: Park the vehicle on level ground. - Page 50 CARRIER INSTALLATION WITHOUT BASE STEP 3: Adjust the recline of the carrier by moving the carrier so that the Blue Proper Seat Recline line is horizontal. Proper seat recline Note: For a more stable installation, a pool noodle or rolled towel may be used. STEP 4: Go to Installation with Vehicle Lap/ Shoulder Belt section or Installation with Vehicle Lap Belt Only section based on the vehicle belt available in the seating position to be used.
-
Page 51: Vehicle Lap/Shoulder Belt
CARRIER INSTALLATION WITHOUT BASE INSTALLATION WITH VEHICLE - LAP/ SHOULDER BELT WARNING • Vehicle belt must stay tightly adjusted around carrier. • If the vehicle belt does not stay tightly adjusted around carrier, a locking clip must be used. • Inflatable seat belts are NOT compatible with this child restraint. • Proper seat back recline is required: - Too upright can cause breathing difficulty. - Too reclined can cause ejection in a crash. LEVELING THE CARRIER STEP 1: Level the carrier as described in the section. - Page 52 CARRIER INSTALLATION WITHOUT BASE STEP 3: For vehicle seat belts with a switchable or lockable retractor, switch the retractor into the locked mode. NOTE: See vehicle owner’s manual for more information on locking your seat belt for child restraint installations. STEP 4: Tighten the vehicle lap belt around the carrier by pushing down on the carrier (1) and pulling on the shoulder belt (2). STEP 5: Adjust and lock the carry handle into the desired adjustment position.
- Page 53 CARRIER INSTALLATION WITHOUT BASE If the vehicle lap belt does not stay tightly adjusted around the carrier try reinstalling and tightening the lap belt. If the vehicle lap belt does not stay tight and continues to loosen, a locking clip is required or the carrier must be moved to another seating position in the vehicle.
-
Page 54: Installation With Locking Clip
INSTALLATION WITH LOCKING CLIP INSTALLATION WITH LOCKING CLIP If a locking clip is needed for installation in your vehicle, contact Hauck Consumer services at 1-877-428-2545 log onto www.hauckusa.com. To install locking clip: • Install carrier and tighten vehicle lap/shoulder belt. • Hold vehicle seat belts together at UAS plate and unbuckle. • While holding belts togther, slide locking clip on seat belts approximately 12,7 mm (0,5 inch) away from UAS plate. • Re-buckle seat belt. • Retest for secure installation and that lap belt stays tight. 1/2 in. -
Page 55: Vehicle Lap Belt Only
CARRIER INSTALLATION WITHOUT BASE INSTALLATION WITH VEHICLE - LAP BELT ONLY WARNING • Vehicle belt must stay tightly adjusted around carrier. • Proper seat back recline is required: - Too upright can cause breathing difficulty. - Too reclined can cause ejection in a crash. STEP 1: Level the carrier as described in the “Levelling the Carrier” section. STEP 2: Slide the lap belt into both vehicle belt guides on the carrier, and buckle the vehicle seat belt. CA-EN... - Page 56 CARRIER INSTALLATION WITHOUT BASE STEP 3: Tighten the vehicle lap belt around the carrier by pushing down on the carrier (1) and pulling on the free end of the lap belt (2). STEP 4: Adjust and lock the carry handle into the desired adjustment position. STEP 5: Check that the carrier is securely installed and the vehicle belt stays securely adjusted around the carrier. Carrier should not move more than 2,5 cm (1 inch) side to side at the belt path. If the vehicle lap belt does not stay...
-
Page 57: Check For Proper Installation
CARRIER INSTALLATION WITHOUT BASE CHECK FOR PROPER INSTALLATION Carrier doesn’t move more than 2,5 cm (1 inch) side to side at the vehicle belt guides. Vehicle belt is not twisted. Vehicle lap belt is tightly adjusted and stays tightly adjusted around carrier. Recline angle is correct. Carrier is properly reclined when the blue Proper Seat Recline reference line is horizontal when the vehicle is parked on level ground. Carry handle is locked in any of the five (5) positions. CA-EN... -
Page 58: Aircraft Installation
AIRCRAFT INSTALLATION WARNING • DO NOT use base with aircraft installation. • Only the carrier is certified for aircraft use. AIRCRAFT INSTALLATION THIS CHILD RESTRAINT (WITHOUT BASE) IS CERTIFIED FOR AIRCRAFT USE. USE INFANT CARRIER ONLY (WITHOUT BASE) ON AIRCRAFT. Transport Canada Civil Aviation (TCCA) strongly recommend that children up to 18 kg (40 lbs) use a certified harnessed child restraint or other device approved for aircraft travel. When installing this child restraint on an airplane, use... - Page 59 AIRCRAFT INSTALLATION • Install this infant carrier in a window seat to avoid blocking the aisle. • Ask for a seat belt extender if the lap belt is too short. • Use only on an aircraft seat that faces for- ward. • DO NOT use this restraint if a secure installa- tion cannot be achieved. • Place carry handle in any one of the handle adjustment positions for use in the aircraft as long as it doesn’t interfere with the back of the seat in front of the carrier. CA-EN...
-
Page 60: Infant Insert
INFANT INSERT INFANT INSERT 1,8 kg - 5,0 kg (4 lbs- 11 lbs) WARNING • Infant insert with foam insert must be used for infants 5,0 kg (11 lbs) or less (1). • Discontinue use of infant insert (2) with child over 10 kg (22 lbs) or if harness straps become too tight. • Infant insert may be used without foam insert (3) with infants 5,0 kg to 10 kg (11 lbs to 22 lbs). CA-EN... -
Page 61: Crotch Strap Positioning
CROTCH STRAP POSITIONING CROTCH STRAP POSITIONING • Place the crotch strap in the inner crotch strap slot (1) for children 10 kg (22 lbs) or less. • Place the crotch strap in the outer crotch strap slot (2) for children over 10 kg (22 lbs). TO CHANGE CROTCH STRAP POSITION STEP 1: Unbuckle the harness. STEP 2: Flip carrier over, insert the metal anchor plate down completely through the carrier shell and seat pad. CA-EN... - Page 62 CROTCH STRAP POSITIONING STEP 3: Locate the appropriate crotch strap slot for your child. From the top of the carrier, slide the crotch strap anchor plate down completely though the seat pad and carrier shell and then back up through the unused crotch strap slot, seat pad and carrier. Check that the crotch strap anchor plate is completely through the carrier. NOTE: When using the inner slot (1) with a small infant, a rolled washed cloth or small blanket may be placed in between the crotch of the infant and the crotch strap. CA-EN...
-
Page 63: Shoulder Strap Height Adjustment
SHOULDER STRAP HEIGHT ADJUSTMENT SHOULDER STRAP HEIGHT ADJUSTMENT WARNING • Shoulder straps must be through shoulder strap slots at or just below the top of the child‘s shoulders. STEP 1: From the front of the carrier, press down and hold harness adjuster lock button (1) and pull out on the harness shoulder straps to loosen harness (2). CA-EN... - Page 64 SHOULDER STRAP HEIGHT ADJUSTMENT STEP 2: From the back of the carrier, disconnect the shoulder straps from the metal harness plate. STEP 3: From the front of the carrier, pull the shoulder straps out through the front of the carrier. CA-EN...
- Page 65 SHOULDER STRAP HEIGHT ADJUSTMENT STEP 4: Slide the ends of the shoulder straps through the shoulder belt height slots that are at or just below your child‘s shoulders. Make sure the shoulder straps are not twisted. NOTE: For babies 1,8 kg - 5,0 kg (4-11 lbs) use the sewn loop in the middle of the shoulder strap with the lowest shoulder strap slot (1). For babies at 8 lbs and up use the sewn loop at the end of the shoulder strap with the 3 highest shoulder strap slots (2). CA-EN...
- Page 66 SHOULDER STRAP HEIGHT ADJUSTMENT STEP 5: From the back of the carrier, pull the shoulder straps out and connect the correct sewn loop for your child on the shoulder straps to the metal harness plate. Make sure the shoulder straps are not twisted and that the entire shoulder strap is secured onto the metal harness plate. CA-EN...
- Page 67 SHOULDER STRAP HEIGHT ADJUSTMENT WARNING • To prevent ejection in a crash, the sewn loops on the shoulder straps MUST be completely within the slots of the metal harness plate. CA-EN...
-
Page 68: Securing Your Child
SECURING YOUR CHILD SECURING YOUR CHILD WARNING • Shoulder straps must be through shoulder straps slots at or just below the top of the child‘s shoulders. • Harness must be snugly adjusted around child. • Infants less than 5,0 kg (11 lbs) must use the infant insert with foam insert. • DISCONTINUE using this child restraint if the the top of the child’s head is less than 1 inch from the top of the seat back. • DO NOT use clothing or blankets that interfere with fastening or tightening the harness. INSTEAD place a blanket over the child after being properly secured in the harness. STEP 1: Loosen the harness by pressing down on the harness release button and pulling out on the shoulder straps. CA-EN... - Page 69 SECURING YOUR CHILD STEP 2: Open the chest clip (1) unbuckle the harness (2) and fold the buckle tongues over the sides of the carrier (3). STEP 3: Place baby in child restraint making sure their body is making full contact with the seating surface. Bring the shoulder straps over the child’s shoulders and insert the buckle tongues into the buckle until a “click” is heard. Pull up on the buckle tongues to make sure they are locked.
- Page 70 SECURING YOUR CHILD STEP 4: Pull up on the shoulder straps to remove excess slack around the child’s legs. STEP 5: Pull the harness adjuster strap (1) so the restraint fits snugly around your child. A snug strap should not allow any slack. It lies in a relatively straight line without sagging. It does not press on the child’s flesh or push the child’s body into an unnatural position. STEP 6: Close chest clip and position at armpit level. Make sure the shoulder pads don’t interfere with positioning the chest clip. CA-EN...
- Page 71 SECURING YOUR CHILD WARNING STRANGULATION HAZARD: Children have STRANGLED in loose or partially buckled harness straps. Fully restrain the child even when carrier is used outside the vehicle. CA-EN...
-
Page 72: Pinch Test
PINCH TEST PINCH TEST CHECK THAT SHOULDER STRAPS ARE SNUGLY ADJUSTED ONTO THE CHILD USING THE “PINCH TEST” If you can pinch the shoulder strap webbing at the child‘s shoulder between your thumb and finger, the harness is too loose and must be tightened. -
Page 73: Carry Handle Adjustment
CARRY HANDLE ADJUSTMENT WARNING • NEVER hang toys and other objects from the carry handle when using in the vehicle. These products have not been tested and therefore are not approved for use with this child restraint. CARRY HANDLE Carrier Hub Label located on the carrier handle. 1- Rear Rebound 2- Carry 3- Store 4- Store 5- Stand The carry handle must be locked in to one of the five (5) positions when in use: rear rebound, carry, store or stand. To adjust the carry handle position, squeeze both handle adjustment buttons and rotate handle... -
Page 74: Tuck Away Canopy
TUCK AWAY CANOPY TUCK AWAY CANOPY WARNING • DO NOT carry car seat by the canopy. Tuck-away canopy easily adjusts to one of three (3) positions. TO EXTEND CANOPY: Slowly pull forward on main canopy frame until resting in desired position. TO RETRACT/ STOW CANOPY: Gently push downward on main canopy frame allowing the center support and canopy fabric to guide into the storage compartment in carrier. - Page 75 TUCK AWAY CANOPY CA-EN...
-
Page 76: Important Checks
IMPORTANT CHECKS IMPORTANT CHECKS This child restraint must always be facing the rear of the vehicle. This car seat must be securely installed in a vehicle seat that faces the front of the vehicle. The shoulder straps must be through the shoulder strap slots that are at or just below the child‘s shoulders. Harness must be snugly adjusted around child. Chest clip must be at armpit level and harness straps must be snugly adjusted around your child. - Page 77 IMPORTANT CHECKS NEVER place carrier in front of an active frontal airbag. Install using UAS or the vehicle seat belt, NOT BOTH. DO NOT secure an infant in the carrier with extra material, bulky clothing, or extra padding. Instead place a blanket over the harness after properly securing the child.
-
Page 78: Attaching To A Stroller
ATTACHING CARRIER TO A STROLLER WARNING • Always lift handle to check that car seat is securely locked onto stroller. • Only use car seat on stroller models approved by Hauck. This car seat is only for use on stroller models approved by Hauck. For additional stroller models, check Hauck web site at www. hauckusa.com STEP 1: Lower the carrier onto the stroller until a click is heard. CA-EN... - Page 79 ATTACHING CARRIER TO A STROLLER STEP 2: Lift the carrier handle to to check the carrier issecurely locked onto the stroller (1). CA-EN...
-
Page 80: Releasing From A Stroller
RELEASING CARRIER FROM A STROLLER RELEASING CARRIER FROM A STROLLER STEP 1: Pull the release handle located on the back of the carrier. STEP 2: Lift the carrier from the stroller. CA-EN... -
Page 81: Seat Pad Removal Information
SEAT PAD REMOVAL INFORMATION SEAT PAD REMOVAL INFORMATION STEP 1: Remove crotch strap and buckle (1) (see crotch strap adjustment section). STEP 2: Remove shoulder straps from shoulder strap slots (2) (see harness height adjustment section). STEP 3: Lift the ends of the seat pad from the top and bottom of the carrier (1) then remove the seat pad from the carrier (2). CA-EN... -
Page 82: Seat Pad Installation Information
SEAT PAD INSTALLATION INFORMATION SEAT PAD INSTALLATION INFORMATION WARNING • Shoulder straps must be through shoulder strap slots at or below the child‘s shoul- ders. • Straps must not be twisted. • Shoulder straps must be properly attached to the metal harness plate. To install the seat pad, reverse the steps stated in the seat pad removal section. CA-EN... -
Page 83: Cleaning
CLEANING CLEANING FABRICS Fabrics include: seat pad, infant inserts, buckle pads and shoulder pad. Machine wash in cold Dry flat and away DO NOT bleach, iron water on gentle cycle from direct sunlight or dry clean. with mild detergent. before re-use or storage. CLEANING HARNESS WEBBING + CANOPY Spot clean using DO NOT bleach or Air dry completely warm water with iron. before re-use or mild detergent. storage. CLEANING PLASTIC DO NOT bleach. Towel dry completely Spot clean using before re-use or warm water with storage. mild detergent. CLEANING BUCKLE AND UAS HARDWARE NOTE: Buckle should fasten with a “click” if not, rinse under warm running water. -
Page 84: Important Information/ Warranty
IMPORTANT INFORMATION LIMITED WARRANTY Your HAUCK infant car seat is warranted to be free from any manufacturing defects for a period of 2 years from the date of purchase under normal use and in compliance with the operating instructions. This warranty cannot be extended and an extended warranty cannot be purchased. This warranty is not transferable and extends only to the original retail purchaser and is only valid when supplied with proof of purchase. - Page 85 IMPORTANT INFORMATION HAUCK will provide replacement parts or conduct repairs as determined fitting by the company. HAUCK reserves the right to exchange item with a replacement part. Some parts may be replaced with newer model parts as the infant car seat is improved over time. Please note that a repair issue will NOT be covered by this warranty if: • The issue is caused by misuse or poor maintenance.
-
Page 86: Customer Service
IMPORTANT INFORMATION • Repairs or modifications are carried out by a third party. • Infant car seat is purchased from an unauthorized retailer. If you are unsure if a retailer is authorized please contact us under 1-877-428-2545 for more information. • Infant car seat is second-hand. • Infant car seat is damaged as a result of an accident, airline or freight damage. HAUCK reserves the right to determine if warranty terms and conditions have been met. Please contact your local distributor if you have any questions regarding warranty. Register your infant car seat online at: www.prosafe35.com/register CUSTOMER SERVICE INFORMATION HAUCK FUN FOR KIDS INC 212A Wilkinson Road Brampton, Ontario L6T 4M4 Canada PHONE: 1-877-428-2545 E-MAIL: info@hauckusa.com WEBSITE: www.hauckusa.com CA-EN... - Page 87 Keep this instruction manual for future use. Store in the instruction manual storage compartment on the back of carrier or in the base. CA-EN...
- Page 89 Instrucciones • La sujeción infantil está certificada para usarla en vehículos de motor y aviones. • Por favor lea todas las instrucciones de este manual y as de las etiquetas del producto antes de usarlo. • Conserve las instrucciones para usos futuros. Guarde las in- strucciones en la parte trasera del portabebés o en la base. ADVERTENCIA • El no seguir estas instrucciones y las de las pegati- nas del producto podría resultar en heridas graves o muerte en caso de accidente. • Lea todas las instrucciones antes de utilizar el porta- bebés para niños.
- Page 90 +1-877 428 2545 hauck GmbH & Co. KG fax: +1-905 455 7888 Frohnlacher Str. 8 e-mail: info@hauckusa.com 96242 Sonnefeld website: www.hauckusa.com Germany L6T4M4 IM_H_Prosafe_35_85x140_CA-EN_16_06_09...
Need help?
Do you have a question about the prosafe 35 and is the answer not in the manual?
Questions and answers