Table of Contents
Advertisement
Quick Links
Advertisement
Table of Contents

Related Manuals for Radix DT-10 S


Summary of Contents for Radix DT-10 S
- Page 1 Users Guide Read these instructions carefully before using this appliance. • Retain for future reference. RADIX shall not be liable for damages resulting from improper use of this appliance. RADIX Electronic Vertriebs-GmbH • D-61381 Friedrichsdorf • F.R. Germany Version 1.0...
-
Page 2: Introduction
Introduction Introduction Thank you for purchasing your RADIX digital satellite receiver. All RADIX products are manu- factured to the highest standards at our ISO 9002 accredited manufacturing plants. You naturally want to begin viewing your favourite programmes as quickly as possible - this is why we have designed the menu to fully meet your requirements. -
Page 3: Table Of Contents
Contents Contents Chapter Content Page Introduction ....................20 Contents ...................... 21 Important Safety Notes ................22 Your Receiver and its Functions ..............23 Remote Control ................... 23 Connecting the Antenna and Other Devices ..........24 Installing Your Receiver ................25 Setting Up Your Receiver ................ -
Page 4: Important Safety Notes
Important Safety Notes Important Safety Notes This appliance is designed exclusively for receiving satellite signals as described in this guide. It must not be used for any other purpose. Keep the appliance out of reach of children. To avoid injury and to avoid damaging your receiver, please note the following: WARNING: Never remove the cover or any parts of it! -
Page 5: Your Receiver And Its Functions
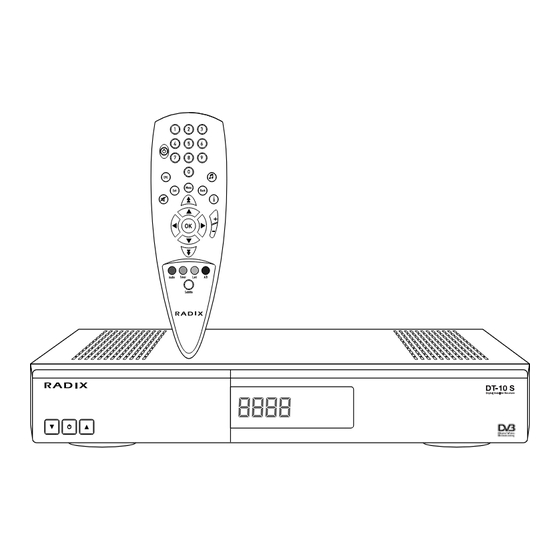
Your Receiver and its Functions 4 Your Receiver and its Functions 4.1 Remote Control Number buttons ON/OFF Button Menu Button Electronic Program Guide Radio button Back Exit menu Continous Page (preference list) Mute Button Program information Select button (up) Volume button Select button (back) Select button (continue) OK Button... -
Page 6: Connecting The Antenna And Other Devices
Your Receiver and its Functions Connecting the Antenna and Other Devices ON/OFF Switch LED (four digit display) Displays channel number Selector Switch (Channel) Front of Receiver Antenna Scart Connection F-type connector IF-Input – Audio conection Antenna cable Video for HiFi system (coaxial) connection (analog) -
Page 7: Installing Your Receiver
Installing Your Receiver Installing Your Receiver CAUTION: Do not place the receiver near any heat sources or in strong sunlight. Protect all cables from damage caused, for example, by sharp edges. This appliance must only be used with a mains voltage of 230 V (± 10%), 50 Hz. CAUTION: Do not connect the receiver to the mains until you have correctly connected your VCR, TV and any other analogue receiver you may have to the mains. -
Page 8: Setting Up Your Receiver
Setting Up Your Receiver Setting Up Your Receiver • Switch your television on and set it to receiver-receive (AV or SCART input). • Press the Power button on your receiver or on your remote control unit. The ON message appears on the receivers display and the following screen appears. -
Page 9: Using Your Receiver
Using Your Receiver When you have completed these settings, you are ready to begin viewing the pre-programmed chan- nels. To do this you must first activate the factory presets: • Press the Exit key to download the channel data. After a few moments you will receive a television programme. -
Page 10: Selecting The Audio Mode
Using Your Receiver Listening to the Radio In addition to television programmes, many broadcasters transmit their radio programmes in digital HIFI format. • Press the RADIO key (see Section 4.1) to toggle between TV and Radio mode. • Press the Radio key to switch from Radio to TV mode. Selecting the Audio Mode •... -
Page 11: Channel Lists And Information
Using Your Receiver Programme Lists and Information Preference Lists Digital television offers you hundreds of channels and it’s easy to lose track of your favourites. To help you find your favourite programmes quickly and easily, you can create preference lists. Several hundred broadcasters are preset into the receiver at the factory - these are listed in the Com- plete Video List and the Complete Radio List. -
Page 12: Channel Guides And Information On Channel Contents
Using Your Receiver Channel Guides and Information on Channel Contents NOTE: Information on programme content is not broadcast by all TV broadcasters! 8.2.1 Comprehensive Information on Channel Contents • Press the EPG key while watching a program (EPG: Electronic Program Guide). In the program guide you see a list containing the entered broadcasters as well as the names and start time of the current program. -
Page 13: Programming Your Receiver In The Main Menu
Programming Your Receiver Programming Your Receiver in the Main Menu If you want to receive additional or other programs to those which were preset, you can program Main menu ,01 the new broadcaster yourself. You can also use a variety of service functions ranging from antenna positioning to prefer- 1. -
Page 14: Channel Manager
Programming Your Receiver In order to include a radio station in your personal list, switch from the complete video list to the com- plete radio list using the RADIO button. The procedure is the same as above. Radio programs which have been included in your personal list are identified with an “A”. -
Page 15: Automatic Search
Programming Your Receiver 9.3.1 Automatic Search During automatic search, certain data is already pre-programmed. Standard satellite systems use Auto Search Universal-LNBs with a local oscillator frequency of 1. Satellite 1 HOTBIRD 2. LNB Local Frequency 9750 MHz for the lower band and 10600 MHz for the 3. -
Page 16: Programme Data Transfer
Programming Your Receiver 9.3.3 Programme Data Transfer This menu item is included to support specialist retailers. In this way a desired preset can be trans- ferred from a master device to several slave devices. This pre-setting serves the common interests of a group of customers, for example regional or ethnic interests. -
Page 17: Antenna Control
Programming Your Receiver NOTE: In case of emergency: If you forget your password, your local stockist can request a general password for your receiver from the factory. Antenna Control The following settings require highly specialised knowledge and skills. If in doubt, you should have Antenna Positioner this work carried out by an experienced professional. -
Page 18: Trouble Shooting
Trouble Shooting Trouble Shooting Your digital Receiver NOTE: Digital communications involve the simultaneous transfer and processing of large amounts of data. Changing channels may takes longer in comparison to analogue devices. An hourglass appears on screen with the message “Please Wait” while the receiver changes channel. Problem Possible Causes Solution... - Page 19 Technische Daten • Technical Data • Caractéristiques Techniques Datos Técnicos • Dati Tecnici • Teknik Özellikler Tuner Microprocessor and Main Memories IF Input Frequency 920 ~ 2150MHz Microprocessor Type ST20-C2(STI5512) IF Loop through output 920 ~ 2150MHz Flash ROM IF Bandwidth 8/55MHz, automatical switching (for program memory) 512K x 16 bit...
Need help?
Do you have a question about the DT-10 S and is the answer not in the manual?
Questions and answers