Algo 8180 User Manual
Sip audio alerter
Hide thumbs
Also See for 8180:
- User manual (65 pages) ,
- Technical publications (25 pages) ,
- Manual (3 pages)

Subscribe to Our Youtube Channel
Related Manuals for Algo 8180


Summary of Contents for Algo 8180
-
Page 1: User Guide
8180 SIP Audio Alerter User Guide For Firmware Version 1.1 Algo Communication Products Ltd. www.algosolutions.com 90-00041D - 1 -... -
Page 2: Table Of Contents
NAT ................16 STUN.Server................16 Asterisk.and.other.SIP.Servers..........17 Multicast Configuration ........... 18 Setting.up.Master.and.Slave.units..........18 Unmanaged.Mode..............20 Auto-Provisioning (via TFTP) ........21 MD5.Checksum...............21 Generating.a.generic.configuration.file........22 Generating.a.specific.configuration.file........22 8180 Firmware ............23 Upgrade.8180.Firmware............23 Appendix ..............24 Multicast.Technical.Information..........24 Specifications................25 FCC.Compliance..............28 Important.Safety.Notice............28 Optional.8180.Accessories............28 - 2 -... -
Page 3: Overview
8180 is typically eight times louder than a telephone speaker. If the optional 1185 Horn Speaker is used, then the 8180 can be 20 times louder. Audio Files Several audio files are pre-loaded into the 8180 internal... - Page 4 Configuration & Provisioning Configure the 8180 through a web interface control panel or by using the program buttons on the back of the unit. Central provisioning may also be used to allow units to be preconfigured for a specific server prior to deployment in the field.
-
Page 5: Front.and.back.views
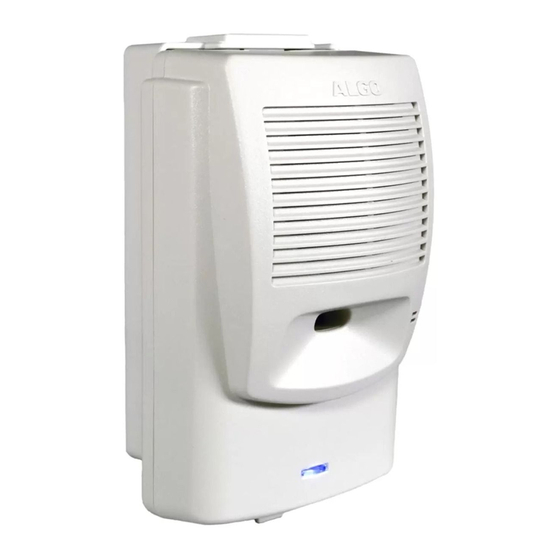
Front and Back Views Microphone Blue Indicator Light Surface Mount Wiring Channel RJ45 Network (for LAN & PoE) Speaker Output LR95233 To External Speaker(s) 8 Wrms Audio Output To Slave Amplifier 0 dbm Relay Output 67-00047D Max 30V 50mA Play Menu Select Up Dn Program Buttons - 5 -... -
Page 6: Setup And Installation
Setup and Installation Wall Mounting Mount the wall bracket securely and snap the 8180 into the bracket by engaging the top first and then pushing the bottom firmly into place. To remove the 8180 from the bracket, press firmly on the tab of the bottom catch, then lift the cover. -
Page 7: Programming.and.configuration
Connection to Network and Obtaining IP Address After connecting the 8180 to a network PoE port, the blue indicator light will turn on during initialization. The 8180 will then attempt to obtain an IP address from the DHCP server. -
Page 8: Program Buttons
Choose Tone Record Tone Get Device Info The Program buttons on the back of the 8180 allow local adjustment of alert tones and alert volume. The buttons are intentionally hidden from view after installation and can be disabled using the web interface. -
Page 9: Web Interface Control Panel
Web Interface Control Panel Using the SIP Audio Alerter web interface control panel, configure the 8180 network settings and select the desired options. These settings survive power cycling and may be programmed in advance prior to site installation. After changing settings, click Save Settings (at top or bottom of page). - Page 10 SIP requests through different port numbers. Maintain connection between the 8180 Keep-alive Method and the SIP Server if the 8180 is behind NAT. See “NAT” on page 16. Period of time where the 8180 will send Keep-alive Period (seconds) some information to the SIP Server to keep the connection alive.
- Page 11 Hang up call after the preselected Page Timeout period of time. : Transmission only; Page Mode One-way audio from the phone to the 8180. : Allow half-duplex Talkback communication through the 8180 (direction based on voice detection). The communication can only be initiated from a phone.
- Page 12 Page Tone tones are played before starting the paging. Select None to skip playing a page tone. Will activate the 8180 front light when Message Waiting Light there is a message waiting signal on the line. Function available if supported by the SIP server.
- Page 13 DHCP setting to Off. Length of time following a request from DHCP Timeout (seconds) an 8180 to the DHCP server that the 8180 will wait before assuming the server is not available. After such time, the 8180 will use its default address of 192.168.1.111...
- Page 14 Device Name (similar to “Computer Name” field in Windows). Password to log into the 8180 web interface. Password You should change the default password in order to secure the device on the network. If you have forgotten your password, a soft reset will restore the default setting (including all of the device’s default settings).
-
Page 15: Services.menu
Save the device settings to a text Save Settings to File file for backup or to setup an auto- provisioning configuration file. Restore settings from a backup file. Restore Settings from File Upgrade Refer to “8180 Firmware” on page 23 Upgrade - 15 -... -
Page 16: Nat
NAT (Network Address Translation) is located between a private network and the Internet. When properly configured, it allows an 8180 installed on a private network to have access to the outside world, such as would be required when using a hosted SIP provider (i.e. -
Page 17: Asterisk.and.other.sip.servers
Asterisk and other SIP Servers Set Keep-alive Method to Double CRLF Set Keep-alive Period to 30 Click Save Settings The NAT library sends the binding requests for each port every 30 seconds to ensure NAT mapping is valid all the time. - 17 -... -
Page 18: Multicast Configuration
Multicast Configuration Setting up Master and Slave units To set up multicasting, first configure a single 8180 unit as a master, then set up one or more 8180s as slaves. To do this: Set the 8180 that you want to use as the master with... - Page 19 10, and the Gong tone on Slave 2 at volume level 5, when they receive a ring signal from the master 8180, Slave 1 will play the Chime tone at volume 10 while Slave 2 will play the Gong tone at volume 5.
-
Page 20: Unmanaged.mode
Unmanaged Mode This mode allows 8180s to play an audio (RTP) stream from a source other than an 8180. For example, you can use the Unmanaged Mode to play audio from another phone on the switch that is generating a page to other phones using multicast. -
Page 21: Auto-Provisioning (Via Tftp)
It is typically used for large deployments. If desired, 8180 configuration files can be automatically downloaded from a TFTP (Trivial File Transfer Protocol) server using DHCP Option 66. Option 66 is a term used by some DHCP vendors to describe DHCP code 66. -
Page 22: Generating.a.generic.configuration.file
8180 with the MAC address specified in the configuration file name. Since all the necessary settings can be included in this file, the 8180 will be ready to work immediately after the configuration file is downloaded. The MAC address of each 8180 can be found on the back label of the unit. -
Page 23: 8180 Firmware
8180 Firmware Periodically, new firmware for the 8180 is released that either offers new functionality or addresses problems. To determine if there is firmware available for the 8180, please visit www.algosolutions.com/8180 Upgrade 8180 Firmware From the top menu, click on Services... -
Page 24: Appendix
Multicast IP addresses range: 224.0.0.0/4 (from 224.0.0.0 to 239.255.255.255) Port numbers range: 1 to 65535 By default, the 8180 is set to use the multicast IP address 224.0.2.60 and the port number 50000 Make sure that the multicast IP address and port number do not conflict with other services and devices on the same network. -
Page 25: Specifications
Audio Output 0 dBm into 600 Ohm load Ring Tones • Gong • Bell NA (Shipping with • Warble1 (low) • Bell UK 8180) • Warble2 (medium) • Buzzer • Warble3 (high) • Chime • Warble4 (trill) • Dogs Environmental 0-40°... - Page 26 Dimensions - Front and Side 4 “ (10.2 cm) 2.2” (5.5 cm) With wall bracket: 2.6 “ (6.5 cm) - 26 -...
- Page 27 Dimensions - Wall Bracket 3.5 “ (8.8 cm) - 27 -...
-
Page 28: Fcc.compliance
4) Consult the dealer or an experienced radio/TV technician for help. Important Safety Notice The.8180.is.intended.for.installation.in.a.dry.indoor.location.with. all.connected.wiring.located.within.the.perimeter.of.a.building. The.8180.is.a.Power.over.Ethernet.(PoE).device..The.PoE.power. source.must.be.a.Limited.Power.Source.(LPS),.provided.by.CAT5. UTP.cable,.and.isolated.from.mains.by.minimum.reinforced.or. double.insulation..Ensure.that.the.PoE.injector.or.PoE.enabled. switch.carries.safety.regulatory.approval.marks.(ie.CSA,.UL,.CE). Optional 8180 Accessories 1185 Horn 1127 Visual 1126 Strobe Light Speaker Alerter algosolutions.com/1185 algosolutions.com/1127 algosolutions.com/1126 Algo Communication Products Ltd.
Need help?
Do you have a question about the 8180 and is the answer not in the manual?
Questions and answers