
Related Manuals for Bak USA Atlas 10


Summary of Contents for Bak USA Atlas 10
-
Page 1: User Guide
Atlas User Guide BAK USA Technologies Corp. 425 Michigan Ave. Buffalo, New York 14203... - Page 2 Hello there. Thanks for embracing the evolution of mobile technology with Bak USA. We hope you enjoy your Atlas 10 experience. To best use your device, please refer to this guide. Bak USA Atlas 10 User Guide Version: v2 // 2016...
- Page 3 Attention Please follow these guidelines for the safe and proper handling of the device, power supply, battery pack, and power cord. Keep the power cord away from young children. • Observe precaution while using and handling to prevent electric shock. The power supply (adapter) should not be handled by children.
- Page 4 Saftey Precautions Please read and understand the following precautionary measures before using your device. Do not place near the fire or other heat sources. Do not expose to magnetic fields. Do not place heavy objects on the device. CAUTION RISK OF EXPLOSION IF BATTERY IS REPLACED BY AN INCORRECT TYPE. DISPOSE OF USED BATTERIES ACCORDING TO THE INSTRUCTIONS.
-
Page 5: Table Of Contents
Content Section Getting to Know Your Device page 1 Introduction ......................... Package contents ....................... Layout .......................... Views ........................Front ......................Left ........................ Back and Bottom ..................Docking keyboard..................Function keys ......................Docking and undocking ..................... Docking into the keyboard ................Undocking from the keyboard Installing your macro lens .................. - Page 6 Section Setup and Connection page 19 Settings screen ....................... Windows Activation ......................Setup Your Microsoft Account ..................Replacing Desktop with Start screen ................Pin and unpin your app ....................Pinning an App to Start menu or taskbar ..............Removing an App ......................Wireless LAN ........................
-
Page 7: Section 1 Getting To Know Your Device
Getting to Know Your Device Package Contents: Carefully unpack your box and take out the items listed as below. If any items are missing or damaged, contact the seller immediately. 1. Seal 8 Tablet 1 Tablet with a Stylus 1 Docking Keyboard 1 USB Adapter 1 USB Cable 1 Macro Lens... -
Page 8: Layout
The Hardware Front of tablet 1. Front Facing Camera 4. Touchscreen Often for taking self-portraits or video View and touch to operate the device. conferencing. 5. Stylus Holder 2. Power Button Rest your stylus here. Press and hold to power device on/off. 6. -
Page 9: Left
Left side of tablet 1. Rubber Cover 4. Micro SD Card Slot Protect the I/O interfaces and ports. Insert your micro SD card here. 2. Volume Up/Down 5. Micro SIM Card Slot Push the buttons to adjust the sound Insert your micro SIM card here to access volume of your system. -
Page 10: Back And Bottom
Back and bottom of tablet 1. Power Button 3. Stylus Holder Rest the stylus here. Press to power device on/off. 2. Rear Facing Camera 4. Docking Connector Take photos or record videos. Connect to the keyboard dock. -
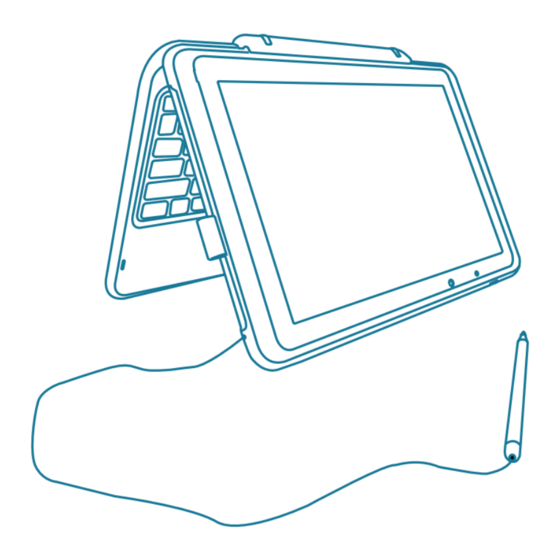
Page 11: Docking Keyboard
Keyboard 1. Docking Connector Dock your tablet here to use your device like a laptop. 2. Windows Key Press here to open the Start menu. 3. Touchpad Use this to perform traditional mouse functions. -
Page 12: Function Keys
Function Keys Press a key to perform a function. For example, if you want to mute or unmute the system, press the F1 key. Increase the display brightness. Mute or unmute the system. Open the Settings screen. Decrease the volume. Play or pause music and video. -
Page 13: Docking And Undocking
Docking and Undocking Before docking into or undocking from the keyboard • Safely disconnect any USB device from the USB port on the device. • Before trying to undock your tablet, power off your tablet and wait at least 10 seconds. Docking into the keyboard Hold your tablet with the button side facing the dock. -
Page 14: Installing Your Macro Lens
Installing Your Macro Lens Installing your macro lens will turn your camera into a microscope. 1. Take the macro lens. 2. Press it gently over the rear facing camera. 3. Fit the lens into the outer rim of the camera. 4. -
Page 15: Section 2 Using Your Device
Using Your Device Powering On/Off Powering on Your Device If this is the first time you turn this device on, connect the AC adapter and fully charge the battery. Press the power button (normally 1 to 2 seconds). You will see the power indicator LED on the right side of the device light up green. -
Page 16: Powering Off Your Device
Powering off Your Device Save all your data before powering off your device. To power off your device, follow the steps below. From the Start menu: Click or tap the Windows icon in the lower left corner of the Desktop, or press the Windows key on a connected keyboard. -
Page 17: Putting Your Device Into Sleep Mode
To wake up your device, perform one of the following: • Press the power button once briefly. • Press any key on the keyboard, tap the touchpad, or open the display panel. • Tap the Bak USA logo on the screen. - Page 18 Basic Touchpad Operations The touchpad works like a traditional mouse. Use it to move the cursor, left-click, right- click, and double-click. Functions may vary based on the app you are using. Action Name Explanation Left-click (aka Click) Tap once on the touchpad surface or press once on the lower left corner of the touchpad.
-
Page 19: Basic Touchscreen Operations
Basic Touchscreen Operations • Do not use sharp objects to touch the screen; doing so may cause harm. • Do not touch the touchscreen with a conductive material; doing so may cause harm. • The following functions are application dependent. •... - Page 20 Gesture name Explanation Pinch Touch two fingers to the screen. Bring them together or pull them apart to zoom in and out on visual apps (such as pictures and maps). Rotate Touch your thumb and forefinger to an item, and then twist in a circular motion to rotate an object.
-
Page 21: Section 3 Windows Interface
Windows Interface Desktop and Virtual Desktop Experience The Desktop screen is shown below and natively provides the virtual desktop feature. To launch the feature, click the app icon (pictured left), or press the Window key + TAB key on keyboard at the same time. -
Page 22: Taskbar
Taskbar The black bar on the bottom of the desktop is called the Taskbar. It provides several key features: • Start menu • Search box • App shortcuts area Start Menu To open the Start menu, tap or click the Windows icon (aka Start button) at the left end of the taskbar, or press the Windows key on the keyboard (picured left). -
Page 23: Search Box - Cortana
Search Box - Cortana The search box is next to the Start menu, as shown below. When you select this box, a window will pop out, as shown below. This is the Cortana icon. Cortana is a new virtual assistant built into Windows 10. -
Page 24: App Shortcuts Area
App Shortcuts Area In this area, you can put the shortcuts for your frequently used apps. For how to arrange this area, please refer to page 10. Notification Area The right part of the taskbar holds several icons that show you the status of your laptop, as shown below. -
Page 25: Section 4 Setup And Connection
Setup and Connection To access the Settings screen: 1. Click the Windows icon in the lower left corner of the Desktop, or press the Windows key on the keyboard. 2. Select <Settings>. This will open the Settings screen, as shown below. -
Page 26: Windows Activation
Activating Windows To use all features of your Windows device, you may need to activate your Windows system. To register and activate your Windows, perform the following: 1. Open the Start menu and click <Settings >. 2. Click <Update & security>. 3. -
Page 27: Replacing Desktop With Start Screen
Replacing Desktop with Start Screen If you are more familiar with the interface similar to the Start screen introduced in the Windows 8 series, you can set your device to display the Start screen instead of the Desktop every time you power on your device. To do so: 1. -
Page 28: Pin And Unpin Your App
Pining and Unpinning Your App Pinning an app to Start menu or taskbar To pin an app: Open the Start menu and select <All Apps> . Right-click the app that you want to appear on your Start menu or taskbar. An option menu will appear. -
Page 29: Wireless Lan
Wireless LAN Enabling wireless connection Open Settings menu and select <Network & Internet>. Select <Wi-Fi> and set the function to ON, as shown below. Make sure you have switched the Airplane mode OFF. To confirm that Airplane mode is disabled, go to the Desktop and check the Notification Area. If you see an airplane icon displayed on the lower right, you must disable Airplane mode. - Page 30 Micro SD Card Slot Use your micro SD cards as removable disks to exchange data with digital devices such as your digital camera, digital camcorder, MP3 player, etc. To insert your micro SD card Insert the micro SD card into the card slot as shown below. Follow the on-screen instructions and choose to open and view files.
-
Page 31: Connecting An External Device
Connecting an External Device Connecting to the USB port Your device comes with one USB 2.0 port and one micro USB port. Connect USB devices to the micro-USB port using a USB cord or USB OTG cable. Once you plug a USB device into a USB port on your device, Windows will automatically load a driver for that device. -
Page 32: Connecting To The Hdmi Port
Connecting to the HDMI Port You can connect any external display that has an HDMI port (monitor, TV, projector, etc.). This lets you connect your tablet to a larger display with a higher resolution. Power off the external device. Locate the HDMI port on your device. Connect one end of your HDMI cable to the port, and the other end to the HDMI port on the external device. -
Page 33: Section 5 Battery
Battery Charging Your Battery If your tablet is just being unpacked from the box, you need to charge the tablet first. It will take around 4 to 5 hours to be fully charged. 1. Plug the adapter into the charging port/micro-USB port, which you can find on the right side of the device. -
Page 34: Inspecting Your Battery Status
Inspecting Your Battery Status In the Desktop, move the cursor to the battery icon in the Taskbar, or tap the battery icon on the Taskbar. A pop-up dialog box will appear and display the remaining battery percentage, as shown below. The battery icon reveals the status of your battery, which is described as below. - Page 35 A battery is an expendable supply, so when using it over a long time, the capacity/ battery life is shortened. If the battery life is reduced to under half of its initial time, we recommend purchasing a new battery. When not using the battery for a long time, store the battery after charging it to 30-40% of its capacity.
-
Page 36: Section 6 Windows Help And Troubleshooting
Windows Help and Troubleshooting Troubleshooting This section describes some common problems, suggested solutions, and ways to recover your device from a crash. Be aware that the problems and solutions described here are meant only as a guide. They are not definitive problem solving techniques. For certain problems, you might need help from your IT department, the seller, or the Microsoft website. - Page 37 - Press any key on the keyboard for 2 to 3 seconds. - Press the power button. - Press the Bak USA logo on the screen. Sleep Problems The critical low-battery error message • The battery power is getting low. Connect appears, and the device turns off.
- Page 38 Display Problem The screen is blank. • Do the following: - If you are using the AC adapter or battery, and the battery status indicator is on, increase the brightness of the display. - Press the power button to resume from sleep mode.
- Page 39 Other Problems Your device does not respond. • To power off your device, press and hold the power button for 6 seconds or more. If the device still does not respond, remove the AC adapter. • Your device might lock when it enters sleep mode during a communication operation.
-
Page 40: Section 7 Specifications
Specification Atlas Physical Specifications Type Detail Description Product Form Dimensions 275.5 x 180.8 x 12.3mm Screen Size 10.1’’ 16:10 Screen Resolution 1280 x 800 P Touch Panel 5-point touch Battery Type Lithium polymer battery Capacity 6300 mAh Hardware Specifications Type Detail Description Type... - Page 41 Regulatory Compliance Information FCC Declaration of Conformity This device complies with Part 15 of the FCC Rules. Operation is subject to the following two conditions: (1) this device may not cause harmful interference, and (2) this device must accept any interference received, including interference that may cause undesired operation.
- Page 42 この装置は、情報処理装置等電波障害自主規制協議会=E s ` ` f F = の基準= に基づくクラス= _ = 情報技術装置です。この装置は、家庭環境で使用するこ= とを目的としていますが、この装置がラジオやテレビジョン受信機に近接= して使用されると、受信障害を引き起こすことがあります。= 取扱説明書に従って正しい取り扱いをして下さい。= Taiwan Battery Recycling: Translation: Please recycle batteries. Trademarks Windows and Microsoft are trademarks of Microsoft Corporation. Atlas 10 is a trademark of BAK USA Technologies Corp.
Need help?
Do you have a question about the Atlas 10 and is the answer not in the manual?
Questions and answers