ClimateRight CR12000SACH Owner's Manual
Mini split air conditioner & heater
Hide thumbs
Also See for CR12000SACH:
- Owner's manual (7 pages) ,
- Installation manual (7 pages) ,
- Owner's manual & installation manual (17 pages)
Table of Contents
Advertisement
Quick Links
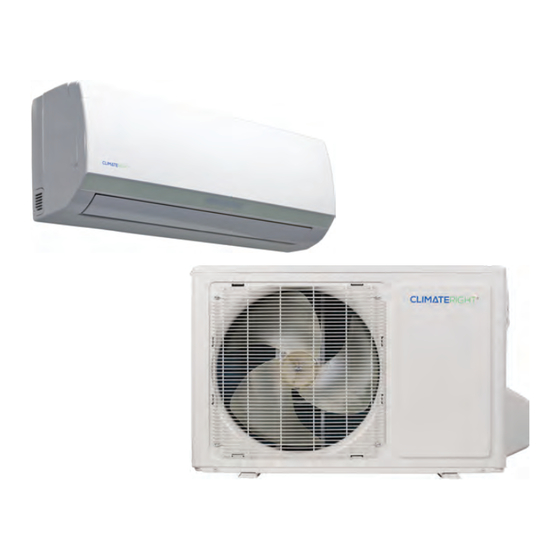
Air Conditioner & Heater
Questions or concerns? For assistance, please call Customer Service
ClimateRight
USA
®
777 Manor Park Drive • Columbus, OH 43228
www.climateright.com
Ph: 800-725-4628
OWNER'S MANUAL &
INSTALLATION GUIDE
MINI SPLIT
AIR CONDITIONER & HEATER
CR12000SACH
IMPORTANT: READ CAREFULLY BEFORE ASSEMBLY AND USE
Read and follow all safety rules and instructions
before operating this equipment.
THIS PRODUCT IS INTENDED FOR HOUSEHOLD USE ONLY.
Please keep this manual for future reference.
Advertisement
Table of Contents

Related Manuals for ClimateRight CR12000SACH


Summary of Contents for ClimateRight CR12000SACH
-
Page 1: Installation Guide
OWNER’S MANUAL & INSTALLATION GUIDE MINI SPLIT AIR CONDITIONER & HEATER CR12000SACH Air Conditioner & Heater IMPORTANT: READ CAREFULLY BEFORE ASSEMBLY AND USE Read and follow all safety rules and instructions Questions or concerns? For assistance, please call Customer Service before operating this equipment. -
Page 2: Table Of Contents
INTRODUCTION CLIMATERIGHT CR12000SACH Mini-Split Air Conditioner and Heater Thank you for choosing ClimateRight. This owner’s manual will provide you with valuable information necessary for the proper care, installation, and maintenance of your new product. Please take a few moments to thoroughly read the instructions and familiarize yourself with all the operational aspects of your new ClimateRight Mini-Split Air Conditioner and Heater. -
Page 3: Safety Instructions
SAFETY INSTRUCTIONS PACKAGE CONTENTS IMPORTANT SAFETY INSTRUCTIONS FOR USING YOUR Mini Split Air Conditioner and Heater • Do not clean unit with benzene or WARNING: TO REDUCE THE paint thinner. Do not spray RISK OF FIRE, ELECTRIC insecticides on the unit. SHOCK OR INJURY: •... -
Page 4: Remote Controller
USERS GUIDE USERS GUIDE Timer Function: The TIMER function allows the system to automatically switch on and off This air conditioner is designed to create a comfortable climate for individuals in the based on your settings. To set timed start, the system should be turned off. Press TIMER, set affected room. -
Page 5: Pre-Setup Instructions
Outdoor Space Requirements fittings. • Avoid leaving items near the outlet and inlet of the outdoor unit. These can cause malfunction or increase operation noise. • Consult your ClimateRight Customer Service Representative if you continue to hear ® irregular sounds during operation... -
Page 6: Power Cord Assembly
POWER CORD ASSEMBLY POWER CORD ASSEMBLY 1. Gather the tools and parts listed below and 5. Using wire cutters, clip the white, black, prepare a workspace where small items, such and green wires within approximately 1” as screws and other small parts, can be safely of the black insulation as shown. - Page 7 POWER CORD ASSEMBLY POWER CORD ASSEMBLY 9. Remove screws and plastic washers 12. Thread the 3 wires from the power from side panels A, B, and C; each panel cable and the enclosure connector has 3 screws and 3 washers as indicated. through the punched hole in Panel B.
- Page 8 POWER CORD ASSEMBLY POWER CORD ASSEMBLY 20. Loosen the screws in the two unused 16. Remove the left screw on the strain relief as shown and set aside. Take care to terminals in the terminal block on the avoid dropping screw into the unit. Then lower left labeled L and N.
- Page 9 SET-UP INSTRUCTIONS INSTALLATION OF INDOOR UNIT - As the gravity center of the unit is not at the installation center, special caution should be Pipelines can be routed in the order of: Fig. A taken when using hoisting cables to lift it up. 1, 2, 3, 4, and 5 as indicated.
-
Page 10: Maintenance & Care
MAINTENANCE AND CARE WHOLE-UNIT STEP 4 STEP 4 - Close the key lever of indoor male coupler to Power Cord Care: the horizontal position. You can now hear the indoor and outdoor refrigerant will be • Do not rest anything on the power cord clrculatlng. -
Page 11: Troubleshooting
Please refer to the maintenance instructions provided in the owner’s manual error codes that allow • The use of ClimateRight products in commercial settings or in settings not specifically us to pinpoint the root recommended on our official company website cause of any issues. - Page 12 BUYER’S REMORSE POLICY: If you are not completely satisfied with the product received, ClimateRight will accept the return of the product within 30 days from the date of purchase. Customer will be responsible for the return shipping costs associated with shipping the product back to ClimateRight.
- Page 13 NOTES NOTES...
Need help?
Do you have a question about the CR12000SACH and is the answer not in the manual?
Questions and answers