Table of Contents
Advertisement
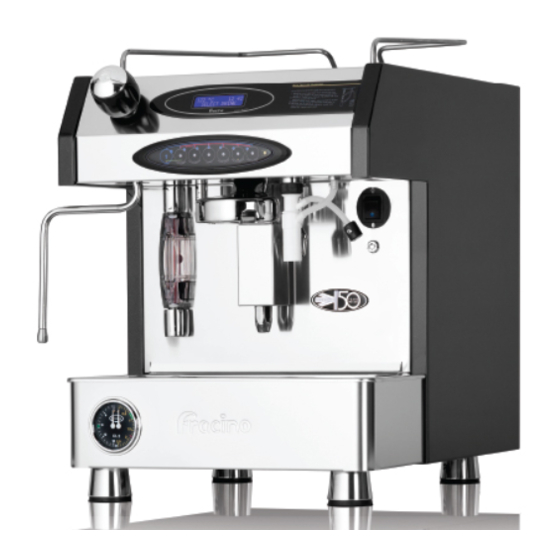
MACHINE OVERVIEW
6.
5.
4.
3.
2.
1.
1.
Pressure Gauge
2.
Sight Glass
3.
Steam Tube Nozzle (if fitted)
4.
Steam Tube (if fitted)
5.
Keypad
6.
Steam Valve Handle (if fitted)
7.
LCD Display
8.
Cup Shield (if fitted)
9.
Air/Steam Inlet Tube
8.
7.
18.
17.
16.
15.
9.
13.
14.
10.
On/off Switch
11.
Milk Temperature adjuster
12.
Milk Inlet Tube
13.
Programming Key Switch
14.
Cup Positioning Pins
15.
Milk Frother
16.
Group Exhaust
17.
Filter Holder
18.
Group
1
10.
11.
12.
Advertisement
Table of Contents

Related Manuals for Fracino GE948


Summary of Contents for Fracino GE948
- Page 1 MACHINE OVERVIEW Pressure Gauge On/off Switch Sight Glass Milk Temperature adjuster Steam Tube Nozzle (if fitted) Milk Inlet Tube Steam Tube (if fitted) Programming Key Switch Keypad Cup Positioning Pins Steam Valve Handle (if fitted) Milk Frother LCD Display Group Exhaust Cup Shield (if fitted) Filter Holder Air/Steam Inlet Tube...
- Page 2 KEYPAD - DETAIL LARGE ESPRESSO HOT WATER MILK TOP-UP CAPPUCCINO AMERICANO LATTE PRIMARY FUNCTIONS Press before selecting drink to dispense a large drink, the drink must be LARGE selected within 5seconds. ESPRESSO Dispenses a shot of Espresso CAPPUCCINO Dispenses a Cappuccino LATTE Dispenses a Latte AMERICANO...
- Page 3 SECONDARY FUNCTIONS CLEANING Starts the group cleaning cycle, see cleaning section, for LARGE ESPRESSO TOGETHER full instructions on cleaning the group. Starts the milk frother cleaning cycle, see cleaning LARGE MILK TOP-UP THEN section, for full instructions on cleaning the milk frother NOTE: The milk frother and group must be cleaned as instructed PROGRAMING MODE The programming key is required to enter program mode...
- Page 4 LARGE and LATTE as described above. START UP NOTE: Ensure machine has been correctly installed by a suitably trained engineer, see Fracino Installation manual for details on installing the machine. Ensure the machines power and water supply has been turned on.
- Page 5 After approximately 8-10mins the display will show, the boiler temperature, time and “select drink”, the machine is now ready to use 12:00 Select drink The steam pressure is located on the right hand side of the pressure gauge, this should read between 1.0 and 1.3Bar, when the machine is up to temperature.
- Page 6 NOTE: For milk based drinks the milk frother inlet tube must be completely immersed in fresh, cold milk - milk fridges are available from Fracino. WARNING: It is the users responsibility to ensure milk...
- Page 7 NOTE: Fracino offer a range of adapters and conversion kits to allow the machine to use coffee PODs and Capsules, contact Fracino for further information.
- Page 8 Place a cup under the group, the positioning pins on the drip tray grid should be used to ensure the cup is in the correct position. Select the require drink by pressing the appropriate button, pressing the large button before pressing the drink button will dispense a large drink.
- Page 9 ESPRESSO – a shot of espresso is dispensed CAPPUCCINO – a shot of espresso is dispensed together with a timed dose of cappuccino milk LATTE – a shot of espresso is dispensed together with a timed dose of latte milk AMERICANO –...
- Page 10 HOT WATER The hot water button is used to dispense a timed dose of hot water, the timing can be adjusted in the programming menu. Selecting a large hot water will dispense a larger dose of host water, depending on the programed setting. WARNING: DO NOT hold the cup whilst the machine is dispensing drinks.
- Page 11 MANUALLY STEAMING MILK (if fitted) Open the steam valve, by turning the steam handle anti- clockwise, for a second or two to vent the system, then close the valve. Fill a stainless steel milk jug approximately 1/3 full with fresh cold milk. NOTE: Ensure fresh cold milk is used, do not try to re-steam milk Place the milk jug into the steam tube, ensuring the tip of the steam tube is in the milk.
- Page 12 NOTE: A milk thermometer can be used to measure the milk temperature while steaming milk, these are available from Fracino After steaming milk, open the steam valve for a second or two, which will help to keep the holes in the nozzle clear.
- Page 13 Remove the filter holder from the group, using a showerplate brush clean the underside of the group and around the filter holder washer (showerplate brushes can be obtained from Fracino – part no. FC54) Press the espresso button to dispense water from the group, repeat 4-5 times.
- Page 14 Weekly Group Cleaning At least once a week, or more frequently with heavy use, the group should be thoroughly cleaned using Fracino Liquid Quartz cleaning liquid (available from Fracino). Remove the filter holder dip the shower plate brush in some neat Liquid Quartz and clean the underside of the group and filter holder washer, the liquid quartz will help remove stubborn coffee residue.
- Page 15 Make some of cleaning solution, using 500mL of fresh cold water and 25mL (approx. 3 cap fulls) of Fracino milk frother cleaning liquid. Place the milk inlet tube into the cleaning solution and place a container under the milk frother spout.
- Page 16 When the cycle has finish, retain the warmed cleaning solution that has come from the frother. This will be used in step 8. When the cycle has finish, remove the milk inlet tube and steam/air tube from the milk frother...
- Page 17 Dis-assemble 3 white components of the milk frother, as shown. Place all the milk frother components in to the warmed milk cleaning solution and allow to soak overnight, or at least an hour. Remove the components from the milk cleaning solution, inspect all components paying special attention to the holes.
- Page 18 Re-assemble al parts, ensuring all o-rings are present, and all parts are in the correct orientation and are firmly fitted together. Check the milk inlet tube and steam/air tube are in the correct orientation. General Cleaning Procedures The machine should be cleaned and wiped down daily. WARNING: Do not use bleach based cleaners to clean any parts of the machine, doing so will...
- Page 19 Remove the drip tray and drip try grid, clean with warm water, a mild detergent and a soft cloth. Remove the filter holder(s) from the group and clean with warm water and a mild detergent, if heavy soiled with coffee residue or a thorough clean is required, soak the filter holder in a quartz cleaning solution and wipe clean using a soft cloth, rinse thoroughly rinse with fresh water.
- Page 20 PROGRAMMING Programming – Espresso and Hot Water Volumes For each drink the volume of espresso can be set within the programming menu. NOTE: Some suggested espresso and hot water volumes can be found in the appendix of this manual. Enter the programming mode using the programming key. The display will read “Programming”...
- Page 21 Program within 30 seconds To program the Hot water volume, place a cup or measuring jug under the hot water spout and press the hot water button, when the desired volume has been dispensed press the hot water button again to stop the flow, repeat for Large hot water.
- Page 22 Programming – Drink Times The hot water and milk times for each drink can be tailored to create the required Cappuccino, Latte and Americano. Enter the programming mode using the programming key. The display will read “Programming” when in programming mode programming Press and hold the Espresso and Americano buttons together for 10seconds, until the display read “Time...
- Page 23 Select the drink you require to change, for example Cappuccino, use the Latte button to scroll through the drink settings. NOTE: Some suggested drink times can be found in the appendix Use the Espresso and Cappuccino buttons to increase or decrease the times. Repeat for other drinks as required.
- Page 24 Enter the Technical menu by pressing and holding the Espresso and Milk Top-up Buttons together for 10 seconds until the display reads “Language: English” Language English Use the Latte button to scroll through the different settings and the Espresso and Cappuccino button to change the setting, listed below is definition of each setting.
- Page 25 HSE PSSR Act of 2002 to have the boiler inspected and tested annually, contact Fracino or an authorised service agent for further information or to have your boiler tested. A Written Scheme of Examination is available in the supplied installation manual. The service counter is not an indication of when the boiler is due for an inspection or service.
- Page 26 groups Groups: Selects the number of groups, this should be set to LED Idle: When selected to Disabled the LEDs on the keypad LED Idle will illuminate all of the time, when set to Enabled the LEDs will be off and will flash when a drink is selected. The default enabled setting is Enabled.
- Page 27 Programming – Technical Menu The machine records the amount of drinks that have been dispensed, the amount of water used and total number of drinks. counters When in programing mode press and hold the espresso and cappuccino together for 5seconds until the display reads “DRINK COUNTER”.
- Page 28 MILK FROTHER ADJUSTMENT CAPPUCCINO AIR The machine is fitted with a needle valve to adjust the amount of air entering the milk frothing system to account for variations in milk types and brands. The needle valve is located on the underside of the front panel, to the left of the group.
- Page 29 MILK TEMPERATURE The milk temperature can be adjusted using adjustment fitting found on the milk inlet tube To prevent unauthorised adjustment the temperature can only be adjusted using a 2.5mm Allen key. Locate the hex head screw in the side of the fitting, to increase the temperature turn the screw clockwise using the allen key.
- Page 30 If in doubt, contact Fracino to arrange for a trained service engineer to inspect and test the appliance. MAINTENANCE...
- Page 31 It is your responsibility to have a boiler test certificate carried out annually. This is a requirement of the HSE under the PSSR Act of 2000. Contact Fracino or an authorised service agent for further information or to have your boiler tested.
- Page 32 Fracino website – www.fracino.com We at Fracino wish you many years of satisfaction with your new coffee machine. Please keep this warranty and user manual in a safe place once you have read the important instructions contained herein and keep for future reference.
- Page 33 Milk frother – any calls related to “milk frother not frothing” caused by incorrectly cleaning frother, incorrect assembly (including loss of o-rings) and wear of the o-rings. Milk frother – any calls related to milk temperature or milk foam consistency as a result of incorrectly adjustment of temperature or air valve, incorrectly assembled frother or incorrectly cleaning.
- Page 34 APPENDIX 1 – DRINK TIMES 8oz Cup 12oz Cup 16oz Cup ESPRESSO ESPRESSO ESPRESSO VOLUME VOLUME VOLUME ESPRESSO 35mL 60mL 75mL 24 sec 32 sec 45 sec STEAM TIME CAPPUCCINO 35ml 60mL 75mL 3.0 sec 4.5 sec 4.5 sec COFFEE DELAY 24 sec 45 sec 50 sec...
Need help?
Do you have a question about the GE948 and is the answer not in the manual?
Questions and answers