Table of Contents
Advertisement
Quick Links
IS-ZW-TSTAT-300
Advanced Thermostat
Installation Guide
Content
Location 3
Wiring 4
Contact information
For contact information, see www.interlogix.com.
Copyright © 2010 UTC Fire & Security. All rights reserved.
GE and the GE monogram are trademarks of the General Electric Company and
are under license to Interlogix, a UTC Fire & Security Company, 9 Farm Springs
Road, Farmington, CT 06034-4065
P/N 1069510 • REV A • ISS 09NOV10
1
Advertisement
Table of Contents

Related Manuals for GE IS-ZW-TSTAT-300


Summary of Contents for GE IS-ZW-TSTAT-300
-
Page 1: Table Of Contents
For contact information, see www.interlogix.com. Copyright © 2010 UTC Fire & Security. All rights reserved. GE and the GE monogram are trademarks of the General Electric Company and are under license to Interlogix, a UTC Fire & Security Company, 9 Farm Springs Road, Farmington, CT 06034-4065 P/N 1069510 •... -
Page 2: Introduction
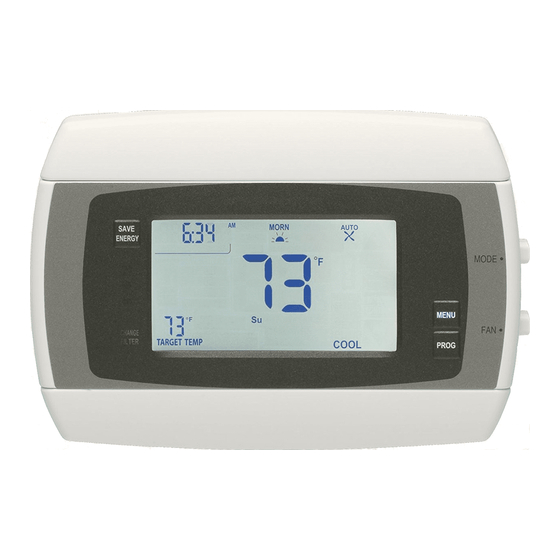
Introduction The IS-ZW-TSTAT-300 programmable communicating thermostat operates via a high-quality, easy-to-use touch screen. Figure 1: IS-ZW-TSTAT-300 Top cover Reset button HVAC switches Wire terminals Save Energy button MODE button RA D IO Power grid L IN K status FAN button... -
Page 3: Location
Tools You will need a small Phillips screwdriver and a drill with a 3/16-in. (4.8 mm) bit for wall mounts. Location For replacement installations, mount the thermostat in place of the old thermostat. A new location will require moving your wiring. For new installations and relocating the thermostat, follow these guidelines: •... -
Page 4: Wiring
Fan out wires below the mounting hole (see Figure 3 on page 5). • Remove insulation 1/8 in. from the tip of each wire (see Figure 3 on page 5). • When handling, take care not to damage the labels for each wire. IS-ZW-TSTAT-300 Advanced Thermostat Installation Guide... - Page 5 Figure 3: Preparing the wires From HVAC System Jumper wire 2.6 in. Wire terminals Identify your wiring diagram Select the reference page with your wiring diagram and set-up information. • “Two-wire heat, gas millivolt or 24 VAC system (C, W, RH):” on page 11 •...
-
Page 6: Mount The Thermostat To The Wall
3. Attach the thermostat to the wall with the screws provided. If you are mounting the thermostat to sheet rock or if you are using the old mounting holes, use the plastic anchors provided. IS-ZW-TSTAT-300 Advanced Thermostat Installation Guide... -
Page 7: Hvac Selection
Figure 5: Mounting the thermostat Wall MODE Wires FA N Wall anchor HVAC selection • If you have conventional heat, set the HVAC Type switch to NORM (normal). • If you have a heat pump system, set the HVAC Type switch to HP (heat pump). -
Page 8: Install The Batteries
• If the thermostat batteries fail with the cool OFF, this could result in no cooling and could cause possible damage or excessive temperatures. • Always use new alkaline batteries. IS-ZW-TSTAT-300 Advanced Thermostat Installation Guide... -
Page 9: To Complete The Installation
To complete the installation Press the Reset button (under the top cover, see Figure 1 on page 2) to implement the HVAC switch selections. With all the wires connected, it is time to turn the AC power back on. Do this at the breaker you used to switch it off. -
Page 10: Testing The Installation
To check cool (do not operate AC if the outside temperature is below 65°F): 1. Set the mode to COOL by pressing the MODE button until COOL is displayed. 2. Touch the temperature display to bring up the Manual screen. IS-ZW-TSTAT-300 Advanced Thermostat Installation Guide... -
Page 11: Wiring Diagrams
3. Touch the - icon and lower the target temperature to 50°F; allow the system 5 minutes to respond. 4. Verify that cool air is blowing from the system. 5. Return the target temperature to a normal setting. 6. Return mode to OFF by pressing the MODE button. Note: If you have a heat pump, leave the thermostat in OFF mode for 4 minutes before checking cool. -
Page 12: Three-Wire Heat (C, W, Rh, G)
5. Set the HVAC Type switch to NORM and: If you have gas or oil heat, set the Heat Type switch to GAS. If you have electrical heat, set the Heat Type switch to ELEC. IS-ZW-TSTAT-300 Advanced Thermostat Installation Guide... -
Page 13: Five-Wire Heat/Cool (C, W, Y, Rh, Rc, G)
Your HVAC system is now connected to the thermostat. Figure 11: Four-wire heat/cool HVAC system Power C B O W W2 Y Y2 RH RC G A Thermostat Five-wire heat/cool (C, W, Y, RH, RC, G) 1. Connect the W wire to the W terminal. This connects the heat. 2. -
Page 14: Five-Wire Heat Pump With Aux Heat (C, B Or O, W2, Y, Rh, G)
If you have gas or oil AUX heat, set the Heat Type switch to GAS. If you have electric AUX heat, set the Heat Type switch to ELEC. Your HVAC system is now connected to the thermostat. IS-ZW-TSTAT-300 Advanced Thermostat Installation Guide... -
Page 15: Two-Stage Heat And Two-Stage Cool (C, W2, W, Y, Y2, Rh, G)
Figure 14: Five-wire heat pump with AUX heat Heat pump system Power C B O W W2 Y Y2 RH RC G A Thermostat Two-stage heat and two-stage cool (C, W2, W, Y, Y2, RH, G): 1. Connect the W wire to the W terminal. This connects the 1st stage heat. 2. -
Page 16: Wire Reference Chart
B to B terminal, connect B to C terminal. If not a Trane product, tape off B. N/A emergency heat (do not connect, tape off). N/A system monitor (do not connect, tape off). N/A outdoor sensor (do not connect, tape off). IS-ZW-TSTAT-300 Advanced Thermostat Installation Guide... -
Page 17: Specifications
Lennox heat pump V or VR or R RH power for heat. M or Y Y cool control. Y or W or W2 W2 2nd-stage heat. F or G G fan control. R or O X or X2 or C Trane products (American Standard) C 24 VAC power (to power thermostat). - Page 18 Interference Causing Equipment Regulations. Operation is subject to the following two conditions: (1) this device may not cause harmful interference, and (2) this device must accept any interference received, including interference that may cause undesired operation of the device. IC: 4714A-ZWave-0210 IS-ZW-TSTAT-300 Advanced Thermostat Installation Guide...
Need help?
Do you have a question about the IS-ZW-TSTAT-300 and is the answer not in the manual?
Questions and answers