
Related Manuals for Andrew James BARISTA


Summary of Contents for Andrew James BARISTA
- Page 1 Barista Espresso Maker Please read the manual fully before using the appliance and keep the manual safe for future reference.
-
Page 2: Table Of Contents
Contents Page Safety Instructions Page 3 How to descale your appliance Page 4-5 Appliance Components Diagram Page 5 Control panel Page 6 Before first time use Page 6 Brewing System Page 7 Inserting/ removing the porta filter Page 7 Filling with water Page 8 Pre-heating Page 9... -
Page 3: Safety Instructions
Safety Instructions When using any electrical appliance, basic safety precautions should always be followed, including: This appliance can be used by children aged from 8 years and above and persons with reduced physical, sensory or mental capabilities or lack of experience and knowledge if they have been given supervision or instruction concerning use of the appliance in a safe way and understand the hazards involved. - Page 4 Do not allow the cord to touch hot surfaces and do not place the cord near hot gas, electric burners or in a heated oven. Always remove the plug of the appliance safely. Do not pull on the appliances cord to remove the appliance plug from the electrical socket.
- Page 5 Follow the ‘Brewing Espresso’ section on page 10 (without coffee in the porta filter), switch the appliance on and run through each function. Allow 5 minutes between the use of each function. After descaling, fill the water container with clean water and let the water run through each cycle until the container is empty.
-
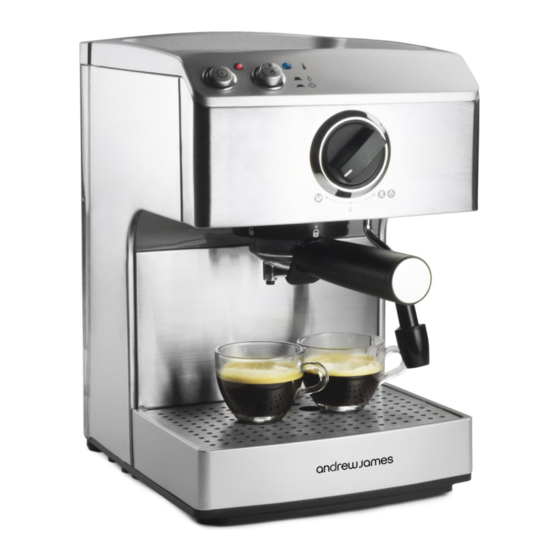
Page 6: Appliance Components Diagram
Appliance Components Diagram 1. Main indicator light 9. Boiler outlet 2. Heating indicator light 10. Porta filter 3. Hot water/steam selector button 11. Filter sieve (a.) 1 cup (b.) 2 cups 4. ON/OFF Switch 12. Water container 5. Operating dial for espresso/steam 13. - Page 7 Settings Follow the instructions on pages 6,7,8 and 9 in order to prepare the Barista Espresso Coffee Maker for the brewing process. The operating dial has three settings: Dispenses steam or hot water through the steam nozzle. Pump is switched OFF.
-
Page 8: Brewing System
Water will be dispensed through the steam nozzle as soon as the heating light goes out. Care must be taken to avoid burning. When the amount of water left in the water container has reached the ‘Min’ mark, switch the pump off by turning the dial to the neutral position. If the appliance has not been used for a long period of time, the same procedure should be used. -
Page 9: Filling With Water
Filling with water Fill the water container with fresh water daily. Clean the container regularly. Ensure the water container is filled before the appliance is switched on. To fill: Lift the water container lid and flip it back. Lift out the water container. -
Page 10: Pre-Heating
Preheating cups Preheating the cups and the porta filter will ensure a higher coffee temperature for your enjoyment. Plug the appliance into the mains supply and press the ON button. The blue heating light will illuminate. Insert the chosen filter sieve (1 or 2 cups) into the porta filter, but do not insert any coffee into the porta filter. -
Page 11: Brewing Espresso
Brewing espresso At this stage the espresso machine will be fully prepared: The container will be filled with water. The brewing system and the cup(s) to be used will be preheated. The porta filter (with the appropriate filter and ground coffee) will be properly fitted to the group head. -
Page 12: Dispensing Hot Water & Steam
Dispensing Hot Water The hot water function is useful for making drinks such as hot chocolate, black coffee and any other drinks requiring hot water. Place the cup under the steam nozzle. Turn the operating dial to Once you have enough hot water, turn the operating dial to neutral. -
Page 13: Frothing Milk
Frothing Milk The steam wand and nozzle can easily produce velvety, frothed milk for coffees such as cappuccino and caffé lattes and other milky drinks such as hot chocolate and chai lattes. Instructions for heating and frothing milk for drinks can be found below: Place cold milk into a cold stainless steel jug. -
Page 14: Cleaning And Care
Cleaning and Care Before cleaning the espresso maker or removing any parts, ensure it has been disconnected from the mains supply. The appliances main body should not be immersed in water to avoid the risk of electric shock. Abrasive cleaners should not be used on the appliance. Water Container ... - Page 15 Housing and boiler outlet Wipe the espresso maker housing and the boiler outlet with a damp cloth. Brush around the boiler head with a soft brush to remove any loose coffee.
-
Page 16: Troubleshooting
Troubleshooting PROBLEM POSSIBLE CAUSE SOLUTION The coffee is not hot The cup(s) and/or the brewing system are Preheat cups, brewing system, porta enough. cold. filter and filter sieves. If stored in the fridge, take out the The ground coffee is too cold. ground coffee a while before use. - Page 17 PROBLEM POSSIBLE CAUSE SOLUTION Coffee is running to quickly; The coffee is too coarse. Grind the coffee until it is fine. there is no crema. There is not enough coffee. Add more coffee. The coffee is not compact enough. ...
-
Page 18: Disposal
UK and EU Guarantee Your new Andrew James product comes with a 24 month guarantee and a 2 year fixed warranty, effective from receipt confirmation. Your receipt or order number is required as proof of purchase date so it is imperative that you keep it safe. This guarantee only applies if the item has been used solely for the use intended, and all instructions have been followed accordingly. -
Page 19: Electrical Information
Customers are responsible for any taxes applied to our products when they are shipped outside of the EU. All of our prices are inclusive of VAT. Once a product has been returned to us, we will aim to repair or replace it within 30 days of receipt. -
Page 20: Contact Details
All of our electrical appliances conform to pre-existing EC Directives 2006/95/EC (Low Voltage Directive) and 2004/108/EC (EMC Directives). For further information please visit http://www.esc.org.uk/industry/product- safety/product-testing-screening/kitchen-appliances/ Contact Details Andrew James UK LTD Unit 1 P C Henderson Premises Bowburn North Industrial Estate Bowburn...
Need help?
Do you have a question about the BARISTA and is the answer not in the manual?
Questions and answers