Table of Contents
Advertisement
Quick Links
Download this manual
See also:
User Manual
Advertisement
Table of Contents

Related Manuals for Osprey Talon G1


Summary of Contents for Osprey Talon G1
- Page 1 Osprey® Talon G1 Decoder User Guide ® © 2016 Osprey Video AG. Osprey is a registered trademark of Osprey Video AG. All other trademarks are the property of their respective owners. Product specifications and availability may change without notice.
-
Page 2: Table Of Contents
Layout / Status Tab ........................18 Decoder Setup / Input Type ......................19 Decode from file ........................... 20 Audio ............................20 Channel Control Buttons ........................ 20 Creating Additional Streams ......................21 Finding your decoder with Osprey BOSS ..................21 Appendix: Osprey Hardware Specifications ................. 22... -
Page 3: Fcc Notice
FCC Notice The Osprey Talon has been tested and found to comply with the limits for a Class B digital device, pursuant to Part 15 of the FCC Rules. These limits are designed to provide reasonable protection against harmful interference in a residential installation. This equipment generates, uses and can radiate radio frequency energy and, if not installed and used in accordance with the instructions, may cause harmful interference to radio communications. -
Page 4: Overview
Overview Thank you for purchasing the Osprey® Talon series video decoder from Osprey Video. This user guide provides step-by-step instructions for installing and using your new video decoder. For the latest Osprey product information and news, visit our website at www.ospreyvideo.com. -
Page 5: Product Description
The Osprey Talon is a small form-factor video decoder for RTP/UDP Unicast and Multicast streams. Audience The audience for this user guide includes anyone who uses or administers the Osprey Talon series. Users should have a basic technical understanding of streaming media. This user guide provides information on the Osprey Talon series only. - Page 6 A dropped system Osprey Video assumes no liability or responsibility for any damaged system that clients continue using. Use only attachments, accessories, or equipment specified by the manufacturer with the system. Using accessories or attachments not recommended by the decoder manufacturer voids the Limited Warranty.
-
Page 7: Installing Additional Software
Osprey Talon systems is not allowed. Connecting to the Internet Never connect an Osprey Talon system to the Internet through a direct connection without the use of a firewall. We recommend taking precautions against unwanted access such as installing systems behind a router or firewall. -
Page 8: Getting Started
Getting Started Before you can use your Osprey Talon decoder, you first need to set up and configure it. This chapter is dedicated to providing you with the details and step-by-step instructions you need to make your installation as quick and easy as possible. -
Page 9: Prerequisites
Prerequisites Before connecting the Osprey Talon decoder, ensure you comply with the following prerequisites: All packaged items are undamaged and in working order. Your environment meets all starting requirements. Safety instructions, notices, and warnings detailed in “Before you Begin” including: ... -
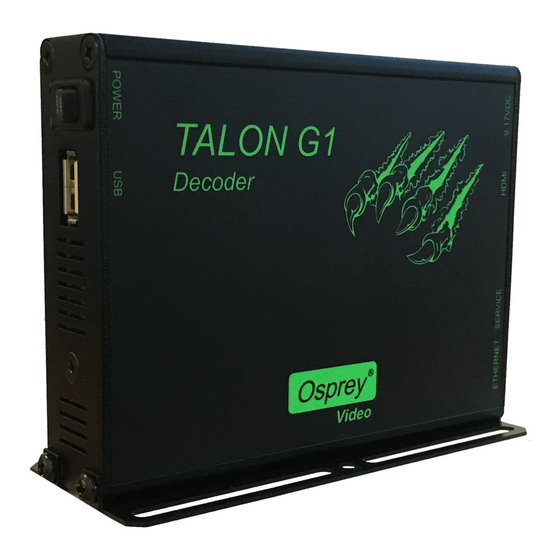
Page 10: Osprey Talon Front Panel Diagram
Osprey Talon front panel diagram You should familiarize yourself with the front panel controls for the Osprey Talon. Besides the Power Switch and USB Port, there are indicator lights that are hidden until illuminated. Osprey Talon front panel Power On/Off USB 2.0... -
Page 11: First Time Set Up
You should read all instructions, notices, and warnings in the previous section prior to getting started with your new Osprey Talon hardware for the first time. Also, ensure you have all required parts and meet all system requirements before installing this product. -
Page 12: Web Interface
By default, the Talon receives its IP address via DHCP. If you are unable to determine the address of your decoder, we have created an application for finding Talon and performing some critical remote functions. Please consult the section labeled finding your decoder with Osprey BOSS at the end of this user guide. -
Page 13: Tab Id
Tab ID The tabs on the front page provide access to the available configuration features of the Talon. System IP Setup, Set Device Name, Set Password, Update Firmware, Select Mode Control Status Displays real time information regarding streams and inputs Stream Contains all streaming settings for one output stream including source and output setup. -
Page 14: System Control Tab
System Control Tab This tab accesses most of the administrative functions of the Talon. Talon IP Setup By default, Talon receives its IP address via DHCP. If you need to use a manual address it can be set in the IP setup dialog box on the System Control page. If you are not familiar with the settings found here check with your system administrator before changing any settings. -
Page 15: Device Management
The model designation for Talon is loaded as the default device name. To easily distinguish multiple Talons, you can create a new name here. Set Password The default password is “osprey”. In order to maintain device security, it is recommended you change the default password. Reboot Reboot performs a complete power reset of the device. -
Page 16: Update Firmware
Talon to ensure that you have the very latest version. There are two methods. Updating via the Talon Web page. 1. Download the update from the Osprey Video webpage and save it on the host computer. 2. Login to the Talon via the web page a click the System Setup tab. - Page 17 Updating via Flash Drive In the event you cannot access the Talon web page, it is possible to update directly from a Flash drive. Insert a Flash drive in your host computer. Format the drive as FAT (do not use FAT32 or NTFS) ...
-
Page 18: Display Setup
Display Setup You can set the Display Mode, Resolution and Layout on this page. Display Mode Currently the only available mode is HDMI. Later Talon versions my offer different output settings. Resolution Set the resolution to match the optimum settings for the display monitor or television. -
Page 19: Layout / Status Tab
Layout Available settings are Single, Quad and 1+2PIP. For 1+2PIP the primary video will be Stream 1. NOTE: Layout can be changed while the decoder is running. The screen will go blank for a few seconds and then resume with the new layout. Any screen section that does not have a stream assigned to it will appear black. -
Page 20: Decoder Setup / Input Type
Decoder Setup All configuration for actual decoding is found under the tab marked “Stream (1)”. If your interface doesn’t have a tab marked “Stream” simply click on the tab marked “+” and one will be created automatically. Additional streams may be created by clicking the “+” up to a maximum of 4 streams. Input Type Talon Decoders accept RTP and UDP streams. -
Page 21: Decode From File
Decode from file Talon will also stream from a .TS file. There is no internal storage on a Talon so you will need to have the file available on a USB Flash drive. NOTE: Talon will only mount a flash drive if it is formatted in FAT32 and the size is under 2GB. The file location is /media/usb/[filename].ts All file and folder names are case sensitive. -
Page 22: Creating Additional Streams
Finding your decoder with Osprey BOSS If your Talon is powered up and attached to the local network Osprey has included an application that allows you to use a browser on another computer to locate the decoder and access it via the network. -
Page 23: Appendix: Osprey Hardware Specifications
Power | Unit Ready | Unit Decoding Dimensions: 93.1mm X 120.2mm X 24.75mm (Chassis only. Does not include mounting brackets or connectors) In the Box: Talon G1 Hardware Decoder | International Power Supply | Mounting Brackets Weight: 240g Power Consumption:...
Need help?
Do you have a question about the Talon G1 and is the answer not in the manual?
Questions and answers