Table of Contents
Advertisement
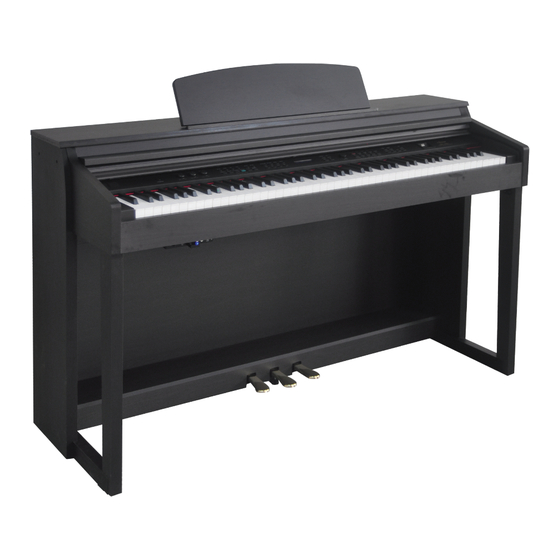
DP-150e
Owner's Manual
Pianos
Pianos
Virgin Musical Instrument Company INC
Virgin Musical Instrument Company INC
P O Box 2908
P O Box 2908
La Mesa, CA 91943
La Mesa, CA 91943
619 244-0006
619 244-0006
Virginmusicalinstrumentcompany.com
Virginmusicalinstrumentcompany.com
info@virginmusicainstruments.com
info@virginmusicainstruments.com
Advertisement
Table of Contents

Subscribe to Our Youtube Channel
Related Manuals for Artesia DP-150E


Summary of Contents for Artesia DP-150E
- Page 1 DP-150e Owner’s Manual Pianos Pianos Virgin Musical Instrument Company INC Virgin Musical Instrument Company INC P O Box 2908 P O Box 2908 La Mesa, CA 91943 La Mesa, CA 91943 619 244-0006 619 244-0006 Virginmusicalinstrumentcompany.com Virginmusicalinstrumentcompany.com info@virginmusicainstruments.com info@virginmusicainstruments.com...
- Page 2 Upright Piano. This piano has been designed to, with proper care, provide you with years of musical enjoyment. Artesia's advanced state of the art electronics are combined with an elegant cabinet that adds beauty and sophistication to any home environment.
-
Page 3: Warranty Information
In the event repairs are needed, the original purchaser should contact Examples of Picture Symbols Virgin Musical Instrument Company, the parent company of Artesia Pianos, denotes that care should be taken. at 888-998-9848. Virgin Musical Instrument Company will then repair The example instructs the user to take care not to allow fingers to be trapped. - Page 4 SPECIFICATIONS Fill-In Variation WARNING - When using electric products, basic precautions should always be followed, including the following. Metronome SPECIFICATIONS One Touch Settings WARNING Indicates a potential hazard that could result in death KEYBOARD or serious injury if the product is handled incorrectly. PLAY ALONG SONGS: 55 Songs 88 Key, Advanced Balanced Graded Hammer-...
-
Page 5: Troubleshooting
TROUBLESHOOTING General Precautions When the instrument is turned on or off, a This is normal and indicates that the instrument popping sound is heard. is receiving electrical power. When using a mobile phone, noise is produced Using a mobile phone is close proximity to the instrument may produce interference. -
Page 6: Table Of Contents
TABLE OF CONTENTS STYLE LIST TAKING CARE OF YOUR DIGITAL PIANO ..8 ..............37 MAIN, SPLIT AND LAYER VOICE BALLAD 16 BEAT Big Band PANEL CONTROLS ..........9 ...........38 TRANSPOSE Piano Ballad Twist Dixie CONNECTOR PANEL ........17 ............38 OCTAVE Latin Ballad Early Rock Big Band Dance PEDALS .............18 MAIN, SPLIT AND LAYER VOICE... -
Page 7: Voice List
VOICE LIST TAKING CARE OF YOUR DIGITAL PIANO This digital piano will supply you with years of musical enjoyment if you follow the simple rules listed below. SERVICE AND MODIFICATION LOCATION PIANO Electric (pick) English Horn ETHNIC Do not attempt to open the piano or make any Do not expose the instrument to the following Acoustic Grand Fretless Bass... -
Page 8: Panel Controls
AUTO BASS CHORD FINGERING GUIDE PANEL CONTROLS FINGERING GUIDE The elegant control panel is divided into several distinct sections. The following is a brief description of all the features located on the control panel. CHORD DISPLAY INTERVALS Major 1-3-5 Major sixth 1-3-5-6 Major seventh 1-3-(5)-7... -
Page 9: Midi Implementation Chart
PANEL CONTROLS MIDI MIDI IMPLEMENTATION CHART Function Transmitted Recognized Remark Basic Channel 1 CH 1-16 CH Channel changed 1-16 CH 1-16 CH Default Mode Note Number 9-120 0-127 Velocity: Note On • • Velocity: Note Off • Pitch Bender • •... -
Page 10: Midi Connection
PANEL CONTROLS MIDI MIDI stands for Musical Instrument Digital Interface. This is a worldwide standard communication interface that enables electronic musical instruments and computers of all brands to communicate with each other so that data can pass between them. This exchange of information makes it possible to create a system of MIDI instruments and devices that offers far greater versatility and control than is available with isolated instruments. - Page 11 PANEL CONTROLS BLUETOOTH to Host Input MIDI Bluetooth Level ♫Please note, Bluetooth devices should be placed near and in direct view of the Bluetooth receiver when initially set up. The distance and strength of the signal will depend on environmental conditions. Please make sure the volume of the piano and the Bluetooth device is turned up.
- Page 12 PANEL CONTROLS BLUETOOTH BT-1 ARTESIA BLUETOOTH CONNECTION Artesia adds Bluetooth to your digital piano! Plug this tiny unit into the allotted slot on the connector panel and stream high-quality audio from Bluetooth devices like your smartphone, tablet or computer. Now you will This receiver is compatible with most A2DP stereo Bluetooth-enabled devices.
- Page 13 PANEL CONTROLS USB is a digital audio interface. The USB feature allows you to record your songs or registrations on a USB drive, or to listen to any MIDI files prerecorded onto a USB. INSERT THE USB Insert the USB flash drive in the USB TO DEVICE slot with the top (fat) side up and leading into the slot.
- Page 14 PANEL CONTROLS PLAY ALONG SONGS PRACTICING BOTH HANDS OF THE SONG USB TO DEVICE Press the SONG LEFT and the SONG RIGHT buttons simultaneously, the PLAY/STOP indicator will flash blue and the first play along song will appear on the display. Both SONG LEFT and SONG RIGHT indicators will be off.
- Page 15 PANEL CONTROLS PLAY ALONG SONGS PRACTICING THE LEFT HAND ACCOMPANIMENT OF THE SONG USB TO DEVICE USB TO DEVICE 36 TRACK 1/SONG LEFT, TRACK 2/SONG RIGHT: These buttons have a dual function. Press the SONG LEFT and the SONG RIGHT buttons simultaneously, the PLAY/STOP indicator will When in the melody recording mode these indicators will be lit when the corresponding tracks flash blue and the first play along song will appear on the display.
-
Page 16: Connector Panel
CONNECTOR PANEL PLAY ALONG SONGS This connector panel, is located on the bottom left of the piano, under the key bed. It allows you to connect PRACTICING THE RIGHT HAND MELODY OF THE SONG external audio equipment, a computer, MIDI equipment or headphones. to Host USB TO DEVICE Input... -
Page 17: Pedals
PLAY ALONG SONGS PEDALS There are 55 songs, of varying difficulty, built into the piano for you to practice and learn how to play. These This piano is complete with three function pedals. songs have separate left hand or accompaniment, and right hand or melody, parts that can be turned on and off independently, so you can learn right, left and both hand portions as you progress in skill. -
Page 18: Demo
RECORD DEMO USB RECORDING This piano has ten different demonstration, or demo, songs that are designed to showcase the different sampled voices that are available. To record a new track on the selected song, press and hold the RECORD button and then press the TRACK button (not the TRACK1/SONG LEFT or TRACK2/SONG RIGHT buttons) at the same time new track will be created. -
Page 19: Keyboard Voices
RECORD KEYBOARD VOICES This piano offers 137 GM (General MIDI) authentic acoustic instrument voices offering unmatched realism with digital effects to further enhance the sound. Please see the complete list of all 137 voices in the Voice List at the back of this manual. ♫Please note, the keyboard and accompaniment volumes can adjusted independently from each other and the master volume by using the KBD.VOL and/or ACC.VOL buttons with the DATA WHEEL. -
Page 20: User Quick Select Button
RECORD KEYBOARD VOICES USB TO DEVICE You must press the RECORD button again to stop recording. The RECORD button indicator will go out, and the TRACK indicator will stop blinking and remain lit showing that it has recorded information. To exit the record mode, press the TRACK buttons one at a time to disengage all recording functions so none of the indicators are lit. -
Page 21: Layer Voice
RECORD KEYBOARD VOICES This digital piano is equipped with a real time recorder. The song bank has a 2- track sequencer. It will record all note events exactly as they are performed and save it to the local memory. This recorded information will not be lost when the power is turned off. -
Page 22: Touch
REGISTRATION MEMORY KEYBOARD VOICES TOUCH The TOUCH button engages the touch response. The touch function provides three types of keyboard sensitivity to match different playing styles. Press the TOUCH button and within five seconds use the +/ YES or –/NO buttons to change the touch response from: 1:TouchSoft, the most sensitive keyboard response which permits maximum sound levels with a light touch. -
Page 23: Save Registration
REGISTRATION MEMORY KEYBOARD VOICES Registration Memory can recall particular settings of style, voice, chord and other parameters or features you have engaged. This piano has six banks each with six registration memories to hold 36 of your favorite settings so that they can be recalled quickly by the press of a button. The registration will not be lost when the power is turned off. -
Page 24: Rhythm
RHYTHM FUNCTION This piano offers 100 rhythm styles and a variation of each of those style patterns to choose from. The rhythm Press the FUNCTION button and use the +/YES and the –/NO buttons or the DATA WHEEL to select section of the keyboard is assigned by the auto accompaniment split point. - Page 25 Some classical piano pieces call for this technique. the keyboard. Now the Artesia line has developed this function for their digital pianos. This function allows you to turn Press the START/ STOP button to stop the accompaniment or press the INTRO/ENDING button on or off the half sustain feature, the default is half sustain on.
-
Page 26: Usb
RHYTHM FUNCTION Press the FUNCTION button and use the +/YES and the –/NO buttons or the DATA WHEEL to select the Function you wish to edit. Press the ENTER button to confirm and access the sub-menu, the current setting will be shown. Use the +/YES and the –/NO buttons or the DATA WHEEL to choose an option. - Page 27 FUNCTION AUTO ACCOMPANIMENT Press the FUNCTION button and use the +/YES and the –/NO buttons or the DATA WHEEL to select AUTO ACCOMPANIMENT the Function you wish to edit. Each of the 100 percussive rhythm styles has its own auto accompaniment, dedicated to that style. These Press the ENTER button to confirm and access the sub-menu, the current setting will be shown.
-
Page 28: Single Mode
AUTO ACCOMPANIMENT FUNCTION THE AUTO ACCOMPANIMENT FINGERING MODE Press the FUNCTION button and use the +/YES and the –/NO buttons or the DATA WHEEL to select the Function you wish to edit. The auto accompaniment, or auto bass chord, fingering modes of this piano are single or fingered. The Press the ENTER button to confirm and access the sub-menu, the current setting will be shown. -
Page 29: Using The Auto Accompaniment
FUNCTION AUTO ACCOMPANIMENT USING THE AUTO ACCOMPANIMENT Press the FUNCTION button and use the +/YES and the –/NO buttons or the DATA WHEEL to select the Function you wish to edit. The rhythm style and corresponding auto accompaniment can be started as a straight start or set for a Press the ENTER button to confirm and access the sub-menu, the current setting will be shown. - Page 30 AUTO ACCOMPANIMENT FUNCTION Press the FUNCTION button and use the +/YES and the –/NO buttons or the DATA WHEEL to select the Function you wish to edit. INTRODUCTION AND ENDING PATTERNS Press the ENTER button to confirm and access the sub-menu, the current setting will be shown. All of the auto accompaniments can be started with an appropriate introduction and stopped with a Use the +/YES and the –/NO buttons or the DATA WHEEL to choose an option.
- Page 31 FUNCTION AUTO ACCOMPANIMENT Press the FUNCTION button and use the +/YES and the –/NO buttons or the DATA WHEEL to select the Function you wish to edit. Press the ENTER button to confirm and access the sub-menu, the current setting will be shown. Use the +/YES and the –/NO buttons or the DATA WHEEL to choose an option.
- Page 32 FUNCTION FUNCTION The Function menu is used to set up or to adjust values or levels of various features related to the operation Press the FUNCTION button and use the +/YES and the –/NO buttons or the DATA WHEEL to select of this keyboard.
Need help?
Do you have a question about the DP-150E and is the answer not in the manual?
Questions and answers