Samsung MX-HS8000 User Manual
Premium hi-fi component system
Hide thumbs
Also See for MX-HS8000:
- User manual (56 pages) ,
- User manual (150 pages) ,
- User manual (30 pages)
Table of Contents
Advertisement
Available languages
Available languages
Advertisement
Chapters
Table of Contents

Related Manuals for Samsung MX-HS8000


Summary of Contents for Samsung MX-HS8000
-
Page 1: User Manual
MX-HS8000 PREMIUM HI-FI Component System user manual imagine the possibilities Thank you for purchasing this Samsung product. To receive more complete service, please register your product at www.samsung.com/register... -
Page 2: Warning
Safety Information Warning TO REDUCE THE RISK OF ELECTRIC SHOCK, DO NOT REMOVE THE COVER (OR BACK). NO USER-SERVICEABLE PARTS ARE INSIDE. REFER SERVICING TO QUALIFIED SERVICE PERSONNEL. CAUTION This symbol indicates "dangerous voltage" inside the product that presents a risk of RISK OF ELECTRIC SHOCK DO NOT OPEN electric shock or personal injury. -
Page 3: Precautions
Precautions • Place the loudspeakers at a reasonable distance on either side of the system to ensure good stereo sound. • Ensure that the AC power supply in your house complies with the identification sticker located • Direct the loudspeakers towards the listening on the back of your product. -
Page 4: Disc And Format Compatibility
Safety Information Disc and Format Compatibility Supported Audio Formats This product does not support Secure (DRM) File Sampling Audio Codec Bit Rate Media files. Extension Rate CD-R Discs 16KHz ~ 80Kbps ~ MPEG 1 Layer3 48KHz 320Kbps • Some CD-R discs may not be playable 16KHz ~ 80Kbps ~ depending on the disc recording device (CD-... -
Page 5: Table Of Contents
Bluetooth device toroidal core Using Bluetooth Power On TV SoundConnect FUNCTIONS To connect the Hi-Fi Component to a SoundConnect Compatible Samsung TV The Display function To disconnect the TV from the Hi-Fi Changing Display mode Component The DEMO Music function... - Page 6 Contents Timer Function Setting the Clock Setting the Timer Cancelling the Timer The Recording Function Basic Recording Recording Speed Special Sound Effects Selecting EQ Mode FOOTBALL MODE function GOAL Function GIGA SOUND Function BEAT WAVING Function DJ BEAT Function +PANNING Funcion NON-STOP MUSIC RELAY Function DANCE TIME Function TEMPO Function...
-
Page 7: Getting Started
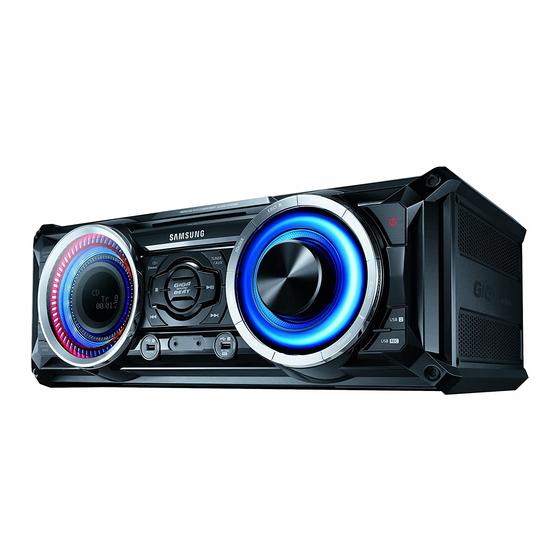
Getting Started Front Panel & VOLUME / DJ button Display Panel +PANNING button BACKWARD SEARCH/SKIP button CD/Bluetooth button NON-STOP MUSIC RELAY button DISC slot USB 2 jack for Playing and USB Recording PLAY/PAUSE button GIGA SOUND BEAT button AUX IN 1 jack TUNER/AUX button Use to connect an external device such as FORWARD SEARCH/SKIP button... -
Page 8: Rear Panel
Getting Started Rear Panel 4 5 6 7 AUX IN 2 Terminals Cooling fan 1. Use an Audio Cable (not supplied) to • The fan operates while the unit is powered on. connect AUX IN 2 on the product to Audio Out on an external analog output If you set the unit to the minimum device. -
Page 9: Remote Control
Remote Control MUTE (Turn off the sound temporarily. Press again to turn the sound back on.) Power BEAT WAVING Bluetooth TV SoundConnect USB REC REC SPEED TUNING MODE MO/ST TUNER/AUX +PANNING NON-STOP MUSIC RELAY DJ BEAT EFFECT LEVEL TEMPO SKIP SEARCH PLAY/PAUSE REPEAT... -
Page 10: Accessories
Getting Started Accessories Check for the supplied accessories below. User Manual Remote Control/Batteries FM Antenna Power Cable Toroidal ferrite core • Figures and illustrations in this user's manual are provided for reference only and may differ from actual product appearance. Connecting the Speakers Cautions on Moving the Speakers Recommended speaker setup. -
Page 11: Attaching The Toroidal Ferrite Core To The
Attaching the toroidal ferrite core to the power cord Attaching the Toroidal ferrite core to the power cord helps prevent RF interference from radio signals. Pull the fixing tab of the Toroidal ferrite core to open it. Make two loops around the core with the power cable. -
Page 12: Functions
Functions The Display function Playing a CD You can view functions available on the display, Loading a Compact Disc adjust the brightness of the display and set the Display/LED either on or off. You can play standard compact discs that require no adapter. -
Page 13: Selecting A Track
Selecting a Track To adjust the volume: • Turn the VOLUME control on the product. You can select a desired track while the disc is • Press the VOL+ or VOL- button on the being played. remote control. To play the previous track The volume level can be adjusted in 31 steps (VOLUME MIN, VOLUME 01 ~ Press the 1 button within 3 seconds after the... -
Page 14: Playing Usb Devices
Functions To Select a File from a USB Device When you want to stop the repeat function, press the REPEAT button until "OFF" is You can select an MP3 file while the product is displayed. playing. • OFF : Cancels repeat playback. | NOTES | • TRACK : Repeatedly plays the selected track. -
Page 15: To Use High Speed Search
To Use High Speed Search Read Before Connecting USB Storage Devices You can search a desired section quickly while the product is playing. • Some USB devices may not work properly with Press the 3, 4 button. this product. • Each time you press the button, you move • This product only supports external HDD's that through the section forward/backward quickly. -
Page 16: Searching For A Track Quickly
Functions Searching for a Track Quickly • If you eject the disc, CD programming is cancelled. You can select a track directly without the 1 , 2 If you turn off the product, CD/USB button. programming is cancelled. CDDA/MP3-CD/USB | NOTES | ✎... -
Page 17: Bluetooth
Bluetooth device. - It is exposed to electrical interference from • You will see a list of scanned devices. same frequency-band devices including Select "[Samsung] HI-FI XXXXXX" from the medical equipment, microwave ovens, and list. wireless LANs. • When the product is connected to • Pair the Hi-Fi Component with the Bluetooth... -
Page 18: To Disconnect The Bluetooth Device From The Hi-Fi Component
Functions ✎ Only one Bluetooth device can be paired at a ✎ In Bluetooth connection mode, the Bluetooth time. connection will be lost if the distance between the Hi-Fi Component and the Bluetooth device ✎ Once you have turned off the Hi-Fi Component exceeds 16.25 feet (5 meters). -
Page 19: Tv Soundconnect
Component before terminating the connection. ✎ The SoundConnect feature is available on some (Disconnection time may differ, depending on Samsung TVs released since 2012. Check the TV) whether your TV supports the SoundShare or ✎ The connection may be lost or sound may SoundConnect function. -
Page 20: Using My Karaoke
Functions Using My Karaoke Auto Change Function You can use the MY Karaoke function to sing You can circularly play between the disc and the along with your favorite CDs and USB tracks. USB. Press the AUTO CHANGE button to select a Connect the microphone to the MIC jack on the front of the product. -
Page 21: Selecting A Stored Station
Timer Function Find a station by: • Pressing and holding the TUNING/ALBUM Setting the Clock , or . button on the remote control to automatically search for broadcasting stations. For each step, you have a few seconds to set the required options. - Page 22 Functions Set the timer switch-on time. Press the ¬ button. Result: TIMER REC SET (Do you want to a. Press the TUNING/ALBUM , or . record?) is displayed. button to set the hours. Press the ¬ button. b. Press the ¬ button. Result: REC SET YES/NO is displayed.
-
Page 23: Cancelling The Timer
Cancelling the Timer USB 1 (Recording device is on USB 2) • Connect the USB device with the files you After you have set the timer, it will start want to record to USB 1 jack. automatically. When it starts, the TIMER ON message appears on the display. -
Page 24: Recording Speed
Functions • If a microphone is connected to the product ✎ When you use the CD high speed search and you press the USB REC button, you function, the CD recording function is activate the MP3 Recording function, not unavailable. the Copy function. -
Page 25: Special Sound Effects
Special Sound Effects | NOTES | ✎ When the Hi-Fi Component is recording, the Selecting EQ Mode EQ function is turned off automatically and is unavailable. Your Hi-Fi Component system provides predefined ✎ If no buttons are pressed within 8 seconds, equalizer settings that are optimized for particular your settings will automatically be cancelled music genre. -
Page 26: Giga Sound Function
Functions DJ BEAT Function | NOTES | ✎ Press the GOAL button to output the currently The DJ Beat function lets you turn on the DJ Beat playing sound file mixed with the GOAL sound. sound effect functions. The level of each effect is GIGA SOUND Function adjustable. -
Page 27: Panning Funcion
+PANNING Funcion | NOTES | ✎ When the DANCE TIME sound file finishes Increases the left and right speaker's output in playing, the DANCE TIME mode changes to turn and makes it seem as if the sound is moving DANCE TIME OFF. from side to side. -
Page 28: Appendix
Refer to the chart below when this product does not function properly. If the problem you are experiencing is not listed below or if the instructions below do not help, turn off the product, disconnect the power cord, and contact the nearest authorized dealer or Samsung Electronics Service Center. Symptom Check/Remedy I cannot eject the disc. -
Page 29: Specifications
AUX IN1 1.2V, AUX IN2 2.0V *: Nominal specification - Samsung Electronics Co., Ltd reserves the right to change the specifications without notice. - Weight and dimensions are approximate. - Design and specifications are subject to change without prior notice. - Page 30 Contact SAMSUNG WORLD WIDE If you have any questions or comments relating to Samsung products, please contact the SAMSUNG customer care centre. Area Contact Centre Web Site Area Contact Centre Web Site AUSTRIA 0800 - SAMSUNG (0800 - 7267864) www.samsung.com/at/support...
- Page 31 MX-HS8000 Système PREMIUM HI-FI Component manuel d'utilisation Imaginez les possibilités Merci d'avoir acheté ce produit Samsung. Pour recevoir un service plus complet, veuillez enregistrer votre produit à l'adresse www.samsung.com/register...
- Page 32 Consignes de sécurité Avertissement POUR RÉDUIRE LE RISQUE DE DÉCHARGE ÉLECTRIQUE, NE RETIREZ PAS LE COUVERCLE (OU LA PARTIE ARRIÈRE). CE PRODUIT NE CONTIENT AUCUNE PIÈCE RÉPARABLE PAR L'UTILISATEUR. CONFIEZ TOUTE RÉPARATION À DU PERSONNEL QUALIFIÉ. ATTENTION Ce symbole indique une « tension dangereuse »...
- Page 33 Précautions • Placez les enceintes à une distance raisonnable d'un côté ou de l'autre du système pour assurer une bonne restitution stéréo. • Assurez-vous que l'alimentation en courant c.a. de votre domicile est conforme à l'étiquette • Dirigez-les vers la zone d'écoute. d'identification apposée à...
- Page 34 Consignes de sécurité Compatibilité des disques et des Formats audio pris en charge formats Extension Taux Débit Codec audio Ce produit ne prend pas en charge les fichiers de fichier d’échantillonnage binaire médias protégés (DRM). 16KHz ~ 80Kbps ~ MPEG 1 Couche 3 Disques CD-R 48KHz 320Kbps...
- Page 35 Bluetooth FONCTIONS Utiliser la mise en marche par Bluetooth TV SoundConnect Fonction d'affichage Pour connecter le composant Hi-Fi à un téléviseur Samsung compatible Changer le mode d’affichage SoundConnect La fonction DEMO Music Pour déconnecter le téléviseur du Lecture d'un CD...
- Page 36 Contenus Fonction de minuterie Réglage de l'horloge Réglage de la minuterie Annulation de la minuterie Fonction Enregistrement Enregistrement de base Vitesse d’enregistrement Effets sonores spéciaux Sélection du mode EQ Fonction FOOTBALL MODE Fonction GOAL Fonction GIGA SOUND Fonction BEAT WAVING Fonction DJ BEAT Fonction +PANNING Fonction NON-STOP MUSIC RELAY...
-
Page 37: Mise En Route
Mise en route Panneau avant & Touche VOLUME / DJ Panneau d'affichage Touche +PANNING Touche BACKWARD SEARCH/SKIP Touche CD/ Bluetooth Touche NON-STOP MUSIC RELAY Fente d'insertion du DISQUE Prise USB 2 pour la lecture et l'enregistrement USB Touche GIGA SOUND BEAT Touche PLAY/PAUSE Touche TUNER/AUX Prise D’ENTRÉE AUX IN 1... -
Page 38: Panneau Arrière
Mise en route Panneau arrière 4 5 6 7 Ventilateur de refroidissement ONLY FOR SERVICE • Cette prise est réservé aux essais, • Le ventilateur fonctionne lorsque l'unité est alimentée en tension. veuillez ne pas l’utiliser. S'il est réglé à l'intensité sonore minimale, Bornes D’ENTRÉE AUX IN 2 le ventilateur ne fonctionnera pas. -
Page 39: Télécommande
Télécommande MUTE (Permet de couper le son momentanément. Appuyez une nouvelle fois pour réactiver le son.) Alimentation BEAT WAVING Bluetooth TV SoundConnect USB REC REC SPEED TUNING MODE MO/ST TUNER/AUX +PANNING NON-STOP MUSIC RELAY DJ BEAT EFFECT LEVEL TEMPO SAUT RECHERCHE PLAY/PAUSE REPEAT... -
Page 40: Accessoires
Mise en route Accessoires Vérifiez la présence de tous les accessoires indiqués plus bas. Guide d'utilisation Télécommande / piles Antenne FM Câble d'alimentation Noyau torique en ferrite • Les figures et les illustrations de ce guide de l'utilisateur sont fournies à titre de référence seulement. Elles peuvent différer de l'apparence réelle du produit. -
Page 41: Fixation Du Noyau Torique En Ferrite Au
Fixation du noyau torique en ferrite au cordon d'alimentation Attacher le noyau torique en ferrite sur le cordon d'alimentation aide à éviter la génération d'interférences RF à partir des signaux radio. Tirez sur la languette de fixation du noyau torique en ferrite pour l'ouvrir. -
Page 42: Fonctions
Fonctions Fonction d'affichage Lecture d'un CD Vous pouvez visualiser les fonctions disponibles Chargement d'un disque compact sur l’écran d’affichage, ajuster la luminosité de l’écran et régler l’affichage/DEL actif ou non. Vous pouvez lire les CD standard qui ne Changer le mode d’affichage nécessitent pas d’adaptateur. - Page 43 Choix d'une piste Réglage du volume: • Activez la commande du VOLUME sur le Vous pouvez sélectionner une piste désirée produit. pendant la lecture du disque. • Appuyez sur les boutons VOL+ ou VOL- Pour lire la piste précédente de la télécommande. Le volume peut être ajusté...
-
Page 44: Lecture D'un Périphérique Usb
Fonctions Pour sélectionner un fichier sur un Lorsque vous voulez interrompre la fonction de répétition, appuyez sur la touche REPEAT périphérique USB jusqu'à ce que la mention « OFF » s'affiche. • OFF : Annule la lecture répétée. Vous pouvez sélectionner un fichier MP3 durant la lecture. -
Page 45: Utilisation De La Recherche À Haute Vitesse
Utilisation de la recherche à haute À lire avant de connecter des vitesse périphériques de stockage USB Vous pouvez rapidement rechercher une section • Certains périphériques USB peuvent ne pas désirée pendant que l’appareil est en cours de fonctionner correctement avec cet appareil. lecture. -
Page 46: Rechercher Une Piste Rapidement
Fonctions Rechercher une piste rapidement • Si vous éjectez le disque, la programmation du CD est annulée. Vous pouvez sélectionner une piste directement Si vous éteignez l’appareil, la sans le bouton 1 , 2 . programmation CD/USB est annulée. CDDA/MP3-CD/USB | REMARQUES | ✎... -
Page 47: Bluetooth
- Il est soumis à des variations électriques dans • Une liste d’appareils détectés s’affichera. les obstructions causées par un mur, un coin Sélectionnez « [Samsung] HI-FI XXXXXX » ou des partitions dans les bureaux. dans la liste. - Il est exposé à de l’interférence électrique provenant d’appareils exploitant des bandes... -
Page 48: Pour Débrancher Le Dispositif Bluetooth D'un Composant Hi-Fi
Fonctions ✎ Un seul appareil peut être apparié à la fois. ✎ En mode de connexion Bluetooth, la connexion Bluetooth sera perdue si la distance entre le ✎ Une fois que vous avez éteint le Composant Composant Hi-Fi et le dispositif Bluetooth Hi-Fi et que l'appariement est interrompu, il ne dépasse 5 mètres. -
Page 49: Tv Soundconnect
Vous pouvez déconnecter le téléviseur du Avant d’activer cette fonction, assurez-vous composant Hi-Fi. de définir les fonctions SoundConnect ou SoundShare du téléviseur Samsung sur On. Pour les instructions, reportez-vous au manuel d’utilisation du téléviseur. Appuyez sur le bouton TV SoundConnect • Lorsque le composant Hi-Fi est déconnecté... -
Page 50: Utilisation De Mon Karaoke
Fonctions Utilisation de Mon Karaoke Fonction de modification automatique Vous pouvez utiliser la fonction Mon Karaoke pour Vous pouvez passer de la lecture du disque au chanter sur des plages musicales enregistrées sur périphérique USB. un CD ou un périphérique USB. Appuyez sur le bouton AUTO CHANGE pour Connectez le microphone à... -
Page 51: Choix D'un Poste Mémorisé
Fonction de minuterie Sélectionnez le poste à mémoriser en : • Appuyer sur le bouton TUNING/ALBUM Réglage de l'horloge , ou . de la télécommande pour rechercher automatiquement les stations de radiodiffusion actives. Pour chaque étape, vous avez quelques secondes pour régler les options requises. - Page 52 Fonctions Réglez l'heure d'activation de la minuterie. Appuyez sur la touche ¬ . Résultat : TIMER REC SET (Désirez-vous a. Appuyez sur la touche TUNING/ALBUM effectuer un enregistrement?) s'affiche. , ou . pour régler les heures. Appuyez sur la touche ¬ . b.
-
Page 53: Annulation De La Minuterie
Annulation de la minuterie USB 1 (le dispositif d'enregistrement se trouve sur l’USB 2) Une fois que vous avez défini la minuterie, elle se • Connectez le périphérique USB incluant les lancera automatiquement. Lorsqu’elle débute, le fichiers d'origine du périphérique USB à la message TIMER ON apparaît à... -
Page 54: Vitesse D'enregistrement
Fonctions • Si un microphone est relié à l’appareil et ✎ Si vous utilisez la fonction de recherche de CD à grande vitesse, l’enregistrement du CD ne que vous appuyez sur le bouton USB REC, peut pas fonctionner. vous activez la fonction Enregistrement MP3, et non la fonction Copie. -
Page 55: Effets Sonores Spéciaux
Effets sonores spéciaux | REMARQUES | ✎ Lors d'un enregistrement, la fonction EQ Sélection du mode EQ ne fonctionne pas et l'égaliseur passe automatiquement en mode « Désactivé ». Votre produit prend en charge les réglages ✎ Si vous n’appuyez sur aucune touche d'égalisateur prédéfinis entre des basses et pendant 8 secondes, les réglages sont hautes fréquences pour qu'ils s'harmonisent avec... -
Page 56: Fonction Giga Sound
Fonctions Fonction DJ BEAT | REMARQUES | ✎ Appuyez sur le bouton GOAL pour mixer le La fonction DJ Beat vous permet d’activer les fichier audio actuellement en lecture avec le fonctions d’effets sonores DJ. Le niveau de son GOAL. chaque effet est réglable. -
Page 57: Fonction +Panning
Fonction +PANNING | REMARQUES | ✎ Lorsque le fichier audio DANCE TIME se Il accroît la capacité des enceintes gauche et termine, le mode DANCE TIME passe en mode droite et produit un son qui s'apparente à un DANCE TIME OFF. déplacement sonore latéral. -
Page 58: Dépannage
énumérés ci-dessous ou si les directives fournies ne vous sont pas utiles, éteignez le produit, débranchez le cordon d'alimentation et communiquez avec le détaillant autorisé le plus près ou avec le centre de service électronique Samsung. Symptôme Vérification/Solution... -
Page 59: Caractéristiques Techniques
Sensibilité d'entrée AUX IN1 1.2V, AUX IN2 2.0V *: Spécification nominale - Samsung Electronics Co., Ltd se réserve le droit d'apporter des modifications aux spécifications sans préavis. - Les poids et les dimensions sont approximatifs. - Cette conception et ces spécifications techniques sont susceptibles d'être modifiées sans préavis. - Page 60 Comment contacter Samsung dans le monde Si vous avez des suggestions ou des questions concernant les produits Samsung, veuillez contacter le Service Consommateurs Samsung. Area Contact Centre Web Site Area Contact Centre Web Site AUSTRIA 0800 - SAMSUNG (0800 - 7267864) www.samsung.com/at/support...
- Page 61 MX-HS8000 PREMIUM HI-FI-componentsysteem gebruikershandleiding ongekende mogelijkheden Bedankt voor het aanschaffen van dit Samsung- product. Voor een uitgebreidere service kunt u uw product registreren op www.samsung.com/register...
- Page 62 Veiligheidsinformatie Waarschuwing DE BEHUIZING (OF ACHTERZIJDE) NIET VERWIJDEREN, OM HET GEVAAR OP ELEKTRISCHE SCHOKKEN TE VERMINDEREN. DIT APPARAAT BEVAT GEEN ONDERDELEN DIE DE GEBRUIKER ZELF KAN REPAREREN. LAAT ONDERHOUD OVER AAN GEKWALIFICEERD PERSONEEL. LET OP Dit symbool geeft aan dat er in het product sprake is van "gevaarlijke spanning"...
- Page 63 Voorzorgsmaatregelen • Plaats voor een goed stereogeluid de luidsprekers op een redelijke afstand aan weerskanten van het systeem. • Controleer of de stroomvoorziening in uw huis overeenkomt met die op de identificatiesticker • Plaats de luidsprekers in de richting van de aan de achterkant van het product.
- Page 64 Veiligheidsinformatie Compatibiliteit van schijf en Ondersteunde audio-indelingen indeling Bestandsextensie Audiocodec Bemonsteri n gsfrequenti e Bitrate Secure Media (DRM)-bestanden worden door dit 16KHz - 80Kbps ~ product niet ondersteund. MPEG 1 Layer3 48KHz 320Kbps Cd-r-schijven 16KHz - 80Kbps ~ *.mp3 MPEG 2 Layer3 48KHz 320Kbps • Afhankelijk van het opnameapparaat (cd-...
- Page 65 Bluetooth-apparaat verbreken kern leggen Inschakelen via Bluetooth gebruiken TV SoundConnect De Hi-Fi-component aansluiten op een fUNCTIES SoundConnect-compatibele Samsung-tv De tv loskoppelen van de Hi-Fi-component De weergavefunctie De Hi-Fi-component loskoppelen van de tv De weergavemodus wijzigen My Karaoke gebruiken...
- Page 66 Inhoud De timerfunctie De klok instellen De timer instellen De timer uitschakelen De opnamefunctie Basisopname Opnamesnelheid Speciale geluidseffecten De EQ-modus selecteren Functie VOETBALMODUS Functie GOAL GIGA SOUND-functie Functie BEAT WAVING Functie DJ BEAT Functie PANNING Functie NON-STOP MUSIC RELAY Functie DANCE TIME TEMPO-functie De functie Opstartgeluid BIjLAgE...
- Page 67 Aan de slag Voorpaneel & Knop VOLUME / DJ Scherm Knop +PANNING KNOP ACHTERUIT ZOEKEN/ OVERSLAAN Knop NON-STOP MUSIC RELAY Knop CD/Bluetooth USB 2 -aansluiting voor afspelen en USB-opname SCHIJFSLEUF Knop Afspelen/onderbreken Knop GIGA SOUND BEAT AUX IN 1-aansluiting Voor het aansluiten van een extern Knop TUNER/AUX apparaat, zoals een MP3-speler.
- Page 68 Aan de slag Achterpaneel 4 5 6 7 AUX IN 2-uitgangen Koelventilator 1. Gebruik een audiokabel (niet • De ventilator werkt terwijl het apparaat is bijgeleverd) voor het aansluiten van ingeschakeld. de AUX IN-aansluiting op het product Als u het apparaat instelt op het naar de audio-uitgang op een extern minimumvolume, zal de ventilator niet werken.
-
Page 69: Batterijen In De Afstandsbediening Plaatsen
Afstandsbediening MUTE (Het geluid tijdelijk uitschakelen. Druk opnieuw om het geluid opnieuw in te schakelen.) VOEDING BEAT WAVING Bluetooth TV SoundConnect USB REC REC SPEED TUNING MODE MO/ST TUNER/AUX +PANNING NON-STOP MUSIC RELAY DJ BEAT EFFECT LEVEL TEMPO SKIP SEARCH AFSPELEN/PAUZE REPEAT STOP... - Page 70 Aan de slag Toebehoren Controleer de onderstaande meegeleverde accessoires. Gebruiksaanwijzing Afstandsbediening/batterijen FM-antenne Netsnoer Toroïdale ferrietkern • Cijfers en illustraties in deze gebruikershandleiding dienen slechts ter referentie en kunnen afwijken van de werkelijke productvormgeving. De luidsprekers aansluiten Waarschuwingen bij het verplaatsen van de luidsprekers Aanbevolen opstelling van de luidsprekers.
- Page 71 De toroïdale ferrietkern aan het netsnoer bevestigen Het bevestigen van de toroïdale ferrietkern aan het netsnoer helpt RF-interferentie van radiosignalen te voorkomen. 1. Trek aan het bevestigingslipje van de toroïdale ferrietkern om deze te openen. 2. Maak met het netsnoer twee lussen rond de kern. Zie de onderstaande afbeelding.
- Page 72 Functies De weergavefunctie Een cd afspelen U kunt de functies zien die beschikbaar zijn op het Een compact disc afspelen scherm, de helderheid van het scherm aanpassen en het scherm/LED instellen op aan of uit. U kunt standaard cd's die geen adapter vereisen, afspelen.
- Page 73 Een nummer selecteren 3. Het volume regelen: • Draai aan de VOLUME-regeling op het U kunt het gewenste nummer selecteren terwijl de product. disc wordt afgespeeld. • Door op de knop VOL+ of VOL- op de Het vorige nummer afspelen afstandsbediening.
- Page 74 Functies Een bestand vanaf een USB-apparaat 2. Wanneer u de herhaalfunctie wilt stoppen, drukt u op de knop REPEAT tot "OFF" wordt selecteren weergegeven. • OFF: afspelen herhalen uitschakelen. U kunt een MP3-bestand selecteren terwijl het product bezig is met afspelen. • TRACK: het geselecteerde nummer | OPMERKINGEN | herhaald afspelen.
- Page 75 Snel zoeken gebruiken Lezen voordat u de USB- opslagapparaten aansluit U kunt tijdens het afspelen het gewenste gedeelte snel zoeken. • Sommige USB-apparaten zullen mogelijk niet Druk op de knop 3, 4. goed werken met dit product. • Telkens wanneer u op de knop drukt, gaat u • Dit product ondersteunt alleen externe HDD's die zijn geformatteerd in het FAT- snel vooruit/achteruit door de sectie.
- Page 76 Functies Snel nummers zoeken • Als u de schijf uitwerpt, wordt de cd- programmering geannuleerd. U kunt een nummer direct selecteren zonder de Als u het product uitschakelt, wordt de cd/ knop 1 , 2 . USB-programmering geannuleerd. CDDA/MP3-CD/USB | OPMERKINGEN | ✎...
- Page 77 • Er wordt een lijst van aangesloten scheidingswanden. apparaten weergegeven. - Het apparaat wordt blootgesteld aan 4. Selecteer "[Samsung] HI-FI XXXXXX" in de lijst. elektrische interferentie door apparatuur die • Wanneer het product is aangesloten op het dezelfde frequentie gebruikt, bijvoorbeeld...
- Page 78 Functies ✎ U kunt slechts één Bluetooth-apparaat ✎ De Bluetooth-verbinding kan worden verbroken tezelfdertijd koppelen. als in de Bluetooth-verbindingsmodus de afstand tussen de Hi-Fi-component en het ✎ Wanneer u Hi-Fi-component hebt uitgeschakeld Bluetooth-apparaat meer dan 5 meter is. en de koppeling wordt verbroken, zal de koppeling niet automatisch worden hersteld.
- Page 79 SoundConnect-compatibele Samsung-tv De tv loskoppelen van de Hi-Fi- Stel de functie SoundConnect of SoundShare component op uw Samsung-televisie op On voordat u deze functie activeert. U kunt de tv loskoppelen van de Hi-Fi-component. Raadpleeg de gebruiksaanwijzing van de tv voor 1.
- Page 80 Functies my Karaoke gebruiken functie Automatisch wijzigen U kunt de functie My Karaoke gebruiken om mee U kunt afwisselend afspelen van de schijf en de te zingen met uw favoriete cd's en USB-nummers. USB. 1. Sluit de microfoon aan op de MIC-aansluiting 1.
-
Page 81: De Klok Instellen
De timerfunctie 3. Zo selecteert u een station: • Houd de knop TUNING/ALBUM , of De klok instellen . op de afstandsbediening ingedrukt om automatisch te zoeken naar actieve zendstations. Bij elke stap hebt u een paar seconden de tijd om de gewenste opties in te stellen. - Page 82 Functies 3. De inschakeltijd instellen. 7. Druk op de knop ¬ . Resultaat: TIMER REC SET (Do you want to a. Druk op de knop TUNING/ALBUM , of record?) (Wilt u opnemen?) wordt weergegeven. . om de uren in te stellen. 8.
- Page 83 De timer uitschakelen USB 1 (Opnameapparaat is op USB 2) • Sluit het USB-apparaat met de bestanden Nadat u de timer hebt ingesteld, wordt deze die u wilt opnemen aan op de USB automatisch gestart. Wanneer deze wordt gestart, 1-aansluiting. verschijnt het bericht TIMER ON op het display.
- Page 84 Functies • Als een microfoon wordt aangesloten op ✎ Wanneer u de cd-functie voor snel zoeken het product en u op de knop USB REC gebruikt, is de functie voor cd-opname niet drukt, activeert u de MP3-opnamefunctie beschikbaar. en niet de kopieerfunctie. ✎...
- Page 85 Speciale geluidseffecten | OPMERKINGEN | ✎ Wanneer de Hi-Fi-component opneemt, wordt De EQ-modus selecteren de EQ-functie automatisch uitgeschakeld en is deze niet beschikbaar. Uw Hi-Fi-componentsysteem biedt vooraf ✎ Als niet binnen 8 seconden op een knop wordt gedefinieerde equalizerinstellingen die zijn gedrukt, worden de instellingen automatisch geoptimaliseerd voor een specifiek muziekgenre.
- Page 86 Functies Functie DJ BEAT | OPMERKINGEN | ✎ Druk op de knop GOAL om het geluidsbestand Met de functie DJ Beat kunt u de functies voor het dat momenteel wordt afgespeeld, te mixen met DJ-geluidseffect inschakelen. Het niveau van elk het GOAL-geluid.
- Page 87 Functie PANNING | OPMERKINGEN | ✎ Wanneer het geluidsbestand DANCE TIME vergroot de uitvoer van de linker- en rechterluidspreker klaar is met afspelen, wijzigt de modus DANCE afwisselend en laat het erop lijken alsof het geluid van TIME naar DANCE TIME OFF. de ene zijde naar de andere gaat.
- Page 88 Raadpleeg de onderstaande tabel als het product niet naar behoren functioneert. Als uw probleem niet wordt genoemd of als de onderstaande instructies niet helpen, schakelt u het product uit, haalt u de stekker uit het stopcontact en neemt u contact op met de dichtstbijzijnde erkende dealer of Samsung Electronics-servicecentrum.
- Page 89 - Raadpleeg het etiket dat aan het apparaat is bevestigd voor informatie over de stroomtoevoer en het stroomverbruik. Open Source Aankondiging Neem voor vragen en verzoeken met betrekking tot open source contact op met Samsung via e-mail (oss. request@samsung.com). • Hierbij verklaart Samsung Electronics dat deze apparatuur compatibel is met de essentiële vereisten en andere relevante bepalingen van Richtlijn 1999/5/EG.
- Page 90 Contact Samsung wereldwijd Wanneer u suggesties of vragen heeft met betrekking tot Samsung producten, verzoeken wij u contact op te nemen met de consumenten service- en informatie dienst van Samsung Area Contact Centre Web Site Area Contact Centre ...
- Page 91 MX-HS8000 PREMIUM HI-FI Kompaktanlage Bedienungsanleitung erleben sie die möglichkeiten Danke für den Kauf dieses Samsung Produkts. Registrieren Sie Ihr Produkt unter folgendem Link, und profitieren Sie von unserem umfassenden Kundenservice: www.samsung.com/register...
- Page 92 Sicherheitsinformationen Warnung ZUR VERMEIDUNG VON STROMSCHLÄGEN DARF DIESES GERÄT NICHT GEÖFFNET WERDEN. ES ENTHÄLT KEINE BAUTEILE, DIE VOM BENUTZER GEWARTET WERDEN KÖNNEN. LASSEN SIE REPARATUREN NUR VON QUALIFIZIERTEM FACHPERSONAL DURCHFÜHREN. ACHTUNG Dieses Symbol weist auf eine gefährliche Netzspannung" im Inneren des Geräts hin. Es besteht die Gefahr von Stromschlägen STROMSCHLAGGEFAHR! NICHT ÖFFNEN! und Verletzungen.
- Page 93 Vorsichtsmaßnahmen • Stellen Sie die Lautsprecher in einem geeigneten Abstand zu beiden Seiten des Geräts auf, um einen guten Stereoklang zu erzielen. • Stellen Sie sicher, dass die Stromversorgung in Ihrem Haus den auf der Rückseite Ihres Produkts • Richten Sie die Lautsprecher auf den Hörbereich angegebenen Anforderungen entspricht.
- Page 94 Sicherheitsinformationen Kompatible Disks und Formate Unterstützte Audioformate Dieses Produkt unterstützt keine Mediendateien, Dateierweiterung Audio Codec Samplingrate Bitrate die durch DRM (Digital Rights Management) 16KHz bis 80Kbps ~ geschützt sind. MPEG 1 Layer3 48KHz 320Kbps CD-RWs 16KHz bis 80Kbps ~ *.mp3 MPEG 2 Layer3 48KHz 320Kbps...
- Page 95 Netzkabel Einschalten des Geräts über Bluetooth TV SoundConnect FUNKTIONEN Herstellen einer Verbindung zwischen der Hi-Fi-Anlage und einem SoundConnect fähigen Samsung Fernsehgerät Das Display Trennen der Verbindung zwischen Ändern des Display Modus Fernsehgerät und Hi-Fi-Anlage Die DEMO Musik Funktion Verbindung zwischen Hi-Fi-Anlage und Abspielen einer CD Fernsehgerät trennen...
- Page 96 Inhalt Timer-Funktion Uhrzeit einstellen Timer einstellen Timer löschen Die Aufnahmefunktion Grundlegende Aufnahmefunktionen Aufnahmegeschwindigkeit Spezielle Klangeffekte Auswahl des EQ-Modus FOOTBALL MODE Funktion GOAL Funktion GIGA SOUND Funktion BEAT WAVING Funktion DJ BEAT Funktion +PANNING Funktion NON-STOP MUSIC RELAY Funktion DANCE TIME Funktion TEMPO Funktion Booting Sound Funktion ANHANG...
-
Page 97: Erste Schritte
Erste Schritte Vorderseite & VOLUME / DJ Taste Display +PANNING Taste RÜCKWÄRTSSUCHE/ÜBERSPRINGEN Taste NON-STOP MUSIC RELAY Taste CD/Bluetooth Taste USB 2 Anschluss für die Wiedergabe und USB-Aufnahme. DISK-Einschub WIEDERGABE/PAUSE Taste GIGA SOUND BEAT Taste TUNER/AUX Taste AUX IN 1 Anschluss Anschluss für externe Geräte wie z. -
Page 98: Rückseite
Erste Schritte Rückseite 4 5 6 7 AUX IN 2 Anschlüsse Lüfter 1. Verwenden Sie ein Audio-Kabel (nicht • Der Lüfter ist in Betrieb, wenn das Gerät mitgeliefert), um an den AUX IN 2 eingeschaltet ist. Anschluss dieses Geräts den Audio- Wenn das Gerät auf minimale Lautstärke Ausgang eines externen analogen eingestellt wird, dreht sich der Lüfter nicht. -
Page 99: Fernbedienung
Fernbedienung STUMM (Schaltet den Ton vorübergehend aus. Drücken Sie die Taste erneut, um den Ton wieder einzuschalten.) Stromversorgung BEAT WAVING Bluetooth TV SoundConnect USB AUFNAHME REC SPEED SENDERSUCHMODUS MO/ST TUNER/AUX +PANNING NON-STOP MUSIC RELAY DJ BEAT EFFECT LEVEL TEMPO ÜBERSPRINGEN SUCHE WIEDERGABE/PAUSE REPEAT... -
Page 100: Zubehör
Erste Schritte Zubehör Prüfen Sie, ob das nachfolgend aufgeführte Zubehör mitgeliefert wurde. Benutzerhandbuch Fernbedienung/Batterien UKW-Antenne Netzkabel Ferrit-Ringkern • Die Abbildungen in dieser Anleitung dienen nur als Referenz und können sich vom aktuellen Produkt unterscheiden. Anschließen der Lautsprecher Vorsichtsmaßnahmen beim Bewegen der Lautsprecher Empfohlene Lautsprecheraufstellung. -
Page 101: Anbringen Des Ferrit-Ringkerns Am Netzkabel
Anbringen des Ferrit-Ringkerns am Netzkabel Durch die Befestigung des Ferrit-Ringkerns am Netzkabel werden Störungen durch Radiofunksignale unterbunden. An der Verschlusslasche des Ferrit-Ringkerns ziehen, um diesen zu öffnen. Legen Sie mit dem Netzkabel zwei Schlaufen um den Ferritkern. Siehe nachfolgende Abbildung. Befestigen Sie den Ferrit Ringkern am Netzkabel, wie auf der nachfolgenden Abbildung dargestellt, und drücken Sie ihn zusammen, bis er einrastet. -
Page 102: Das Display
Funktionen Das Display Abspielen einer CD Sie können die verfügbaren Funktionen vom Display Einlegen einer Compact Disk ablesen, die Helligkeit des Displays einstellen und das Display/LED ein- oder ausschalten. Es können Standard Compact Disks abgespielt werden, die keinen Adapter erfordern. Ändern des Display Modus Legen Sie die Disk mit der bedruckten Seite Drücken Sie die DISPLAY/DEMO Taste am Gerät. -
Page 103: Auswahl Eines Titels
Auswahl eines Titels Einstellen der Lautstärke: • Drehen Sie den LAUTSTÄRKE Regler am Während der Wiedergabe können Sie einen Gerät. gewünschten Titel auswählen. • Drücken Sie die VOL+ oder VOL- Taste auf Wiedergabe des vorherigen Titels der Fernbedienung. Die Lautstärke kann auf eine von 31 Stufen Drücken Sie die 1 Taste innerhalb von 3 (VOLUME MIN, VOLUME 01 ~ VOLUME Sekunden, nachdem die Wiedergabe des... -
Page 104: Wiedergabe Von Usb-Geräten
Funktionen Eine Datei auf einem USB-Gerät Wenn Sie die Wiederholfunktion beenden möchten, auf die REPEAT Taste drücken, bis auswählen "OFF" angezeigt wird. • OFF : Beendet die wiederholte Wiedergabe. Sie können während der Wiedergabe eine MP3- Datei auswählen. • TRACK : Die Wiedergabe des | HINWEISE | ausgewählten Titels wird wiederholt. -
Page 105: Schneller Vor- Und Rücklauf
Schneller Vor- und Rücklauf Lesen Sie diesen Abschnitt, bevor Sie USB-Speichergeräte anschließen. Sie können während der Wiedergabe den gewünschten Abschnitt schnell suchen. • Einige USB-Geräte funktionieren eventuell nicht Die 3, 4 Taste drücken. einwandfrei mit diesem Gerät. • Jedes Mal, wenn die Taste gedrückt wird, wird • Von diesem Gerät werden nur externe der Abschnitt schnell vorwärts oder rückwärts Festplatten unterstützt, die im FAT Dateisystem... -
Page 106: Schnelle Titelsuche
Funktionen Schnelle Titelsuche • Wenn Sie die Disk auswerfen, wird die CD- Programmierung abgebrochen. Sie können einen Titel direkt, ohne die 1 , 2 Taste. Wenn Sie das Gerät abschalten, wird die CD/USB-Programmierung abgebrochen. CDDA/MP3-CD/USB | HINWEISE | Drücken Sie die SEARCH Taste. ✎... -
Page 107: Bluetooth
• Es wird eine Liste der erkannten Geräte Funknetzwerke. angezeigt. • Um eine Verbindung zwischen der Hi-Fi-Anlage Wählen Sie "[Samsung] HI-FI XXXXXX" aus und einem Bluetooth-Gerät herzustellen, der Liste. müssen sich diese Geräte nah beieinander • Wenn die Hi-Fi-Anlage mit dem Bluetooth- befinden. -
Page 108: Trennen Der Verbindung Zwischen
Funktionen ✎ Es kann nur eine Verbindung zu einem ✎ Die Bluetooth-Verbindung wird unterbrochen, Bluetooth-Gerät hergestellt werden. wenn der Abstand zwischen der Hi-Fi-Anlage ✎ Nachdem die Hi-Fi-Anlage ausgeschaltet und und dem verwendeten Bluetooth-Gerät mehr die Verbindung unterbrochen wurde, wird nach als 5 m beträgt. -
Page 109: Tv Soundconnect
Mithilfe der TV SoundConnect Funktion können Sie den Ton Ihres SoundConnect fähigen ✎ Um ein anderes Fernsehgerät im TV Samsung Fernsehgeräts über den die Hi-Fi- SoundConnect Modus anzuschließen, die Anlage wiedergeben. Taste für mehr als 5 Sekunden drücken und anschließend die Verbindung zu dem anderen... -
Page 110: My Karaoke Verwenden
Funktionen my Karaoke verwenden Automatisches Wechseln der Wiedergabequelle Sie können die My Karaoke Funktion nutzen, um mit Ihren lieblings CD- und USB-Titeln mitzusingen. Sie können zyklisch zwischen der Disk- und USB- Wiedergabe umschalten. Schließen Sie das Mikrofon an den Mikrofonanschluss auf der Vorderseite des Drücken Sie die AUTO CHANGE Taste, um Geräts an. -
Page 111: Gespeicherten Sender Auswählen
Timer-Funktion Wählen Sie einen Sender wie folgt aus: • Drücken Sie und halten Sie die TUNING/ ALBUM , oder . Taste auf der Uhrzeit einstellen Fernbedienung gedrückt, um automatisch nach aktiven Rundfunkstationen zu suchen. Bei jedem Schritt haben Sie einige Sekunden Zeit, um die erforderlichen Optionen einzustellen. - Page 112 Funktionen Einstellten der Einschaltzeit: Drücken Sie die ¬ Taste. Ergebnis: TIMER REC SET (Wohlen Sie die a. Drücken Sie die TUNING/ALBUM , Aufnahme starten?) wird angezeigt. oder . Taste, um die Stunde einzustellen. Drücken Sie die ¬ Taste. b. Drücken Sie die ¬ Taste. Ergebnis: Es wird REC SET YES/NO Ergebnis: Die Minutenanzeige blinkt.
-
Page 113: Timer Löschen
Timer löschen USB 1 (Das Aufnahmegerät befindet sich an USB 2) Nachdem Sie den Timer eingestellt haben, wird • Schließen Sie das USB-Gerät mit den er automatisch gestartet. Wenn der Timer startet, Dateien die Sie aufnehmen möchten an erscheint die TIMER ON Meldung auf dem Display. den Anschluss USB 1 an. -
Page 114: Aufnahmegeschwindigkeit
Funktionen • Wenn ein Mikrofon an das Gerät ✎ Wenn Sie die CD Schnellsuchfunktion verwenden, ist CD Aufnahme nicht verfügbar. angeschlossen ist und Sie die USB REC Taste drücken, wird die MP3- ✎ Bei einigen USB-Geräten kann die Aufnahmefunktion, nicht die Kopierfunktion Aufnahmezeit länger sein. -
Page 115: Spezielle Klangeffekte
Spezielle Klangeffekte | HINWEISE | ✎ Wenn die Hi-Fi-Anlage aufnimmt, wird die EQ- Auswahl des EQ-Modus Funktion automatisch ausgeschaltet und ist nicht verfügbar. Ihre Hi-Fi-Anlage stellt voreingestellte Equalizer- ✎ Wenn innerhalb von 8 Sekunden keine Taste Einstellungen bereit, die für bestimmte Musikarten gedrückt wird, werden Ihre Einstellungen optimiert sind. -
Page 116: Giga Sound Funktion
Funktionen DJ BEAT Funktion | HINWEISE | ✎ Drücken Sie die GOAL Taste, um die gerade Mithilfe der DJ Beat Funktion könne Sie die DJ abgespielte Klangdatei mit dem GOAL Klang Klangeffektfunktionen einschalten. Der Pegel ist zu mischen. für jeden Effekt einstellbar. GIGA SOUND Funktion Drücken Sie die DJ BEAT Taste auf der Fernbedienung oder am Gerät. -
Page 117: Panning Funktion
+PANNING Funktion | HINWEISE | ✎ Wenn die Wiedergabe der DANCE TIME Erhöht und erniedrigt die Lautstärke abwechselnd Sound-Datei beendet ist, wird der DANCE am linken und rechten Lautsprecher, um den TIME Modus auf DANCE TIME OFF geschaltet. Eindruck zu erwecken, dass der Ton von einer ✎... -
Page 118: Fehlerbehebung
Konsultieren Sie untenstehende Liste, wenn die Hi-Fi-Anlage nicht ordnungsgemäß funktioniert. Falls ihr Problem unten nicht aufgelistet oder die Problemlösung nicht hilfreich ist, das Gerät abschalten, den Netzstecker ziehen und setzen Sie sich mit dem nächstgelegenen autorisierten Händler oder dem Samsung Electronics-Servicecenter in Verbindung. Symptom Überprüfen/Beheben Die Disk wird nicht ausgeworfen. -
Page 119: Technische Daten
AUX IN1 1.2V, AUX IN2 2.0V *: Nominelle Spezifikation - Samsung Electronics Co., Ltd behält sich das Recht auf unangekündigte Änderungen vor. - Gewicht und Abmessungen können von den Angaben abweichen. - Das Design und die Technischen Daten können ohne vorherige Ankündigung geändert werden. - Page 120 Kontakt zu Samsung Falls Sie Fragen oder Anregungen zu Samsung-Produkten haben, freuen wir uns über Ihre Kontaktaufnahme mit der Samsung-Kundenbetreuung. Area Contact Centre Web Site Area Contact Centre Web Site AUSTRIA 0800 - SAMSUNG (0800 - 7267864) www.samsung.com/at/support 080 697 267 www.samsung.com/si/...
Need help?
Do you have a question about the MX-HS8000 and is the answer not in the manual?
Questions and answers