
Related Manuals for SilverStone CS280


Summary of Contents for SilverStone CS280
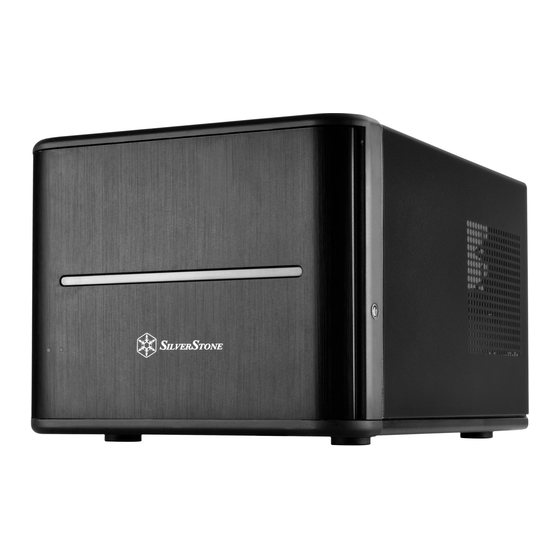
- Page 1 Case Storage Series CS280 Premium 8-bay 2.5" small form factor NAS chassis...
-
Page 2: Table Of Contents
The following manual and guides were carefully prepared by the SilverStone engineering team to help you maximize the potential of your SilverStone product. Please keep this manual for future reference when upgrading or performing maintenance on your system. A copy of this manual can also... -
Page 3: Product Overview
PCB designed to support both SATA and SAS interface for increased compatibly with nearly all modern hard drives or SSDs. At only 11.8 liters overall, the impressively small CS280 is perfect for anyone looking to build a beautiful and even portable small form factor NAS for home or office. -
Page 4: Disassemble Chart
Case Storage Series CS280 Disassemble Chart SFX PSU(OPTION) TOP COVER 2.5"HDD x 8 HDD CAGE USB3.0 + SPK + MIC MINI-ITX(OPTION) 2.5"HDD x 1 POWER LED POWER BUTTON HDD LED RESET BUTTON FAN FILTER PICTURE ITEM PURPOSE RUBBER-E-FEET PAD SCREW C 632*5... -
Page 5: Exterior Overview
Case Storage Series CS280 Exterior Overview LEFT SIDE FRONT RIGHT SIDE BACK BOTTOM... - Page 6 Case Storage Series CS280 Installation Chart Before you begin, please make sure that you have all components collected check that all components do not have compatibility problems with each other or with the case if possible, assemble the components outside the case first to make sure they are working keep the motherboard manual ready for reference during installation prepare a Philips screwdriver.
- Page 7 Case Storage Series CS280 Installation Chart Install memory, CPU cooler, and SATA cables onto the motherboard first. Then install the motherboard through the side of the case and connect front I/O, fans, and power supply cables to it. Installieren Sie zunächst Speicher, CPU-Kühler und SATA-Kabel am Motherboard. Installieren Sie dann das Motherboard durch die Gehäuseseite und schließen Sie frontseitige Ein-/Ausgänge, Lüfter- und Netzteilkabel an.
- Page 8 Case Storage Series CS280 Installation Chart Install power supply as shown. Installieren Sie das Netzteil wie abgebildet. Installez l'alimentation comme indiqué. Instale la fuente de alimentación como se muestra. Installare l'alimentatore come mostrato. Установите блок питания как показано. 將電源按圖示方向安裝。 将电源按图示方向安装。...
- Page 9 Case Storage Series CS280 Installation Chart Please remove the screws holding the expansion card slot cover, and remove it. Bitte entfernen Sie die Schrauben der Expansionssteckplatzabdeckungen und entfernen Sie sie. Veuillez retirer les vis fixant les equerres des emplacements d’extension, puis retirez-les selon vos besoins.
- Page 10 Case Storage Series CS280 Installation Chart Install your graphics card or expansion card. Installieren Sie Ihre Grafik- oder andere Expansionskarte. Installez vos cartes graphiques ou d’extensions. Instale su tarjeta grafica o tarjeta de expansion. Installare la scheda grafica o la scheda di espansione.
- Page 11 Case Storage Series CS280 Installation Chart Reinstall the expansion card slot cover and secure with screws. Installieren Sie die Expansionssteckplatzabdeckung wieder und befestigen Sie sie mit Schrauben. Reinstallez la fixation des equerries et fixez-le avec des vis. Reinstale la cubierta del zocalo de la tarjeta de expansion y fijela con tornillos.
- Page 12 Case Storage Series CS280 Installation Chart Remove 2.5" drive trays, install drives onto them and reinstall back into the drive bracket. Entfernen Sie die 2,5-Zoll-Laufwerksschächte, installieren Sie die Laufwerke in ihnen und bringen Sie sie wieder in der Laufwerkshalterung an.
- Page 13 Case Storage Series CS280 Installation Chart Remove 2.5" drive trays, install drives onto them and reinstall back into the drive bracket, lockdown with key if needed and close the front door. Entfernen Sie die 2,5-Zoll-Laufwerkseinsätze, installieren Sie Laufwerke in ihnen und installieren Sie sie wieder in der Laufwerkshalterung;...
- Page 14 Case Storage Series CS280 Installation Chart Connect all remaining cables and reinstall side panels to complete installation. Verbinden Sie alle restlichen Kabel und bringen Sie zum Abschließen der Installation die Seitenblenden wieder an. Raccordez tous les câbles restants et remontez les panneaux latéraux pour terminer l'installation.
-
Page 15: Guide To Hard Drive Backplane
Case Storage Series CS280 Guide to hard drive backplane 1.Insert two 4pin peripheral connectors into the corresponding plugs on the backplane. 2.Connect the SAS/SATA ports on the backplane to corresponding SAS/SATA ports on the motherboard or expansion card with SAS/SATA cables. -
Page 16: Installation Guide
Case Storage Series CS280 Connector Definition (1) Front Panel Connectors A.Power switch and reset switch installation guide: Please refer to the motherboard manuals for the motherboard’s “Front Panel Connector” or “System Panel Connector” pin definitio Power switch and reset switch have no polarity, so they can be connected in any orientation. - Page 17 Case Storage Series CS280 Connector Definition B:LED indicators installation guide Please refer to the motherboard manuals for the motherboard’s “Front Panel Connector ” or “System Panel Connector” pin definition.; the white/black wires are negative while other colors are positive wires. The Power LED wires are separate pins for compatibility with different motherboard pin definition so please make sure they are connected in the right polarity by referring to your motherboard manual.
- Page 18 A continuación tiene la definición de pines de los conectores frontales de E/S, también debe consultar el manual de su placa base para c omprobar la referencia de los pines para E/S frontales. Los conectores de E/S de SilverStone son de bloque para simplificar la instalación.
-
Page 19: Component Size Limitations
Case Storage Series CS280 Component Size Limitations Height limitation for CPU cooler is 65mm with 7mm clearance over the motherboard’s top edge. Höhenbeschränkung für CPU-Kühler 65 mm mit einem Freiraum von 7 mm oberhalb der Motherboard-Oberkante. La limitation de hauteur des refroidisseurs de processeurs est 65mm avec un espace de 7mm au-dessus du bord supérieur de la carte mere. - Page 20 CS280 is compatible with SFX up to 100mm deep. CS280 ist kompatibel mit SFX-Netzteilen mit einer Tiefe bis 100 mm. Le CS280 est compatible avec les alimentations SFX jusqu'à 100 mm de profondeur. La CS280 es compatible con FA SFX de hasta 100mm de profundidad.
- Page 21 El CS280 acepta una tarjeta de expansión de perfil bajo de hasta 8,66 pulgadas (220mm) y una anchura de hasta 60.75mm. CS280 supporta schede di espansione a basso profilo fino a 8,66" (220 mm) di lunghezza e fino a 60.75 mm di larghezza.
-
Page 22: Warranty Information
2. Under warranty, SilverStone Technology’s maximum liability is limited to the current market value for the product (depreciated value, excluding shipping, handling, and other fees). SilverStone Technology is not responsible for other damages or loss associated with the use of product. - Page 24 NO:G11226800...
Need help?
Do you have a question about the CS280 and is the answer not in the manual?
Questions and answers