
Related Manuals for switel M 300


Summary of Contents for switel M 300
- Page 1 Mobiltelefon Téléphone mobil Telefono cellulare M 300 Cellular telephone Bedienungsanleitung Mode d’emploi Istruzioni per l’uso Operating Instructions...
- Page 2 Wichtiger Hinweis Ihr M 300 wird ohne eine SIM-Karte geliefert. Diese ist notwendig, um mit dem Mobiltelefon zu telefonieren. Erstes Einschalten des Telefons Nach dem Einlegen der SIM-Karte drücken Sie die Auflegetaste für ca. 3 s. Geben Sie ggf. die PIN1 („SIM-PIN“ oder „Provider-PIN“...
-
Page 3: Table Of Contents
Inhaltsverzeichnis 1 Sicherheitshinweise ........2 Bestimmungsgemäße Verwendung, Anwendungsbereich, Allgemeine Hinweise, Netzteil, Akkus, Entsorgung 2 Telefon in Betrieb nehmen . -
Page 4: Sicherheitshinweise
Sicherheitshinweise 1 Sicherheitshinweise Lesen Sie diese Bedienungsanleitung sorgfältig durch. Bestimmungsgemäße Verwendung Dieses Telefon ist geeignet für das Telefonieren innerhalb eines Mobil- telefonnetzes. Jede andere Verwendung gilt als nicht bestimmungsge- mäß. Eigenmächtige Veränderungen oder Umbauten sind nicht zuläs- sig. Öffnen Sie das Gerät in keinem Fall selbst und führen Sie keine eigenen Reparaturversuche durch. - Page 5 Sicherheitshinweise die Leistung beeinträchtigen können. • Halten Sie Ihr Telefon und seine Zubehörteile außerhalb der Reich- weite von Kindern. • Die SIM-Karte kann entnommen werden. Vorsicht! Kleinkinder könnten diese verschlucken. • Der Rufton wird über den Lautsprecher wiedergegeben. Nehmen Sie zuerst den Anruf an und halten Sie dann das Telefon an das Ohr.
- Page 6 Sicherheitshinweise Netzteil Achtung: Verwenden Sie nur das mitgelieferte Steckernetzteil, da andere Netzteile das Telefon beschädigen können. Versperren Sie den Zugang zum Steckernetzteil nicht durch Möbel oder andere Gegenstände. Akkus Achtung: Werfen Sie Akkus nicht ins Feuer. Verwenden Sie nur den mitgelieferten Akku oder Akkus des gleichen Typs! Entsorgung Wollen Sie Ihr Gerät entsorgen, bringen Sie es zur Sam- melstelle Ihres kommunalen Entsorgungsträgers...
-
Page 7: Telefon In Betrieb Nehmen
Telefon in Betrieb nehmen 2 Telefon in Betrieb nehmen Sicherheitshinweise Achtung: Lesen Sie vor der Inbetriebnahme unbedingt die Sicherheitshinweise in Kapitel 1. Verpackungsinhalt prüfen Zum Lieferumfang gehören: • 1 Mobiltelefon M300 • 1 Ladegerät • 1 Gehäusedeckel mit Einlegekarte • 1 Akkupack •... - Page 8 Telefon in Betrieb nehmen Legen Sie dann den Akku wie nebenste- hend abgebildet in das Fach (Schrift oben/Metallkontakte unten links). Entnehmen Sie die beschriftbare Karte aus dem Deckel und notieren Sie ggf. die Bele- gung der Schnellwahltasten, Ihre eigene Rufnummer und die Rufnummer der Per- son, die in einem Notfall benachrichtigt werden soll.
- Page 9 Telefon in Betrieb nehmen Headset anschließen (nicht im Lieferumfang) Das Headset muss über einen 3-poligen 2,5 mm-Stecker verfügen, der in die vorge- sehen Buchse an der linken Seite des Gerätes gesteckt wird. Achtung: Verwenden Sie nur kompatible Headsets. Fragen Sie im Zweifelsfall Ihren Händler.
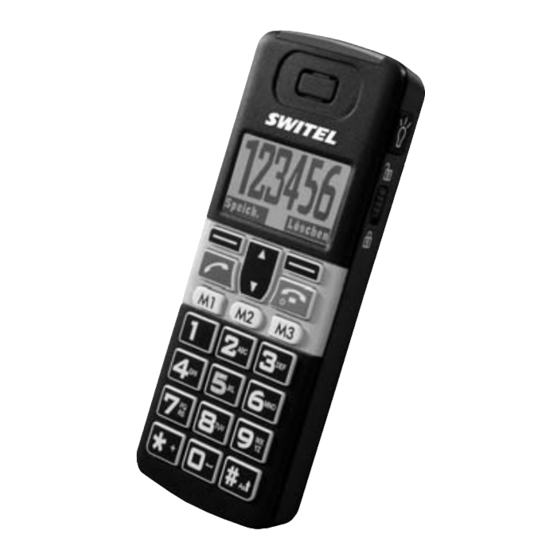
- Page 10 Telefon in Betrieb nehmen Bedienelemente Optische Anrufanzeige Ösen zur Befesti- Taschenlampe gung eines Trage- bandes Pfeiltasten (œ/ƒ): - Zum Einstellen der Hörer Lautstärke Hörer / Softkeys Lautsprecher (links/rechts): - Zum Bewegen in - Auslösen der im Listen, Menüs und Display darüber Einstellungen angezeigten Funk- - Im Bereitschafts-...
- Page 11 Telefon in Betrieb nehmen Achtung: Das Licht wird durch eine Hochleistungs-LED erzeugt. Leuchten Sie niemals direkt in Augen oder optische Geräte. Symbole im Display 1 - Linker Softkey im Bereitschaftszustand: Öffnet das Hauptmenü. 2 - Rechter Softkey im Bereitschaftszustand: Öffnet das SMS-Menü. Die Softkeys verändern je nach Betriebszustand ihre Funktion.
-
Page 12: Telefon Benutzen
Cursor zu bewegen und Löschen, um Zeichen zu löschen. Telefon aus-/einschalten Ausschalten: Drücken und halten Sie die Auflegetaste , bis das Switel-Logo erscheint. Nach kurzer Zeit wird das Display dunkel. Einschalten: Drücken und halten Sie die Auflegetaste , bis die Displaybeleuchtung eingeschaltet wird. - Page 13 Telefon benutzen Taschenlampe benutzen Drücken und halten Sie den mit markierten Tastschalter. Sie können die Taschenlampe auch auf „Dauerlicht“ schalten (Menü -> Dauertaschenlampe -> Ein). Achtung: Das Licht wird durch eine Hochleistungs-LED erzeugt. Leuchten Sie niemals direkt in Augen oder optische Geräte. ☞...
-
Page 14: Anruf Annehmen
Telefon benutzen Einen Anruf annehmen Wenn Ihr Telefon klingelt, drücken Sie die Gesprächstaste. Drücken Sie Ruhe, um den Tonruf für diesen Anruf abzuschal- oder ten. Sie können den Anruf weiterhin annehmen, solange der Anrufer nicht aufgelegt hat. Drücken Sie Abweisen, um den Anruf abzuweisen. Der Anrufer oder erhält den Besetztton (abhängig vom Netzbetreiber). - Page 15 Telefon benutzen Ein Konferenzgespräch aufbauen „Konferenz“ ist ein Netz-Leistungsmerkmal, das mehrere Teilnehmer gleichzeitig miteinander telefonieren lässt (abhängig vom Netzbetrei- ber). 1. Rufen Sie den ersten Teilnehmer an. 2. Drücken Sie Halten, um das Gespräch „in die Warteschleife“ zu legen. 3. Rufen Sie den zweiten Teilnehmer an. 4.
- Page 16 Telefon benutzen Einen neuen Telefonbucheintrag anlegen Drücken Sie ƒ um das Telefonbuch zu öffnen. Drücken Sie Auswahl, wählen Sie Neu und drücken Sie Wäh- len. Wählen Sie, ob der Eintrag im Telefon oder auf der SIM- Karte gespeichert werden soll. Geben Sie den Namen ein und drücken Sie anschließend Wei- ter.
-
Page 17: Anrufliste
Telefon benutzen Alle Telefonbucheinträge löschen Drücken Sie Menu -> Telefonbuch -> Alles löschen. Wählen Sie, ob die Einträge im Telefon oder auf der SIM-Karte gelöscht werden sollen und bestätigen Sie Ihre Wahl. Alle Telefonbucheinträge kopieren Drücken Sie Menu -> Telefonbuch -> Alles kopieren. Wählen Sie, ob die Einträge von der SIM-Karte zum Telefon oder vom Telefon auf die SIM-Karte kopiert werden sollen und bestätigen Sie Ihre Wahl. - Page 18 Telefon benutzen len. Wählen Sie Gesprächsdauer, wird die Dauer des letzten Gesprächs angezeigt. Befindet sich das Telefon im Bereitschaftszustand: oder Drücken Sie die Gesprächstaste um die angenommenen Anrufe , die gewählten Gespräche und die verpassten Anrufe anzusehen. Hinweis: Haben Sie innerhalb der Liste einen Eintrag ausge- wählt, drücken Sie Auswahl und wählen aus den folgenden Möglichkeiten: - Einzelheiten: Einzelheiten zu dem Eintrag werden angezeigt.
- Page 19 Telefon benutzen - Neu: Sie können eine neue SMS schreiben. - Posteingang: Öffnet die Liste der empfangenen SMS. - Postausgang: Öffnet die Liste der gesendeten SMS. - Entwürfe: Zugang zur Liste der Entwürfe. - Nachrichteneinstellungen: Zugang zu verschiedenen Einstel- lungen. - Verwendeter Speicher: Anzeige des Speicherplatzes intern (Telefon) und auf der SIM-Karte.
- Page 20 Telefon benutzen Nachrichten lesen Drücken Sie SMS, wählen Sie Posteingang und drücken Sie Wählen. Wählen Sie mit œ/ƒ eine eingegangene Nachricht aus. Drücken Sie Wählen, um die Nachricht anzuzeigen. Lesen Sie den Text sowie Datum und Uhrzeit des Empfangs. Nach Drücken von Auswahl haben Sie folgende Möglichkeiten: - Löschen: Sie können die SMS löschen.
- Page 21 Telefon benutzen - Nachrichtenzentrum, um die Nummer des Nachrichtenzen- trums einzugeben. Hinweis: Das Telefon übernimmt die Nummer des Nachrich- tenzentrums von der SIM-Karte. Sollte hierbei ein Fehler auf- getreten sein, können Sie die Rufnummer selbst eingeben. - Nachrichtengültigkeit (Dauer der Speicherung der SMS / abhängig vom Netzbetreiber) - Statusbericht (Sendebestätigung / abhängig vom Netzbetrei- ber)
-
Page 22: Telefon Einstellen
Telefon einstellen 4 Telefon einstellen Sie können verschiedene Einstellungen für Ihr Telefon vornehmen sowie den Auslieferungszustand wieder herstellen. Drücken Sie Menü, wählen Sie Einstellungen und drücken Sie Wäh- len. Sie haben folgende Möglichkeiten: Telefoneinstellungen - Sprache: Sie können die Displaysprache auswählen. - Displayeinstellungen: Sie können den Displaykontrast, die Hintergrundbeleuchtung und das Idle Display (Anzeige im Bereitschaftszustand) einstellen. -
Page 23: Antworten Mit Jeder Taste
Telefon einstellen - Uhrenart: Sie können auswählen, wie die Uhrzeit im Bereit- schaftsdisplay angezeigt wird (Analog oder Digital). - Weltzeit: Sie können eine zweite Zeitzone einstellen. Netzeinstellungen (abhängig vom Netzbetreiber) - Anklopfen: Ist Anklopfen aktiviert, können Sie während eines Gesprächs ein zweites „anklopfendes“ Gespräch mit der Gesprächstaste annehmen. -
Page 24: Taschenlampe
Telefon einstellen Klingeltonlautstärke, Tastenlautstärke, Vibrator und Weckton verändern und diesen Profilen einen neuen Namen geben. Wecker Sie können 3 verschiedene Alarmzeiten einstellen, die einmalig oder wiederkehrend an einem oder mehreren Wochentagen ertönen sollen. Ertönt das das Wecksignal, schalten Sie es mit Löschen aus. Soll der Alarm nach 5 Minuten erneut gegeben werden, drücken Sie stattdessen Snooze. - Page 25 Anhang 5 Anhang Fehlersuche Haben Sie Probleme mit Ihrem Telefon, kontrollieren Sie zuerst die fol- genden Hinweise. Bei technischen Problemen können Sie sich an unsere Service-Hotline unter Tel. 0900 00 1675 innerhalb der Schweiz (Kosten Swisscom bei Drucklegung: CHF 2.60/min) wenden. Bei Garan- tieansprüchen wenden Sie sich an Ihren Fachhändler.
-
Page 26: Anhang
Anhang bzw. das Guthaben ist aufgebraucht. Sie können trotzdem die Notrufnummer wählen. Wie kann die Empfangsqua- Wenn das Signal schwach ist, versuchen Sie an lität verbessert werden? einem anderen Ort das Gespräch aufzubauen oder fortzusetzen, innerhalb eines Gebäudes gehen Sie zum Fenster. -
Page 27: Garantie
Sollte Ihr Gerät dennoch einen Defekt innerhalb der Garantiezeit aufwei- sen, wenden Sie sich bitte unter Vorlage Ihrer Kaufquittung ausschliess- lich an das Geschäft, in dem Sie Ihr SWITEL-Gerät gekauft haben. Alle Gewährleistungsansprüche nach diesen Bestimmungen sind aus- schliesslich gegenüber Ihrem Fachhändler geltend zu machen. Nach Ablauf von zwei Jahren nach Kauf und Übergabe unserer Produkte kön-... - Page 28 Anhang Stichwortverzeichnis Akku ....4, 5, 6 Garantie ....25 Anklopfen .
- Page 29 Anhang Wahlwiederholung ..11 Schnellwahltaste ... .15 Wecker ....22 Sicherheitseinstellungen .
-
Page 30: Information Importante
Information importante Votre M 300 est livré sans carte SIM. Celle-ci est nécessaire pour pouvoir téléphoner avec votre téléphone mobile. Première mise en marche du téléphone Après avoir inséré la carte SIM appuyez pour 3 sec sur le bouton Touche de raccroché... - Page 31 Table des matières 1 Consignes de sécurité ....... . .2 Utilisation conforme aux prescriptions, Domaine d’emploi, Généralités, Bloc secteur, Piles rechargeables, Élimination 2 Mettre votre téléphone en service .
-
Page 32: Consignes De Sécurité
Consignes de sécurité 1 Consignes de sécurité Lisez très attentivement ce mode d’emploi. Utilisation conforme aux prescriptions Ce téléphone est adéquat pour téléphoner à l’intérieur d’un réseau de télé- phonie mobile. Toute autre utilisation est considérée comme non conforme à l’usage. - Page 33 Consignes de sécurité • Sur tous les téléphones portatifs, il peut y avoir des interférences pouvant altérer la performance. • Maintenez votre téléphone et ses accessoires hors de portée des enfants. • La carte SIM peut être retirée. Attention ! Les petits enfants peuvent éventuellement l’avaler. •...
-
Page 34: Piles Rechargeables
Consignes de sécurité Bloc secteur Attention: N’utilisez que le bloc secteur fourni avec l’appareil, d’autres pouvant endommager votre téléphone. Ne bloquez pas l’accès au bloc secteur par des meubles ou d’autres objets. Piles rechargeables Attention: Ne jetez jamais les piles rechargeables dans le feu. N’utilisez que des piles rechargeables du même type ! Élimination Si vous ne voulez plus vous servir de votre appareil, veuillez... -
Page 35: Mettre Votre Téléphone En Service
Mettre votre téléphone en service 2 Mettre votre téléphone en service Remarques concernant la sécurité Attention: Avant de mettre votre appareil en service, lisez impé- rativement les consignes de sécurité mentionnées au chapitre 1. Vérifier le contenu de l’emballage Les éléments suivants font partie de la livraison : •... - Page 36 Mettre votre téléphone en service Insérez ensuite la batterie comme l’indique la figure ci-contre (écriture vers le haut/contacts métalliques en bas à gauche) Enlevez le carton inscriptible du couvercle et notez éventuellement l'occupation des touches de numérotation abrégée, votre propre numéro d'appel et le numéro d'appel des personnes à...
- Page 37 Mettre votre téléphone en service Connecter le casque (non fourni) Le casque doit disposer d’une fiche tripolaire de 2,5 mm qui se branche sur la prise qui se trouve à gauche du boîtier de l'appareil. Attention: N’utilisez que des casques compatibles. Dans le doute, demandez conseil à...
- Page 38 Mettre votre téléphone en service Equipement Indicateur visuel d'appel Lampe de poche Œillet de fixation Touche vers le haut / Écouteur vers le bas (œ/ƒ): Touches sensibles - Pour régler le volume (gauche/droite): du combiné / du - - Validation des haut-parleur fonctions affichées - pour vous déplacer...
- Page 39 Mettre votre téléphone en service Attention: La lumière est générée par un LED puissant. Evitez le contact direct avec les yeux ou avec les appareils optiques. Icônes à l’écran 1 - Touche de gauche en mode veille : Ouvre le menu principal 2 - Touche de droite en mode veille : Ouvre le menu SMS.
-
Page 40: Utiliser Le Téléphone
Allumer et éteindre le combiné Eteindre : Maintenez enfoncée la touche qui sert à raccrocher , jusqu'à ce que le logo Switel s'affiche. Après un court instant, l’écran devient som- bre. Allumer : Maintenez enfoncée la touche qui sert à raccrocher , jusqu'à... - Page 41 Utiliser le téléphone Utilisez la lampe de poche Maintenez enfoncée la touche marquée Vous pouvez également allumer la lampe de poche de manière « permanen- te » ( Menu -> Lumiére permanente -> Marche ). Attention: La lumière est générée par un LED puissant. Evitez le contact direct avec les yeux ou avec les appareils optiques.
- Page 42 Utiliser le téléphone Prendre un appel Lorsque votre téléphone sonne, appuyez sur la touche d’appel. Appuyez sur Silence, pour arrêter la sonnerie. Vous pouvez continuer à accepter la communication tant que l'appelant n'a pas raccroché Appuyez sur Refusé, pour refuser la communication. L’appelant entend le signal occupé...
-
Page 43: Mute
Utiliser le téléphone Préparer une conférence « Conférence » est une caractéristique de réseau qui permet à plusieurs appelants de participer à une même communication (dépendant de l’opéra- teur). 1. Appeler le premier participant. 2. Appuyez sur Attente pour mettre la communication « en attente ». 3. -
Page 44: Telefonbuch
Utiliser le téléphone Créer une nouvelle entrée dans le répertoire Appuyez sur ƒ pour ouvrir le répertoire. Appuyez sur Options, choisissez Nouveau et appuyez sur Sélect.. Sélectionnez si le nouveau contact doit être sauvegardé sur le télé- phone ou sur la carte SIM. Entrez le nom, puis appuyez sur Suivant. - Page 45 Utiliser le téléphone Supprimer toutes les entrées du répertoire Appuyez sur Menu -> Répertoire -> Supprimer tout. Choisissez si les contacts doivent être sauvegardés sur le téléphone ou sur la carte SIM et validez votre choix. Copier tous les contacts du répertoire Appuyez sur Menu ->...
- Page 46 Utiliser le téléphone Appuyez sur la touche d’appel pour consulter les appels reçus , les communications sélectionnées et les appels manqués Consigne : Si vous avez sélectionné une entrée figurant dans la liste d’appel, appuyez sur Options et faites votre choix parmi les possibili- tés suivantes : - Détails : Des détails concernant l’entrée sont affichés.
- Page 47 Utiliser le téléphone la mémoire de la carte SIM. - Tout supprimer : Tous les SMS sons effacés. Ecrire et envoyer un SMS Appuyez sur SMS, choisissez Nouveau et appuyez sur Sélect.. Rédi- gez votre SMS à l’aide du clavier à chiffres. Voir « Généralités sur l'uti- lisation du téléphone », pour plus d'informations concernant la saisie de texte.
- Page 48 Utiliser le téléphone Lire message Appuyez sur SMS, choisissez Boîte d’app. entrants et appuyez sur Sélect.. Avec les touches fléchées œ/ƒ, sélectionnez un message reçu. Appuyez sur Sélect. pour afficher le message. Lisez le texte ainsi que la date et l’heure de réception. Après avoir appuyé...
- Page 49 Utiliser le téléphone Consigne : Le téléphone reprend le numéro du centre des messa- ges de la carte SIM. Si une erreur s’est produite, vous pouvez entrer vous-même le numéro. - Validité message (Durée de sauvegarde du SMS / dépendant de l’opérateur) - Rapport de statut (Accusé...
-
Page 50: Paramètres
Paramètres 4 Paramètres Vous pouvez effectuer certains réglages de votre téléphone et revenir au réglages par défaut. Appuyez sur Menu, choisissez Réglages et appuyez sur Sélect.. Vous avez le choix parmi les possibilités suivantes : Réglages téléphone - Langue: Vous pouvez choisir la langue. - Réglages affichage : Vous pouvez régler le contraste de l’écran, l’éclairage de fond et Idle Display (affichage en mode opérationnel). - Page 51 Paramètres - Heure mondiale : Vous pouvez régler un deuxième fuseau horaire. Réglages réseau (dépendant de l’opérateur) - Appel en attente : Si Appel en instance est activé, vous pouvez accepter un deuxième « appel en instance » à l’aide de la touche d’appel .
- Page 52 Paramètres Alarme Vous pouvez régler 3 alarmes différentes, alarmes uniques ou récurrentes, un jour ou plusieurs jours de la semaine. Si le son du réveil retentit, vous pouvez l’arrêter avec Suppr.. Si vous désirez que l’alarme retentisse à nouveau au bout de 5 minutes, appuyez sur Snooze.
- Page 53 Annexe 5 Annexe En cas de problèmes Si vous avez des problèmes avec votre émetteur-récepteur, contrôlez d’abord les points suivants. S’il s’agit de problèmes techniques, vous pouvez vous adresser à notre hotline de service en Suisse en appelant le numéro 0900 00 1675 (frais Swisscom à...
-
Page 54: Annexe
Annexe communication est épuisé. Vous pouvez néanmoins appeler le numéro d’urgence. Comment peut-on améliorer Si le signal est faible, essayez de passer ou de conti- la qualité de réception ? nuer l’appel à un autre endroit ; rapprochez-vous d’une fenêtre si vous vous trouvez à l'intérieur d’un immeuble. - Page 55 Annexe Garantie SWITEL - Les appareils sont fabriqués et testés selon les procédés de pro- duction les plus modernes. Des matériels sélectionnés et des technologies de pointe ont pour effet un fonctionnement irréprochable et une longue durée de vie. La garantie ne s’applique pas si la cause d’une erreur de fonctionnement de l’appareil repo-...
- Page 56 Annexe Index Format heure ....20 Alarme ....22 Allumer et éteindre le combiné .10 Garantie .
- Page 57 Annexe Profils sonores ... . .21 Programmer l’heure du réveil . .22 Verrouillage du clavier ..10 Volume sonore ... . .12 Recomposer automatiquement 21 Réglages affichage .
- Page 58 Indicazione importante Il vostro M 300 viene consegnato senza scheda SIM. Quest’ultima è necessaria per poter telefonare con il cellulare. Prima accensione del telefono Dopo aver inserito la scheda SIM premere il Tasto di riaggancio per ca. 3 s. Inserire eventualmente il PIN1 (“SIM-PIN” oppure “Provider-PIN”...
- Page 59 Contenuto 1 Indicazioni di sicurezza ....... .2 Impiego conforme agli usi previsti, Ambito di impiego, In generale, Alimenta- tore di rete, Accumulatori ricaricabili, Smaltimento 2 Mettere in funzione il telefono .
-
Page 60: Indicazioni Di Sicurezza
Indicazioni di sicurezza 1 Indicazioni di sicurezza Leggere attentamente le presenti istruzioni per l’uso. Impiego conforme agli usi previsti Il presente telefono consente di svolgere telefonate all’interno di una rete di telefonia mobile. Qualsiasi altro impiego è considerato come non conforme agli usi previsti. - Page 61 Indicazioni di sicurezza • Tutti gli apparecchi di telefonia mobile possono essere soggetti a interfe- renze a discapito delle prestazioni. • Tenere il telefono e i rispettivi accessori fuori dalla portata di bambini. • La scheda SIM può essere rimossa. Attenzione! Pericolo di ingestione da parte di bambini piccoli.
- Page 62 Indicazioni di sicurezza Alimentatore di rete Attenzione: Utilizzare solo l’alimentatore a spina fornito in dotazione visto che altri alimentatori di rete potrebbero addirittura danneggiare il telefono. Non ostacolare il libero accesso all’alimenta- tore a spina con mobili o altri oggetti simili. Accumulatori ricaricabili Attenzione: Non gettare gli accumulatori ricaricabili nel fuoco.
-
Page 63: Mettere In Funzione Il Telefono
Mettere in funzione il telefono 2 Mettere in funzione il telefono Indicazioni di sicurezza Attenzione: Prima della messa in funzione, leggere attenta- mente le indicazioni di sicurezza riportate al capitolo 1. Verificare il contenuto della confezione La confezione contiene: • 1 telefono cellulare M300 •... - Page 64 Mettere in funzione il telefono Inserire poi la batteria nel suo scomparto come raffigurato di fianco (scritta verso l’alto/contatti metallici in basso a sinistra). Estrarre la scheda inscrivibile dal coperchio ed annotarvi evtl. le memorizzazioni dei tasti di selezione rapida, il proprio numero telefonico e quello della persona che dovrebbe essere avvisata in caso di emergenza.
- Page 65 Mettere in funzione il telefono Collegare l’auricolare (non presente nella confezione) L’auricolare dispone di un connettore a spina da 2,5 mm tripolare, che viene inserito nella presa all’uopo prevista sul lato sinistro dell’ap- parecchio. Attenzione: Utilizzare solo auricolari compatibili. In caso di dubbio chiedere al proprio rivenditore.
- Page 66 Mettere in funzione il telefono Elementi di comando Indicazione ottica di chiamata Torcia Gancio di fissaggio Tasto verso sopra / verso sotto (œ/ƒ): Ricevitore - Per impostare l’inten- Tasti softkey sità di volume ricevi- (sinistra/destra): tore / altoparlante - Attivazione della - Per muoversi nelle funzione indicata in liste, menu e impo-...
- Page 67 Mettere in funzione il telefono Attenzione: La luce viene prodotta da un LED ad alto rendi- mento. Non puntare mai il fascio di luce direttamente negli occhi o verso apparecchi ottici. Simboli sul display 1 - Softkey di sinistra in stand-by: apre il menu principale. 2 - Softkey di destra in stand-by: apre il menu SMS.
-
Page 68: Usare Il Telefono
Attivare e disattivare l’unità portatile Spegnimento: Premere e tenere premuto il tasto di fine chiamata , fin- ché non appare il logo Switel. Dopo pochi secondi il display diventa scuro. Accensione: Premere e tenere premuto il tasto di fine chiamata , fin- ché... - Page 69 Usare il telefono Usare la torcia Premere e tenere premuto il tasto di accensione con il simbolo È possibile impostare la torcia anche su “Luce continua” ( Menu -> Spia fissa -> Attivo ). Attenzione: La luce viene prodotta da un LED ad alto rendi- mento.
- Page 70 Usare il telefono Accettare una chiamata Se il telefono suona, premere il tasto di chiamata. Premere Silenzio, per disattivare la suoneria per questa chiamata. La chiamata potrà essere accettata successivamente, fintanto che il chia- mante non abbia riappeso. Premere Rifiuta, per respingere la chiamata. Il chiamante riceve un segnale di occupato (dipendente dall’operatore di rete).
- Page 71 Usare il telefono Intavolare una conferenza “Conferenza” è una risorsa di rete, che permette a più soggetti di parlarsi contemporaneamente (dipendente dall’operatore di rete). 1. Chiamare il primo partecipante. 2. Premere Attesa per mettere la chiamata in “stato di attesa”. 3.
- Page 72 Usare il telefono Premere Opzioni, secgliere Nuovo e premere Selez.. Scegliere se memorizzare il contatto nel telefono o sulla scheda SIM. Inserire il nome e premere poi Succ.. Inserire il numero telefonico e premere poi Salva. Selezionare numeri di chiamata dalla rubrica telefonica Premere ƒ...
-
Page 73: Elenco Chiamate, Sms
Usare il telefono Copiare tutti i contatti della rubrica Premere Menu -> Rubrica -> Copia tutto. Scegliere se copiare i contatti dalla scheda SIM al telefono o dal telefono alla scheda SIM e confermare la propria scelta. Memorizzare un numero telefonico su un tasto di selezione rapida Premere ƒ... - Page 74 Usare il telefono Avviso: Se è stata selezionata una registrazione dall’elenco, premere Opzioni e scegliere fra le possibilità di seguito elencate: - Dettagli: Vengono mostrati i dettagli della registrazione. - Chiamata: Viene digitato il numero telefonico. - Modifica prima della chiamata: Si può evtl. modificare il numero prima della selezione.
- Page 75 Usare il telefono Scrivere e inviare un SMS Premere SMS, secgliere Nuovo e premere Selez.. Scrivere il proprio SMS con i tasti cifra. Per ulteriori indicazioni sull’inserimento del testo vedi il capitolo “Informazioni generali sull’uso del telefono”. Una volta inserito il testo, premere Opzioni, selezionare Invia e premere Selez..
- Page 76 Usare il telefono Leggere i messaggi Premere SMS, scegliere In arrivo e premere Selez.. Selezionare un messaggio ricevuto con i tasti œ/ƒ. Premere Selez., per visualizza- re il messaggio. Si legge testo, data e ora di ricezione. Dopo aver premuto Opzioni si hanno a disposizione le seguenti possibilità: - Elimina: Elimina: Si può...
- Page 77 Usare il telefono Avviso : Il telefono rileva il numero del centro messaggi dalla scheda SIM. Nel caso si verificasse un errore, è possibile inserire manual- mente il numero. - Validità messaggio (durata di memorizzazione dell’SMS / dipen- dente dall’operatore di rete) - Report stato (conferma di invio / dipendente dall’operatore di rete) - Percorso risposta (con l’invio di un SMS viene inviato il percorso di risposta del proprio provider / dipendente dall’operatore di rete).
-
Page 78: Impostazioni
Impostazioni 4 Impostazioni Si possono modificare varie impostazioni del proprio telefono, così come ripristinare le impostazioni originali di fabbrica. Premere Menu, scegliere Impostazioni e premere Selez.. Si hanno a disposizione le seguenti possibilità: Impostazioni telefono - Lingua: È possibile scegliere la lingua del display. - Impostazioni display: Si possono impostare il contrasto del display, la retroilluminazione e l’Idle Display (visualizzazione in modalità... - Page 79 Impostazioni - Ore nel mondo: È possibile impostare un secondo fuso orario. Impostazioni reti (dipendente dall’operatore di rete) - Chiamata in attesa: Se è attivo l’avviso di chiamata, durante una telefonata è possibile accettare una seconda chiamata “in arrivo” premendo il tasto di chiamata .
- Page 80 Impostazioni Allarme Si possono impostare 3 diversi allarmi, in modo che squillino una volta o ripe- tutamente in uno o più giorni settimanali prestabiliti. Quando la sveglia squilla, la si spegne con Elimina. Se l’allarme si deve ripetere dopo 5 minuti, premere invece Snooze. Programmare gli orari di sveglia Premere Menu, scegliere Allarme e premere Selez..
-
Page 81: Appendice
Appendice 5 Appendice Localizzazione guasti In presenza di problemi con il radiotrasmettitore, seguire le indicazioni riportate qui di seguito. In caso di problemi tecnici è possibile rivolgersi alla nostra hotline di assistenza tecnica chiamando al numero 0900 00 1675 valido per la Svizzera (spese da rete Swisscom alla data di stampa: CHF 2.60 / min). - Page 82 Appendice Come si può migliorare la Se il segnale è debole, provare a spostarsi in un qualità di ricezione? altro posto per chiamare o proseguire la conversa- zione, all’interno di un edificio avvicinarsi alla fine- stra. Problemi di ricezione si verificano normalmente in ascensore, galleria e stazioni della metropolitana.
- Page 83 Appendice Garanzia Gli apparecchi SWITEL sono costruiti e collaudati in osservanza dei processi di produzione più moderni. L’impiego di materiali selezionati e tecnologie altamente sviluppate sono garanti di una perfetta funzionalità e lunga durata in vita. Non si considera caso di garanzia un malfunzionamento dell’apparec- chio la cui causa vada individuata nella sfera di responsabilità...
- Page 84 Appendice Indice alfabetico Accettare una chiamata ..12 Formato data ....20 Accumulatore ...4, 5, 6 Formato ora .
- Page 85 Appendice Ore nel mondo ... . .21 Vivavoce ....12 Volume del ricevitore ..12 Profili audio .
-
Page 86: Important Note
Important note Your telephone is delivered without any SIM card. You need a SIM card to use the phone regularly. Starting up the phone After having inserted the SIM card press the End Call Key approx. 3 s. If necessary enter the PIN1 (“SIM PIN“ or “Provider PIN“ / you got the SIM PIN together with your SIM card from your provider) and press Select. - Page 87 Contents 1 Safety Information ........2 Intended use, Areas of use, General information, Power adapter plug, Rechargeable batteries, Disposal 2 Preparing the Telephone .
-
Page 88: Safety Information
Safety Information 1 Safety Information Please read this operating instruction manual thoroughly. Intended use This telephone is designed for use when connected to a mobile phone network. Any other use is considered unintended use. Unauthorised modification or reconstruction is not permitted. Under no circum- stances open the device or complete any repair work yourself. - Page 89 Safety Information • Keep the phone and accessories out of the reach of children. The SIM card can be removed. Caution! Small children can swallow them. • The ringing tone is issued via the loudspeaker. Take an incoming call first and then hold the phone to your ear. This prevents any possible hearing damage.
-
Page 90: Rechargeable Batteries, Disposal
Safety Information Power adapter plug Attention: Only use the power adapter plug supplied because other power supplies could damage the telephone. Ensure access to the power adapter plug is not obstructed by furniture or such. Rechargeable batteries Achtung: Never throw batteries into a fire. Only use the batterie delivered with the phone or batteries of the same type. -
Page 91: Preparing The Telephone
Preparing the Telephone 2 Preparing the Telephone Safety information Attention: It is essential to read the Safety Information in Chapter 1 before starting up. Checking the package contents The package contains: • 1 mobile phone M300 • 1 power adapter plug •... - Page 92 Preparing the Telephone Align the gold-coloured connectors on the battery with the corresponding connectors on the phone, and push the opposite end of the battery until it snaps into the right place. Remove the index memory card and note the telephone numbers stored to the one touch dialling buttons, your own telephone number and the person’s telephone num- ber to be called in case of an emergency.
- Page 93 Preparing the Telephone Connecting a headset (not supplied) The connector must be a 2.5mm 3-pole jack plug that inserts in the Power/Headset socket on the left side of the handset. Attention: Only use compatible headsets. Ask your dealer for this. When connecting a headset, pay special attention to volume levels to avoid affection to your hearing ability.
- Page 94 Preparing the Telephone Key Functions Visual ringer Torch Attachment eye for strap Arrow keys (œ/ƒ): - Setting the ear- Earpiece piece/loudspeaker Softkeys volume (left/right): - Scrolling in lists, - Perform functions menus and settings indicated by the - In idle mode: œ->...
- Page 95 Preparing the Telephone Warning: The torch uses a high-brightness LED and you should not point the beam directly into eyes, or view with optical instruments. Icons in the handset display 1 - Left softkey in idle state: opens the main menu. 2 - Right softkey in idle state: opens the SMS menu.
-
Page 96: Using The Phone
Using the phone 3 Using the phone General Menu lists are used for set up and operation. After having pressed the softkey Menu, the softkeys will change their function (left: Select, right: Back). Use the arrow keys œ/ƒ to scroll through menus and lists (e. g. phonebook). - Page 97 Using the phone Using the torch Press and hold down the switch marked with You can also set the torch to permanent “on“ (Menu -> Permanent torch -> On). Warning: The torch uses a high-brightness LED and you should not point the beam directly into eyes, or view with optical instruments. ☞...
- Page 98 Using the phone Taking a call If your telephone is ringing press the call key. Press Silent, to disable the ringer for this call. Nevertheless you can take this call as long as the caller didn’t hang up. Press Reject, to reject this call. The caller will hear the busy tone (if supported by your provider).
- Page 99 Using the phone Setting up a 3-party conference “3-party“ is a network feature to talk to multiple subscribers simultane- ously (check with your service provider). 1. Call the first subscriber. 2. Press Hold, to put this call “on hold“. 3. Call the second subscriber. 4.
- Page 100 Using the phone Creating a new entry Press ƒ to open the phone book. Press Options, select New and press Select. Select whether the entry should be saved in the phone or on the SIM card. Enter the name and press Next. Enter the telephone number and press Save.
- Page 101 Using the phone Deleting all entries Press Menu -> Phonebook -> Delete all. Select whether the entries in the phone or on the SIM card will be deleted and con- firm. Copying all entries Press Menu -> Phonebook -> Copy all. Select whether the entries in the phone should be copied to the SIM card or vice- versa and confirm.
- Page 102 Using the phone Note: If you select an entry and press Options you have the fol- lowing options: - Details: You get more details to this entry. - Call: The telephone number is dialled. - Edit before call: You can edit the telephone number before dialling.
- Page 103 Using the phone Writing and sending a SMS Press SMS, select New and press Select. Write your SMS using the keypad. For further information on entering text refer to “Using the phone/General“. Enter the text, press Options, select Send and press Select. Enter the recipient’s telephone number and press Select.
- Page 104 Using the phone Reading messages Press SMS, select Inbox and press Select. Select an entry using œ/ƒ . Press Select, to view this message. You can read the text as well as the receiving date and time of the message. After pressing Options select from the following: - Delete: You can delete the message.
- Page 105 Using the phone Note: Your phone reads the service number from the SIM card. If it has been accidentally changed, you’ll need to get the correct number and reprogram it. - Message validity: You can set the length of time that your text messages are stored at the message centre (network service) / check with your service provider.
-
Page 106: Settings
Settings 4 Settings You are able to adjust various settings on the phone, and also to reset them to their factory default values. Press Menu, select Settings and press Select. You have the follow- ing options: Phone settings - Language: You can set the display language. - Display settings: You can set the contrast, the back light and some characteristics of the idle display. - Page 107 Settings - Clock type: You can select the clock type shown in the idle display (analog or digital). - World time: You can set a second time zone. Network settings (check with your service provider) - Call waiting: When activated you can take a second call dur- ing a current call using the call key .
- Page 108 Settings Alarm clock You can set up to three different alarms to sound at the time you want just once, or repeatedly, for example every working day. When alarm sounds, you can stop the alarm by pressing Cancel. If you press Snooze, the alarm stops and rings again in five minutes. Setting an alarm time Press Menu, select Alarm clock and press Select.
-
Page 109: In Case Of Problems
Appendix 5 Appendix In case of problems Should problems arise with the phone, please refer to the following infor- mation first. In the case of technical problems, you can contact our hot- line service, Tel. 0900 00 1675 within Switzerland (cost via Swisscom at time of going to print: CHF 2.60/min). -
Page 110: Appendix
Appendix You can call the emergency number if there is no credit on your phone. How can reception be If the signal is weak, try another location to make or improved? continue with a call, e.g. when indoors move towards a window. - Page 111 If your device shows signs of defect during the period of guarantee, please return it to the sales outlet in which you purchased the SWITEL device together with the purchase receipt. All claims under the terms of guarantee in accordance with this agreement can only be asserted at the sales outlet.
- Page 112 Appendix Index Alarm clock ....22 Factory reset ....20 Anykey answer ... . .21 Areas of use .
- Page 113 Appendix Phone Book ....13 Phone settings ... . .20 Power adapter plug ..4 Reading messages .
- Page 116 Quest’apparecchiatura è conforme alla direttiva europea R&TTE. Per la dichiarazione di conformità com- pleta si prega di voler usufruire del servizio gratuito di download dal nostro sito Internet www.switel.com. This equipment complies with the European R&TTE directive. To view the complete Declaration of Con- formity, please refer to the free download available at our web site: www.switel.com.
Need help?
Do you have a question about the M 300 and is the answer not in the manual?
Questions and answers