
Related Manuals for switel CD738


Summary of Contents for switel CD738
-
Page 1: Operating Instructions
Schnurlostelefon Téléphone sans fil CD738 Telefono senza fili Cordless telephone Bedienungsanleitung Mode d’emploi Istruzioni per l’uso Operating Instructions... - Page 2 CD738 Bedienungsanleitung ... . . Mode d’emploi ....Istruzioni per l’uso ....
-
Page 3: Table Of Contents
− Inhaltsverzeichnis − Allgemeine Hinweise ......Bestimmungsgemäße Verwendung ......Stromausfall . - Page 4 − Inhaltsverzeichnis − Anzeige der Gesprächsdauer ......Freisprechen ..........Einstellen der Hörerlautstärke .
- Page 5 − Inhaltsverzeichnis − 10.1 Uhrzeit und Uhrzeitformat ....... . . 10.2 Name des Mobilteils ändern .
- Page 6 ......16.1 Erweitern des CD738 Telefonsystems ..... . .
-
Page 7: Allgemeine Hinweise
− Allgemeine Hinweise − Allgemeine Hinweise Bitte lesen Sie diese Bedienungsanleitung sorgfältig durch. Öffnen Sie das Gerät in keinem Fall selbst und führen Sie keine eigenen Reparaturversuche durch. Bei Gewährleistungsansprüchen wenden Sie sich bitte an Ihren Fachhändler. Im Zuge von Projektverbesserungen behalten wir uns technische und optische Veränderungen am Artikel vor. -
Page 8: Netzteil
− Allgemeine Hinweise − Netzteil Verwenden Sie nur das mitgelieferte Switel Steckernetzteil, da andere Netzteile das Telefon zerstören können. Netzteil nicht öffnen. Es besteht Lebensgefahr, wenn das Netzteil geöffnet wird, solange es an das Stromnetz angeschlossen ist. Sie dürfen den Zugang zum Steckernetzteil nicht durch Möbel oder andere Gegenstände versperren. -
Page 9: Rückgabe Von Altgeräten
− Allgemeine Hinweise − Rückgabe von Altgeräten Wenn Sie Ihr Switel−Gerät entsorgen wollen, bringen Sie es bitte zur Sammelstelle Ihres kommunalen Entsorgungsträgers (z. B. Wertstoffhof). Das nebenstehende Symbol auf Ihrem Telefon bedeutet, dass das Altgerät nicht im Hausmüll entsorgt werden darf. -
Page 10: Leistungsmerkmale
− Leistungsmerkmale − Leistungsmerkmale Telefon Digitaler DECT/GAP Standard Bis zu 10 Stunden Dauergespräch Bis zu 120 Stunden Standby Sprachverschlüsselung für eine hohe Sicherheit Tonwahl/Pulswahl (DTMF/IWV) Temporäre Umschaltung von Pulswahl (IWV) auf Tonwahl (DTMF) Hervorragende Darstellung durch beleuchtetes grafisches Farbdisplay Beleuchtung des Tastenfeldes Anrufkennung, kompatibel mit FSK/DTMF (automatisch) Rufnummern−... -
Page 11: Anrufbeantworter
− Leistungsmerkmale − Anrufbeantworter Gesprochene Bedienerführung in Englisch für eine einfache Bedienung Wochentag− und Zeitansage zu jeder aufgenommenen Nachricht Speicherkapazität von bis zu 16 Minuten Aufnahmekapazität für bis zu 60 Nachrichten Voreingestellte neutrale Ansagetexte Aufnehmbarer Ansagetext von bis zu 40 Sekunden Voreingestellter Ansagetext bei vollem Speicher (Nur Ansage) Selektives Löschen einzelner Nachrichten oder Gesamt−Löschen... -
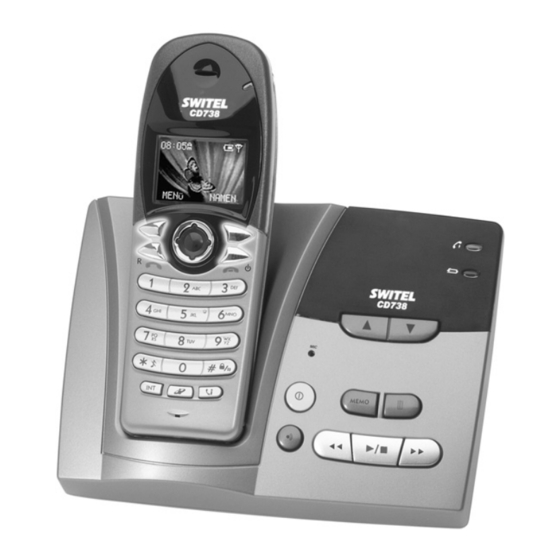
Page 12: Bedienelemente
− Bedienelemente − Bedienelemente Mobilteil 1. LED Gesprächsanzeige 2. Grafisches Farb−Display 3. Displaytaste rechts 4. Taste Gespräch beenden / Ein / Aus 5. Navigationstaste 6. Tastensperre / Pause 7. Anruflistenmenü (verpasste, gewählte und angenommene Anrufe) 8. Sondertelefonbuch 9. Intern− und Konferenzgespräche 10. -
Page 13: Inbetriebnahme
− Inbetriebnahme − Inbetriebnahme Sicherheitshinweise Achtung: Lesen Sie vor der Inbetriebnahme unbedingt die allgemeinen Hinweise in Kapitel 1 dieser Bedienungsanlei- tung. Verpackungsinhalt prüfen Zum Lieferumfang gehören: eine Basisstation ein Telefonanschlusskabel ein Mobilteil mit Gürtelclip zwei Standard−Akkus ein Netzanschlusskabel eine Bedienungsanleitung Basisstation anschließen Stellen Sie die Basisstation in der Nähe Ihrer Telefonanschlussdose und einer Netzsteckdose auf. -
Page 14: Standard−Akkus Einsetzen
− Inbetriebnahme − Standard−Akkus einsetzen Um die mitgelieferten − − wiederaufladbaren Standard−Akkus in das Mobilteil einzulegen, drücken Sie auf den oberen Rand des Batteriefachdeckels. Schieben Sie den Batteriefachdeckel nach unten. Legen Sie die Standard−Akkus ein und achten Sie auf die richtige Polung. -
Page 15: Aufladen Der Standard−Akkus
− Inbetriebnahme − Aufladen der Standard−Akkus Stellen Sie das Mobilteil mit dem Display nach vorne für mindestens 14 Stunden auf die Basisstation. Bei nicht richtig geladenen Standard−Akkus kann es zu Fehlfunktionen des Telefons kommen. Die wiederaufladbaren Standard−Akkus Ihres Mobilteils besitzen eine Standby−Zeit bei Zimmertemperatur von max. -
Page 16: Navigation Und Menüstruktur
− Navigation und Menüstruktur − Navigation und Menüstruktur Das Display Das grafische Farbdisplay zeigt Ihnen alle wichtigen Funktionen mit verschiedenen Symbolen und Meldungen an. Bei jedem Tastendruck wird das Display für 10 Sekunden beleuchtet. Nach 30 Sekunden schaltet sich automatisch der Bildschirmschoner in Form einer analogen Uhr ein. -
Page 17: Navigation Im Menü
− Navigation und Menüstruktur − Symbol Beschreibung Eingabe einer Amtskennzahl oder einer Nummer im Menü Vorwählen". Auswahl der Lautstärke für die Tonrufmelodie. Navigation im Menü Alle Funktionen sind über ein sehr benutzerfreundliches grafisches Menü zu erreichen. Die Displaytasten T und U sind in den verschiedenen Menüs und Telefonbüchern mit unterschiedlichen Funktionen belegt. - Page 18 − Navigation und Menüstruktur − Taste Beschreibung − Im Standby−Modus öffnet die Displaytaste das Haupt- menü. − Das angezeigte Menü wird geöffnet, wenn Sie die Dis- playtaste drücken. − Achten Sie auf die menübegleitenden Texte über der Displaytaste. Sie gelangen direkt in das Telefonbuch PRIVAT, wenn −...
-
Page 19: Übersicht Der Menüstruktur
− Navigation und Menüstruktur − 4. Mit der Navigationstaste X können Sie eine Funktion auswählen. 5. Mit der Displaytaste OK wird diese Funktion geöffnet. 6. Mit der Navigationstaste X können Sie die gewünschte Einstellung wählen. 7. Mit der Displaytaste OK bestätigen Sie Ihre Einstellung. 8. - Page 20 − Navigation und Menüstruktur − (Lautstärke 1 bis 5, aus, TÖNE MOBILTEIL ansteigend) (Tonrufmelodie 1 bis 20, extern) (Tonrufmelodie 1 bis 20, intern) (Lautstärke 1 bis 5, aus, BASIS ansteigend) (Tonrufmelodie 1 bis 10) MT−TASTENTON MT−TÖNE EXTRAS WECKER BABYFON WALKY−TALKY MOBILTEIL 1 MOBILTEIL ...
- Page 21 − Navigation und Menüstruktur − SONDER- FUNKTIONEN AUTO ANNAHME WAHLMODUS DTMF IMPULS FLASHZEIT FLASH 1 FLASH 2 PAUSE PAUSE 1 PAUSE 2 VORWÄH- (PIN ein- geben) VORWÄHLEN 1 VORWÄHLEN 2 VORWÄHLEN 3 AMTS- KENNZAHL WAHL- (PIN ein- SPERRE geben) MOBILTEIL 1 MOBILTEIL 2 MOBILTEIL 3 MOBILTEIL 4...
- Page 22 − Navigation und Menüstruktur − SYSTEM ANMELDEN BASISWAHL AUTO BASIS 1 BASIS 2 (falls verfügbar) BASIS 3 (falls verfügbar) BASIS 4 (falls verfügbar) MT ABMELDEN MOBILTEIL 1 MOBILTEIL 2 MOBILTEIL 3 MOBILTEIL 4 PIN ÄNDERN RESET 5.4.2 Telefonbuchmenü In das Telefonbuchmenü gelangen Sie durch Drücken der Displaytaste NAMEN .
- Page 23 − Navigation und Menüstruktur − 5.4.3 Telefonbuch für Sonderrufnummern In das Sondertelefonbuch gelangen Sie durch Drücken der Taste SONDER−NR. ANSEHEN HINZUFÜGEN STATUS ALLE LÖSCHEN 5.4.4 Anruflisten In die Anruflisten gelangen Sie durch Drücken der Taste S. ANRUFLISTEN VERPASST GEWÄHLT ANGENOMMEN GESPR.
-
Page 24: Bedienung
− Bedienung − Bedienung Anrufe entgegennehmen Erreicht Sie ein Anruf, ertönt der Tonruf am Mobilteil und an der Basisstation. Nehmen Sie das Mobilteil von der Basisstation, um das Gespräch anzunehmen. Zum Beenden des Gesprächs, stellen Sie das Mobilteil wieder zurück in die Basisstation. oder Gespräch annehmen Gespräch beenden... -
Page 25: Anrufe Führen
− Bedienung − Anrufe führen Rufnummer eingeben (max. 20 Stellen) Rufnummer wählen Hinweis: Haben Sie eine falsche Zahl eingegeben, können Sie den Cursor mit der Navigationstaste X bewegen und mit der Displaytaste LÖSCHEN einzelne Stellen in der Rufnummer löschen. Sie können auch zuerst die Gesprächstaste V drücken und erhalten damit das Freizeichen. -
Page 26: Anzeige Der Gesprächsdauer
− Bedienung − Anzeige der Gesprächsdauer Während eines Gesprächs wird im Display die Gesprächsdauer in Minuten und Sekunden sowie die Rufnummer des Gesprächpartners angezeigt. Die Gesprächsdauer der aus− und eingehenden Anrufe wird gespeichert. Weitere Informationen finden Sie in Kapitel 8.3. Freisprechen 6.6.1 Freisprechen einschalten... -
Page 27: Mikrofon Im Mobilteil Stummschalten
− Bedienung − Mikrofon im Mobilteil stummschalten Sie können während eines Telefongespräches das Mikrofon des Mobilteils aus− und einschalten. So ist es möglich, mit jemand anderem zu sprechen, ohne dass der Gesprächspartner Sie hört. Der Lautsprecher im Mobilteil bleibt eingeschaltet, sodass Sie den Gesprächspartner weiterhin hören können. -
Page 28: Hinweise Zur Reichweite
− Bedienung − 6.12 Hinweise zur Reichweite Die Reichweite des Mobilteils beträgt ca. 50 Meter in Innenräumen und ca. 300 Meter im Freien. Bei einer guten Verbindung zur Basisstation erscheint im Display dauerhaft das Symbol a. Hinweis: Haben Sie sich zu weit von der Basisstation entfernt, blinkt das Symbol a und Sie hören Warntöne. -
Page 29: Externe Anrufbeantworter
− Bedienung − Hinweis: Die Ansage Ihres Calling−Card−Anbieters fragt Sie nach Ihrer PIN−Nummer. PIN−Nummer eingeben Hinweis: PIN−Nummern sollten Sie nicht im Telefonbuch speichern, um sich vor Missbrauch zu schützen. MEHR , X TELEFONBUCH , OK Menü auswählen und bestätigen X, DETAILS , WÄHLEN Eintrag auswählen und bestätigen Hinweis: Sie können während einer Verbindung beliebig viele Einträge aus dem Telefonbuch verketten. -
Page 30: Das Telefonbuch
− Das Telefonbuch − Das Telefonbuch Es stehen Ihnen zwei Telefonbücher zur Verfügung. Im Telefonbuch PRIVAT können Sie 100 Rufnummern inklusive Namen speichern. Im Telefonbuch GEMEINSAM können Sie 20 Einträge vornehmen. Auf Einträge im Telefonbuch PRIVAT können Sie nur mit dem Mobilteil zugreifen, mit dem die Einträge erstellt wurden. -
Page 31: Hinweise Zum Telefonbuch
− Das Telefonbuch − X, MEHR Eintrag auswählen X NR.VERWENDEN , OK Funktion auswählen und bestätigen Verbindung herstellen Um Rufnummern aus dem Telefonbuch GEMEINSAM zu wählen, gehen Sie bitte folgendermaßen vor: NAMEN , X GEMEINSAM , OK Menü auswählen und bestätigen X ANSEHEN , OK Funktion auswählen und bestätigen X, MEHR oder (V) -
Page 32: Namenseingabe
− Das Telefonbuch − Gesprächspartner Rufnummern aus Ihrem Telefonbuch durchgeben. Namenseingabe Zur Eingabe des Namens sind die Zahlentasten mit Buchstaben beschriftet. Durch mehrmaliges Drücken der entsprechenden Taste können Buchstaben, Zahlen und Sonderzeichen eingegeben werden. Beispiel: Sie möchten den Namen "Peter" eingeben. Drücken Sie: 1 x Taste 7, 2 x Taste 3, 1 x Taste 8, 2 x Taste 3, 3 x Taste Um ein Leerzeichen einzugeben, drücken Sie einmal die Taste 1. -
Page 33: Gespeicherte Einträge Aus Dem Telefonbuch Löschen
− Das Telefonbuch − Hinweis: Wählen Sie die Einstellung AUS , wird der allgemein eingestellte Tonruf wiedergegeben. Sie können nur den Telefonbucheinträgen im Telefonbuch PRIVAT einen speziellen Tonruf zuweisen. SPEICH Änderungen bestätigen Gespeicherte Einträge aus dem Telefonbuch löschen NAMEN , X PRIVAT oder GEMEINSAM , OK Menü... -
Page 34: Telefonbuch Für Sonderrufnummern
− Das Telefonbuch − 7.9.1 Direktwahltasten belegen NAMEN , X PRIVAT , OK Menü auswählen und bestätigen X DIREKTWAHL , OK Funktion auswählen und bestätigen X, WÄHLE Direktwahltaste wählen und bestätigen X, DETAILS , OK Eintrag auswählen und bestätigen 7.9.2 Belegung der Direktwahltasten ändern NAMEN , X PRIVAT , OK Menü... -
Page 35: Rufnummern Aus Dem Sondertelefonbuch Wählen
− Das Telefonbuch − V, 2 Gesprächspartner wechseln Hinweis: Bitte fragen Sie Ihren Netzbetreiber, welche Flash−Zeit Sie zur Nutzung von Mehrwertdiensten einstellen müssen (siehe Kapitel 13.3). Achtung: Das Halten von Gesprächen ist ein optionaler Ser- vice Ihres Netzbetreibers. Bitte fragen Sie Ihren Netzbetreiber nach weiteren Informationen. -
Page 36: Rufnummernanzeige (Clip)
− Rufnummernanzeige (CLIP) − Rufnummernanzeige (CLIP) Mit der Rufnummernanzeige können Sie bei eingehenden Gesprächen erkennen, wer Sie anruft. Wenn diese Funktion an Ihrer Telefonleitung zur Verfügung steht, zeigt Ihnen das Display bereits die Rufnummer des Anrufers, wenn das Telefon klingelt. Haben Sie diese Rufnummer in Ihrem Telefonbuch gespeichert, wird zusätzlich zur Rufnummer der Name aus dem Telefonbuch angezeigt. -
Page 37: Informationen Über Einträge In Anruflisten Abrufen
− Rufnummernanzeige (CLIP) − 8.1.2 Rufnummer aus einer Anrufliste wählen Um Rufnummern aus den verschiedenen Anruflisten zu wählen, gehen Sie bitte wie folgt vor: Anruflistenmenü öffnen X VERPASST oder GEWÄHLT oder ANGENOMMEN , OK Anrufliste auswählen und bestätigen X, MEHR oder (V) Rufnummer auswählen (Verbindung herstellen) X NR.VERWENDEN , OK... -
Page 38: Rufnummer Aus Einer Anrufliste Im Telefonbuch Speichern
− Rufnummernanzeige (CLIP) − Rufnummer aus einer Anrufliste im Telefonbuch speichern Die gespeicherten Rufnummern aus den Anruflisten VERPASST , GEWÄHLT oder ANGENOMMEN können direkt in einem der Telefonbücher PRIVAT oder GEMEINSAM gespeichert werden. Anruflistenmenü öffnen X VERPASST oder GEWÄHLT oder ANGENOMMEN , OK Anrufliste auswählen und bestätigen X, MEHR... - Page 39 − Rufnummernanzeige (CLIP) − 8.5.2 Einzelne Anruflisten löschen Löschen Sie die Anruflisten VERPASST , GEWÄHLT oder ANGENOMMEN einzeln. Anruflistenmenü öffnen X LISTEN LÖSCH , OK Menü auswählen und bestätigen X VERPASST oder GEWÄHLT oder ANGENOMMEN , OK Anrufliste auswählen und bestätigen Bestätigen 8.5.3 Gesamtlöschen...
-
Page 40: Nebenstellenanlagen / Mehrwertdienste
Ihrer Nebenstellenanlage einwandfrei funktioniert, erfahren Sie bei dem Händler, bei dem die Anlage gekauft wurde. R−Taste und die Mehrwertdienste Ihres Netzbetreibers Ihr SWITEL−Telefon unterstützt die wichtigsten Mehrwertdienste Ihres Netzbetreibers (z. B. Makeln, Anklopfen, Dreier−Konferenz). Bitte fragen Sie Ihren Netzbetreiber, welche Flash−Zeit Sie zur Nutzung von Mehrwertdiensten einstellen müssen (siehe Kapitel 13.3). -
Page 41: Einstellungen Für Das Display
− Einstellungen für das Display − Einstellungen für das Display 10.1 Uhrzeit und Uhrzeitformat Die angezeigte Uhrzeit im Display wird automatisch durch das Einstellen des Tag− und Zeitstempels vom Anrufbeantworter (siehe Kapitel 17.2) aktualisiert. Das Uhrzeitformat können Sie folgendermaßen einstellen. MENÜ... -
Page 42: Hintergrundbild
− Einstellungen für das Display − 10.4 Hintergrundbild Für den Hintergrund des Displays stehen Ihnen drei verschiedene Motive zur Verfügung. Wählen Sie zwischen Schmetterling, Blume oder Wolken. MENÜ , X DISPLAY , OK Menü auswählen und bestätigen X HINTERGRUND , OK Option auswählen und bestätigen X, OK Hintergrund auswählen und... -
Page 43: Tonruf Und Signaltöne Einstellen
− Tonruf und Signaltöne einstellen − Tonruf und Signaltöne einstellen 11.1 Tonruf am Mobilteil und der Basisstation einstellen An Ihrem Mobilteil und der Basisstation können verschiedene Tonrufmelodien und entsprechende Lautstärken eingestellt werden. Das Mobilteil kann sich mit 20 polyphonen Tonrufmelodien und die Basisstation mit 10 Tonrufmelodien melden. -
Page 44: Hinweistöne Ein−, Ausschalten
− Tonruf und Signaltöne einstellen − 11.3 Hinweistöne ein−, ausschalten Wenn das Mobilteil in die Basisstation gestellt oder Sie Einstellungen ändern, werden Hinweistöne vom Mobilteil wiedergegeben. MENÜ , X TÖNE , OK Menü auswählen und bestätigen X MT-TÖNE , OK Funktion auswählen und bestätigen X AUS oder EIN , OK Einstellung wählen und bestätigen... -
Page 45: Extras
SCHLUMM Schlummerfunktion aktivieren STOP Wecksignal beenden 12.2 Babyfon Wenn Ihnen zwei CD738−Mobilteile zur Verfügung stehen, können Sie die Mobilteile als Babyfon" einsetzen. 12.2.1 Babyfon ein−, ausschalten MENÜ , X EXTRAS , OK Menü auswählen und bestätigen X BABYFON , OK Funktion auswählen und bestätigen... -
Page 46: Walky Talky
Interne Rufnummer des Mobilteils wählen Raumüberwachung beenden 12.3 Walky Talky Wenn Ihnen zwei CD738−Mobilteile zur Verfügung stehen, können Sie die Mobilteile als Walky Talky" benutzen. 12.3.1 Walky Talky ein−, ausschalten MENÜ , X EXTRAS , OK Menü auswählen und bestätigen X WALKY TALKY , OK Funktion auswählen und bestätigen... -
Page 47: Stoppuhr
− Extras − STOP Signalton beenden. 12.4.2 Timer vor Ablauf der eingestellten Zeit ausschalten MENÜ , X EXTRAS , OK Menü auswählen und bestätigen X TIMER , OK Funktion auswählen und bestätigen AUS? Bestätigen 12.5 Stoppuhr Sie können Zeiten mit einer Auflösung von bis zu 10tel Sekunden messen. -
Page 48: Sonderfunktionen
− Sonderfunktionen − Sonderfunktionen 13.1 Automatische Gesprächsannahme Haben Sie die Funktion automatische Gesprächsannahme" aktiviert, wird ein Anruf automatisch beim Herausnehmen des Mobilteils aus der Basisstation angenommen. MENÜ , X SONDERFUNKT. , OK Menü auswählen und bestätigen X AUTO ANNAHME , OK Funktion auswählen und bestätigen X AUS oder EIN , OK Einstellung auswählen und... -
Page 49: Vorwählen
− Sonderfunktionen − X PAUSE , OK Funktion auswählen und bestätigen X PAUSE 1 oder PAUSE 2 , OK Einstellung auswählen und bestätigen 13.5 Vorwählen Bei der Funktion Vorwählen" können Sie automatisch eine Nummer vor der eigentlichen Rufnummer vorwählen lassen. Dieses findet hauptsächlich Anwendung bei Call−by−Call−Nummern. -
Page 50: Wahlsperre
− Sonderfunktionen − X AMTSKENNZAHL , OK Funktion auswählen und bestätigen Z, OK PIN−Code eingeben und bestätigen X o, X AUS oder EIN Einstellung auswählen X p, Z, OK Amtskennzahl eingeben und bestätigen 13.7 Wahlsperre Mit der Funktion Wahlsperre" können Sie alle ausgehenden Anrufe oder auch bestimmte Vorwahlnummern sperren. -
Page 51: System
An− und Abmelden von Mobilteilen Weitere Informationen über die Verwendung von mehreren Mobilteilen finden Sie in Kapitel 15. Die Werkseinstellung des PIN−Codes ist "0000". 14.1.1 Anmelden von CD738 Mobilteilen Paging−Taste 3 Sekunden drücken MENÜ , X SYSTEM , OK Menü auswählen und bestätigen X ANMELDEN , OK Funktion auswählen und bestätigen... -
Page 52: Auswählen Einer Basisstation
− System − 14.1.4 Abmelden von Mobilteilen Es ist nicht möglich, eine Abmeldung mit dem Mobilteil durchzuführen, das abgemeldet werden soll. MENÜ , X SYSTEM , OK Menü auswählen und bestätigen X MT ABMELDEN , OK Funktion auswählen und bestätigen X, OK Mobilteil auswählen und bestätigen Z, OK... -
Page 53: Pin−Code Ändern
− System − 14.3 PIN−Code ändern Das An− und Abmelden von Mobilteilen und viele andere Funktionen des Telefons sind mit einem PIN−Code vor unerlaubter Benutzung geschützt. Der PIN−Code kann aus bis zu acht Zahlen bestehen. Die Werkseinstellung des PIN−Codes ist "0000". Wenn Sie den PIN−Code ändern, bewahren Sie den neuen PIN−Code gut auf. - Page 54 − System − 14.4.1 Werkseinstellungen Mobilteil Mobilteil Name: SWITEL Wahlpause: Pause 1 (2 sec) Uhrformat: 12 Stunden Flash−Zeit: Flash 1 (120ms) Sprache: Deutsch Vorwählen: Aus/Leer Hintergrund: Schmetterling Amtskennzahl: Aus/Leer Menüfarbe: Wahlsperren: Aus/Leer Tonruflautstärke MT: 5 autom. Gesprächsannahme: Ein Ext. Tonrufmelodie Tonruflautstärke...
- Page 55 − System − 14.4.2 Werkseinstellungen Anrufbeantworter Anrufbeantworter: Sicherheitscode: Ansage: Standard Tag, Zeit: Montag, 00:00 Nachrichtenspeicher: Leer Verzögerung Anrufannahme: Memo: Leer Sprachausgabe: Englisch Lautstärke: Hinweissignal: Mithören: 14.4.3 Werkseinstellungen wieder herstellen Um die Werkseinstellungen des Mobilteils und des Anrufbeantworters wieder herzustellen, gehen Sie folgendermaßen vor: MENÜ...
-
Page 56: Mehrere Mobilteile
Registrierungen vorhanden und Sie kön- nen keine neuen Mobilteile mehr anmelden. Hinweis: Über den international genormten GAP Standard können Switel−Mobilteile und auch Mobilteile von Fremdherstellern in das Telefonsystem integriert werden. Genauso können Sie ein Switel−Mobilteil an Basisstationen anderer Hersteller anmelden, sofern diese Geräte nach dem GAP Standard... -
Page 57: Intern Telefonieren
− Mehrere Mobilteile − 15.1 Intern telefonieren Sobald Sie zwei Mobilteile an einer Basisstation angemeldet haben, können Sie interne Gespräche führen. Q, X, OK Drücken, Mobilteil wählen und bestätigen Internes Gespräch annehmen Hinweis: Erreicht Sie während eines internen Gesprächs ein externer Anruf, hören Sie den Tonruf Ihrer Basisstation und im Display Ihrer Mobilteile wird die Rufnummer des Anrufers angezeigt. -
Page 58: Rücksprache / Makeln
− Mehrere Mobilteile − 15.3 Rücksprache / Makeln Während eines externen Gesprächs können Sie ein anderes Mobilteil anwählen, um Rücksprache zu halten. Der externe Gesprächspartner wird gehalten, während Sie mit dem internen Gesprächspartner sprechen. Nachdem Sie das interne Gespräch geführt haben, kehren Sie wieder zum externen Gesprächspartner zurück. -
Page 59: Mehrere Basisstationen
Basisstationen angemeldet werden, um eine größere Fläche in der Sie Ihre Mobilteile nutzen möchten, abzudecken. Sie können dabei CD738 Basisstationen und auch Basisstationen anderer Hersteller verwenden, sofern diese Geräte nach dem GAP Standard arbeiten. Alle Basisstationen benötigen dazu eine eigene Telefonsteckdose. -
Page 60: Erhöhung Der Reichweite
− Mehrere Basisstationen − 16.3 Erhöhung der Reichweite Die Reichweite Ihrer Mobilteile lässt sich dadurch erhöhen, dass Sie innerhalb Ihres Hauses oder an Ihrem Arbeitsplatz Basisstationen in verschiedenen Bereichen platzieren (siehe Grafik II). 1. Platzieren Sie die Basisstationen so, dass sich die Reichweite der einzelnen Basisstationen überschneidet (siehe Grafik II). -
Page 61: Der Anrufbeantworter
− Der Anrufbeantworter − Der Anrufbeantworter Einstellungen, die Sie am Anrufbeantworter vornehmen, werden von einer Ansage wiedergegeben. Klappen Sie die Plastikabdeckung über den Lautstärketasten nach oben, um die Tasten J, K, L, M und N zu bedienen. Wenn der Anrufbeantworter den Anruf bereits entgegengenommen hat, können Sie die Aufzeichnung jederzeit mit der Displaytaste ABBRUCH abbrechen. -
Page 62: Allgemeine Einstellungen
− Der Anrufbeantworter − 17.5 Allgemeine Einstellungen 17.5.1 Maximale Aufnahmezeit Der Anrufbeantworter kann bis zu 60 eingehende Nachrichten mit bis zu einer Gesamtlänge von 16 Minuten speichern. Die maximale Länge für jede eingehende Nachricht beträgt 2 Minuten. Spricht der Anrufer länger, wird das Telefongespräch abgebrochen. -
Page 63: Ansagen Aufzeichnen, Kontrollieren Oder Löschen
− Der Anrufbeantworter − 17.6 Ansagen aufzeichnen, kontrollieren oder löschen Ihr Anrufbeantworter stellt Ihnen zwei voreingestellte Ansagetexte zur Verfügung. Der voreingestellte Ansagetext, nach dem eine Nachricht hinterlassen werden kann, kann natürlich durch einen eigenen Ansagetext ersetzt werden. Wenn keine eigene Ansage aufgenommen wurde, meldet sich automatisch die Standardansage. -
Page 64: Aufgezeichnete Nachrichten Abhören
− Der Anrufbeantworter − 17.7.2 Memo abhören Memo anhören Memo stoppen 17.7.3 Memo löschen Memo anhören Während des Memos drücken 17.8 Aufgezeichnete Nachrichten abhören Wenn ein Memo aufgezeichnet wurde, wird zuerst das Memo vor den eingegangenen Nachrichten abgespielt. Die aufgezeichneten Nachrichten werden in der Reihenfolge, in der sie eingegangen sind, wiedergegeben. -
Page 65: Die Fernabfrage
− Der Anrufbeantworter − 17.10 Die Fernabfrage Die Fernabfrage erlaubt es, den Anrufbeantworter von einem beliebigen Telefon mit Tonwahlfunktion aus anzurufen, um Nachrichten abzuhören und weitere Funktionen durchzuführen. 17.10.1 Der Sicherheitscode für die Fernabfrage Ihr Anrufbeantworter besitzt eine persönliche Zugriffsberechtigung, so dass nur Sie die eingegangenen Nachrichten über die Fernabfrage abhören können. - Page 66 − Der Anrufbeantworter − 17.10.4 Tastenfunktionen der Fernabfrage Die Tastenfunktionen sind abhängig davon, in welchem Modus Sie sich befinden. Die folgende Tabelle verschafft Ihnen eine Übersicht über die jeweiligen Funktionen der einzelnen Tasten. Taste Funktionen während des Funktionen während des Anhörens vom Hilfsmenü...
- Page 67 − Der Anrufbeantworter − 17.10.5 Ferneinschalten des Anrufbeantworters Sie haben die Möglichkeit, von einem anderen tonwahlfähigem Telefon aus, den Anrufbeantworter einzuschalten. Eigene Rufnummer wählen Taste *, Z 10 Tonrufe abwarten und nach Signalton betätigen und PIN−Code eingeben Hinweis: Bei falscher Eingabe hören Sie die erneut die Ansage des Anrufbeantworters.
-
Page 68: Fehlerbeseitigung
− Fehlerbeseitigung − Fehlerbeseitigung Haben Sie Probleme mit Ihrem Telefon, kontrollieren Sie bitte zuerst die folgenden Hinweise. Bei Garantieansprüchen wenden Sie sich bitte an Ihren Fachhändler. Fehler Lösungen Keine Verbindung zur Ba- − Prüfen Sie, ob Sie sich mit der richti- sisstation möglich gen PIN Nummer an der Basisstation angemeldet haben. - Page 69 − Fehlerbeseitigung − Fehler Lösungen Die Ladekontrollleuchte − Stellen Sie das Mobilteil richtig auf die leuchtet nicht Basisstation, reinigen Sie die Kontakt- flächen am Mobilteil und an der Basis- station mit einem weichen, trockenen Tuch. Das Mobilteil schaltet sich − Legen Sie das Mobilteil für 14 Stunden von selbst ab auf die Basisstation.
- Page 70 − Fehlerbeseitigung − Fehler Lösungen Die LED F des Anruf- − Der Speicher des Anrufbeantworters beantworters blinkt schnell ist voll. Löschen Sie Nachrichten aus dem Speicher. Der Anrufbeantworter − Stellen Sie sicher, dass der Anrufbe- nimmt keine Anrufe auf antworter korrekt angeschlossen und eingeschaltet ist.
-
Page 71: Wichtige Informationen
− Wichtige Informationen − Wichtige Informationen 19.1 Technische Daten Merkmal Wert Standard DECT−GAP Stromversorgung Basisstation 220/230 V, 50 Hz Reichweite (Außen/Innen) 300 m, 50 m Standby bis zu 120 h Max. Gesprächsdauer bis zu 10 h Aufladbare Standard−Akkus 2 x 1.2 V/750 mAh, Größe: AAA Wahlverfahren Ton−Wahlverfahren (DTMF) Impuls−Wahlverfahren (IWV) - Page 72 − Table des matières − Généralités ........Utilisation conforme aux prescriptions .
- Page 73 − Table des matières − Comment passer deux communications ..... . Affichage de la durée de la communication ....Mode mains−libres .
- Page 74 − Table des matières − Installations à postes supplémentaires / Services spéciaux ....... . Touche R avec les installations à...
- Page 75 ........16.1 Élargissement du système téléphonique CD738 ....
-
Page 76: Généralités
− Généralités − Généralités Veuillez lire ce mode d’emploi attentivement et complètement. N’ouvrez en aucun cas l’appareil et n’effectuez aucun essai de réparation vous−même. En ce qui concerne le droit à la garantie, adressez−vous à votre revendeur. Dans le cadre des améliorations de produit, nous nous réservons le droit d’apporter à... -
Page 77: Bloc Secteur
− Généralités − Bloc secteur N’utilisez que le bloc d’alimentation enfichable de SWITEL fourni avec l’appareil car d’autres modèles peuvent détruire le téléphone. Ne l’ouvrez pas. Il y a danger de mort si vous l’ouvrez tant qu’il est raccordé au réseau. -
Page 78: Restitution Des Anciens Appareils
− Généralités − Restitution des anciens appareils Si vous souhaitez jeter votre appareil SWITEL, veuillez l’apporter à votre déchetterie communale (p. ex. centre de recyclage). Le symbole apporté sur le côté de votre téléphone, signifie que l’appareil usagé ne doit pas être éliminé dans les ordures ménagères. -
Page 79: Caractéristiques
− Caractéristiques − Caractéristiques Téléphone DECT/GAP numérique standard Jusqu’à 10 heures de conversation continue Jusqu’à 120 heures de veille Codage de la parole pour une grande sécurité Numérotation par tonalité/Numérotation par impulsions (DTMF/IWV) Commutation temporaire de numérotation par impulsions (IWV) sur numérotation par tonalité (DTMF) Visualisation parfaite grâce à... -
Page 80: Répondeur
− Caractéristiques − Désactivation du micro (secret) Verrouillage du clavier Avertissement sonore pour batteries et portée Répondeur Guide de l’utilisateur parlé en anglais pour faciliter la manipulation Annonce du jour de la semaine et de l’heure à chaque message enregistré Capacité... -
Page 81: Eléments De Manipulation
− Eléments de manipulation − Eléments de manipulation Combiné 1. DEL affichage de communications 2. Écran graphique couleur 3. Touche écran droite 4. Touche terminer communication / Marche / Arrêt 5. Touche de navigation 6. Verrouillage du clavier / Pause 7. -
Page 82: Mise En Service
− Mise en service − Mise en service Remarques concernant la sécurité Attention : Avant de mettre votre téléphone en service, veuil- lez lire impérativement les généralités décrites au chapitre 1 de ce mode d’emploi. Contrôle du contenu du colis Les éléments suivants font partie de la livraison : une base un câble de raccordement télé-... -
Page 83: Placez Des Piles Rechargeables Standard
− Mise en service − Placez des piles rechargeables standard Pour insérer dans le combiné les − − piles rechargeables standard livrées avec l’appareil, appuyez sur le bord supérieur du cache du compartiment à piles. Poussez le vers le bas. Insérez les piles rechargeables standard en tenant compte de la polarisation correcte. -
Page 84: Rechargement Des Piles Rechargeables Standard
− Mise en service − Rechargement des piles rechargeables standard Posez le combiné sur la base, écran vers l’avant, et laissez−le pendant au moins 14 heures . Si les piles rechargeables standard ne sont pas correctement rechargées, il peut y avoir des erreurs de fonctionnement de la part du téléphone. -
Page 85: Navigation Et Structure Du Menu
− Navigation et structure du menu − Navigation et structure du menu L’écran L’écran graphique couleur affiche toutes les fonctions importantes avec leurs différents icônes et messages. À chaque pression d’une touche, l’écran s’allume pendant 10 secondes. Au bout de 30 secondes, l’économiseur d’écran se branche automatiquement sous la forme d’une horloge analogique. -
Page 86: Navigation Dans Le Menu
− Navigation et structure du menu − Icône Description Saisie d’un code réseau ou d’un numéro au menu SEL. INDIC.". Sélection du volume sonore de la mélode de sonnerie. Navigation dans le menu Vous avez accès à toutes les autres fonctions via un menu graphique très facile d’utilisation. - Page 87 − Navigation et structure du menu − Touches Description − En mode d’attente, la touche de visualisation ouvre le menu principal. − Le menu affiché s’ouvre si vous appuyez sur la touche de visualisation. − Tenez compte des textes accompagnant le menu situés au−dessus de la touche de visualisation.
-
Page 88: Vue D'ensemble De La Structure Du Menu
− Navigation et structure du menu − 3. Avec la touche de visualisation OK ce menu s’ouvre. 4. Avec la touche de navigation X vous pouvez sélectionner une fonction. 5. Avec la touche de visualisation OK cette fonction s’ouvre. 6. Avec la touche de navigation X vous pouvez sélectionner le réglage désiré. - Page 89 − Navigation et structure du menu − (volume 1 à 5, muet, SONS COMBINÉ croissant) (mélodie 1 à 20, externe) (mélodie 1 à 20, interne) (volume 1 à 5, muet, BASE croissant) (mélodie 1 à 10) SON TOUCHES MARCHE COMBINÉ ARRÊT SONS COMBINÉ...
- Page 90 − Navigation et structure du menu − FONCTIONS SPÉCIALES RÉPONSE AUTO ARRÊT MARCHE MODE SÉLECT. DTMF IMPULSIONS DURÉE FLASH FLASH 1 FLASH 2 PAUSE PAUSE 1 PAUSE 2 SÉL. INDIC. (entrer PIN ) SÉL. INDIC. 1 SÉL. INDIC. 2 SÉL. INDIC. 3 NO ACCÈS VERROUIL- (entrer...
- Page 91 − Navigation et structure du menu − SYSTÈME DÉCLARER SÉLECT BASE AUTO BASE 1 BASE 2 (si disponible) BASE 3 (si disponible) BASE 4 (si disponible) ANNUL DCL CB COMBINÉ 1 COMBINÉ 2 COMBINÉ 3 COMBINÉ 4 MODIFICATION DU CODE PIN RESET 5.4.2 Menu du répertoire...
- Page 92 − Navigation et structure du menu − 5.4.3 Répertoire pour numéros spéciaux Vous accédez au répertoire spécial en appuyant sur la touche R. NO SPÉCIAL VOIR AJOUTER ÉTAT EFFACER TOUS 5.4.4 Liste d’appels Vous accédez aux listes d’appels en appuyant sur la touche S. LISTES D’APPELS APP.
-
Page 93: Manipulation
− Manipulation − Manipulation Comment prendre un appel Si un appel vous parvient, la sonnerie d’appel du combiné et de la base se fait entendre. Prenez le combiné de la base pour prendre la communication. Pour terminer la communication, reposez le combiné sur la base. Prendre la communication Terminer la communication Remarque :Pendant que le combiné... -
Page 94: Comment Téléphoner
− Manipulation − Comment téléphoner Entrez le numéro d’appel (max. 20 chiffres) Composez le numéro Remarque :Si vous avez entré un chiffre erroné, vous pouvez déplacer le curseur avec la touche de navigation X et avec la touche de visualisation EFFACER effacer des positions individuelles du numéro. -
Page 95: Affichage De La Durée De La Communication
− Manipulation − Affichage de la durée de la communication Pendant une communication, l’écran affiche sa durée en minutes et secondes ainsi que le numéro du correspondant. La durée de communication des appels sortants et entrants est enregistrée. Vous trouverez de plus amples informations au chapitre 8.3. Mode mains−libres 6.6.1 Brancher le mode mains−libres... -
Page 96: Désactivation Du Microphone Du Combiné (Silencieux)
− Manipulation − Désactivation du microphone du combiné (silencieux) Pendant une communication, vous pouvez débrancher et brancher le microphone du combiné. Il est ainsi possible de parler à quelqu’un d’autre sans que le correspondant vous entende. Le haut−parleur du combiné reste branché si bien que vous pouvez continuer à entendre le correspondant. -
Page 97: Remarque Concernant La Portée
− Manipulation − 6.12 Remarque concernant la portée La portée du combiné est d’env. 50 mètres en pièces fermées et d’env. 300 mètres à l’extérieur. Sie une bonne connexion existe vers la base, l’icône suivant apparaît constamment sur l’ecran a. Remarque :Si vous vous êtes trop éloigné... -
Page 98: Répondeur Externe
− Manipulation − Remarque :L’annonce de votre prestataire de carte pastel vous demande votre numéro PIN. Entrer le numéro PIN Remarque :Ne conservez pas votre numéro PIN dans le répertoire afin de vous protéger contre un mauvais usage. PLUS , X RÉPERTOIRE , OK Sélectionner le menu et confirmer X, DETAILS , COMPOS. -
Page 99: Le Répertoire
− Le répertoire − Le répertoire Vous avez deux répertoires à votre disposition. Dans le répertoire PRIVÉ vous pouvez enregistrer 100 numéros, y compris le nom. Dans le répertoire COMMUN vous pouvez effectuer 20 enregistrements. Vous n’avez accès à des enregistrements dans le répertoire PRIVÉ qu’avec le combiné... -
Page 100: Remarques Concernant Le Répertoire
− Le répertoire − X RÉPERTOIRE Appuyer vers le haut ou vers le bas X, PLUS Sélectionner l’enregistrement X UTILISER NO , OK Sélectionner la fonction et confirmer Établir la connexion Pour composer des numéros du répertoire COMMUN , procédez comme suit: , X COMMUN , OK... -
Page 101: Saisie Du Nom
− Le répertoire − Saisie du nom Pour permettre la saisie de noms, des lettres sont inscrites sur les touches chiffrées. En appuyant plusieurs fois sur la touche adéquate, vous pouvez entrer des lettres, des chiffres et des symboles. Exemple : Vous désirez saisir le nom "Peter". Appuyez : 1 x touche 7, 2 x touche 3, 1 x touche 8, 2 x touche 3, 3 x touche Pour introduire un espace, appuyez une fois sur la touche 1. -
Page 102: Suppression D'enregistrements Sauvegardés Dans Le Répertoire
− Le répertoire − enregistrements du répertoire PRIVÉ que vous pouvez attribuer une sonnerie spéciale. MÉMOIRE Confirmez les modifications Suppression d’enregistrements sauvegardés dans le répertoire , X PRIVÉ ou COMMUN , OK Sélectionner le menu et confirmer X VOIR , OK Sélectionner la fonction et confirmer X, PLUS Sélectionner l’enregistrement... -
Page 103: Répertoire Pour Numéros Spéciaux
− Le répertoire − 7.9.1 Occuper les touches de sélection directe , X PRIVÉ , OK Sélectionner le menu et confirmer X SELEC DIRECT , OK Sélectionner la fonction et confirmer X, SELECT Sélectionner la touche et confirmer X, DETAILS , OK Sélectionner l’enregistrement et confirmer 7.9.2... -
Page 104: Composer Des Numéros Depuis Le Répertoire Spécial
− Le répertoire − Remarque :Veuillez demander à votre exploitant de réseau quel temps de flash vous devez régler pour utiliser les services confort (voir chapitre 13.3). Attention : Le maintien de communications est un service optionnel de votre exploitant de réseau. Veuillez lui demander de plus amples informations. -
Page 105: Affichage Du Numéro D'appel (Clip)
− Affichage du numéro d’appel (CLIP) − Affichage du numéro d’appel (CLIP) − L’affichage du numéro d’appel vous permet de savoir qui vous appelle à l’arrivée d’une communication. Si cette fonction est à votre disposition sur votre ligne téléphonique, l’écran vous indique le numéro du correspondant dès que le téléphone sonne. -
Page 106: Appeler Les Informations Sur Des Enregistrements Dans La Liste Des Appels
− Affichage du numéro d’appel (CLIP) − 8.1.2 Composer un numéro dans la liste d’appels Pour composer de numéros dans les différentes listes, veuillez procéder comme suit: Ouvrir le menu des listes d’appels X APP. MANQUÉS ou SÉLECTIONNÉ RÉCEPTIONNÉS , OK Sélectionner la liste d’appels et confirmer X, PLUS ou (V) -
Page 107: Enregistrer Dans Le Répertoire Des Numéros D'une Liste D'appels
− Affichage du numéro d’appel (CLIP) − 8.3.3 Durée totale de la communication Ouvrir le menu des listes d’appels X DURÉE COMM , OK Sélectionner le menu et confirmer X TOUS , OK Sélectionner l’option et confirmer Enregistrer dans le répertoire des numéros d’une liste d’appels Les numéros enregistrés des listes d’appels APP. -
Page 108: Effacer Des Enregistrements Dans Les Listes D'appels Et Les Effacer Complètement
− Affichage du numéro d’appel (CLIP) − Effacer des enregistrements dans les listes d’appels et les effacer complètement 8.5.1 Effacer des enregistrements individuels Ouvrir le menu des listes d’appels X APP. MANQUÉS ou SÉLECTIONNÉ ou RÉCEPTIONNÉS , OK Sélectionner la liste d’appels et confirmer X, PLUS Sélectionner des numéros... -
Page 109: Installations À Postes Supplémentaires / Services Spéciaux
Touche R et les services confort de votre exploitant de réseau Votre téléphone SWITEL supporte les services confort les plus importants de votre exploitant de réseau (par ex. le va−et−vient, la signalisation d’appel en instance, la conférence à trois). Veuillez demander à... -
Page 110: Réglages Pour L'écran
− Réglages pour l’écran − Réglages pour l’écran 10.1 Heure et format de l’heure L’heure affichée sur l’écran est automatiquement actualisée par le réglage du chronotimbre du répondeur (voir chapitre 17.2). Vous pouvez régler le format de l’heure de la manière suivante. Menu , X ÉCRAN , OK Sélectionner le menu et confirmer... -
Page 111: Fond D'écran
− Réglages pour l’écran − 10.4 Fond d’écran Trois motifs sont disponibles pour le fond d’écran. Choisissez entre papilon, fleur ou nuages. Menu , X ÉCRAN , OK Sélectionner le menu et confirmer X FOND , OK Sélectionner l’option et confirmer X, OK Sélectionner le fond et confirmer 10.5... -
Page 112: Régler La Sonnerie D'appel Et Les Signaux
−Régler la sonn. d’appel/les signaux d’avertissem.− Régler la sonnerie d’appel et les signaux d’avertissement 11.1 Réglage de la sonnerie d’appel du combiné et de la base Vous pouvez, sur votre combiné comme sur la base, régler différentes mélodies de sonnerie d’appel ainsi que le volume correspondant. Le combiné... -
Page 113: Brancher Et Débrancher Le Son Des Touches
−Régler la sonn. d’appel/les signaux d’avertissem.− 11.2 Brancher et débrancher le son des touches Un son est produit par votre combiné à chaque fois que l’on appuie sur une touche. Menu , X SONS , OK Sélectionner le menu et confirmer X SON TOUCHES COMBINÉ... -
Page 114: Extras
Activer la fonction Snooze STOP Terminer le signal de réveil 12.2 INTERPHONEBB Si vous avez deux combinés CD738 à votre disposition, vous pouvez les utiliser comme interphonebb". 12.2.1 Brancher et débrancher l’interphonebb Menu , X EXTRAS , OK Sélectionner le menu et confirmer X INTERPHONEBB , OK Sélectionner la fonction et confirmer... -
Page 115: Walky Talky
Terminer la surveillance de pièce 12.3 Walky Talky Si vous avez deux combinés CD738 à votre disposition, vous pouvez les utiliser comme Walky Talky". 12.3.1 Brancher/débrancher le Walky Talky MENU , X EXTRAS , OK Sélectionner le menu et confirmer... -
Page 116: Chronomètre
− Extras − 12.4.2 Débrancher la minuterie avant l’expiration du temps réglé. MENU , X EXTRAS , OK Sélectionner le menu et confirmer X MINUTERIE , OK Sélectionner la fonction et confirmer ARRÊT? Confirmer 12.5 CHRONOMÈTRE Vous pouvez mesurer les temps avec une résolution allant jusqu’à 10tel secondes. -
Page 117: Fonctions Spéciales
− Fonctions spéciales − Fonctions spéciales 13.1 Mise en communication automatique Si vous avez activé la fonction Prise de commutation automatique", un appel est automatiquement réceptionné à la prise du combiné de la base. MENU , X FONCT. SPÉC. , OK Sélectionner le menu et confirmer X RÉPONSE AUTO , OK Sélectionner la fonction et confirmer... -
Page 118: Sél. Indic
− Fonctions spéciales − X PAUSE 1 ou PAUSE 2 , OK Sélectionner le réglage et confirmer 13.5 SÉL. INDIC. À la fonction Sél. Ind.", vous pouvez sélectionner automatiquement un indicatif devant le véritable numéro. Cette sélection est principalement applicable pour les numéros Call−by−Call. Vous pouvez attribuer un numéro à... -
Page 119: Verrouillage
− Fonctions spéciales − Z, OK Entrer le code PIN et confirmer X o, X ARRÊT ou MARCHE Sélectionner le réglage X p, Z, OK Entrer le code réseau et confirmer 13.7 VERROUILLAGE Avec la fonction Verrouillage", vous pouvez bloquer tous les appels sortants ou également des préfixes déterminés. -
Page 120: Système
Déclaration et annulation de combinés Vous trouverez d’autres informations sur l’utilisation de plusieurs combinés au chapitre 15. Le réglage usine du code PIN est "0000". 14.1.1 Déclarer les combinés CD738 Appuyer pendant 3 secondes sur la touche Paging MENU , X SYSTÈME , OK Sélectionner le menu et confirmer... -
Page 121: Sélection D'une Base
− Système − 14.1.4 Annulation des combinés Il n’est pas possible d’annuler une inscription avec le combiné qui doit être déclaré. MENU , X SYSTÈME , OK Sélectionner le menu et confirmer X ANNUL DCL CB , OK Sélectionner la fonction et confirmer X, OK Sélectionner le combiné... -
Page 122: Modification Du Code Pin
− Système − 14.3 Modification du code PIN La déclaration et l’annulation de combinés et de nombreuses autres fonctions de votre téléphone sont protégées par un code PIN contre une utilisation non autorisée.Le code PIN peut être composé de 8 chiffres au maximum. - Page 123 − Système − 14.4.1 Réglages en usine combiné Nom du combiné: SWITEL Pause de numérotation: Pause 1 (2 sec) Format heure: 12 heures Temps de flash : Flash 1 (120ms) Langue: français Sél ind.: Arrrêt/ Vide Fond: papillon No accès: Arrrêt/...
- Page 124 − Système − 14.4.2 Réglage usine répondeur Répondeur: MARCHE Code de sécurité: Annonce: Standard Jour, heure: Lundi, 00:00 Mémoire messages: Vide Temporisation prise d’appel: Mémo: Vide Sortie langue: Anglais Volume: Signal indicateur: Arrêt Écoute amplifiée: Marche 14.4.3 Rétablissement des réglages usine Pour rétablir les réglages usine du combiné...
-
Page 125: Plusieurs Combinés
SWITEL ainsi que les combinés d’autres fabricants dans le système téléphonique. De même, vous pouvez déclarer un combiné SWITEL sur des bases d’autres fabricants dans la mesure où ces appareils travaillent d’après le GAP standard. -
Page 126: Téléphoner À L'intérieur
− Plusieurs combinés − 15.1 Téléphoner à l’intérieur Dès que vous avez inscrit deux combinés sur une base, vous pouvez passer des communications internes. Q, X, OK Appuyer, sélectionner le combiné et confirmer Prendre une communication interne Remarque : Si l’on vous appelle de l’extérieur pendant une communication interne, vous écoutez la sonnerie de votre base et sur l’écran de votre combiné... -
Page 127: Intercommunication / Va−Et−Vient
− Plusieurs combinés − 15.3 Intercommunication / Va−et−vient Vous pouvez, pendant une communication externe, sélectionner un autre combiné, pour intercommuniquer. Le correspondant externe sera maintenu en ligne pendant que vous parlez avec le correspondant interne. Après la communication interne, vous retzournez au correspondant externe. -
Page 128: Plusieurs Bases
4 stations différentes pour couvrir un plus grand espace dans lequel vous souhaitez utiliser vos combinés. Vous pouvez utiliser les bases CD738 et celles d’autres fabricants dans la mesure où ces appareils fonctionnent suivant le standard GAP. Pour cela, chacune des bases nécessite sa propre prise téléphonique. -
Page 129: Augmention De La Portée
− Plusieurs bases − 16.3 Augmention de la portée La portée de vos combinés peut être augmentée grâce au fait que vous placiez des bases à divers endroits chez vous ou à votre lieu de travail (voir graphique II). 1. Placez vos bases de telle sorte que la portée de chacune se recoupe (voir graphique II). -
Page 130: Le Répondeur
− Le répondeur − Le répondeur Les réglages que vous entreprenez sur le répondeur seront repris par une annonce. Basculez vers le haut le recouvrement de plastique situé au−dessus des touches de volume pour vous servir des touches J, K, L, M et N. -
Page 131: Réglages D'ordre Général
− Le répondeur − 17.5 Réglages d’ordre général 17.5.1 Temps d’enregistrement maximum Le répondeur peut enregistrer jusqu’à 60 messages entrants d’une longueur totale de 16 minutes. La durée maximale de chaque message entrant est de 2 minutes. Si le correspondant parle plus longtemps, la communication téléphonique sera interrompue. -
Page 132: Enregistrement, Contrôle Ou Suppression D'annonces
− Le répondeur − 17.6 Enregistrement, contrôle ou suppression d’annonces Votre répondeur met à votre disposition deux textes d’annonce préenregistrés. Le texte d’annonce après lequel un message peut être laissé, peut, bien entendu, être remplacé par un propre texte. Si aucune annonce n’a été... -
Page 133: Ecoute De Messages Enregistrés
− Le répondeur − 17.7.2 Ecoute d’un mémo Écouter le mémo Arrêter le mémo 17.7.3 Supprimer un mémo Écouter un mémo Appuyer sur cette touche pendant le mémo 17.8 Ecoute de messages enregistrés Quand un mémo a été enregistré, c’est le mémo qui est écouté avant les autres messages. -
Page 134: La Consultation À Distance
− Le répondeur − 17.10 La consultation à distance La consultation à distance permet d’appeler le répondeur d’un téléphone quelconque ayant la fonctionnalité numérotation par tonalité pour écouter des messages et effectuer d’autres fonctionnalités. 17.10.1 Le code de sécurité pour la consultation à distance Votre répondeur est pourvu d’un droit d’accès personnel si bien que vous seul pouvez écouter les messages entrants par l’intermédiaire de la consultation à... - Page 135 − Le répondeur − 17.10.4 Fonctions des touches de la consultation à distance Les fonctions des touches sont dépendantes du mode dans lequel vous vous trouvez. Le tableau suivant vous donne une vue d’ensemble des fonctions de chaque touche. Touche Fonctions pendant Fonctions pendant l’écoute du menu auxi-...
- Page 136 − Le répondeur − 17.10.5 Activation à distance du répondeur Vous avez la possibilité, à partir d’un autre téléphone à numérotation vocale, d’activer le répondeur. Composer ses propres numéros Touche *, Z Attendre 10 sonneries et l’actionner après le signal d’avertissement et entrer le code PIN.
-
Page 137: Elimination Des Perturbations
− Elimination des perturbations − Elimination des perturbations Si vous avez des problèmes avec votre téléphone, contrôlez tout d’abord les indications suivantes sur votre appareil. En ce qui concerne le droit à la garantie, veuillez vous adresser à votre revendeur. Erreurs Solutions Pas de connexion possi-... - Page 138 − Elimination des perturbations − Erreurs Solutions Le voyant du contrôle de − Placez le combiné correctement sur la charge n’est pas allumé base, nettoyez les surfaces de contact du combiné et de la base avec un chif- fon sec et doux. Le combiné...
- Page 139 − Elimination des perturbations − Erreurs Solutions La DEL F du répon- − La mémoire du répondeur est pleine. deur clignote rapidement Supprimez des messages. Le répondeur n’enregistre − Assurez−vous que celui−ci est correcte- pas d’appels ment connecté et branché. −...
-
Page 140: Informations Importantes
− Informations importantes − Informations importantes 19.1 Données techniques Caractéristique Valeur Standard DECT−GAP Alimentation en courant Base 220/230 V, 50 Hz Portée (à l’extérieur / à l’intérieur) 300 m, 50 m Etat de veille Jusqu’à 120 h Durée max. de communication jusqu’à... - Page 141 − Indice − Indicazioni generali ....... Impiego conforme agli usi previsti .
-
Page 142: Indice
− Indice − Visualizzazione della durata di chiamata ..... Funzione vivavoce ........Impostare il volume del ricevitore . - Page 143 − Indice − Tasto R e i servizi a valore aggiunto del proprio gestore di rete telefonica ..........Immettere una pausa di selezione .
- Page 144 ....16.1 Ampliamento del sistema telefonico CD738 ....
-
Page 145: Indicazioni Generali
− Indicazioni generali − Indicazioni generali Si prega di leggere attentamente le presenti istruzioni per l’uso. Non aprire per nessuna ragione l’apparecchio autonomamente e svolgere riparazioni di propria iniziativa. In caso di reclami entro il periodo di garanzia si prega di rivolgersi al rivenditore autorizzato. Con riserva di modifiche tecniche ed ottiche dell’articolo dovute a migliorie di sviluppo. -
Page 146: Alimentatore Di Rete
− Indicazioni generali − Alimentatore di rete Utilizzare esclusivamente l’alimentatore a spina SWITEL fornito in dotazione visto che altri alimentatori di rete potrebbero addirittura danneggiare il telefono. Non aprire l’alimentatore di rete. Pericolo di vita in caso di apertura dell’alimentatore di rete fino a quando questo è... -
Page 147: Resa Di Apparecchi Usati
− Indicazioni generali − Resa di apparecchi usati Volendo procedere allo smaltimento dell’apparecchio SWITEL, consegnare questo presso il punto di raccolta dell’azienda di smaltimento comunale (per es. punti di raccolta per materiali riciclabili). Il simbolo raffigurato qui a lato e riportato sul telefono indica che non è... -
Page 148: Prestazioni
− Prestazioni − Prestazioni Telefono Standard DECT/GAP digitale Fino a 10 ore di autonomia di conversazione Fino a 120 ore di stand−by Codifica della parola per elevata sicurezza Selezione a toni/Selezione a impulsi (DTMF/PSI) Commutazione temporanea da selezione a impulsi (PSI) a selezione a toni (DTMF) Ottima visualizzazione grazie a display grafico a colori retroilluminato... -
Page 149: Segreteria Telefonica
− Prestazioni − Silenziamento del microfono Blocco tastiera Segnale di avviso portata / Batteria scarica Segreteria telefonica Guida vocale dell’operatore in inglese per un facile esercizio Indicazione di giorno settimanale e orario per ogni messaggio registrato Capacità di memoria fino a 16 minuti Capacità... -
Page 150: Elementi Di Comando
− Elementi di comando − Elementi di comando Unità portatile 1. LED di visualizzazione di chiamata 2. Display grafico a colori 3. Tasto di display a destra 4. Tasto concludere chiamata / ON / OFF 5. Tasto di navigazione 6. Blocco tastiera / Pausa 7. -
Page 151: Messa In Funzione
− Messa in funzione − Messa in funzione Indicazioni di sicurezza Attenzione: Leggere attentamente prima della messa in fun- zione le indicazioni generali riportate al capitolo 1delle presenti istruzioni per l’uso. Verificare il contenuto della confezione La confezione contiene: una stazione base un cavo di collegamento telefonico un’unità... -
Page 152: Inserire Le Batterie Standard Ricaricabili
− Messa in funzione − Inserire le batterie standard ricaricabili Al fine di inserire le batterie standard − − ricaricabili fornite in dotazione all’interno dell’unità portatile, premere sulla parte superiore del coperchio del vano batterie. Spingere il coperchio del vano batterie verso il basso. -
Page 153: Caricare Le Batterie Standard Ricaricabili
− Messa in funzione − Caricare le batterie standard ricaricabili Inserire l’unità portatile con il display rivolto in avanti per una durata di minimo 14 ore nella stazione base. L’uso di batterie standard non ricaricate in maniera corretta può causare difetti o guasti al telefono. Le batterie standard ricaricabili dell’apparecchio portatile sono in grado di garantire una durata di stand−by di max. -
Page 154: Il Display
− Navigazione e struttura menu − Navigazione e struttura menu Il display Il display grafico a colori indica le funzioni più importanti per mezzo di simboli e messaggi differenti. Ogni volta che si preme un tasto il display si illumina per 10 secondi. Dopo 30 secondi si attiva automaticamente il salvaschermo raffigurante un orologio analogico. -
Page 155: Navigazione Nel Menu
− Navigazione e struttura menu − Simbolo Descrizione Immissione di un numero di accesso alla rete esterna o di un numero nel menu PRESELEZIONE". Selezione del volume per la melodia di suoneria. Navigazione nel menu Tutte le funzioni sono accessibili attraverso un menu grafico di facile uso. - Page 156 − Navigazione e struttura menu − Tasto Descrizione − Nella modalità di stand−by questo tasto di display con- sente di accedere al menu principale. − Il menu visualizzato è aperto nel momento in cui si preme il tasto di display. −...
-
Page 157: Panoramica Sulla Struttura Di Menu
− Navigazione e struttura menu − 4. Con il tasto di navigazione X è possibile selezionare una funzione. 5. Con il tasto di display OK la funzione selezionata è aperta. 6. Con il tasto di navigazione X è possibile selezionare l’impostazione desiderata. - Page 158 − Navigazione e struttura menu − (Volume da 1 a 5, OFF, TONI MOBILE crescente) (Melodia di suoneria da 1 a 20, esterna) (Melodia di suoneria da 1 a 20, interna) (Volume da 1 a 5, OFF, BASE crescente) (Melodia di suoneria da 1 a 10) CLIC TASTI M TONI M...
- Page 159 − Navigazione e struttura menu − FUNZ. SPEC. RICEZ. AUTO MODO SELEZ. A FREQUENZE AD IMPULSI TEMPO FLASH FLASH 1 FLASH 2 PAUSA PAUSA 1 PAUSA 2 PRESELE- (immet- ZIONE tere PIN) PRESELEZIONE 1 PRESELEZIONE 2 PRESELEZIONE 3 NO. ACC. R.
- Page 160 − Navigazione e struttura menu − SISTEMA REGISTRA SELEZ. BASE AUTO BASE 1 BASE 2 (se disponibile) BASE 3 (se disponibile) BASE 4 (se disponibile) DEREGISTRA M MOBILE 1 MOBILE 2 MOBILE 3 MOBILE 4 MODIFICA PIN RESET 5.4.2 Menu rubrica telefonica Nel menu rubrica telefonica si giunge premendo il tasto di display NOMI .
- Page 161 − Navigazione e struttura menu − 5.4.3 Rubrica telefonica per numeri telefonici speciali Nella rubrica telefonica per numeri speciali si giunge premendo il tasto NO. SPECIALE MOSTRA AGGIUNGI STATO CANC. TUTTO 5.4.4 Elenchi chiamate Negli elenchi chiamate si giunge premendo il tasto S. LISTA CHIAM.
-
Page 162: Esercizio
− Esercizio − Esercizio Ricevere chiamate Una segnalazione acustica di chiamata presso unità portatile e stazione base indica una chiamata in arrivo. Estrarre l’unità portatile dalla stazione base per accettare la chiamata. Alla fine della telefonata, riporre l’unità portatile nuovamente indietro nella stazione base. oppure Accettare la chiamata Concludere la chiamata... -
Page 163: Condurre Due Telefonate
− Esercizio − Avvertenza: In caso di immissione di un numero errato, è possibile spostare il cursore con il tasto di navigazione X e procedere con il tasto di display CANCELLA alla cancellazione di singole cifre del numero di chiamata. E’... -
Page 164: Visualizzazione Della Durata Di Chiamata
− Esercizio − Visualizzazione della durata di chiamata Mentre è in svolgimento una chiamata, sul display viene visualizzata la durata di conversazione in minuti e secondi oltre al numero di chiamata del rispettivo interlocutore. La durata di conversazione è salvata sia per chiamate selezionate sia per chiamate ricevute. -
Page 165: Silenziamento Del Microfono Nell'unità Portatile
− Esercizio − Silenziamento del microfono nell’unità portatile E’ possibile attivare e disattivare il microfono dell’unità portatile durante una chiamata telefonica in corso. Questo consente di parlare con un’altra persona senza che il partner di chiamata possa sentire la conversazione. L’altoparlante presente nell’unità portatile rimane invece attivo, continuando a sentire il partner di chiamata in linea. -
Page 166: Selezione A Toni Temporanea
− Esercizio − Avvertenza: Nel caso di un allontanamento eccessivo dalla stazione base, il simbolo a lampeggia facendo inoltre risuonare un segnale acustico di allarme. Avvicinarsi di nuovo alla stazione base altrimenti la chiamata in corso sarà interrotta. Nel caso in cui l’unità... -
Page 167: Segreteria Telefonica Esterna
− Esercizio − ALTRO , X RUBR. TELEF. , OK Selezionare e confermare il menu X, DETTAG. , SELEZ. Selezionare e confermare la voce Avvertenza: Mentre è in corso una telefonata è consentito collegare un numero qualsiasi di voci presenti nella rubrica telefonica. 6.15 Segreteria telefonica esterna Nel caso in cui il gestore della rete telefonica metta a disposizione una... -
Page 168: La Rubrica Telefonica
− La rubrica telefonica − − La rubrica telefonica − Sono disponibili due rubriche telefoniche. Nella rubrica telefonica PRIVATO è possibile memorizzare 100 numeri di chiamata inclusi i rispettivi nomi. Nella rubrica telefonica IN COMUNE è possibile memorizzare 20 voci. Le voci memorizzate nella rubrica telefonica PRIVATO sono accessibili solo per l’unità... -
Page 169: Avvertenze Riguardo La Rubrica Telefonica
− La rubrica telefonica − X, V Selezionare una voce e instaurare un collegamento X RUBR. TELEF. Premere in alto o in basso X, ALTRO Selezionare una voce X UTILIZZA NO. , OK Selezionare e confermare la funzione Instaurare un collegamento Per selezionare numeri di chiamata dalla rubrica telefonica IN COMUNE procedere come segue: NOMI , X IN COMUNE , OK... -
Page 170: Immettere Nomi
− La rubrica telefonica − La rubrica telefonica è accessibile anche con chiamata telefonica in corso. Con il tasto display ALTRO si passa alla RUBR. TELEF. . in tal modo è possibile indicare al proprio partner di chiamata un numero di chiamata dalla propria rubrica telefonica. -
Page 171: Cancellare Voci Memorizzate Dalla Rubrica Telefonica
− La rubrica telefonica − X k, Z Modificare il numero di chiamata (max. 20 posizioni) Modificare la melodia di suoneria Avvertenza: Selezionando l’impostazione OFF viene riprodotta la segnalazione acustica di chiamata impostata. Solo alle voci presenti nella rubrica telefonica PRIVATO è possibile assegnare una segnalazione acustica di chiamata specifica. -
Page 172: Rubrica Telefonica Per Numeri Telefonici Speciali
− La rubrica telefonica − Premere il tasto di selezione diretta desiderato per 2 secondi e la voce dell’elenco telefonico rispettivamente memorizzata è subito selezionata. 7.9.1 Occupare i tasti di selezione diretta NOMI , X PRIVATO , OK Selezionare e confermare il menu X SELEZ. -
Page 173: Selezionare Numeri Di Chiamata Dalla Rubrica Telefonicaspeciale
− La rubrica telefonica − interlocutore, la prima chiamata è trattenuta. Il numero di passaggi della chiamata tra i due interlocutori di chiamata è illimitato. V, 2 Cambiare il partner di chiamata Avvertenza: Si prega di consultare il proprio gestore di propria rete telefonica per l’impostazione del tempo flash necessario per l’utilizzo dei servizi a valore aggiunto (vedi capitolo 13.3). -
Page 174: Visualizzazione Del Numero Di Chiamata (Clip)
− Visualizzazione del numero di chiamata (CLIP) − Visualizzazione del numero di chiamata (CLIP) Grazie alla funzione di visualizzazione del numero di chiamata è possibile individuare il chiamante con telefonata in arrivo. A condizione che la linea telefonica offra questa funzione, sul display LCD sarà visualizzato il numero del chiamante non appena il telefono squilla. -
Page 175: Richiamo Di Informazioni Sulle Immissioni Degli Elenchi Chiamate
− Visualizzazione del numero di chiamata (CLIP) − 8.1.2 Selezionare un numero di chiamata da un elenco chiamate Per selezionare un numero di chiamata dai differenti elenchi chiamate, procedere come segue: Aprire il menu elenchi chiamata X PERDUTA oppure SELEZIONATA oppure RICEVUTA , OK Selezionare e confermare l’elenco... -
Page 176: Memorizzare Un Numero Di Chiamata Da Un Elenco
− Visualizzazione del numero di chiamata (CLIP) − 8.3.3 Durata di conversazione complessiva Aprire il menu elenchi chiamata X TEMPO CONV. , OK Selezionare e confermare il menu X TUTTO , OK Selezionare e confermare l’opzione Memorizzare un numero di chiamata da un elenco chiamate nella rubrica telefonica I numeri di chiamata riportati negli elenchi chiamate PERDUTA , SELEZIONATA oppure RICEVUTA possono essere memorizzati... -
Page 177: Cancellare Singole Voci Dagli Elenchi Chiamate E Cancellare Tutto
− Visualizzazione del numero di chiamata (CLIP) − Cancellare singole voci dagli elenchi chiamate e cancellare tutto 8.5.1 Cancellare singole voci Aprire il menu elenchi chiamata oppure SELEZIONATA X PERDUTA oppure RICEVUTA , OK Selezionare e confermare l’elenco chiamate X, ALTRO Selezionare il numero di chiamata X CANCELLA , OK Selezionare e confermare la... -
Page 178: Impianti Telefonici Int. / Servizi Aggiunti
Tasto R e i servizi a valore aggiunto del proprio gestore di rete telefonica Il telefono SWITEL supporta i più importanti servizi a valore aggiunto del proprio gestore di rete telefonica (per es. funzioni di chiamata in attesa, avviso di chiamata, conferenza a tre). Si prega di consultare il proprio gestore di propria rete telefonica per l’impostazione del tempo flash... -
Page 179: Impostazioni Del Display
− Impostazioni del display − Impostazioni del display 10.1 Orario e formato ora L’orario riportato sul display è aggiornato automaticamente attraverso l’impostazione di data e orario per la segreteria telefonica (vedi capitolo 17.2). Il formato ora è impostabile come segue. MENU , X DISPLAY , OK Selezionare e confermare il menu X FORMATO ORA , OK... -
Page 180: Sfondo
− Impostazioni del display − 10.4 Sfondo Per lo sfondo del display è possibile scegliere fra tre motivi differenti. Sono disponibili wallpaper con farfalle, fiori o nuvole. MENU , X DISPLAY , OK Selezionare e confermare il menu X SFONDO , OK Selezionare e confermare l’opzione X, OK Selezionare e confermare lo sfondo... -
Page 181: Impostare La Suoneria E I Segnali Acustici
− Impostare la suoneria e i segnali acustici − Impostare la suoneria e i segnali acustici 11.1 Impostare la segnalazione acustica di chiamata presso unità portatile e stazione base Presso unità portatile e stazione base è possibile scegliere delle melodie di segnalazione di chiamata differenti con impostazione di volume separata. -
Page 182: Attivare E Disattivare Il Suono Tasti
− Impostare la suoneria e i segnali acustici − 11.2 Attivare e disattivare il suono tasti Ogni volta che si preme un tasto, l’unità portatile emette un suono. MENU , X TONI , OK Selezionare e confermare il menu X CLIC TASTI M , OK Selezionare e confermare la funzione X OFF oppure ON , OK Selezionare e confermare... -
Page 183: Extra
Attivare la funzione di snooze STOP Spegnere il segnale di allarme 12.2 Monitor bebe Avendo a disposizione due unità portatili del tipo CD738, gli apparecchi possono essere utilizzati come MONITOR BEBE". 12.2.1 Attivare e disattivare il monitor bebe MENU , X EXTRA , OK... -
Page 184: Walky Talky
Concludere la sorveglianza della stanza 12.3 Walky talky Avendo a disposizione due unità portatili del tipo CD738, gli apparecchi possono essere utilizzati come WALKY TALKY". 12.3.1 Attivare e disattivare i walky talky MENU , X EXTRA , OK... -
Page 185: Cronografo
− Extra − 12.4.1 Attivare il timer MENU , X EXTRA , OK Selezionare e confermare il menu X TIMER , OK Selezionare e confermare la funzione X ORA oppure MINUTO oppure SECONDO , OK Impostare l’orario STOP Concludere il segnale acustico. 12.4.2 Disattivare il timer prima del decorso dell’orario impostato MENU , X EXTRA , OK... -
Page 186: Funzioni Speciali
− Funzioni speciali − Funzioni speciali 13.1 Accettazione di chiamata automatica In caso di attivazione della funzione Accettazione di chiamata automatica", una chiamata telefonica è accettata automaticamente non appena si estrae l’unità portatile dalla stazione base. MENU , X FUNZ. SPEC. , OK Selezionare e confermare il menu X RICEZ. -
Page 187: Preselezione
− Funzioni speciali − MENU , X FUNZ. SPEC. , OK Selezionare e confermare il menu X PAUSA , OK Selezionare e confermare la funzione X PAUSA 1 oppure PAUSA 2 , OK Selezionare e confermare l’impostazione 13.5 Preselezione Con la funzione PRESELEZIONE" è possibile compiere la preselezione automatica di un numero davanti al numero di chiamata vero e proprio. -
Page 188: Numero Di Accesso Alla Rete Esterna
− Funzioni speciali − 13.6 Numero di accesso alla rete esterna In presenza di impianti telefonici interni è necessario selezionare un determinato numero (per es. 9" o 0 ) prima di ottenere un segnale di libero che indica la disponibilità della linea di collegamento di rete. Questo numero di accesso alla rete esterna è... -
Page 189: Sistema
Ulteriori informazioni riguardo l’utilizzo di un numero maggiore di unità portatili sono riportate nel capitolo 15. L’impostazione di default del codice PIN corrisponde a "0000". 14.1.1 Selezione di unità portatili CD738 Premere il tasto di paging per 3 secondi MENU , X SISTEMA , OK... -
Page 190: Selezione Di Una Stazione Base
− Sistema − 14.1.4 Deselezione di unità portatili Non è possibile compiere una deselezione con la stessa unità portatile che si desidera deselezionare. MENU , X SISTEMA , OK Selezionare e confermare il menu X DEREGISTRA M , OK Selezionare e confermare la funzione X, OK Selezionare e confermare l’unità... -
Page 191: Modifica Del Codice Pin
− Sistema − 14.3 Modifica del codice PIN Allo scopo di proteggere la selezione e deselezione di unità portatili e numerose altre funzioni del telefono, questo sono protette da un codice PIN che ne impedisce un accesso non autorizzato. Il codice PIN può essere composto da fino a otto cifre numeriche. - Page 192 − Sistema − 14.4.1 Impostazioni di default dell’unità portatile Nome unità portatile: SWITEL Pausa di selezione: Pausa 1 (2 sec) Formato orario: 12 ore Tempo flash: Flash 1 (120ms) Lingua:Tedesco Preselezione: OFF/ vuoto Sfondo: Farfalla Numero di accesso alla rete...
- Page 193 − Sistema − 14.4.2 Impostazioni di default della segreteria telefonica Segreteria telefonica: ON Codice di sicurezza: Annuncio: Standard Giorno, orario: Lunedì, 00:00 Memoria di messaggi: Vuoto Ritardo dell’accettazione di chiamate: Promemoria: Vuoto Inglese Lingua di annuncio: Volume: Segnale di avviso: Intercettazione: 14.4.3 Ripristinare le impostazione di default...
-
Page 194: Maggior Numero Di Unità Portatili
Avvertenza: Lo standard internazionale GAP consente di integrare unità portatili SWITEL così come unità portatili di altri costruttori in un unico sistema telefonico. Allo stesso modo è possibile selezionare unità portatili SWITEL per stazioni base di altri costruttori, a condizione che gli apparecchi dispongano della funzione GAP standard. -
Page 195: Telefonate Interne
− Maggior numero di unità portatili− 15.1 Telefonate interne A conclusione della selezione di due unità portatili presso una stazione base sarà possibile condurre chiamate interne. Q, X, OK Premere, selezionare l’unità portatile e confermare Accettare una chiamata interna Avvertenza: Se durante lo svolgimento di una chiamata interna sopraggiunge una telefonata esterna, la stazione base emette una segnalazione acustica e sul display della propria unità... -
Page 196: Riscontro / Chiamata In Attesa
− Maggior numero di unità portatili− 15.3 Riscontro / Chiamata in attesa Durante lo svolgimento di una chiamata esterna è possibile chiamare un’altra unità portatile allo scopo di consultarsi o eseguire un riscontro. Mentre è in corso la conversazione con l’interlocutore interno, la chiamata esterna è... -
Page 197: Maggior Numero Di Stazioni Base
A tale scopo si prestano sia stazioni base CD738 sia stazioni base di altri costruttori, sebbene sia essenziale osservare che questi apparecchi operino seguendo lo standard GAP. -
Page 198: Aumento Della Portata
− Maggior numero di stazioni base − 16.3 Aumento della portata Al fine di ampliare la portata delle unità portatili è possibile installare, all’interno dell’abitazione o presso il posto di lavoro, delle stazioni base in aree differenti (vedi disegno II). 1. -
Page 199: La Segreteria Telefonica
− La segreteria telefonica − La segreteria telefonica Impostazioni eseguite sulla segreteria telefonica sono ripetute da un annuncio vocale. Ribaltare il coperchio in plastica al di sopra dei tasti di volume verso sopra , per poter comandare i tasti J, K, L, M e N. Nel caso in cui la segreteria telefonica avesse già... -
Page 200: Impostazioni Generali
− La segreteria telefonica − 17.5 Impostazioni generali 17.5.1 Durata di registrazione massima La segreteria telefonica consente di memorizzare digitalmente fino a 60 chiamate in arrivo con una lunghezza complessiva di 16 minuti. La lunghezza massima per un messaggio in arrivo è di 2 minuti. Nel caso in cui il chiamante parlasse più... -
Page 201: Registrare, Verificare O Cancellare Annunci
− La segreteria telefonica − 17.6 Registrare, verificare o cancellare annunci La segreteria telefonica dispone di due annunci predefiniti. Il messaggio di annuncio predefinito, dopo il quale è possibile lasciare un messaggio, può naturalmente essere sostituito da un testo di annuncio personale. In caso di mancata registrazione di un annuncio personalizzato, la segreteria risponde automaticamente con l’annuncio standard predefinito. -
Page 202: Ascoltare I Messaggi Registrati
− La segreteria telefonica − 17.7.2 Ascoltare il promemoria Riprodurre il promemoria Arrestare il promemoria 17.7.3 Cancellare il promemoria Riprodurre il promemoria Premere durante il promemoria 17.8 Ascoltare i messaggi registrati Avendo precedentemente registrato un promemoria, in caso di ascolto è prima riprodotto il promemoria e quindi i messaggi registrati. -
Page 203: Interrogazione A Distanza
− La segreteria telefonica − 17.10 Interrogazione a distanza L’interrogazione a distanza consente di chiamare la propria segreteria telefonica da un telefono qualsiasi con procedura di selezione a toni per ascoltare eventuali messaggi e compiere altre funzioni. 17.10.1 Codice di sicurezza per l’interrogazione a distanza La segreteria telefonica prevede un accesso personale sicché... - Page 204 − La segreteria telefonica − 17.10.4 Funzioni dei tasti durante l’interrogazione a distanza Le funzioni dei tasti dipendono dalla modalità nella quale ci si trova. La seguente tabella offre una vista generale delle rispettive funzioni dei singoli tasti. Tasto Funzioni da svolgere du- Funzioni da svolgere du- rante la riproduzione del rante la riproduzione di un...
- Page 205 − La segreteria telefonica − 17.10.5 Attivazione a distanza della segreteria telefonica E’ dato modo di attivare la segreteria telefonica da un altro telefono abilitato alla selezione a toni. Selezionare il proprio numero di chiamata Tasto *, Z Attendere 10 squilli di chiamata, premere dopo il segnale acustico e immettere il codice PIN Avvertenza: In caso di immissione errata, l’annuncio della segreteria...
-
Page 206: Eliminazione Di Errori
− Eliminazione di errori − Eliminazione di errori In presenza di problemi con il telefono, si prega di verificare innanzitutto quanto riportato nelle seguenti indicazioni. In caso di reclami entro il periodo di garanzia si prega di rivolgersi al rivenditore autorizzato. Errore Soluzione Non è... - Page 207 − Eliminazione di errori − Errore Soluzione La spia di controllo dello − Posizionare l’unità portatile corretta- stato di carica non è ac- mente nella stazione base, pulire le cesa superfici di contatto presso unità porta- tile e stazione base con un panno mor- bido e asciutto.
- Page 208 − Eliminazione di errori − Errore Soluzione Il LED F della segrete- − La memoria della segreteria telefonica ria telefonica lampeggia è piena. Cancellare i messaggi dalla con una frequenza elevata memoria. La segreteria telefonica − Assicurarsi che la segreteria telefonica non registra più...
-
Page 209: Informazioni Importanti
− Informazioni importanti − Informazioni importanti 19.1 Dati tecnici Caratteristica Valore Standard DECT−GAP Alimentazione elettrica Stazione base 220/230 V, 50 Hz Distanza (esterni/interni) 300 m, 50 m Autonomia di stand−by fino a 120 ore Autonomia di chiamata fino a 10 ore Batterie standard ricaricabili 2 x 1.2 V/750 mAh, tipo: AAA Procedura di selezione... - Page 210 − Contents − General Information ....... Intended use ..........Power failure .
- Page 211 − Contents − Displaying the call timer ........Handsfree .
- Page 212 − Contents − Private Branch Exchanges / Supplementary Services ......R button on private branch exchanges .
- Page 213 ......16.1 Extending the CD738 telephone system ..... .
-
Page 214: General Information
− General Information − General Information Please read this operating instruction manual thoroughly. Under no circumstances open the device or complete any repair work yourself. In the case of claims under the terms of guarantee, contact your sales outlet. We reserve the right to make technical and optical modifications to the product during the course of product improvement. -
Page 215: Power Supply
− General Information − Power supply Only use the Switel power adapter plug supplied because other power supplies could destroy the telephone. Do not open the power adapter plug. There is a risk of fatal injury if the power adapter plug is opened and not disconnected from the power supply. -
Page 216: Disposing Of Old Equipment
− General Information − Disposing of old equipment When your Switel equipment has come to the end of its operating life, dispose of it at the collecting point provided by your local, public waste disposal service (e.g. recycling center). The adjacent symbol on your telephone indicates that the old equipment must not be disposed of in normal domestic waste. -
Page 217: Features
− Features − Features Telephone Digital DECT / GAP standard Up to 10 hours continuous conversation Up to 120 hours standby Voice scrambling for a high level of security Tone/Pulse dialling modes Temporary switching from pulse to tone dialling modes Excellent legibility through illuminated, graphical display Illumination of the keypad Call identification, compatible with FSK/DTMF (automatic) -
Page 218: Answering Machine
− Features − Answering machine Voice guidance in English for simple operation Weekday and time announcement for each message recorded Storage capacity up to 16 minutes Recording capacity for up to 60 messages Pre−recorded, neutral outgoing messages Outgoing message of up to 40 seconds can be recorded Pre−recorded outgoing message when memory is full (outgoing message only) Selective deletion of individual messages or delete all... -
Page 219: Operating Elements
− Operating Elements − Operating Elements Handset 1. LED, call indicator 2. Graphical colour display 3. Display button, right 4. End call / On/Off button 5. Navigation button 6. Key lock / Pause 7. Calls list menu (calls missed, dialled and received) 8. -
Page 220: Starting Up
− Starting Up − Starting Up Safety notes Caution: It is essential to read the General Information in chapter 1 of this manual before starting up. Checking the package contents The package contains: a base station a telephone connection cable one handset with belt clip two rechargeable standard batte- ries... -
Page 221: Inserting The Standard Batteries
− Starting Up − Inserting the standard batteries In order to insert the rechargeable − − standard batteries in the handset, press on the top edge of the battery compartment cover. Slide the battery compartment cover downwards. Insert the standard batteries, paying attention to correct polarity. -
Page 222: Charging The Standard Batteries
− Starting Up − Charging the standard batteries Place the handset, with its display facing the front, for at least 14 hours in the base station or charging station. Failure to charge the batteries properly can lead to telephone malfunction. The rechargeable standard batteries in the handset have a maximum standby time of 120 hours at room temperature. -
Page 223: Navigation And Menu Structure
− Navigation and Menu Structure − Navigation and Menu Structure Display The graphical, colour display indicates all the important functions by means of various icons and messages. After pressing any button, the display lights up for 10 seconds. The screen saver, which takes the form of an analogue clock, is activated automatically after 30 seconds. -
Page 224: Navigating In The Menu
− Navigation and Menu Structure − Navigating in the menu All the functions can be accessed by means of a user friendly, graphical menu. The Display buttons T and U are assigned different functions in the various menus and phone books. Pay attention to the texts above the Display buttons which accompany the menu because they state the function currently assigned to the button and help you to navigate correctly and intuitively. - Page 225 − Navigation and Menu Structure − Button Description − In Standby mode, this Display button opens the main menu. − Pressing the Display button opens the menu displayed. − Pay attention to the texts accompanying the menus which appear above the Display button. −...
-
Page 226: Menu Structure Overview
− Navigation and Menu Structure − Note: Every programming process is automatically cancelled if there is no input within 30 seconds. 9. Press the W button at any time to exit from Programming mode and return to Standby mode without making any changes. - Page 227 − Navigation and Menu Structure − SOUNDS HANDSET (volume 1 to 5, off, crescendo) (ringer melody 1 to 20, exter- nal) (ringer melody 1 to 20, inter- nal) BASE (volume 1 to 5, off, crescendo) (ringer melody 1 to 10) HS KEY TONES HS TONES EXTRAS...
- Page 228 − Navigation and Menu Structure − ADVANCED AUTO ANSWER DIAL MODE TONE PULSE RECALL RECALL 1 RECALL 2 PAUSE PAUSE 1 PAUSE 2 PREFIX (enter PIN) PREFIX 1 PREFIX 2 PREFIX 3 PABX CALL (enter PIN) HANDSET 1 BARRING HANDSET 2 HANDSET 3 HANDSET 4...
- Page 229 − Navigation and Menu Structure − SYSTEM REGISTER BASE SELECT AUTO BASE 1 BASE 2 (if available) BASE 3 (if available) BASE 4 (if available) DELETE HS HANDSET 1 HANDSET 2 HANDSET 3 HANDSET 4 CHANGE PIN RESET 5.4.2 Phone book menu (PHBK menu) Open the phone book menu by pressing the Display button NAMES .
- Page 230 − Navigation and Menu Structure − 5.4.3 Phone book for service phone numbers Access the service phone book by pressing the R button. SERVICES VIEW ADD ENTRY STATUS DELETE ALL 5.4.4 Calls lists Access the calls recorded lists by pressing the S button. CALL RECORDS MISSED DIALLED...
-
Page 231: Operation
− Operation − Operation Taking a call When a call is received, both the handset and base station ring. Remove the handset from the base station to take the call. To end the call, replace the handset in the base station. Take the call End the call Note:... -
Page 232: Making A Call
− Operation − Making a call Enter the phone number (max. 20 digits) Dial the phone number Note: If you have entered an incorrect digit, use the Navigation button X to move the cursor and press the Display button CLEAR to delete individual digits from the phone number. -
Page 233: Displaying The Call Timer
− Operation − Displaying the call timer When a call is being made, the call time is indicated in minutes and seconds and the number of the person called appears in the display. The duration of outgoing and incoming calls is stored. Further information is available in Chapter 8.3. -
Page 234: Key Lock
− Operation − 6.10 Key lock If you carry the handset around a lot, you can lock the handset keypad so that buttons are not inadvertently activated. Calls can still be taken in the normal way even when the key lock function is activated. 6.10.1 Activating the key lock function Press for 2 seconds... -
Page 235: Temporary Tone Dialling
− Operation − 6.13 Temporary tone dialling If you only operate the telephone using the Pulse dialling method (refer to Chapter 13.2), you can still make use of the advantages of the Tone dialling method (e.g.: remote access of the answering machine). During a call, you can temporarily switch to Tone dialling. -
Page 236: External Answering Machine
− Operation − 6.15 External answering machine If the telephone network provider has an external answering machine available for you, the i icon indicates new messages have been recorded. After playing back all the messages on the external answering machine, the icon disappears from the display. The icon can also be deleted in the following way: S, X DELETE CALLS , OK Select menu and confirm... -
Page 237: Phone Book
− Phone Book − Phone Book There are two phone books available for use. The PRIVATE phone book can be used to store 100 phone numbers together with the associated names. The SHARED phone book can be used to store 20 entries. -
Page 238: Note On The Phone Book
− Phone Book − X, OPTIONS Select an entry X USE NUMBER , OK Select function and confirm Dial the number To dial phone numbers in the SHARED phone book, proceed as follows: NAMES , X SHARED , OK Select menu and confirm X VIEW , OK Select function and confirm... -
Page 239: Modifying Entries In The Phone Book
− Phone Book − Example: To enter the name Peter". Press: 1 x button 7, 2 x button 3, 1 x button 8, 2 x button 3, 3 x button 7 To enter a space, press 1 once. To enter special characters, press 0 or * as often as necessary. -
Page 240: Deleting Stored Entries From The Phone Book
− Phone Book − Deleting stored entries from the phone book NAMES , X PRIVATE SHARED , OK Select menu and confirm X VIEW , OK Select function and confirm X, OPTIONS Select an entry X DELETE , OK Select function and confirm Confirm Deleting all entries from the phone book NAMES , X PRIVATE or... -
Page 241: Phone Book For Service Phone Numbers
− Phone Book − 7.9.1 Assigning quick dial keys NAMES , X PRIVATE , OK Select menu and confirm X QUICK DIAL , OK Select function and confirm X, SELECT Select the quick dial key and confirm X, DETAILS , OK Select entry and confirm 7.9.2 Changing the quick dial key assignment... -
Page 242: Dialling Phone Numbers Stored In The Service Phone Book
− Phone Book − Caution: Holding calls is an optional service offered by your telephone network provider. Contact your network provider for further information. Open the service phone book X ADD ENTRY , OK Select menu and confirm X j, Z Enter the name (max. -
Page 243: Caller Number Display (Clip Function)
− Caller Number Display (CLIP Function) − Caller Number Display (CLIP Function) The CLIP function enables you to view the number of a caller when a call is received. If this function is available with your telephone line, the number of the caller appears in the display when the phone rings. If the caller’s number is stored in your phone book, the name stored in the telephone book is also displayed with the phone number. -
Page 244: Recall Information On Entries In The Call Records Lists
− Caller Number Display (CLIP Function) − 8.1.2 Dialling phone numbers from a call records list Proceed as follows to dial phone numbers from the various calls lists: Open the Call Records menu X MISSED or DIALLED or RECEIVED , OK Select call records list and confirm X, OPTIONS or (V) -
Page 245: Storing Phone Numbers From The Call Records List In The Phone Book
− Caller Number Display (CLIP Function) − Storing phone numbers from the call records list in the phone book Numbers stored in the call records MISSED , DIALLED or RECEIVED can be transferred directly to either the PRIVATE or SHARED phone book and stored. - Page 246 − Caller Number Display (CLIP Function) − 8.5.2 Deleting individual lists The MISSED , DIALLED or RECEIVED call records lists can be deleted individually. Open the Call Records menu X DELETE CALLS , OK Select menu and confirm X MISSED or DIALLED or RECEIVED , OK...
-
Page 247: Private Branch Exchanges / Supplementary Services
R button and supplementary services offered by your telephone network provider Your SWITEL telephone supports the most important supplementary services offered by your telephone network provider (e.g. brokering, call waiting, three−way conferencing, etc.). Please contact your telephone network provider regarding which recall (Flash) time must be set to use the supplementary services (refer to Chapter 13.3). -
Page 248: Display Settings
− Display Settings − Display Settings 10.1 Time and time format The time displayed is automatically updated by adjusting the day and time stamp from the answering machine (refer to Chapter 17.2). The time format can be adjusted as follows. MENU , X DISPLAY , OK Select menu and confirm X TIME FORMAT , OK... -
Page 249: Wallpaper
− Display Settings − 10.4 Wallpaper Three different wallpapers are available as a background for your display. Select between the butterfly, flowers or clouds. MENU , X DISPLAY , OK Select menu and confirm X WALLPAPER , OK Select option and confirm X, OK Select wallpaper and confirm 10.5... -
Page 250: Setting Ringing And Signal Tones
− Setting Ringing and Signal Tones − Setting Ringing and Signal Tones 11.1 Setting the ringing tones on the handset and base station Different ringing melodies and volume settings can be set on the handset and base station. The handset can ring with one of 20 polyphone ringing melodies and the base station with 10. -
Page 251: Switching Information Tones On/Off
− Setting Ringing and Signal Tones − 11.3 Switching confirmation tones on/off When the handset is in placed in the base station or settings are changed, the handset issues confirmation tones. MENU , X SOUNDS , OK Select menu and confirm X HS TONES , OK Select function and confirm X OFF or ON , OK... -
Page 252: Extras
Activate the snooze function STOP Stop alarm clock signal 12.2 Baby monitor If you have two CD738 handsets at your disposal, they can be used for baby monitoring". 12.2.1 Switching baby monitoring on/off MENU , X EXTRAS , OK Select menu and confirm... -
Page 253: Walkie−Talkie Function
− Extras − End baby monitoring 12.3 Walkie−Talkie function If you have two CD738 handsets at your disposal, they can be used as walkie−talkies". 12.3.1 Switching the walkie−talkie function on/off MENU , X EXTRAS , OK Select menu and confirm... -
Page 254: Stopwatch
− Extras − OFF? Confirm 12.5 Stopwatch The handset can be used as a stopwatch with a resolution up to tenths of a second. MENU , X EXTRAS , OK Select menu and confirm X STOPWATCH , OK Select function and confirm START , PAUSE Start / Pause in time measurement RESUME , STOP... -
Page 255: Advanced Functions
− Advanced Functions − Advanced Functions 13.1 Automatic answering If the automatic answering" function has been activated, a call is taken automatically on removing the handset from the base station. MENU , X ADVANCED , OK Select menu and confirm X AUTO ANSWER , OK Select function and confirm X OFF or ON... -
Page 256: Prefix
− Advanced Functions − 13.5 Prefix The prefix" function enables a number to be dialled automatically before the actual phone number. This is mainly implemented when using call−by−call numbers. Various area access codes can be assigned to a call−by−call number or you can dial the same call−by−call number before every call. -
Page 257: Outside Line
− Advanced Functions − 13.6 Outside line In the case of private branch exchanges, it is necessary to dial a specific number (e.g. 9" or 0") in order to obtain the dialling tone for an outside line. The number for the outside line can be predialled automatically. MENU , X ADVANCED , OK Select menu and confirm... -
Page 258: System
Registering and deregistering handsets Further information on the use of several handsets is provided in Chapter 15. The default setting of the PIN code is 0000". 14.1.1 Registering CD738 handsets Press the Paging button for 3 seconds MENU , X SYSTEM , OK... -
Page 259: Selecting A Base Station
− System − 14.1.4 Deregistering handsets It is not possible to complete the deregistration using the handset which is to be deregistered. MENU , X SYSTEM , OK Select menu and confirm , OK X DELETE HS Select function and confirm X, OK Select handset and confirm Z, OK... -
Page 260: Changing The Pin Code
− System − 14.3 Changing the PIN code The registration and deregistration of handsets and numerous other functions available on the telephone are protected against unauthorised use by a PIN code. The PIN code can comprise of up to eight digits. The default setting of the PIN code is 0000". -
Page 261: Default Settings
The default settings cannot be restored without entering the currently valid PIN code. If you forget or lose the PIN code, please contact your sales outlet. 14.4.1 Default settings, handset Name of handset: SWITEL Dialling pause: Pause 1 (2 sec) Time format: 12 HOURS... - Page 262 − System − 14.4.2 Default settings, answering machine Answering machine: ON Security code: Outgoing message: Standard Day, time: Monday, 00:00 Message memory: Empty Answering delay: Memo: Empty Voice output: English Volume: Information signal: Listen in: 14.4.3 Restoring the default settings Proceed as follows to restore the default settings on the handset and base station: MENU , X SYSTEM , OK...
-
Page 263: Multiple Handsets
The standardised GAP Standard enables Switel handsets and even those from other manufacturers to be integrated in the telephone system. In the same way, an Switel handset can be registered on base stations from other manufacturers as long as they comply with the GAP Standard. -
Page 264: Internal Calls (Intercom Function)
− Multiple Handsets − 15.1 Internal calls (intercom function) As soon as two handsets are registered on a base station, they can be used for internal calls. Q, X, OK Press, select handset and confirm Take internal call Note: If an external call is received while an internal call is in progress, the base station rings and the phone number of the caller appears in the handset display. -
Page 265: Consultation / Brokering
− Multiple Handsets − 15.3 Consultation / Brokering While a call is in progress, it is possible to dial another handset in order to consult with someone. The external caller is put on hold while you converse with the second, internal person called. After completing the internal call, return to the external caller. -
Page 266: Several Base Stations
Your handsets can be registered on up to four different base stations in order to increase the area in which the handsets can be used. CD738 base stations can be used for this or base stations from other manufacturers as long as the devices comply with the GAP Standard. -
Page 267: Increasing The Range
− Several Base Stations − 16.3 Increasing the range The range of the handset can be increased by placing additional base stations in specific areas of the building or workplace (refer to Diagram II). 1. Position the base stations so that the ranges of the individual base stations overlap (refer to Diagram II). -
Page 268: Telephone Answering Machine
− Telephone Answering Machine − Telephone Answering Machine Settings made on the answering machine are played back vocally. Hinge the plastic flap up above the Volume buttons in order to access the buttons J, K, L, M and N. If the answering machine has already taken the call, you can stop the recording at any time by pressing the Display button CANCEL . -
Page 269: General Settings
− Telephone Answering Machine − 17.5 General settings 17.5.1 Maximum recording time The answering machine can digitally save up to 60 incoming messages with a total length of 16 minutes. The maximum length for each incoming call is 2 minutes. If the caller’s message is longer, the call is disconnected. -
Page 270: Recording, Checking Or Deleting Outgoing Messages
− Telephone Answering Machine − 17.6 Recording, checking or deleting outgoing messages The answering machine is provided with two, pre−recorded outgoing messages. The preset outgoing message, after which a message can be left, can be replaced by one of your own. If no other outgoing message is recorded, the standard outgoing message is played automatically. -
Page 271: Playing Back Recorded Messages
− Telephone Answering Machine − 17.7.2 Playing back the memo Play the memo Stop the memo 17.7.3 Deleting the memo Play the memo Press during the memo playback 17.8 Playing back recorded messages When a memo has been recorded, it is played back before any incoming messages. -
Page 272: Remote Access
− Telephone Answering Machine − 17.10 Remote access Remote access enables the answering machine to be contacted from any telephone which uses tone dialling in order to listen to messages received and execute other functions. 17.10.1 Remote access security code The answering machine is provided with a personal identification number so only you can listen to incoming messages via the remote access feature. - Page 273 − Telephone Answering Machine − 17.10.4 Function keys for remote access The functions assigned to the buttons are dependent on the mode currently activated. The following table provides an overview of the respective functions assigned to the individual buttons. Button Functions during playback Functions during playback of Options menu...
- Page 274 − Telephone Answering Machine − 17.10.5 Remote activation of the answering machine The remote access feature enables the answering machine to be switched on via any telephone which uses the tone dialling method. Dial your own phone number Button *, Z Wait 10 rings, press after the acoustic signal and enter the PIN code...
-
Page 275: Troubleshooting
− Troubleshooting − Troubleshooting Should problems arise with the telephone, refer to the following information. In the case of claims under the terms of guarantee, contact your sales outlet. Faults Corrective measures No connection to base − Check that the handset has been regi- station possible stered on the base station with the cor- rect PIN. - Page 276 − Troubleshooting − Faults Corrective measures The handset switches off − Place the handset in the base station automatically for 14 hours. If this does not help, re- place the rechargeable standard batte- ries. Following a charge time of − The rechargeable standard batteries 14 hours, the z icon are empty or defective.
- Page 277 − Troubleshooting − Faults Corrective measures No memo can be recorded − Check whether a memo has already been recorded. Delete the old memo, if possible. − Check whether the answering ma- chine memory is full. Delete messages from the memory, if necessary. No remote access func- −...
-
Page 278: Important Information
− Important Information − Important Information 19.1 Technical data Feature Value Standard DECT−GAP Power supply Base station, 220/230 V, 50 Hz Range (outdoors/indoors) 300 m, 50 m Standby Up to 120 h Max. talk time Up to 10 h Rechargeable standard batteries 2 x 1.2 V/750 mAh, size: AAA Dialling method Tone or Pulse dialling mode... -
Page 280: Declaration Of Conformity
TELGO AG Route d’Englisberg 17 CH−1763 Granges−Paccot Declare under our own responsibility that the product MODEL: CD738 DESCRIPTION: Cordless digital DECT telephone with ans- wering machine Is in conformity with directives: R&TTE Directive (1999/5/EC) COMPLIANCE IS ACHIEVED BY CONFORMITY TO THE FOLLOWING: EN 60950−1:2001, EN 41003:1998,...
Need help?
Do you have a question about the CD738 and is the answer not in the manual?
Questions and answers