
Related Manuals for Bosch LC2-PC30G6-4


Summary of Contents for Bosch LC2-PC30G6-4
- Page 1 Prosound Ceiling Speakers LC2-PC30G6-4 | LC2-PC30G6-8 | LC2-PC30G6-8L | LC2-PC60G6-8H | LC2- PC60G6-10 Installation and User Instructions...
-
Page 3: Table Of Contents
Step 5 — Connect an Auxiliary Support Line Step 6 — Adjust Tap Selector Step 7 — Attach the Grille Troubleshooting Technical data Appendices Appendix A Painting the Speaker Bosch Security Systems B.V. Installation and User Instructions 2016.05 | 12 |... -
Page 4: Safety
Bosch strongly recommends that all speakers be suspended taking into account all current national, federal, state and local regulations. It is the responsibility of the installer to ensure that all speakers are safely installed in accordance with all such regulations. -
Page 5: Welcome
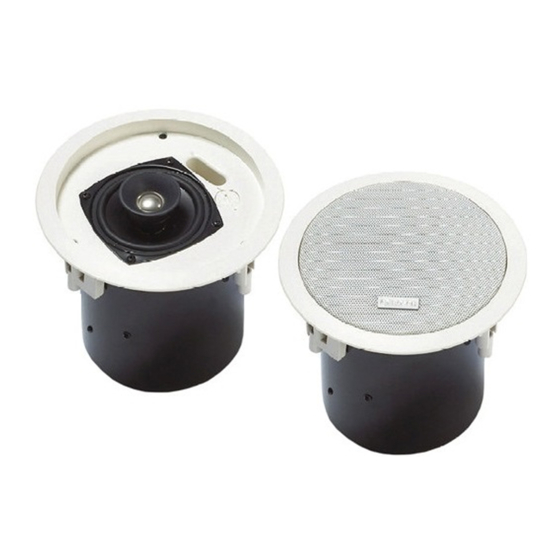
Bosch loudspeakers use innovative design and materials to provide premium-level performance in a flush-mount ceiling format. Four models comprise by Bosch: the LC2- PC30G6-4 with a 4-inch LF driver and a .75-inch, titanium-coated tweeter with waveguide; the LC2-PC30G6-8 with an 8-inch LF driver and a 1-inch titanium-coated tweeter with waveguide;... -
Page 6: System Overview
45 Hz! It is one of the few quick-mount ceiling TRUE subwoofers available. Flexible installation and powerful low-end performance make it the ideal mate to any Bosch ceiling model. 2016.05 | 12 | Installation and User Instructions... -
Page 7: Packing List
System overview | en Packing List Item Quantity Part Speaker system Tile rails C-ring support Grille Owner’s manual Support ring screws Cutout template Paint shield Figure 1: Packing list Bosch Security Systems B.V. Installation and User Instructions 2016.05 | 12 |... -
Page 8: Product Feature Identification
Mounting screws Ceramic connector Tap selector Seismic tab (auxiliary support ring) Grille safety tether hole Grille safety tether Bosch Ceiling Series Systems (sold in pairs) Model Part No Description LC2-PC30G6-4 4" coaxial speaker with horn-loaded, Ti-coated tweeter LC2-PC30G6-8 8" coaxial speaker with horn-loaded, Ti-coated tweeter LC2-PC30G6-8L Same as C8.2 above except with low-profile backcan... -
Page 9: Installation And Wiring
Figure 4: Cut ceiling hole Step 2 — Install C-Ring and/or Tile Rails All Bosch speakers come packaged with two types of backing hardware: a C-ring and two tile rails. For suspended ceiling installations, insert the C-ring through the hole cut in the ceiling tile. -
Page 10: Step 3 - Attach Wiring To The Ceramic Connector
Figure 6:Tighten with screwdriver When adding a subwoofer, be sure to observe the correct polarity. The LC2-PC60G6-10 subwoofer has been designed for optimum performance when used with the LC2-PC30G6-4. In order to maximize the low frequency output when used with the LC2-PC30G6-8, LC2- PC30G6-8L or LC2-PC60G-8H, the polarity of the LC2-PC60G6-10 subwoofer should be reversed. -
Page 11: Step 4 - Mount The Speaker Into The Ceiling
Note the support ring on the back of the speaker. The ring allows for connection to a independent and secure anchor point. Construction codes often require the use of this secondary support point. Bosch Security Systems B.V. Installation and User Instructions 2016.05 | 12 |... -
Page 12: Step 6 - Adjust Tap Selector
Step 7 — Attach the Grille INSTALLATION NOTE: GRILLE SAFETY FEATURE Bosch grilles features a unique safety tether to prevent the grille from falling if the grille is removed or comes loose after installation. First, install the grille’s safety tether by pushing the grille fastener into the hole in the front of the baffle (see Figure 13). - Page 13 Continue the same procedure around the perimeter of the grille, loosening a portion at a time until the grille is removed. Figure 13: Attach the grille Bosch Security Systems B.V. Installation and User Instructions 2016.05 | 12 |...
-
Page 14: Troubleshooting
Which ever condition results in greater low-frequency output is the in-polarity condition. If these suggestions do not solve your problem, contact your nearest dealer or distributor. 2016.05 | 12 | Installation and User Instructions Bosch Security Systems B.V. -
Page 15: Technical Data
Prosound Ceiling Speakers Technical data | en Technical data LC2-PC30G6-4 and LC2-PC30G6-8 Specification LC2-PC30G6-4 LC2-PC30G6-8 Dimensions (depth x diam.) 6.9 in x 7.1 in (176 mm x 181 mm) 10.0 in x 10.6 in (255 mm x 270 Bezel diameter 8.3 in (210 mm) - Page 16 100 W (with overload protection) Sensitivity (SPL 1 W/1 m) 94 dB Input configuration 8Ω; 70V/100V 70V/100V power taps 7.5 (70V only)/15/30/60 W Included accessories Tile bridge, mounting ring 2016.05 | 12 | Installation and User Instructions Bosch Security Systems B.V.
-
Page 17: Appendices
Do not paint the steel back can. Bosch Security Systems B.V. Installation and User Instructions 2016.05 | 12 |... - Page 20 Bosch Security Systems B.V. Torenallee 49 5617 BA Eindhoven Netherlands www.boschsecurity.com © Bosch Security Systems B.V., 2016...
Need help?
Do you have a question about the LC2-PC30G6-4 and is the answer not in the manual?
Questions and answers