Advertisement
Quick Links
SAFETY PRECAUTIONS
This electric R/C model plane is not a toy.
Assemble the plane according to the instructions. Do not alter or modify the model, If you make any
modifications, you will void your warranty.
Children under 14 years old must use it accompanied by an adult.
Test the operation of the model before each flight to insure that all equipment is operating properly,
and that the model remains structurally sound.
Fly only on calm days (with wind speeds less than 10 mph) and in large open areas free of trees,
people, building or any other obstacles.
REMEMBER:
Take your time and follow the instructions to end up with a well-built model that is durable and easy to fly.
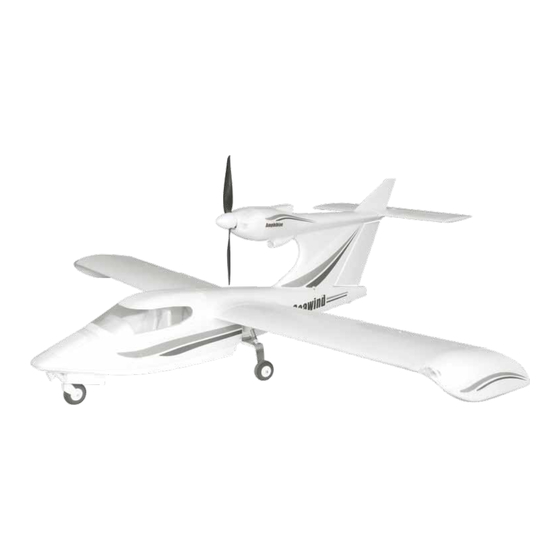
PRODUCT MANUAL
SPECIFICATIONS
Wing span:
Length:
Wing area:
27.74dm²/429.96in²
Flying weight:
Wing loading:
1460mm/57.48in
1112mm/43.78in
1600g/56.50oz
57.68g/dm²
Advertisement

Related Manuals for st model Seawind


Summary of Contents for st model Seawind
-
Page 1: Specifications
SPECIFICATIONS Wing span: 1460mm/57.48in Length: 1112mm/43.78in PRODUCT MANUAL Wing area: 27.74dm²/429.96in² Flying weight: 1600g/56.50oz Wing loading: 57.68g/dm² SAFETY PRECAUTIONS This electric R/C model plane is not a toy. Assemble the plane according to the instructions. Do not alter or modify the model, If you make any modifications, you will void your warranty. - Page 3 ..........x1 R e p l a c e m e n t P a r t s L i s t Replacement part for the ST MODEL SeaWind are available using the numbers in the Replacement Parts List that follows.
- Page 4 P R E P A R E T H E R A D I O C O N T R O L S Y S T E M 1. Locate the transmitter (PIC.01). 2. The transmitter requires eight alkaline “AA” batteries. To install the batteries, remove the battery hatch by sliding it down and inserting them into place (PIC.02).
-
Page 5: Horizontal Stabilizer
A S S E M B L E T H E M O D E L Landing Gears 2.5x10mm Screw --------------------------6 Mount the landing gears to both side of fuselage using six M2.5x10mm. Pay attentin to the marks “L” & “R” on the bottom of the landing gears. - Page 6 Fin Tip Attach the fin tip onto its foundation on the top of fin as illustration. Slide the fin tip to the end to avoid loosening. Main Wing Insert the carbon rod through one of the wings, and then put the other end of carbon rod through the fuselage.
- Page 7 Main Wing Insert the carbon rod through the other wing. And also put the sero wire & light wire and falp pushrod through the fuselage into the canopy. Fit the wings and the fuselage in place, then lock then to acoid looseing.
- Page 8 Propeller 6.0mm ------------------1 Install the propeller adapter with propeller over the motor shaft. Put the propeller washer on the adapter shaft. Take the propeller nut and screw it on the adapter shaft. Tighten the nut with a hex wrench. Tighten the screws securely. If it comes off during flights, you may lose control of your airplane, resulting in an accident! Spinner...
- Page 9 Battery Remove the seat in the cockpit and fix the battery with velcro tape, accord to the C of G on step11. Adjustment Adjust the travel of each control surface to the values in the diagrams. <Aileron> & <Flap> <Elevator> <Rudder>...
- Page 10 C of G position The standard CG is positioned the line as the picture shows. The movement of the CG should not exced ±5mm. Otherwise,it will have an effect on flying performance. Do not fly before confirming the correct location of the CG. If the CG is incorrect, you may lose control of your airplane and way lead to accidents.
- Page 11 O P E R AT I N G Y O U R M O D E L S A F E T Y Before Flying Flying After Flying Cautions for Safety Do not fly your airplane on Always land airplane into the Before flying your airplane, days with strong winds or wind.
Need help?
Do you have a question about the Seawind and is the answer not in the manual?
Questions and answers