Chapters
Table of Contents

Related Manuals for Nostalgia Electrics CDP200RED


Summary of Contents for Nostalgia Electrics CDP200RED
- Page 1 All products are trademarks of Nostalgia Products Group, LLC. Worldwide design & utility patented or patents pending. © 2012 Nostalgia Products Group, LLC. www.nostalgia electrics.com (rev. 08/15/12)
- Page 2 Electric Cookie Press Molde Electrónico para Galletas Presse à biscuits électrique Instructions and Recipes Instrucciones y recetas Instructions et recettes...
-
Page 4: Table Of Contents
Make everyday a party! Visit www.nostalgiaelectrics.com for more fun products. CONTENTS IMPORTANT PRECAUTIONS ......3 IMPORTANT SAFEGUARDS . -
Page 5: Important Precautions
IMPORTANT PRECAUTIONS NEVER immerse appliance or cord in water. NEVER use near water. NEVER use an abrasive sponge or cloth on the appliance. NEVER leave appliance unattended while in use. Unplug appliance from outlet when not in use and when cleaning. DO NOT place appliance in dishwasher. -
Page 6: Introduction
SAVE THESE INSTRUCTIONS! INTRODUCTION Thank you for purchasing the ELECTRIC COOKIE PRESS from Nostalgia Electrics™! Now you can design and decorate delicious cookies like a professional baker! The ELECTRIC COOKIE PRESS makes it fast and easy to whip up beautifully decorated cakes and cookies, as well as other appetizing hors d'oeuvres. -
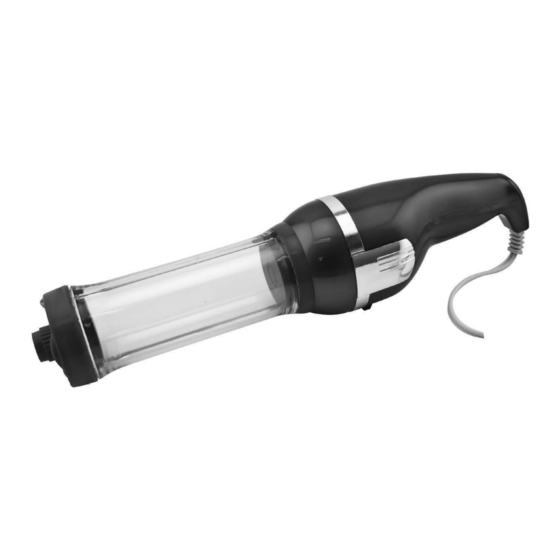
Page 7: Parts & Assembly
PARTS & ASSEMBLY PARTS ON/OFF Switch Tube Cookie Press Shaft Motor Body Tube Cover Pastry Tip Cover Pastry Tip Adapter Shaft Disc PASTRY TIPS (8) COOKIE DISCS (12) - Page 8 ASSEMBLY With the Shaft Disc in place, insert the stem of the Cookie Press Shaft into the center hole of the Motor Body. Push the Cookie Press Shaft completely inside the Motor Body and press firmly into place. Attach the Tube by aligning the pegs on the inside of the Tube with the outside grooves of the Shaft Disc.
- Page 9 If you are using a Pastry Tip, put the desired tip over the Pastry Tip Adapter and secure with the Pastry Tip Cover. Put the fully assembled Pastry Tip into the Tube Cover, place the Tube Cover onto the Tube and turn clockwise to a locked position. If using the Cookie Discs, choose your preferred disc and place it at the end of the Tube.
- Page 10 The ELECTRIC COOKIE PRESS comes with 8 different Pastry Tips to suit all of your decorating and piping needs. From decorating cakes, cookies and cupcakes, to filling cream puffs and topping savory hors d’oeuvres like deviled eggs, the ELECTRIC COOKIE PRESS from Nostalgia Electrics™ is a versatile and convenient baking tool.
-
Page 11: How To Operate
HOW TO OPERATE BEFORE FIRST USE Carefully unpack the ELECTRIC COOKIE PRESS and all accessories. Wash Cookie Discs, Pastry Tips, Pastry Tip Adapter, Tube Cover, Pastry Tip Cover, Tube, Shaft Adapter, and Cookie Press Shaft in warm, soapy water. Rinse and dry completely with a non-abrasive cloth or towel. Wipe all surfaces of the Motor Body with a slightly moistened, non- abrasive cloth and dry thoroughly making sure that no water enters the Motor Body. -
Page 12: Helpful Tips
REFILLING COOKIE PRESS Most recipes provided require the user to refill the cookie press at least once. Depending on the size of the cookie that you are pressing, you can usually get 25 to 40 cookies per fill. • In order to refill the press, remove the tube from the motor body, press the shaft to disengage, and reassemble as instructed on page 2. -
Page 13: Cleaning & Maintenance
CLEANING & MAINTENANCE Please take care of your ELECTRIC COOKIE PRESS by following these simple instructions and precautions. For best results, we recommend that you clean your ELECTRIC COOKIE PRESS after each filling is used. Disconnect from the electrical outlet by unplugging the appliance. Unlock the Tube by holding the motor body with one hand, and the Tube with the other hand. -
Page 14: Recipes
RECIPES With the ELECTRIC COOKIE PRESS you can use your favorite cookie dough recipes or store bought cookie dough to create beautifully designed cookies that everyone will love! Depending on the recipe, the cookie disc used, and the size of the cookies desired, the amount of cookies yielded will vary. You can also use your ELECTRIC COOKIE PRESS to fill eggs, decorate cakes, cookies, cupcakes and much more! Be creative and ENJOY your ELECTRIC COOKIE PRESS! - Page 15 LAVENDER SHORTBREAD COOKIES • 1½ Cups Butter, Preheat the oven to 325˚ F (165˚ C). softened In a medium bowl, cream together the butter, white • Cup White, sugar and confectioners' sugar until light and fluffy. Granulated Sugar Mix in the lavender, mint and lemon zest. •...
- Page 16 MAPLE COOKIES • 1 Cup Butter Preheat an oven to 350˚ F (180˚ C). • ½ Cup Real Beat the butter and maple syrup together with an Maple Syrup electric mixer in a large bowl until smooth. • 2 Cups All- Stir the flour and salt together in a separate Purpose Flour bowl;...
- Page 17 FRUITY COOKIES • 4 Cups All- Preheat oven to 400˚ F (205˚ C). Purpose Flour Sift flour with baking powder. • 1 Tsp. Baking Powder Cream margarine; gradually add sugar • 1½ Cups Margarine and 3-oz. gelatin and cream well. •...
- Page 18 CREAM CHEESE FROSTING • 2 (8-oz.) Packages In a medium bowl, cream together the Cream Cheese, cream cheese and butter until creamy. softened Mix in the vanilla, then gradually stir • ½ Cup Butter, in the confectioners' sugar. softened Store in the refrigerator after use. •...
- Page 19 CANNOLI CREAM FILLING • 1½ Cup Ricotta Mix all ingredients with electric beater until smooth. Cheese Chill until ready to use. • 3 Tbsp. White, Granulated Sugar • 1 Tsp. Vanilla Yield: slightly more than 1½ cups filling, or enough for about 12 cannolis. •...
-
Page 20: Returns & Warranty
SHOULD YOUR UNIT NOT WORK OR IF DAMAGED WHEN YOU FIRST TAKE IT OUT OF THE BOX, PLEASE RETURN IT TO THE PLACE OF PURCHASE IMMEDIATELY. ELECTRIC COOKIE PRESS / CDP200RED Should you have any questions, please contact us via email or at the customer service number listed below between the hours of 8:00 AM and 5:00 PM, Monday through Friday, Central Standard Time. - Page 21 ¡Convierta todos los días en una fietsa! Visite www.nostalgiaelectrics.com para ver más productos divertidos. CONTENIDO PRECAUCIONES IMPORTANTES ......20 MEDIDAS IMPORTANTES .
-
Page 22: Precauciones Importantes
PRECAUCIONES IMPORTANTES NUNCA sumerja el aparato o el cable en agua. NUNCA lo utilice cerca del agua. NUNCA use una esponja o paño abrasivo en el aparato. NUNCA deje el aparato sin supervisar mientras está en uso. Desenchufe el aparato del toma corriente cuando no está en uso y para su limpieza. NO coloque el aparato en el lava vajillas. -
Page 23: Introducción
¡GUARDE ESTAS INSTRUCCIONES! INTRODUCCIÓN ¡Gracias por comprar el MOLDE ELECTRÓNICO PARA GALLETAS de Nostalgia Electrics™! ¡Ahora puede diseñar y decorar deliciosas galletas como un panadero profesional! El MOLDE ELECTRÓNICO PARA GALLETAS hace que elaborar tortas y galletitas hermosamente decoradas y otros divertidos canapés, sea rápido y fácil. -
Page 24: Partes Y Ensamblaje
PIEZAS Y ENSAMBLAJE PARTES Botón de ENCENDIDO/APAGADO Tubo Eje del Molde para Galletas Cuerpo del Motor Cobertor del Tubo Tapa para Puntas de Repostería Adaptador para Puntas de Repostería Disco del Eje PUNTAS DE REPOSTERÍA (8) DISCOS PARA GALLETAS (12) - Page 25 ARMADO Con el Disco del Eje colocado, introduzca el vástago del Eje del Molde para Galletas en el orificio central del Cuerpo del Motor. Presione el Eje del Molde para Galletas completamente dentro del Cuerpo del Motor y presione firmemente para que calce correctamente. Colocar el Tubo alineando las ranuras de la parte interior del Tubo con las líneas fuera del Disco del Eje.
- Page 26 Si utiliza una Punta de Repostería, coloque la punta deseada sobre el Adaptador para Puntas de Repostería y sujete con la Tapa para las Puntas de Repostería. Coloque la Punta de Repostería completamente armada en el Cobertor del Tubo, coloque el Cobertor del Tubo en el Tubo y gire en dirección a las agujas del reloj hasta trabar.
- Page 27 Desde decorar tortas, galletas y pastelitos hasta rellenar profiteroles y adornar sabrosos canapés como huevos endiablados, el MOLDE ELÉCTRICO PARA GALLETAS de Nostalgia Electrics™ es una herramienta de panadería versátil y práctica.
-
Page 28: Cómo Funciona
CÓMO FUNCIONA ANTES DE USAR POR PRIMERA VEZ Desembale el MOLDE ELÉCTRICO PARA GALLETAS y todos los accesorios con cuidado. Lave con agua tibia y jabón los Discos para Galletas, las Puntas de Pastelería, el Adaptador para las Puntas de Pastelería, el Cobertor del Tubo, la Tapa para las Puntas de Pastelería, el Tubo, el Adaptador del Eje y el Eje del Molde para Galletas. -
Page 29: Consejos Útiles
Cuando realice rellenos, ya sean profiteroles o huevos endiablados, coloque en el molde la cantidad deseada y luego pause entre cada uno, asegurándose de haber quitado todo el relleno de la punta, antes de pasar al siguiente. CÓMO RELLENAR EL MOLDE PARA GALLETAS La mayoría de las recetas proporcionadas requieren que el usuario vuelva a rellenar el molde para galletas al menos una vez. -
Page 30: Limpieza Y Mantenimiento
LIMPIEZA Y MANTENIMIENTO Por favor, cuide su MOLDE ELÉCTRICO PARA GALLETAS siguiendo estas simples instrucciones y precauciones. Para obtener mejores resultados, le recomendamos que limpie su MOLDE ELÉCTRICO PARA GALLETAS luego de utilizar cada relleno. Desconecte del toma eléctrico desenchufando la unidad. Destrabe el Tubo sosteniendo el cuerpo del motor con una mano y el Tubo con la otra mano. -
Page 31: Recetas
RECETAS ¡Con el MOLDE ELÉCTRICO PARA GALLETAS podrá utilizar su receta preferida para masa de galletas o masa para galletas compradas en la tienda, para crear galletas bellísimamente diseñadas que todo el mundo adorará! El rendimiento en cantidad de galletas variará dependiendo de la receta, el disco para galletas que se utilice y el tamaño de las galletas. - Page 32 GALLETAS MANTECADAS DE LAVANDA • 1½ Tazas de Manteca Precaliente el horno a 325 grados F (165 grados C). ablandada En un bol mediano, forme una crema con • Taza de Azúcar manteca, azúcar blanca y azúcar de confitería Blanca Granulada hasta que quede suave y esponjosa.
- Page 33 GALLETAS DE MAPLE • 1 Taza de Manteca Precaliente el horno a 350 grados F (180 grados C). • ½ Taza de Jarabe Bata la manteca con el jarabe de arce con una batidora de Arce Real eléctrica en un bol grande hasta que quede pareja. •...
- Page 34 GALLETAS FRUTALES • 4 Tazas de Harina Precaliente el horno a 400 grados F (205 grados C). Común Tamice la harina con polvo de hornear. • 1 Cucharada de Forme una crema con la margarina; agregue gradualmente Polvo de Hornear el azúcar y 3 oz.
- Page 35 BAÑO DE QUESO CREMA • 2 (8 oz.) Paquetes En un bol mediano, forme una crema con el queso crema de Queso Crema, y la manteca hasta que la manteca quede cremosa. ablandado Mezcle la vainilla, luego mezcle con el azúcar de repostería. •...
- Page 36 RELLENO DE CREMA PARA CANNOLIS • 1½ Tazas de Ricota Mezcle todos los ingredientes con batidora eléctrica hasta homogeneizar. • 3 Cucharadas de Azúcar Blanca Enfríe hasta que esté lista para usar. Granulada • 1 Cucharada de Esencia de Vainilla Rendimiento: un poco más de 1 ½...
-
Page 37: Devoluciones Y Garantía
SI SU UNIDAD NO TRABAJA O ESTÁ DAÑADA CUANDO LA EXTRAE POR PRIMERA VEZ DE LA CAJA, DEVUÉLVALA INMEDIATAMENTE AL LUGAR DONDE LA COMPRÓ. MOLDE ELÉCTRICO PARA PREPARAR GALLETAS / CDP200RED Si tiene preguntas, contacte con nosotros por correo electrónico o por el número telefónico de servicio al cliente que aparece a continuación en el... - Page 38 Faire une fête tous les jours! Visiter le site Web www.nostalgiaelectrics.com pour d’autres produits agréables. TABLE DES MATIÈRES PRÉCAUTIONS IMPORTANTES ......37 MISES EN GARDE SÉCURITAIRES IMPORTANTES .
-
Page 39: Précautions Importantes
PRÉCAUTIONS IMPORTANTES NE JAMAIS plonger l'appareil dans l'eau. NE JAMAIS utiliser l'appareil près de l'eau. NE JAMAIS utiliser une éponge abrasive ou un chiffon sur l'appareil. NE JAMAIS laisser l'appareil sans surveillance lorsqu'il est utilisé. Débrancher l'appareil de la prise lorsqu'il n'est pas utilisé et au moment du nettoyage. NE PAS placer l'appareil au lave-vaisselle. -
Page 40: Introduction
12. De cordons d'alimentation ou des rallonges amovibles plus longues sont disponibles et pourront être utilisés avec prudence. Exception : aucun(e) rallonge ou long cordon amovible plus long(ue) n'est recommandé(e) pour utilisation avec cet appareil. Si un cordon d'alimentation amovible long ou une rallonge est utilisé(e) : 1) La puissance nominale du câble ou de la rallonge devrait être au moins aussi élevée que celle de l'appareil;... -
Page 41: Pièces Et Assemblage
PIÈCES ET ASSEMBLAGE PIÈCES Interrupteur de marche/arrêt Tube Arbre de la presse à biscuits Bloc moteur Couvercle du tube Couvercle de douille à pâtisserie Adaptateur de douille à pâtisserie Disque d'arbre DOUILLES (8) DISQUES À BISCUITS (12) - Page 42 ASSEMBLAGE Avec le Disque d'arbre en place, insérer la tige de l'Arbre de la presse à biscuits dans le trou central du Bloc moteur. Pousser l'Arbre de la presse à biscuits complètement à l'intérieur du Bloc moteur, puis appuyer pour fixer solidement. Fixer le Tube en alignant les chevilles à...
- Page 43 Avec l'utilisation d'une Douille à pâtisserie, poser la Douille à pâtisserie désirée sur l'Adaptateur de douille à pâtisserie, puis fixer solidement à l'aide du Couvercle de douille à pâtisserie. Poser la Douille à pâtisserie entièrement assemblée dans le Couvercle du tube, poser le Couvercle du tube sur le Tube, puis tourner dans le sens horaire à...
- Page 44 FORME DES DISQUES À BISCUITS La PRESSE À BISCUITS ÉLECTRIQUE comprend 12 Disques à biscuit différents pour confectionner des biscuits de forme amusante. DOUILLES DE FORME DÉCORATIVE La PRESSE À BISCUITS ÉLECTRIQUE comprend 8 Douilles à pâtisserie pour les besoins en matière de décoration ou d'application à...
-
Page 45: Comment Faire Fonctionner
COMMENT FAIRE FONCTIONNER AVANT SON UTILISATION Déballer soigneusement la PRESSE À BISCUITS ÉLECTRIQUE avec les accessoires. Laver les Disques à biscuit, les Douilles à pâtisserie, l'Adaptateur de douille à pâtisserie, le Couvercle du tube, le Couvercle de douille à pâtisserie, le Tube, l'Adaptateur d'arbre et l'Arbre de la presse à... -
Page 46: Conseils Pratiques
Au moment de garnir une pâtisserie, que ce soit un chou à la crème ou un œuf mayonnaise, appliquer la quantité désirée à la douille, puis faire une pause entre chaque application, en s'assurant que toute la garniture est sortie de la douille avant de passer à la suivante. NOUVEAU REMPLISSAGE DE LA PRESSE À... -
Page 47: Nettoyage Et Entretien
NETTOYAGE ET ENTRETIEN Pour l'entretien de la PRESSE À BISCUITS ÉLECTRIQUE, suivre ces simples consignes et mesures de précaution. Pour de meilleurs résultats, le nettoyage de la PRESSE À BISCUITS ÉLECTRIQUE devrait être effectué après chaque utilisation. Débrancher l'appareil de la prise de courant. Déverrouiller le Tube en tenant le Bloc moteur à... -
Page 48: Recettes
RECETTES Avec la PRESSE À BISCUITS ÉLECTRIQUE, utiliser les recettes de pâte à biscuits de son choix ou de la pâte achetée du commerce pour confectionner de magnifiques biscuits qui plairont à tous ! En fonction de la recette, du disque à... - Page 49 BISCUITS SABLÉS À LA LAVANDE • 360 g (1 ½ tasse) Faire préchauffer le four à 165 °C (325 °F). de beurre, ramolli Dans un bol moyen, battre en crème le beurre, • 180 g ( tasse) de le sucre et le sucre glace jusqu'à obtenir une sucre cristallisé...
- Page 50 BISCUITS À L'ÉRABLE • 240 g (1 tasse) Faire préchauffer le four à 180 °C (350 °F). de beurre Battre le beurre et le sirop d'érable à l'aide d'un mixeur • 120 mL (½ tasse) de dans un grand bol jusqu'à obtenir une consistance lisse. sirop d'érable pur Mélanger la farine et le sel dans un bol séparé;...
- Page 51 BISCUITS AUX FRUITS • 960 g (4 tasses) de Faire préchauffer le four à 205 °C (400 °F). farine tout-usage Tamiser la farine avec la levure chimique. • 1 c. à café de Battre la margarine en crème; ajouter graduellement le levure chimique sucre et le mélange pour gélatine aux fruits de 85 g (3 oz).
- Page 52 GLAÇAGE AU FROMAGE À LA CRÈME • 1 emballage (225 Dans un bol moyen, battre en crème le fromage à la crème g/8 oz) de fromage et le beurre jusqu'à obtenir une consistance crémeuse. à la crème, ramolli Incorporer la vanille, puis graduellement le sucre glace. •...
- Page 53 ŒUFS MAYONNAISE • 6 œufs durs Couper les œufs en deux sur la longueur; retirer les jaunes et les blancs, puis réserver. • 2 c. à table de mayonnaise Dans un petit bol, écraser les jaunes à la fourchette. • 1 c.
-
Page 54: Retours De La Marchandise Et Garanties
LORSQUE VOUS LE SORTEZ DE LA BOÎTE, VEUILLEZ LE RETOURNER IMMÉDIATEMENT À L'ENDROIT OÙ VOUS L'AVEZ ACHETÉ. PRESSE À BISCUITS ÉLECTRIQUE / CDP200RED Pour toutes autres questions pertinentes, veuillez contacter le service à la clientèle soit par courriel ou au numéro de service tel qu'indiqué ci-bas, entre 8h00 et 17h00, du lundi au vendredi, heure normale de l'est.
Need help?
Do you have a question about the CDP200RED and is the answer not in the manual?
Questions and answers