
Subscribe to Our Youtube Channel
Related Manuals for Miele WS 5101


Summary of Contents for Miele WS 5101
- Page 1 Operating Instructions Washer-Extractor WS 5101 WS 5141 To prevent accidents and machine damage read these instructions before installation or use. M.-Nr. 05 640 080...
-
Page 2: Table Of Contents
Contents Warning and Safety Instructions ..........3 Caring for the environment . -
Page 3: Warning And Safety Instructions
Never attempt to force open the door of the washer extractor. As a safety feature Installation, repair and maintenance the door handle has been designed with a work should be by a Miele authorized break line. service technician. Work by unqualified per- sons could be dangerous. - Page 4 Miele spare parts. may become void. The safety standards of the machine can Chlorine or agents containing chlorine only be guaranteed when Miele spare parts are corrosive, and can under certain are used. conditions lead to permanent damage to Over time deterioration of parts can oc- components.
-
Page 5: Caring For The Environment
Caring for the environment Disposal of the packing material Disposal of an old appliance The transport and protective packing materi- Old appliances contain materials that may als are environmentally friendly for disposal be recyclable. Please contact your local re- and can normally be recycled. Please recy- cycling authority about potential recycling. -
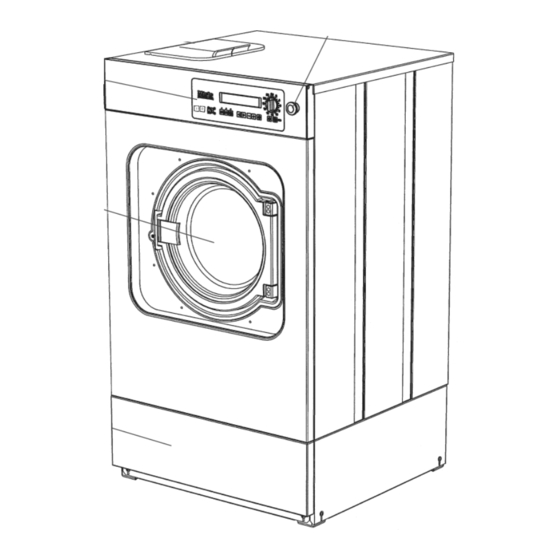
Page 6: Guide To The Washer-Extractor
Guide to the washer-extractor 1 Detergent dispenser 2 Control panel 3 Drum door 4 Plinth (optional) 5 Emergency Stop button... -
Page 7: Control Panel
Guide to the washer-extractor Control panel 6 Display Cursor and input buttons 7 Program selector Delay Start button 8 Y Power on button X Start 9 Z Power off button 7 End 10 Access lock Optic interface 11 Special options buttons... -
Page 8: Display
Guide to the washer-extractor Display Program selector The display content will appear once the machine is turned on. It is up to four lines and 40 digits long, showing which program has been selected. Display during a program Program numbers 1 - 24 can be selected di- rectly. -
Page 9: Access Lock
Guide to the washer-extractor Key access lock Access keys Position A - Free access Programs which have been allocated free Key 1 (2 supplied) for operating levels access can be run. A and B. See Programming Instructions for allocation of free access. Key 2 for operating levels A, B, C. -
Page 10: Special Options Buttons
Guide to the washer-extractor Special options buttons Cursor buttons and Delay Start 1 2 "Cursor" The indicator above each button will light when a special option is selected. The cursor buttons are used to pass back- wards or forwards into the input fields or into T "Prewash"... -
Page 11: Start
Guide to the washer-extractor Emergency Stop Switch X "Start" Press this button to start the selected pro- gram. Only to be used in an emergency. 7 "End" The switch can be reset by turning the rib- bed disc clockwise. Press this button to stop a program. Immedi- ately press once again to terminate a pro- After resetting the following appears in the gram. -
Page 12: Operation
Operation Language selection* Setting current time and date* ^ Turn off the machine with the Z "Power off" (if necessary) button. ^ Turn the unit on at the wall switch. ^ Turn the key to position B "Operation". ^ Turn the key to position B "Operation". Press the "OFF"... -
Page 13: Start Up
Operation Start up Program selection ^ Open the on-site water valves, (and the supply valves for steam, if relevant). ^ Turn on the electricity supply at the mains (on site). ^ Turn the key to position B "Operation". The functions described below are re- stricted only to the "Operation"... -
Page 14: Changing Temperaure And Spin Speed
– the temperature in 1 °C steps from cold, when filling the dispenser. 15 °C to maximum 95 °C . – the spin speed in 100 rpm steps. WS 5101 300 - 1500 rpm WS 5141 300 - 1000 rpm PROGRAMME COTTONS >60 °C<... -
Page 15: Program End Display
Operation Program end - opening the drum The program sequence is shown in the dis- play after the start of the program. door At the end of the program, with a stationary PROGRAMME 1 COTTONS drum and no more water in the machine the 60 °C Prewash 20 °C... -
Page 16: Delayed Start W
Operation Delayed Start W ^ Press X "Start" to confirm the delayed start, and the following will appear in the Use the W "Delay start" button to program display: the unit to start automatically at a later time. PROGRAMME COTTONS ^ Turn the key to position B "Operation". -
Page 17: Notes
Notes Prewash T Without spin V A Prewash should be selected when the Without spin can be selected in all programs load is heavily soiled. (except "Separate spin"). ^ A Prewash can be selected before the When the "Spin" program is reached, "WIT- start, in Programs 1 to 6, by pressing T HOUT SPIN"... -
Page 18: Skipping Program Cycles
Notes Skipping program cycles Program cancellation ^ To cancel a program, press 7 "End" twice Cycles of a program in progress can be skipped or repeated. in succession. ^ Press 7 "End" and the program is stop- If the program was cancelled while there ped. - Page 19 Notes Dispenser pump and Suction pipe Amount to be dispensed ^ Follow the detergent manufacturer’s guide- lines. Always follow the instructions of the chemi- cal manufacturer when using cleaning agents and special application chemicals. Only use such chemicals for the purpose and in the situation specified by the manu- facturer to prevent adverse chemical reac- tions and material damage.
-
Page 20: Liquid Dispensing
Liquid dispensing Priming the dispensing pumps SERVICE-OPERATION SERVICE PROGS Before the liquid dispensing pumps can be SERVICE PROGRAMME used the liquid detergent must be drawn into Dispenser valve >D1< Disp. time 20 sec. the system and the amount to be dispensed Cancel with the End button. -
Page 21: Peak Load Cut-Out / Pc- Printer Connection
Program changes can be made via a PC, or a new program can be downloaded. This re- quires a special Editor Program which is available from the Miele Professional Depart- ment. Printer-Operation: It is possible to print out whole programs or parts of programs. -
Page 22: Problem Solving Guide
Problem solving guide ^ Be careful, some water will seep out of the Power failure - Emergency door screw opening. Catch water in a suitable release container. With a short power failure: ^ Tighten up the venting screw and check that there is no leak. - Page 23 HEATING SYSTEM FAULT applicable codes and standards. Repairs Cut-out of heating sensor 1. and other work by unqualified persons ^ Call the Miele Technical Service Depart- could be dangerous and the manufacturer will not be held responsible. ment. Faults that occur before or after the start of a...
- Page 24 ^ For lightly soiled laundry dispense less de- PRESSURE MONITOR FAULT tergent. Residues, e.g. detergent left on laundry ^ Call the Miele Technical Service Depart- ^ Run an additional Prewash without deter- ment. gent and without selecting a temperature. PROGRAMME 1...
-
Page 25: After Sales Service
After sales service In the event of a fault which you cannot correct yourself please contact: Miele Technical Service USA 1-800-999-1360 techserv@mieleusa.com CDN 1-800-565-6435 service@miele.ca When contacting Technical Service please quote the model and serial number of the machine. These can be found on the data plate with... -
Page 26: Cleaning And Care
Cleaning and Care After each use Cleaning the exterior Never use abrasive cleaners, scouring Never use high pressure cleaners to hose down the machine. pads, steel wool or caustic cleaners on the washer-extractor. They will damage The machine should be cleaned immediately the surface. -
Page 27: Cleaning The Drum
Cleaning and Care Cleaning the drum The drum is made of non-rusting stainless steel. It is however possible that water with a high iron content or foreign bodies in the wash, (e.g. paper clips or metal buttons), may lead to the formation of superficial rust spots especially, if the machine is not used for some time. -
Page 28: Guide To The Symbols On The Data Plate
9 Spin speed * 21 Water-Registration DVGW-test cert (Water) 10 Drum volume/Laundry dry weight 22 Field for CE test symbol / 11 Kinetic Energy (Product ID-No./Gas) 12 Ex. time to top speed *does not apply to WS 5101 / WS 5141... -
Page 29: Installation Instructions
Installation instructions... -
Page 30: Installation
Installation Shipping struts This machine is for use only with articles which have not been treated with dange- Once the machine has been set in its final rous or flammable substances. position the red-marked shipping struts must be removed. Ensure they are remo- To prevent frost damage do not install this ved before using the machine. -
Page 31: Plumbing
The water hook up is by a water valve, which conforms with local and national regulations. The machine is supplied as standard for This work must be carried out by a Miele connection to a 208 V, 60 Hz, 20 A, authorized service technician. - Page 32 Alteration rights reserved / 000 USA - 4401 This paper is made from cellulose bleached without the use of chlorine.
Need help?
Do you have a question about the WS 5101 and is the answer not in the manual?
Questions and answers